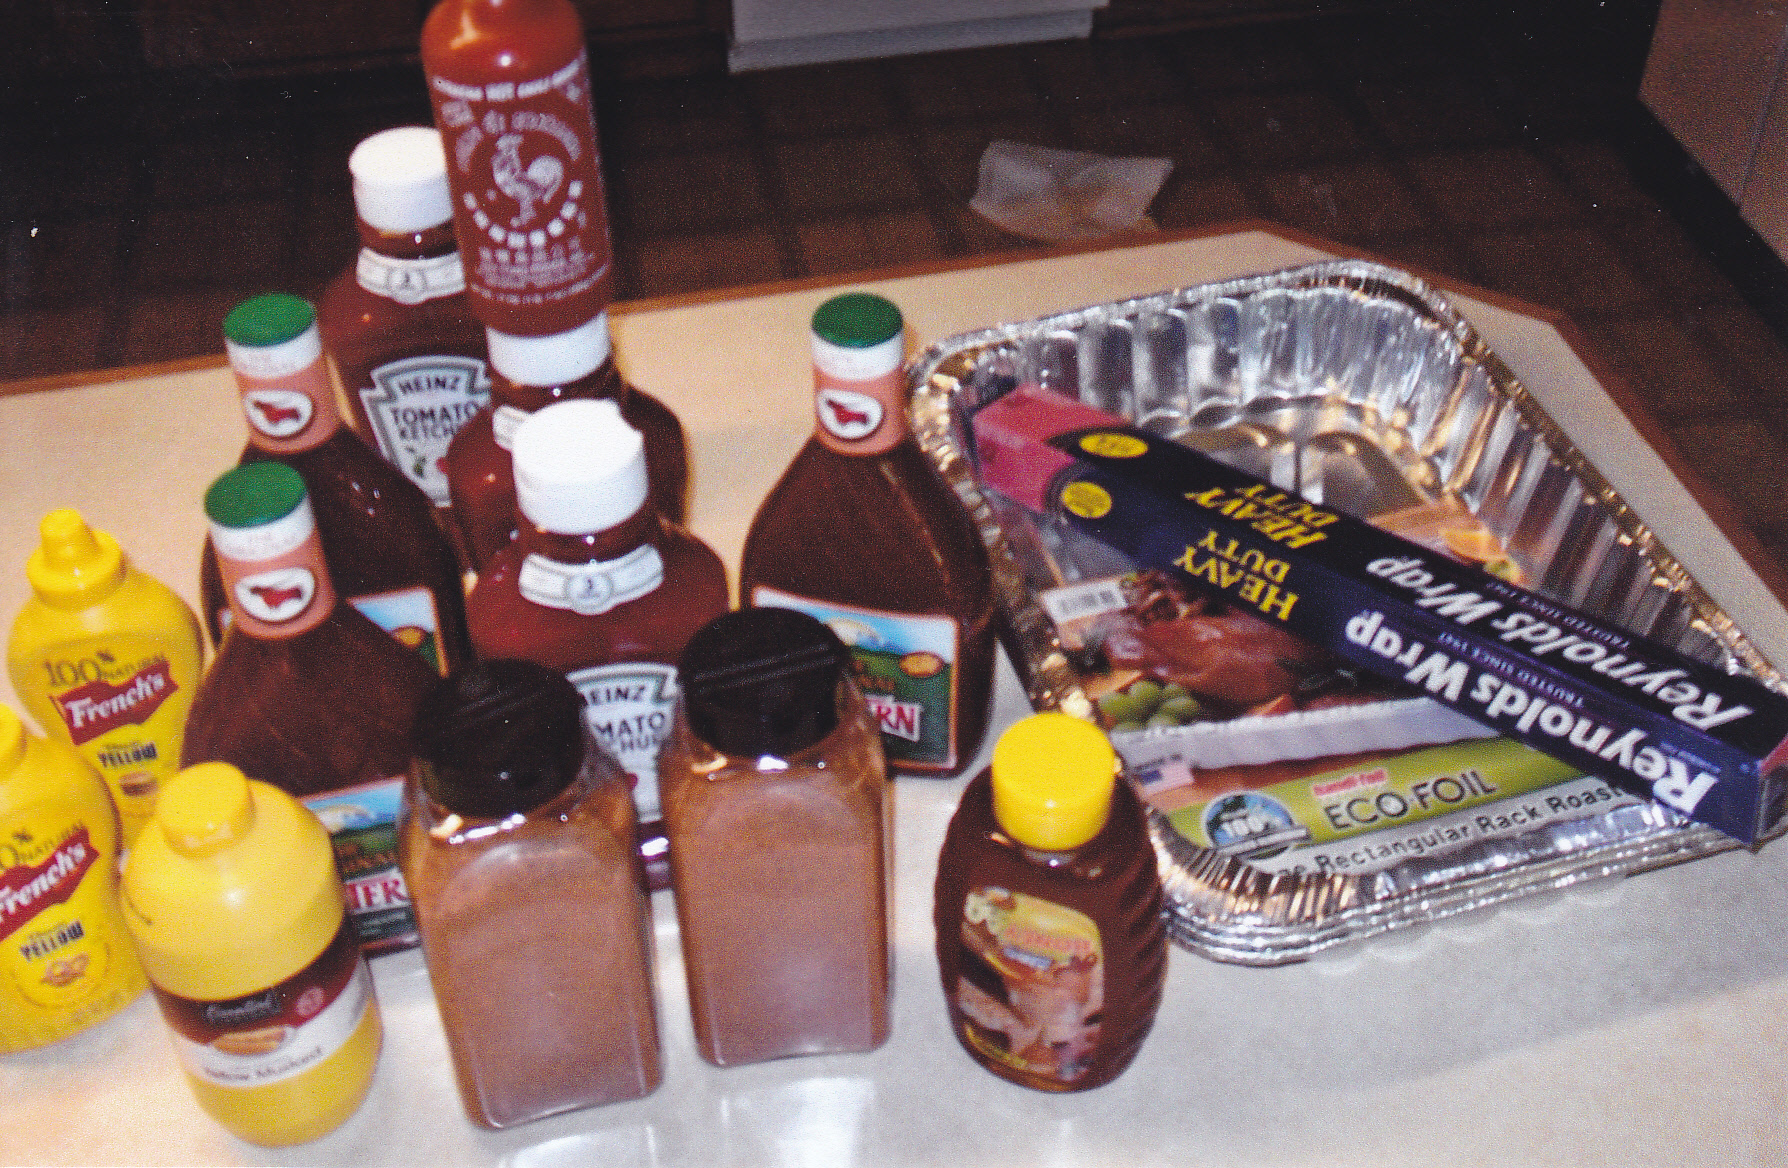
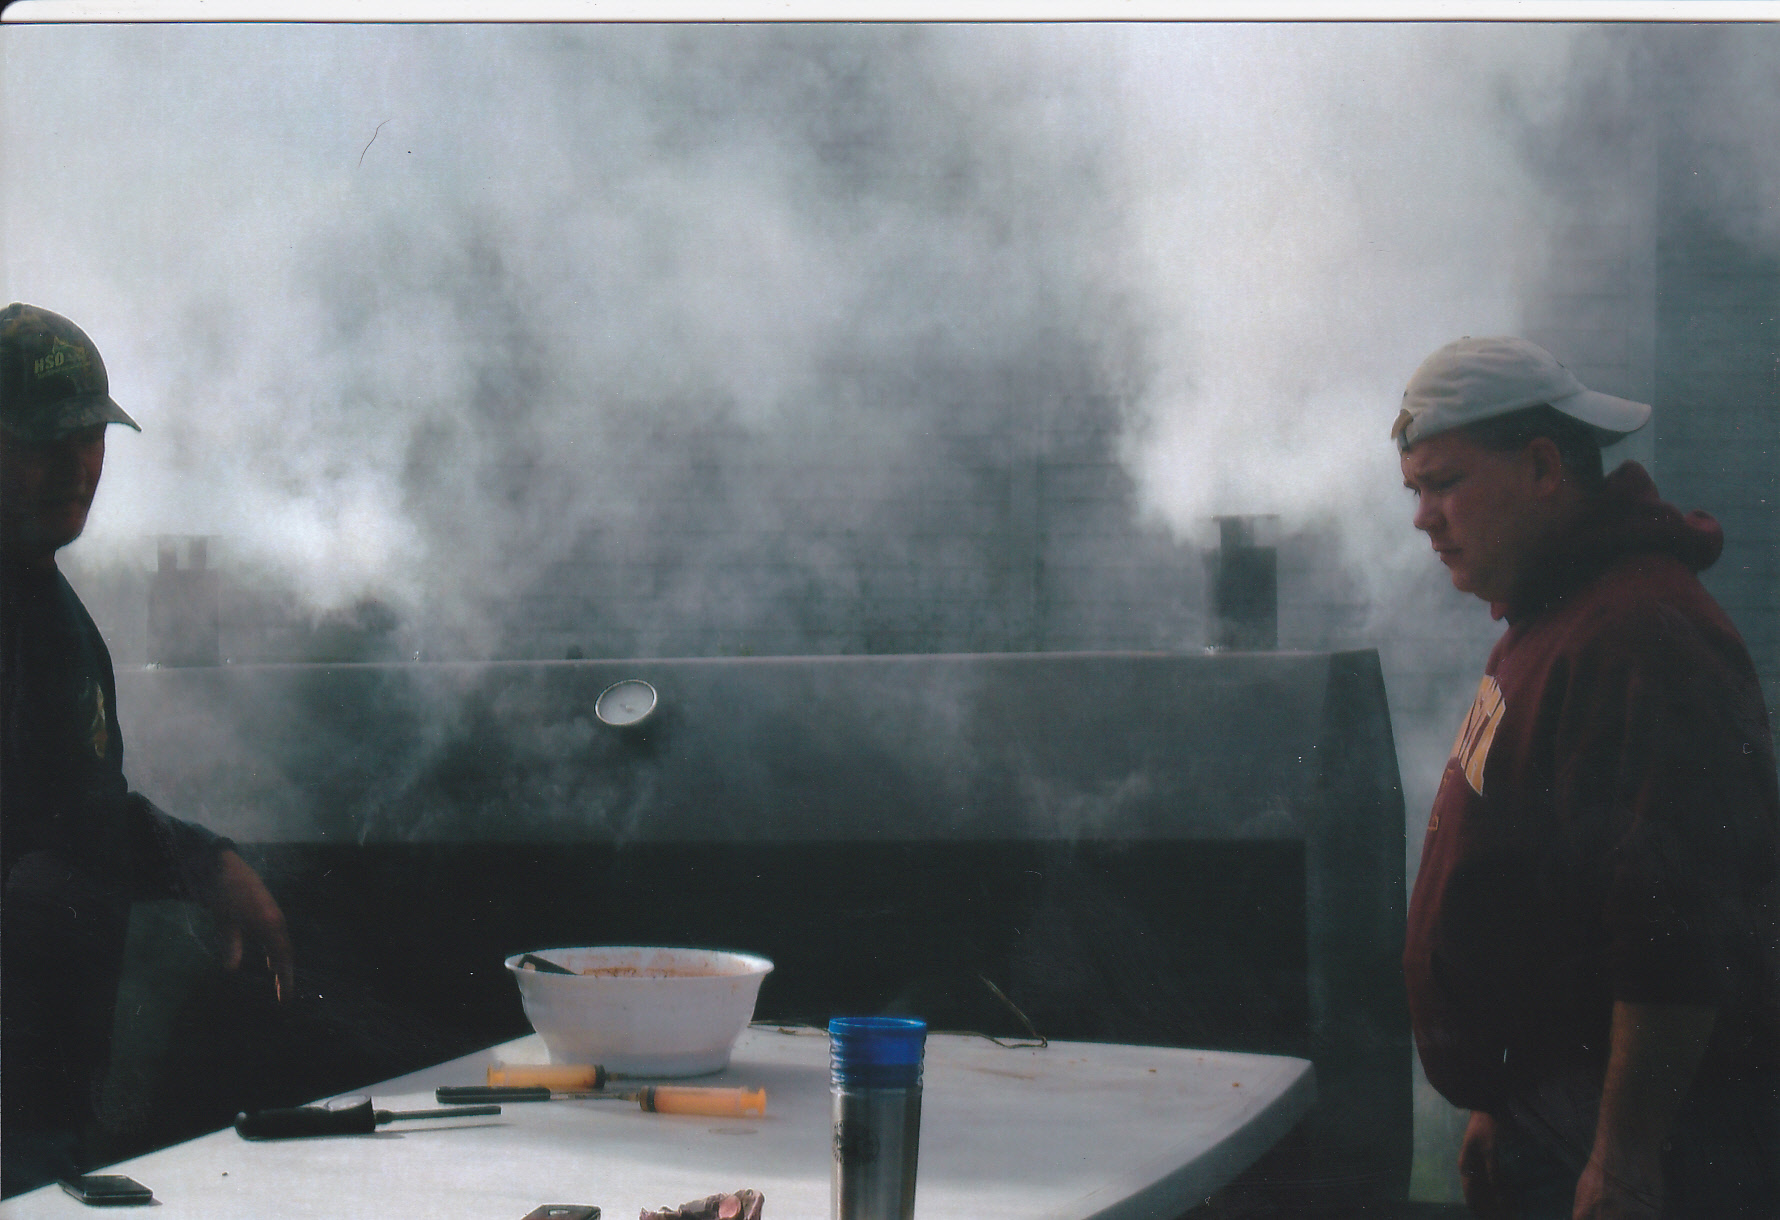
This page will be all about grilling and using that smoker. I normally like to grill all year long but this winter sure was a cold one with a ton of snow. Even my electric smoker sat more than smoked. Here are some pics from warmer months and year long.
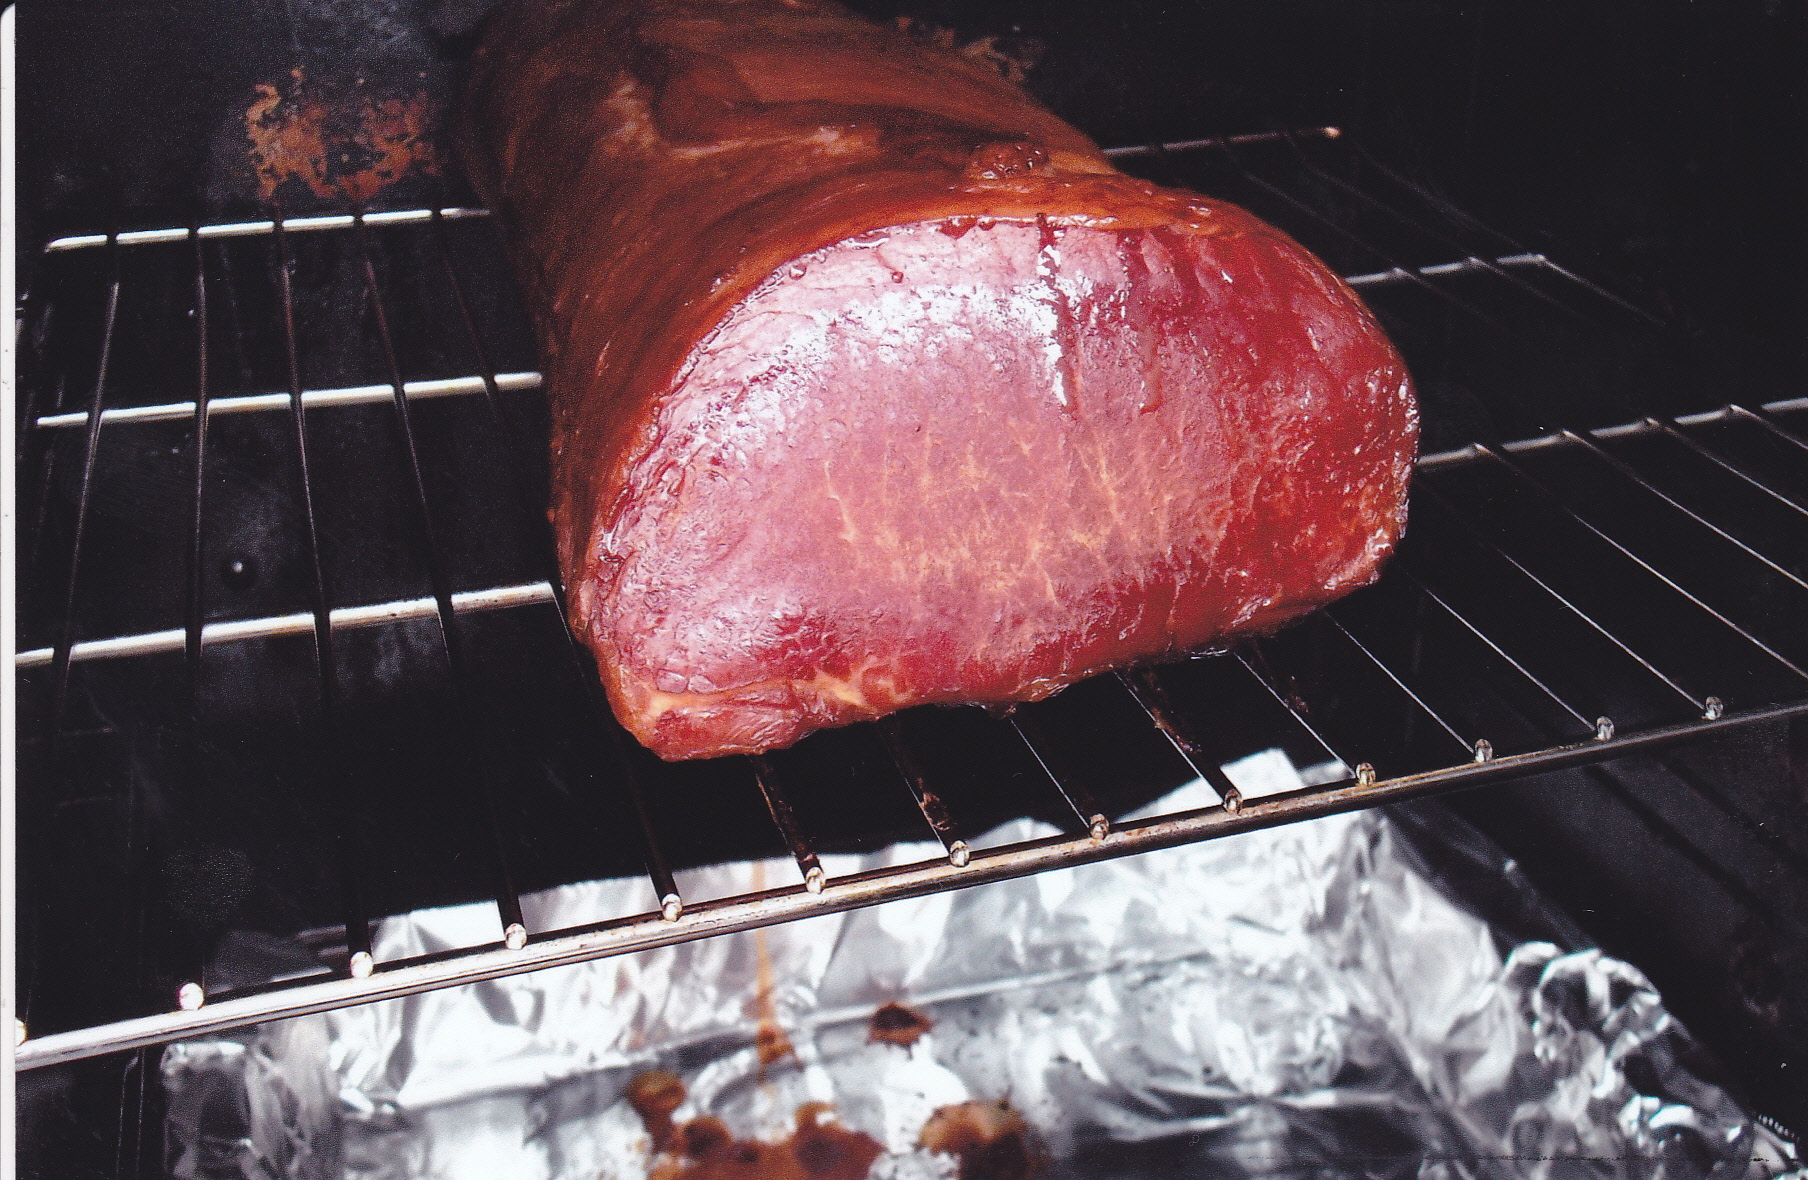
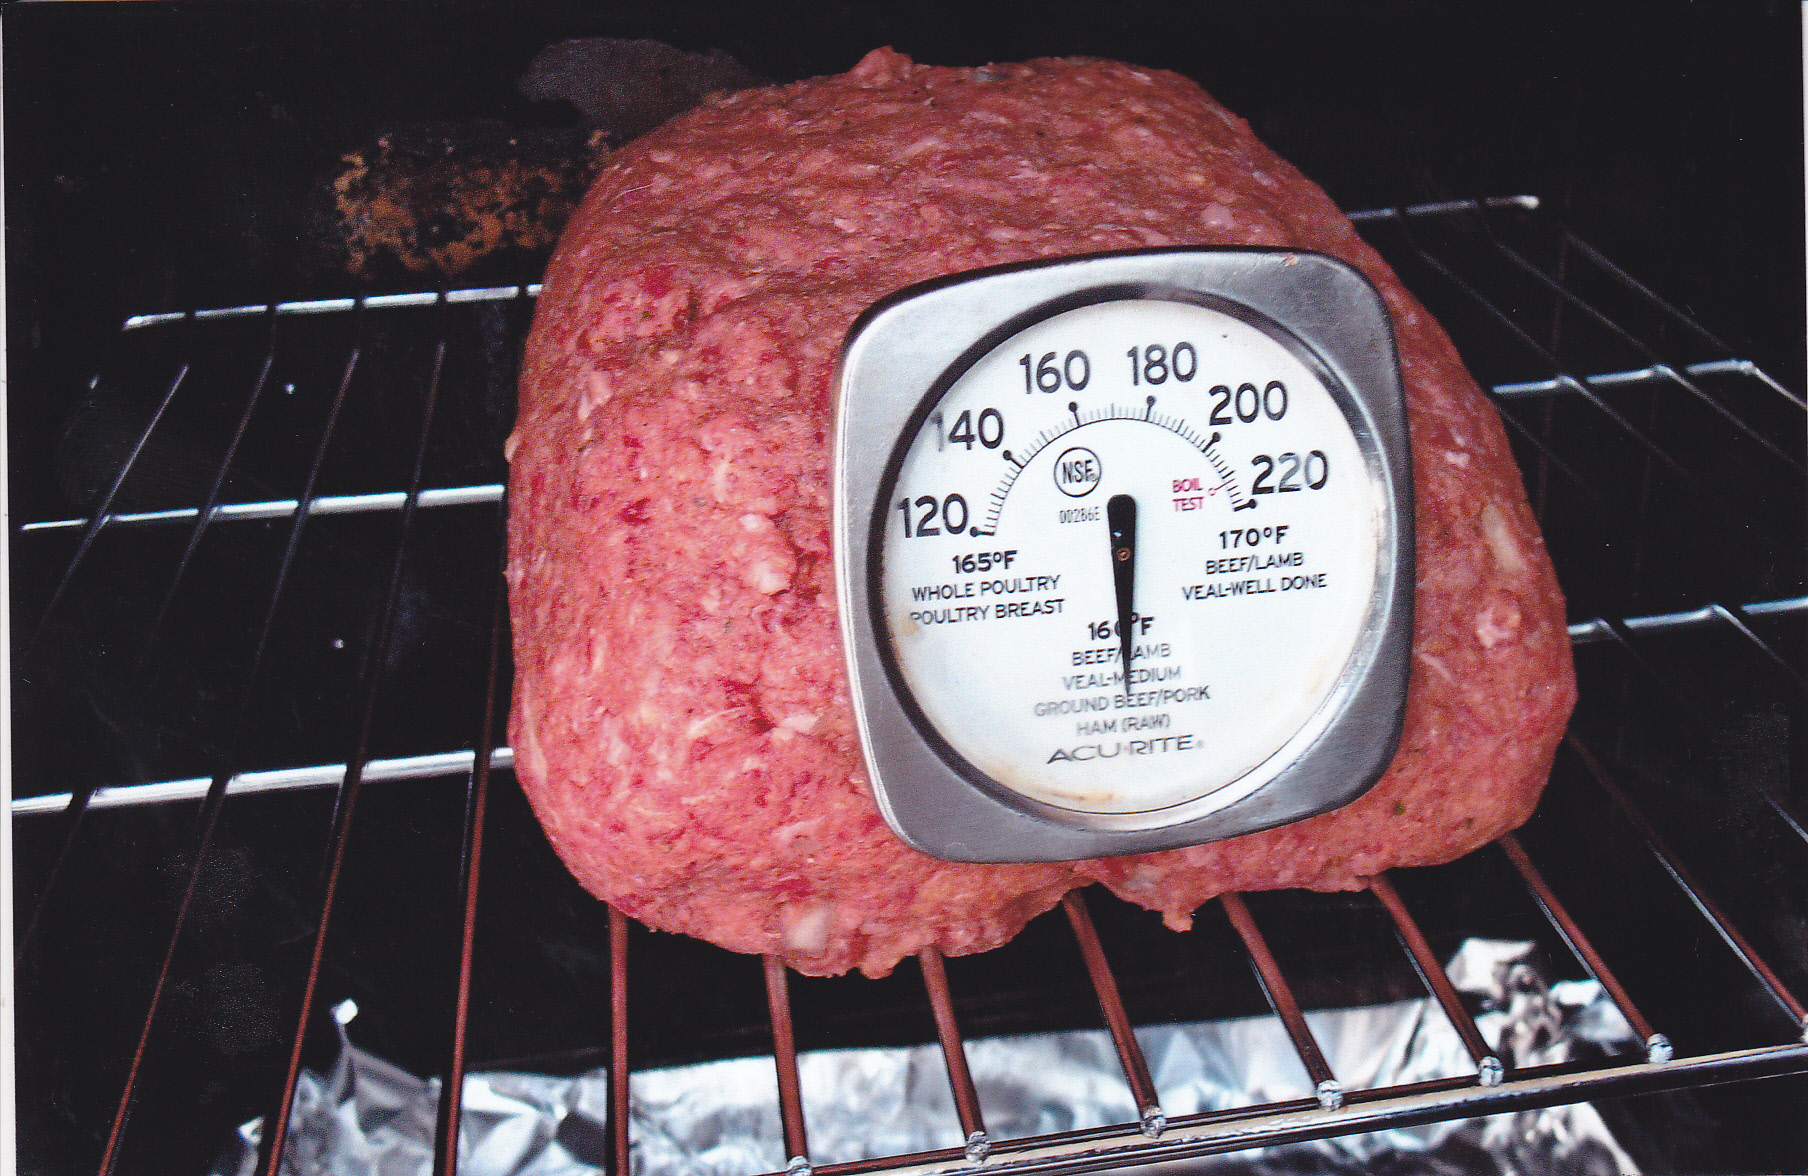
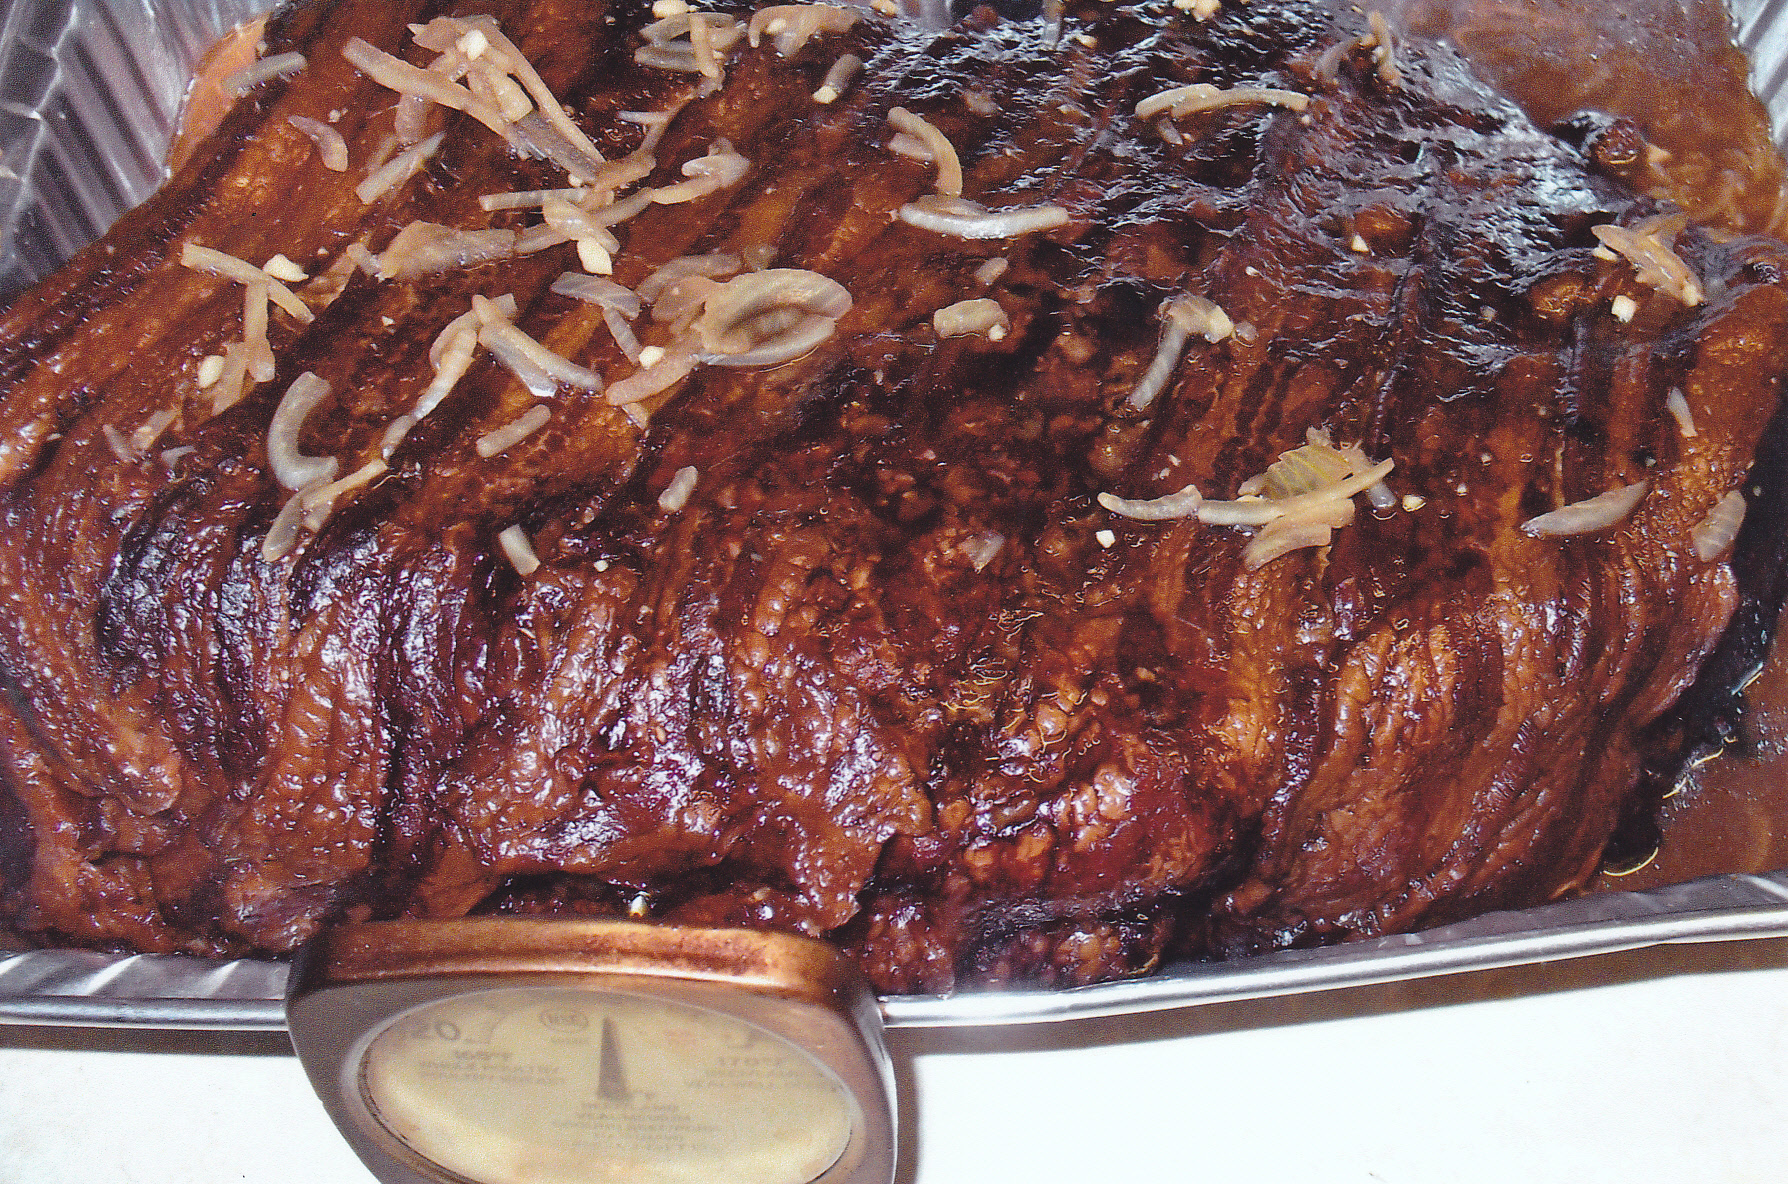
SMOKIN A BOTTOM SIRLOIN ROAST
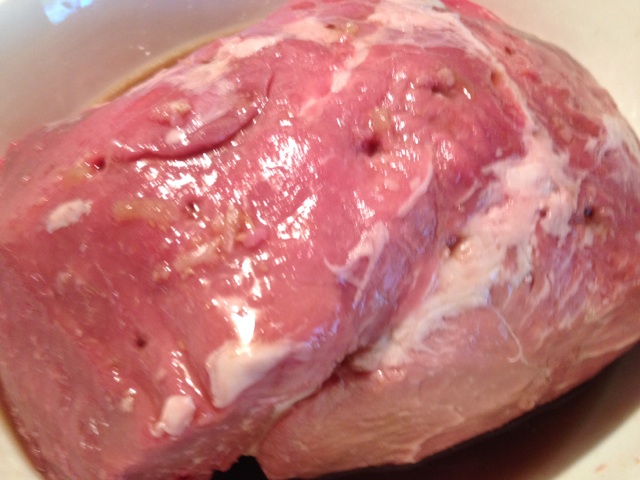
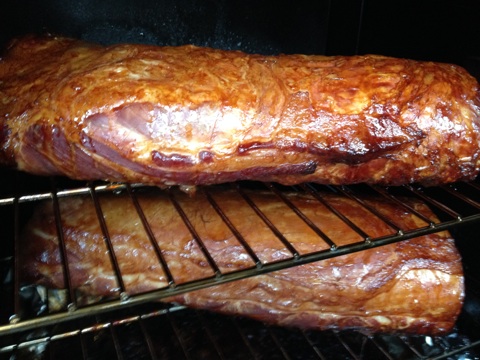
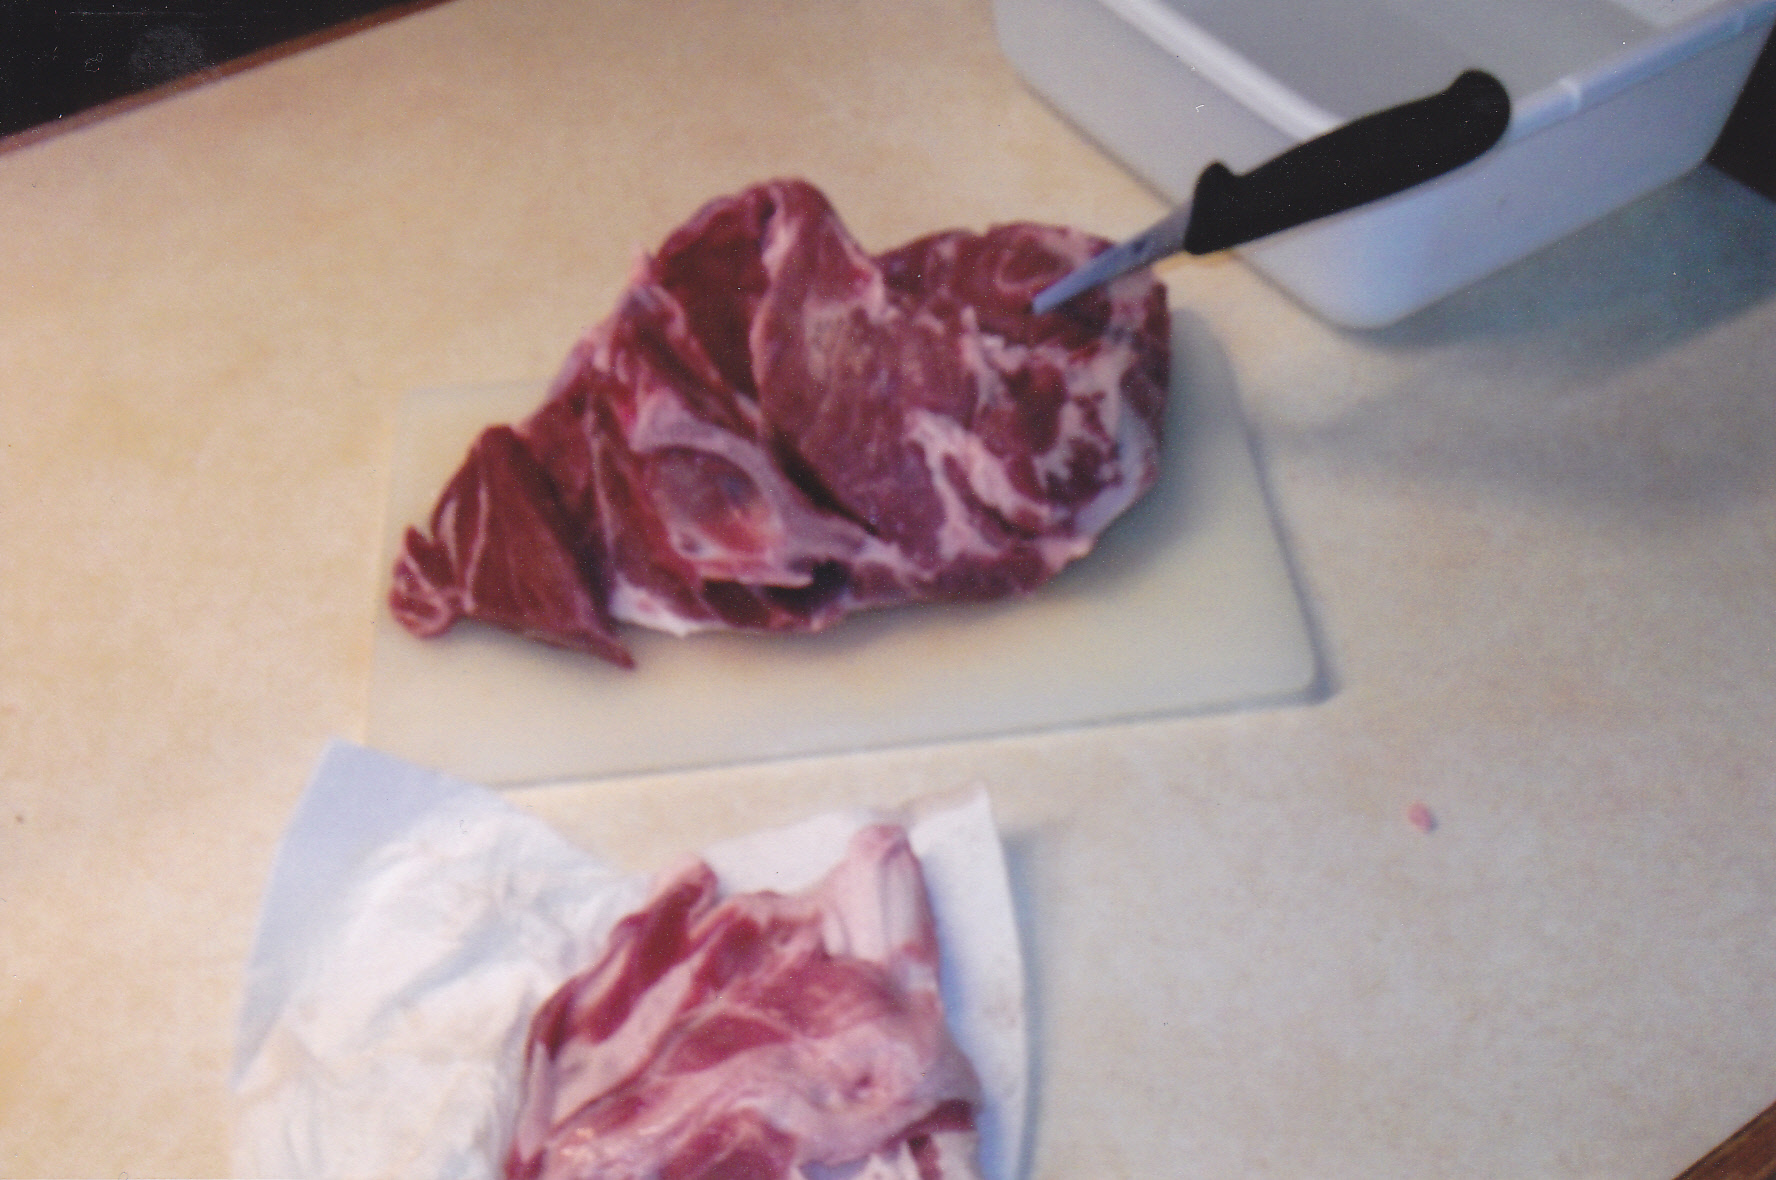
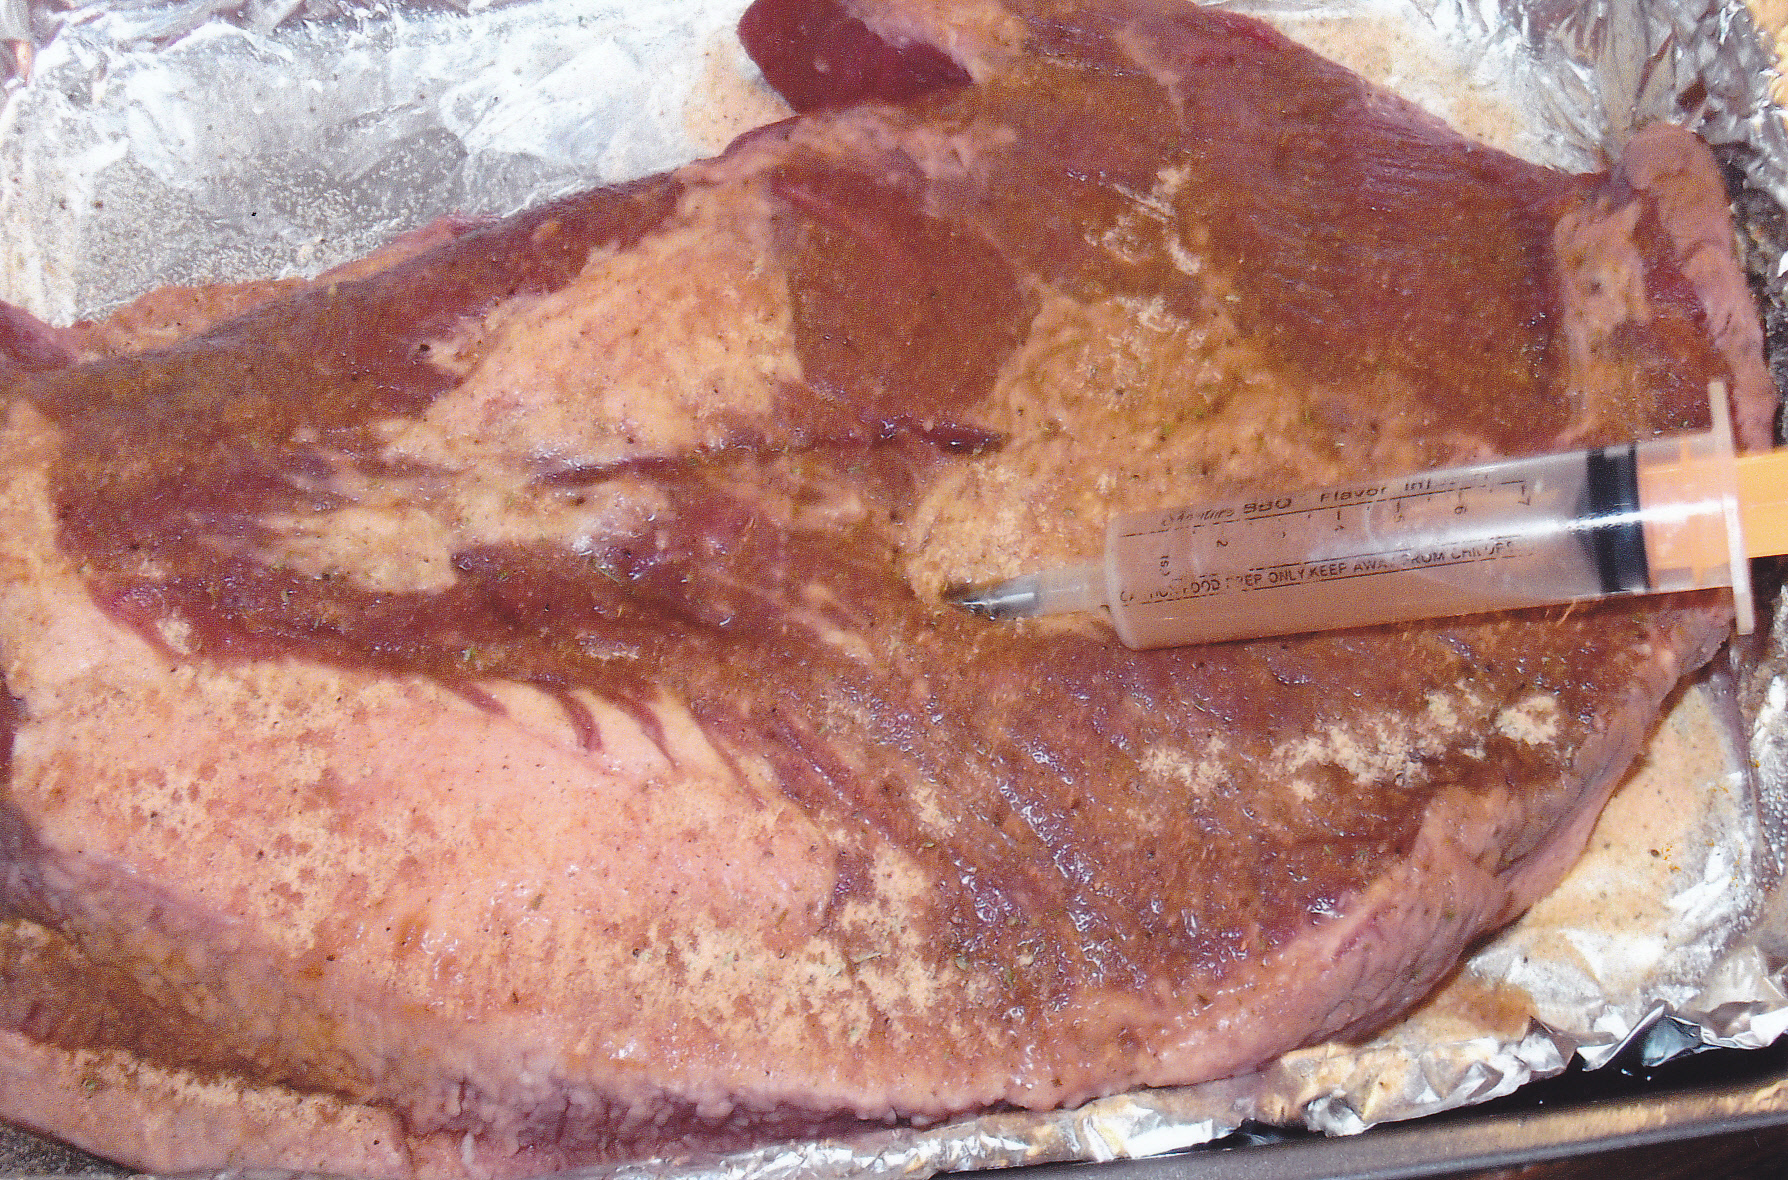
Better know as a ball tip in some places. It is a lean roasts, much like a sirloin tip roast. Normally I buy them as steaks and being that they are lean I normally marinate them. I thought why not do the bottom as a roast for some hoagie’s. I got a large one that weighed in at 4 1/2 pounds. They really don’t get much bigger than that and I have cut many of them.
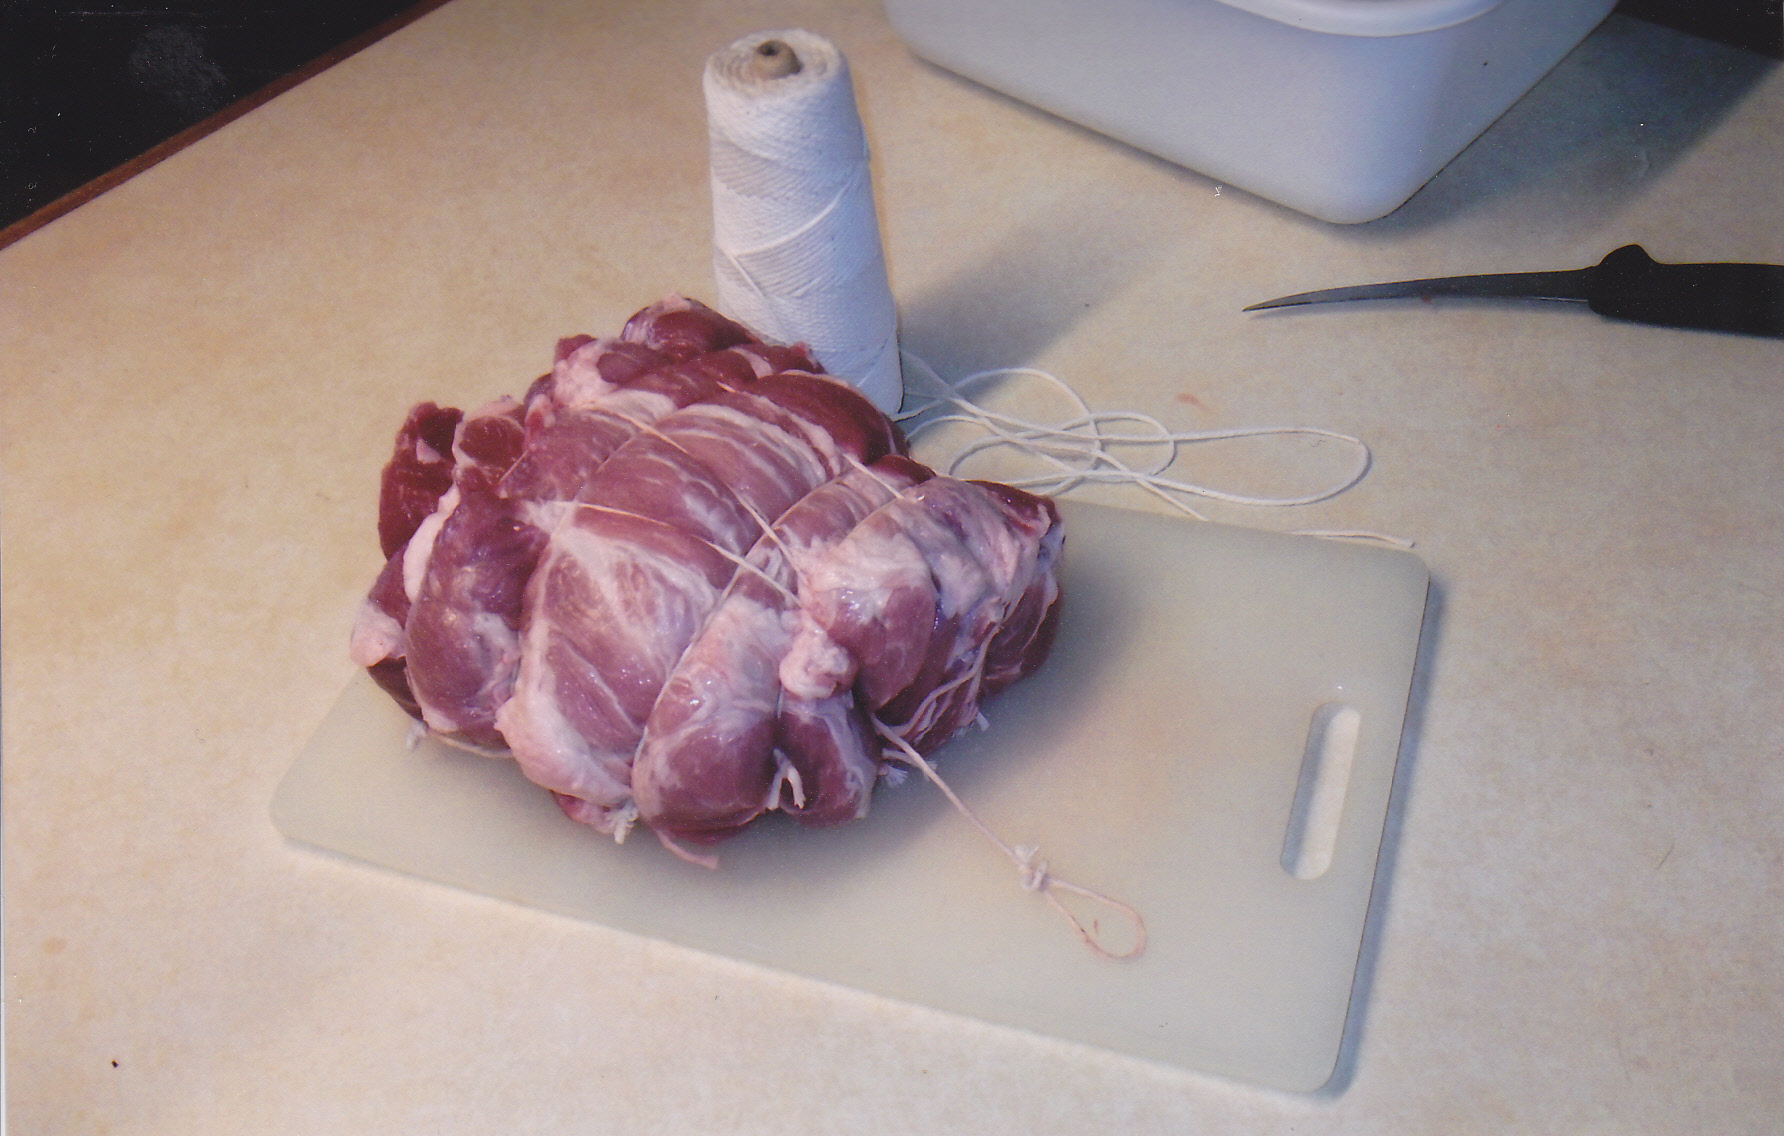
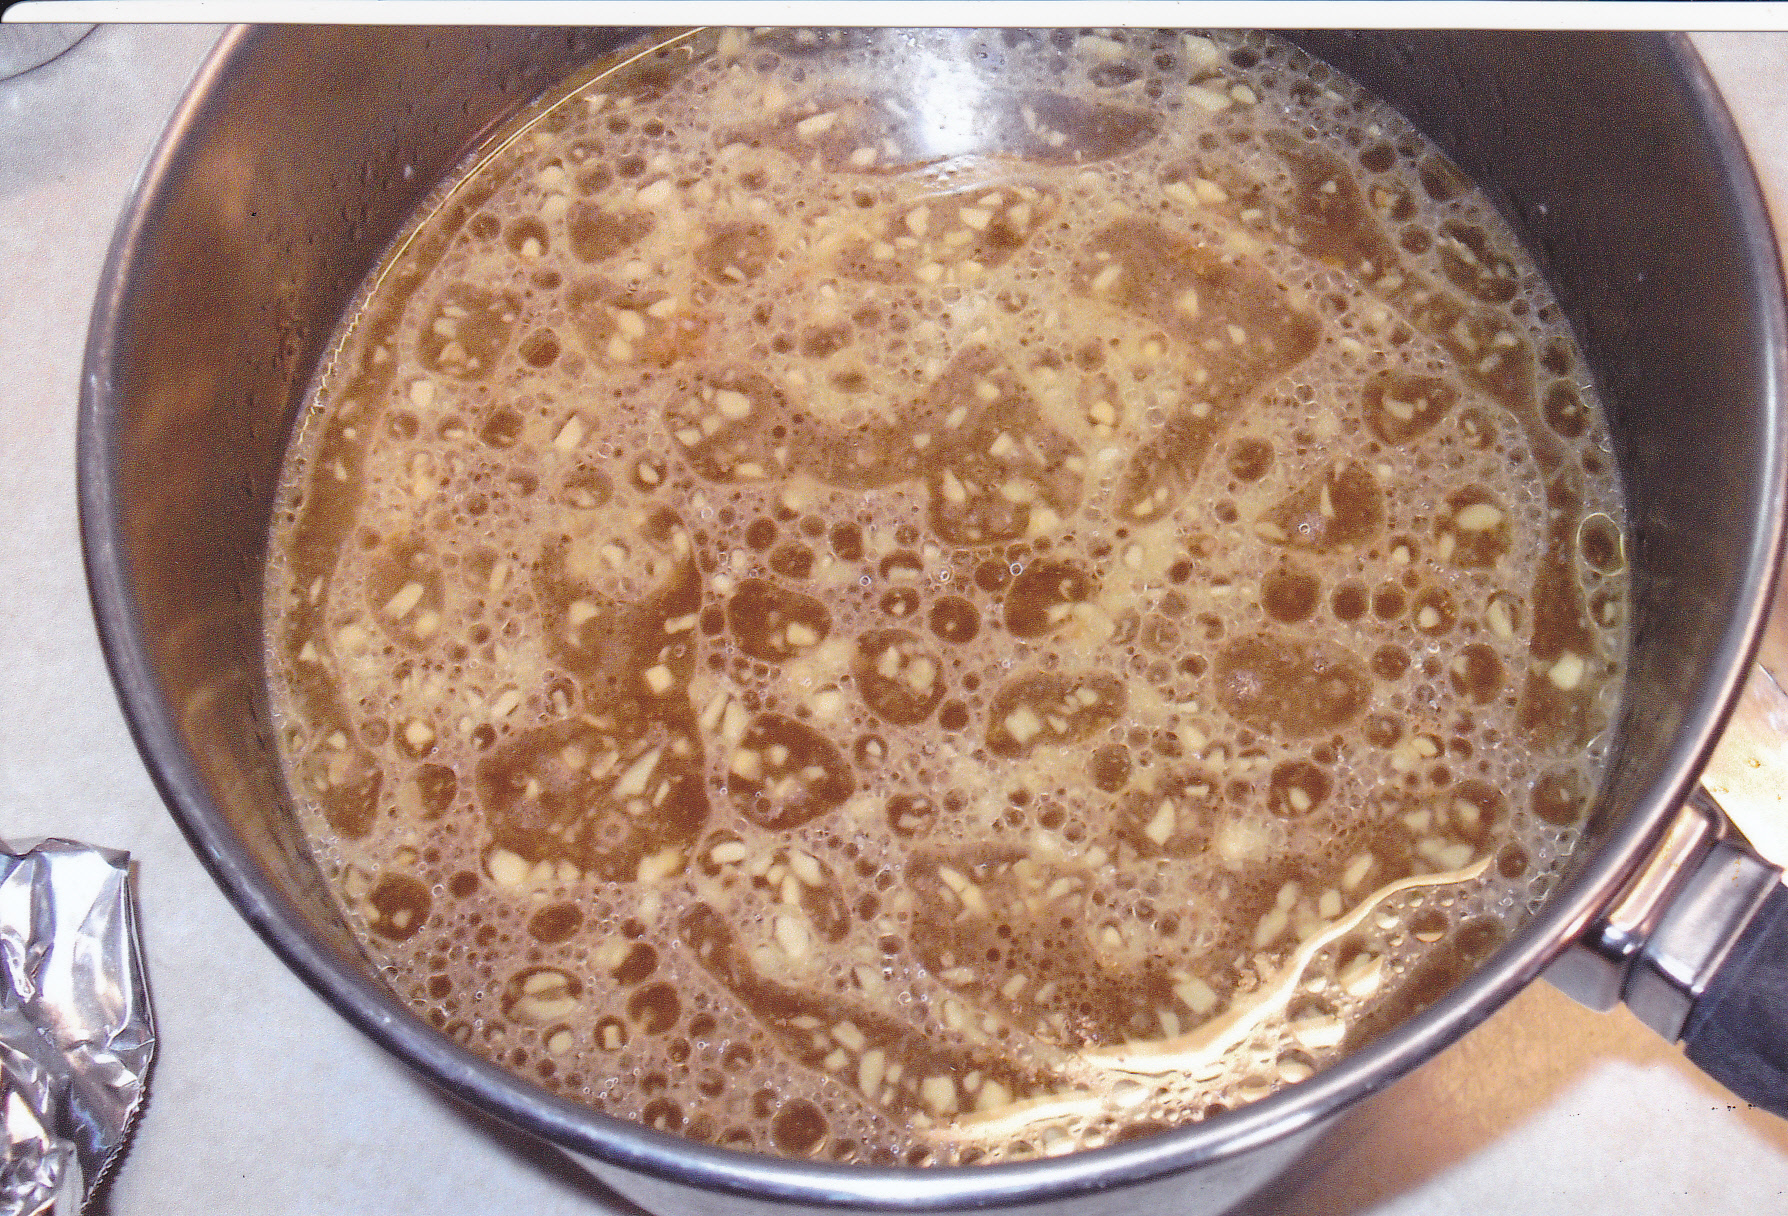
Plan of attack was to inject the roast. I simply used Lipton Beefy Onion soup mix and some garlic. Just follow the direction on the box and add garlic and simmer till done. You will have to strain the soup in order to inject the roast. After I injected the roast I wrapped the roast with bacon to keep the roast moist since this cut had no fat cap. I set the smoker at 250 degrees. Put the roast in the smoker. I did add some smoke near the beginning using a couple of loads of oak/maple mix.
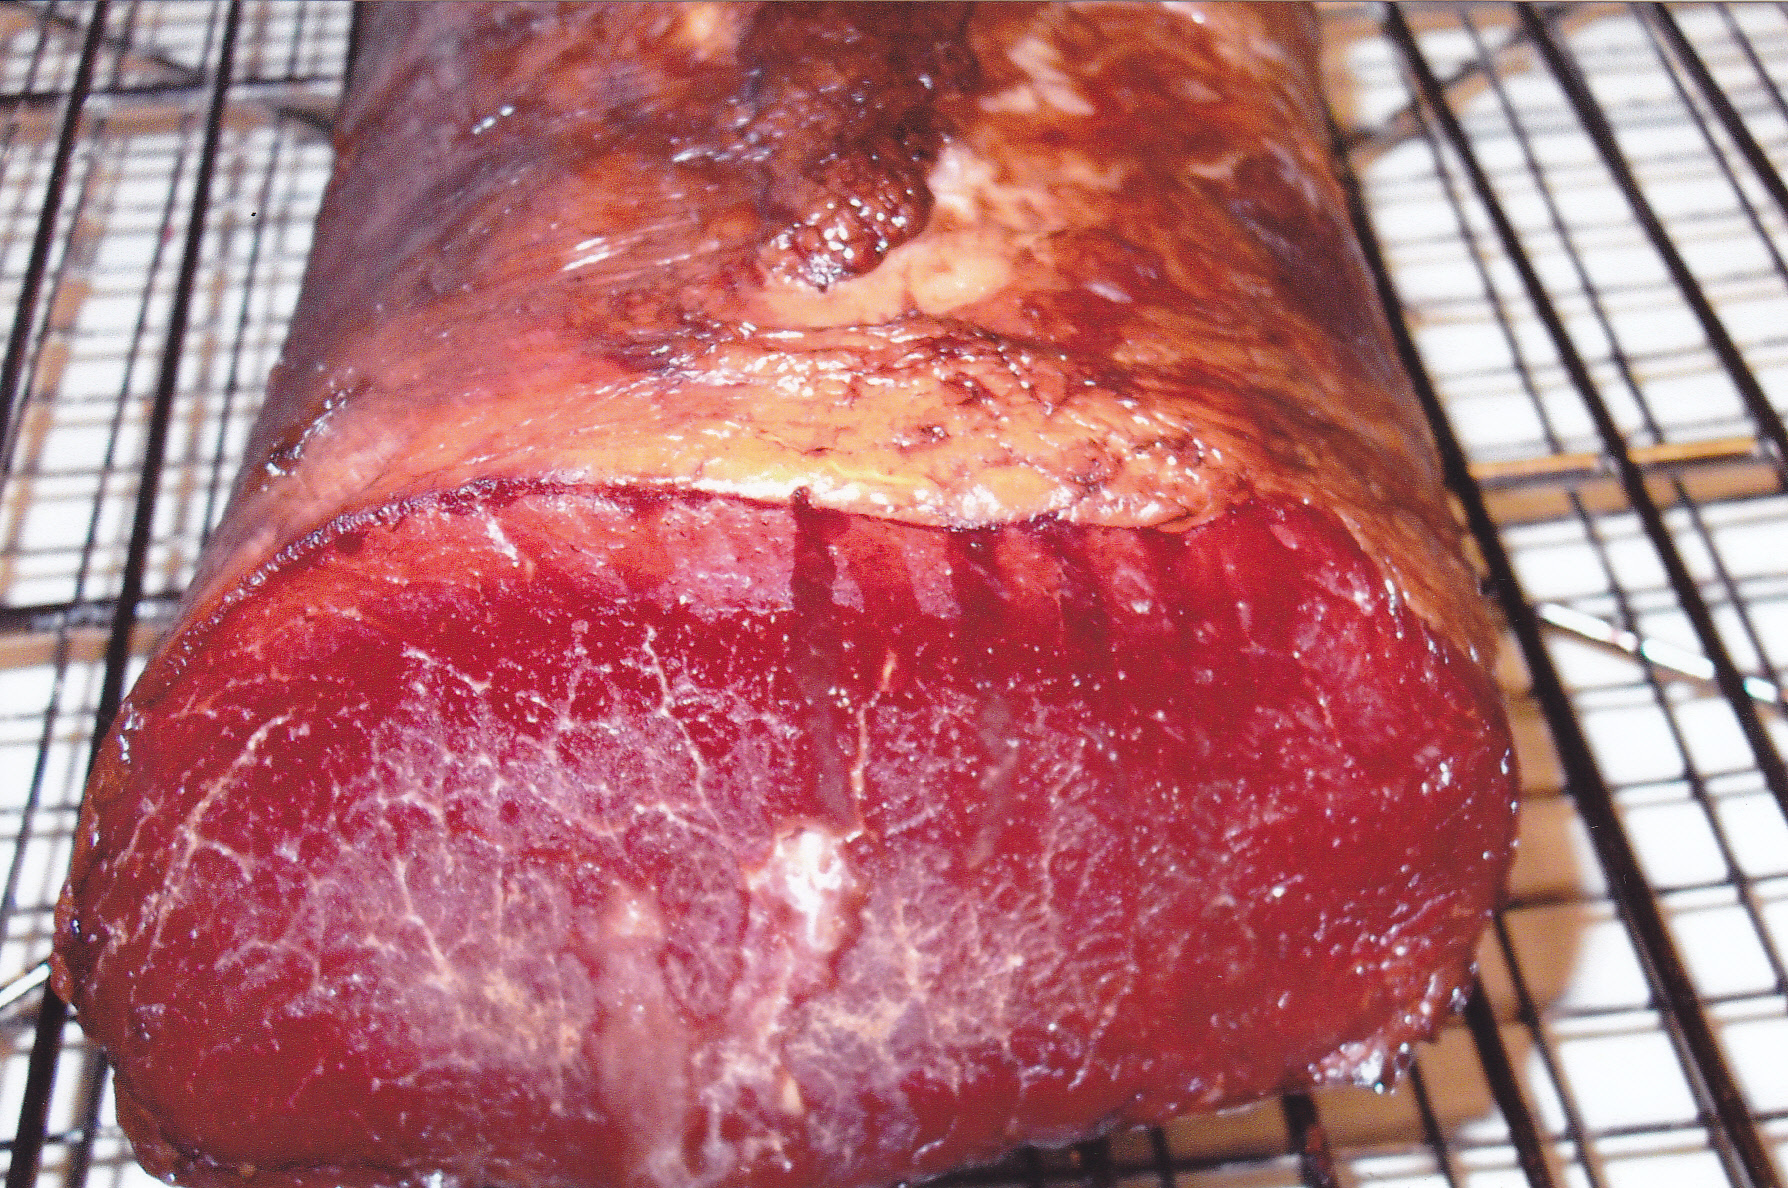
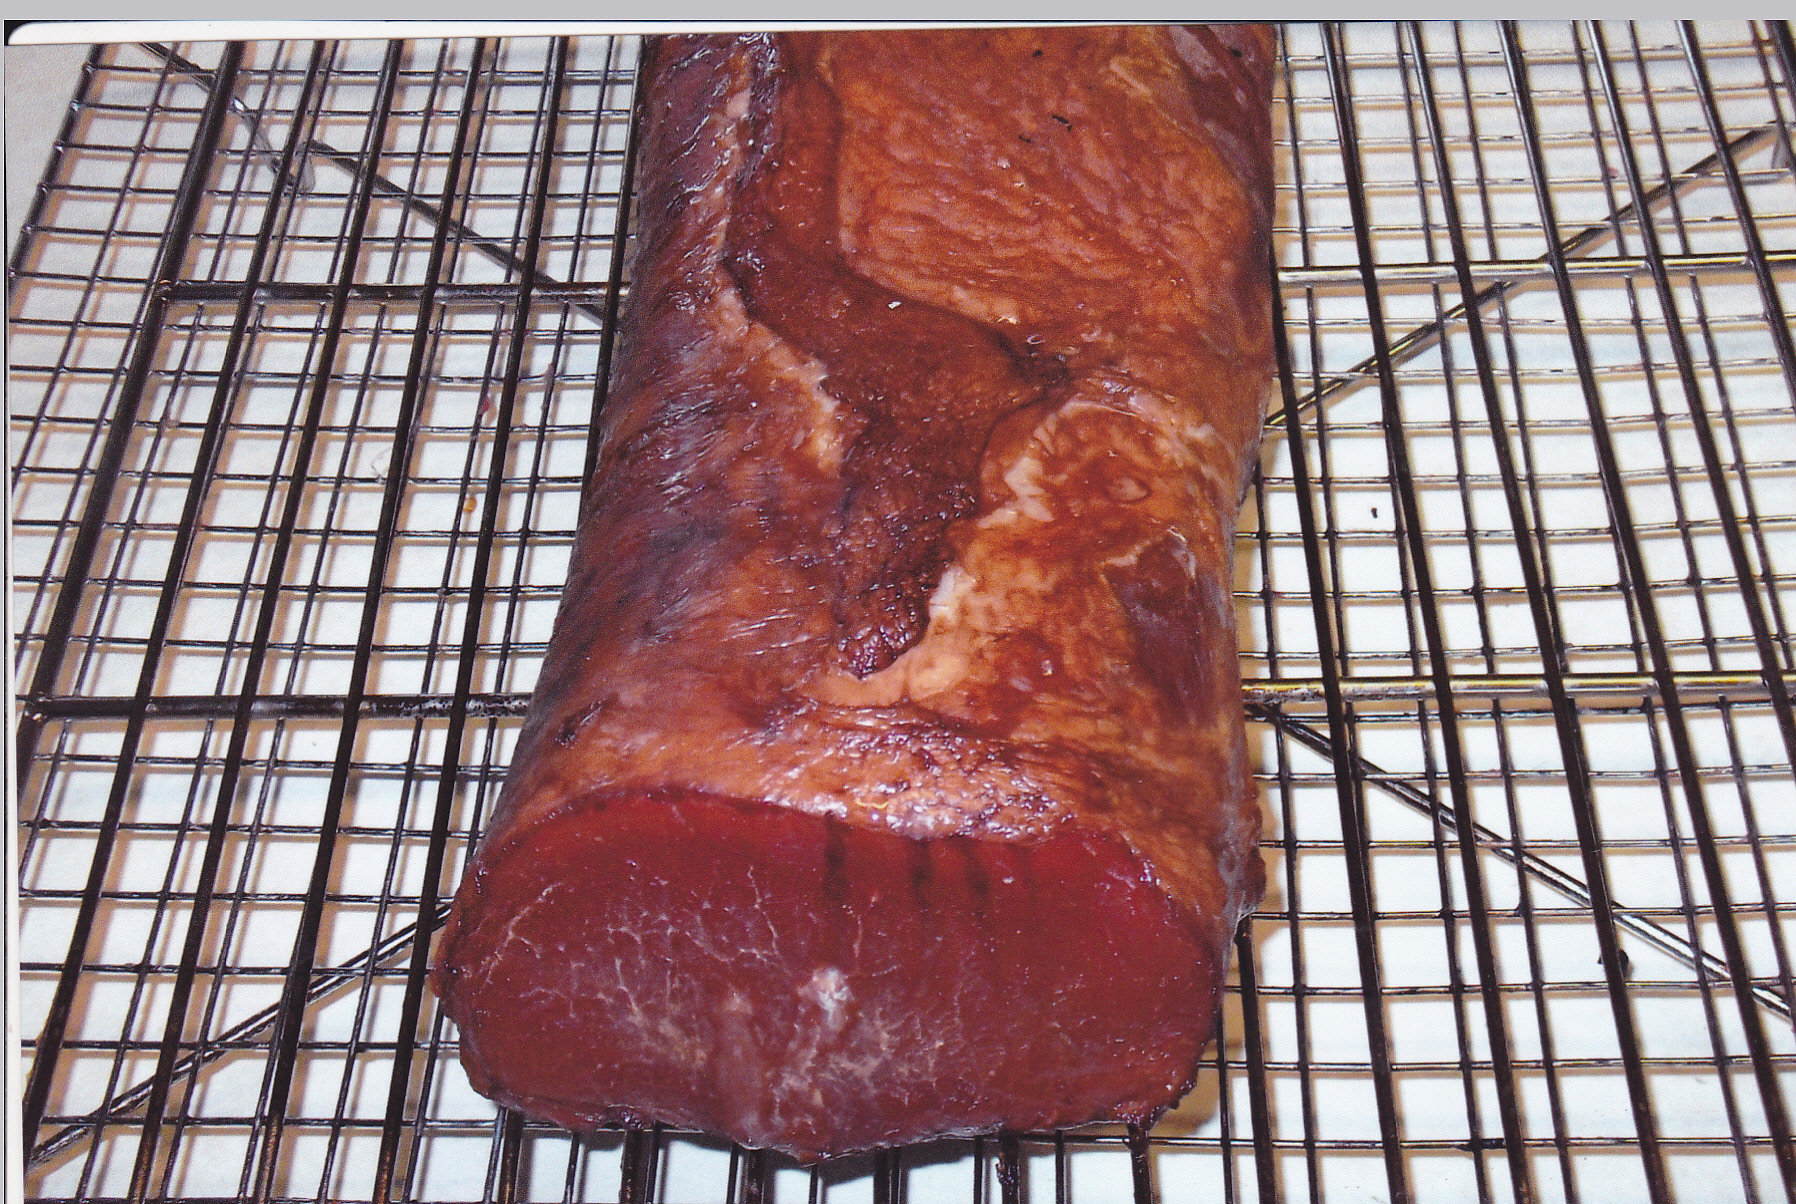
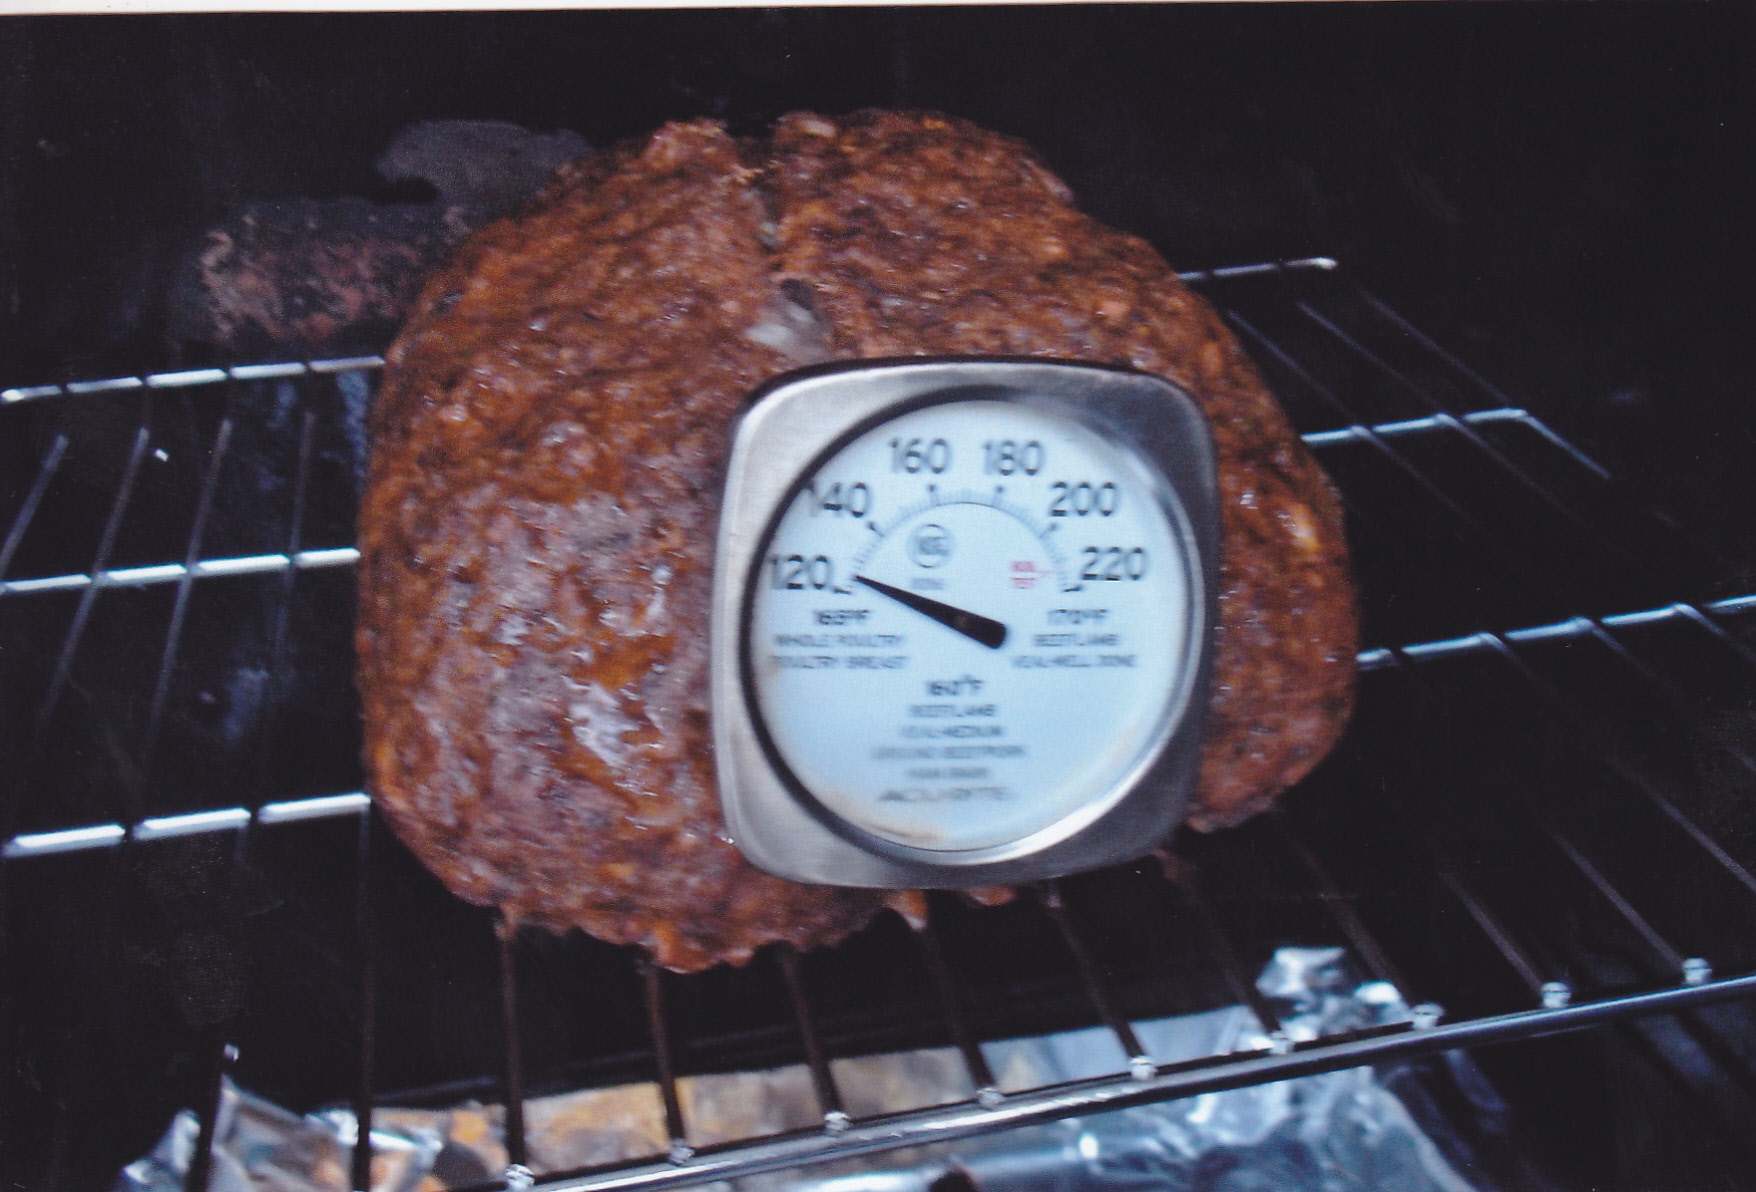
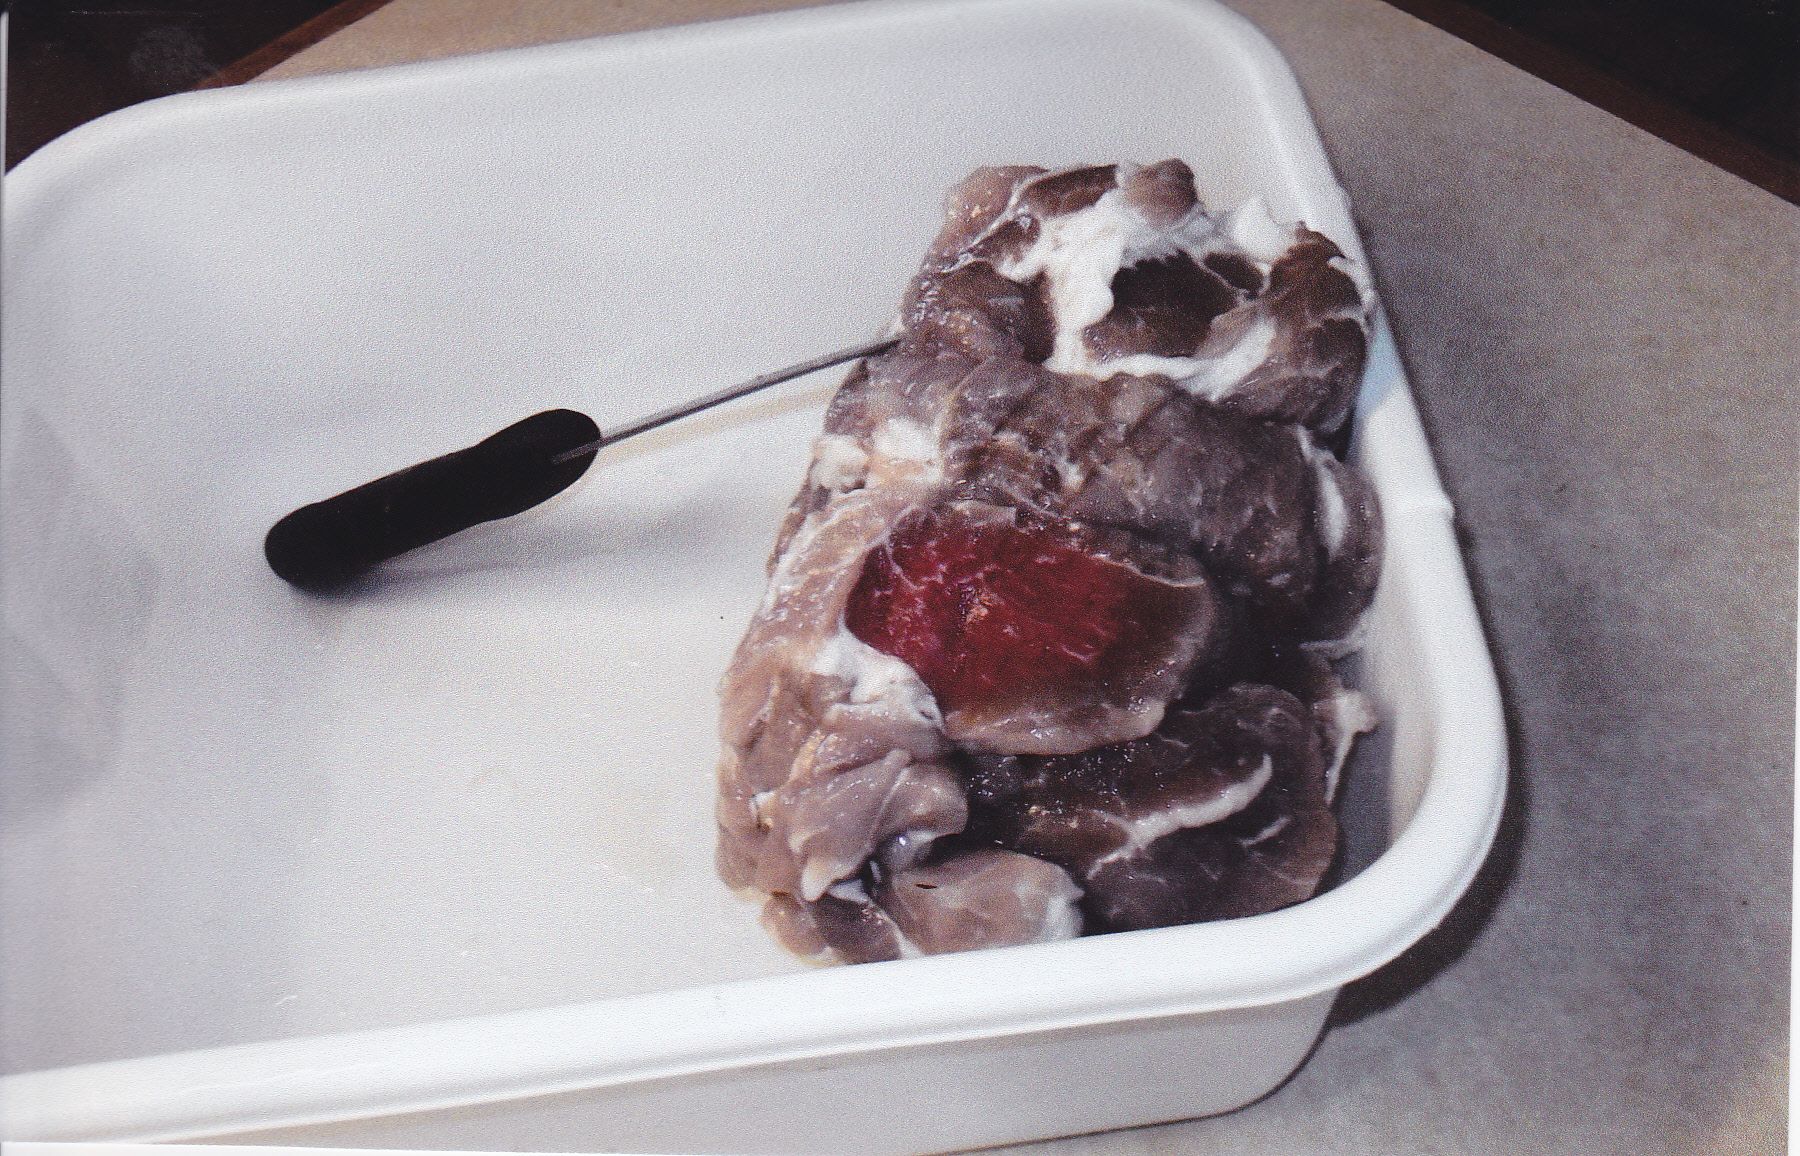
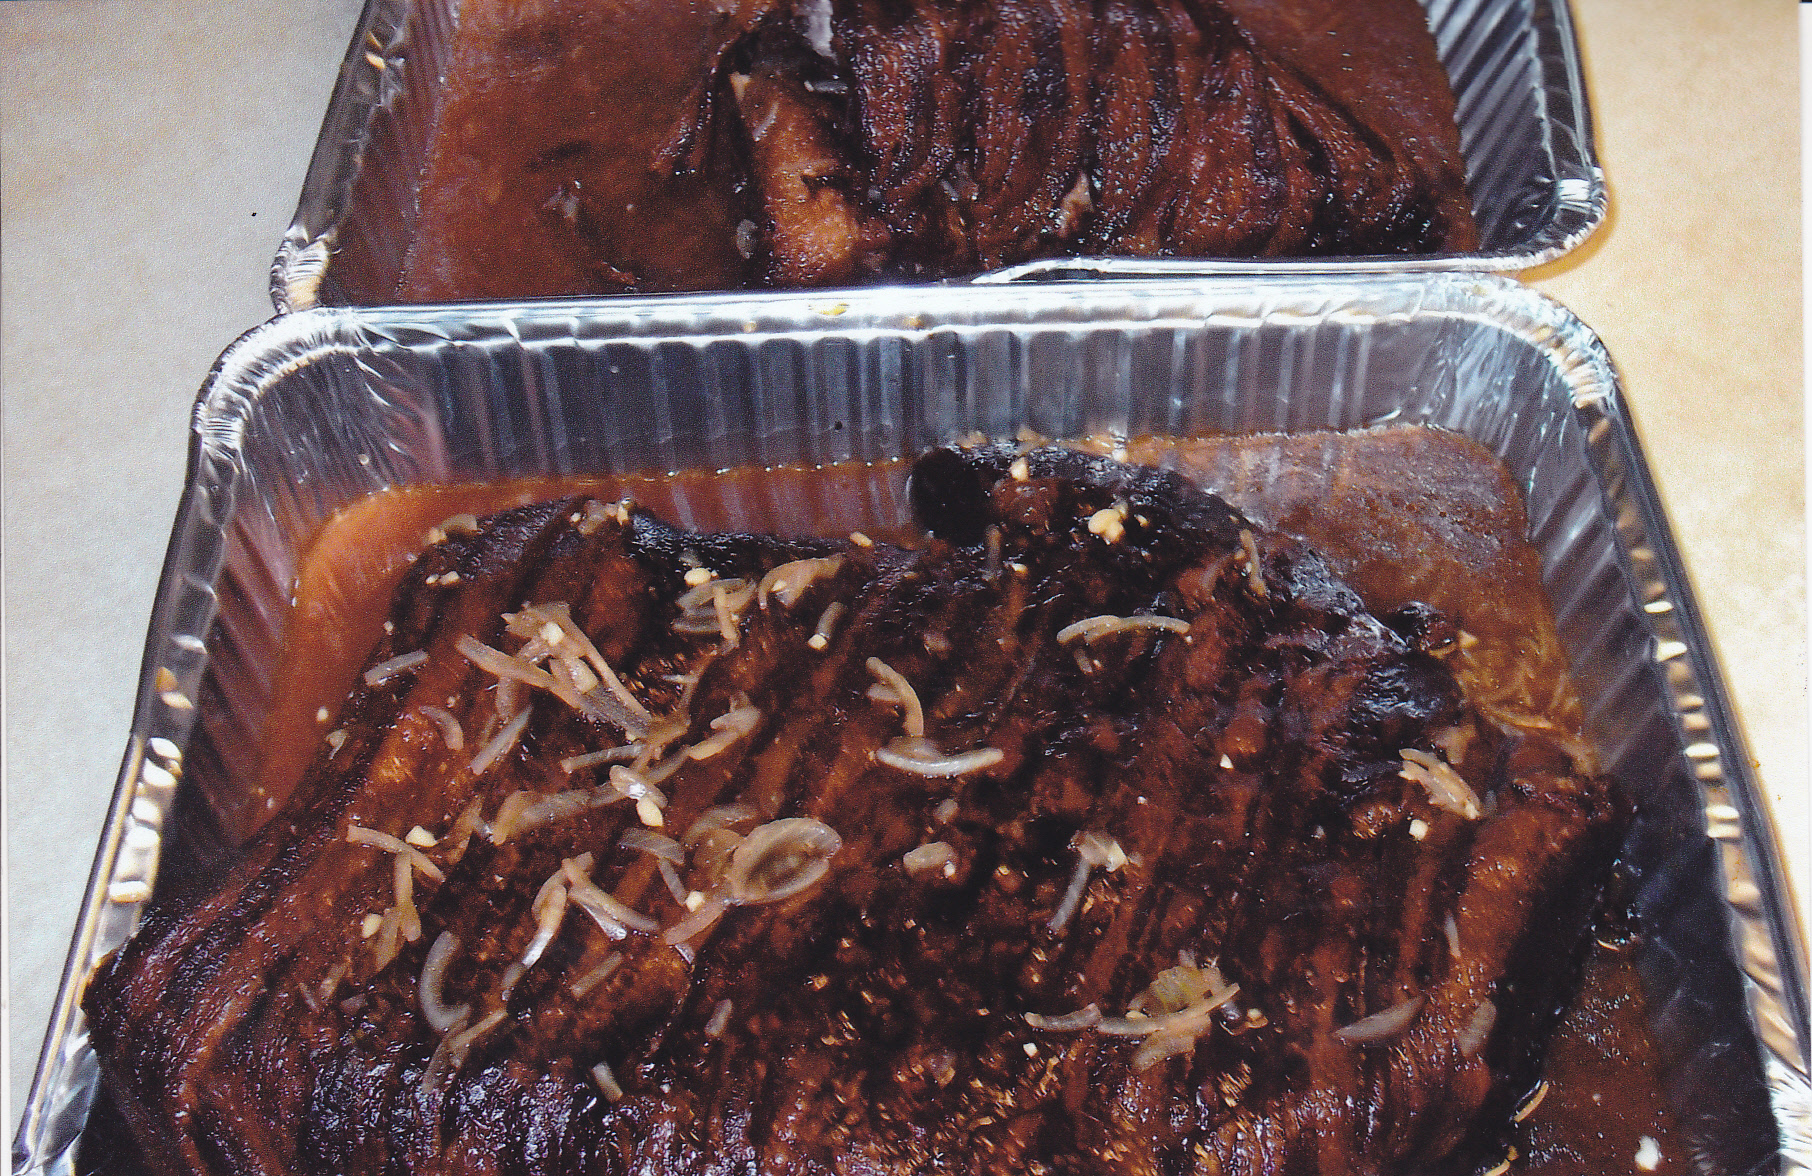
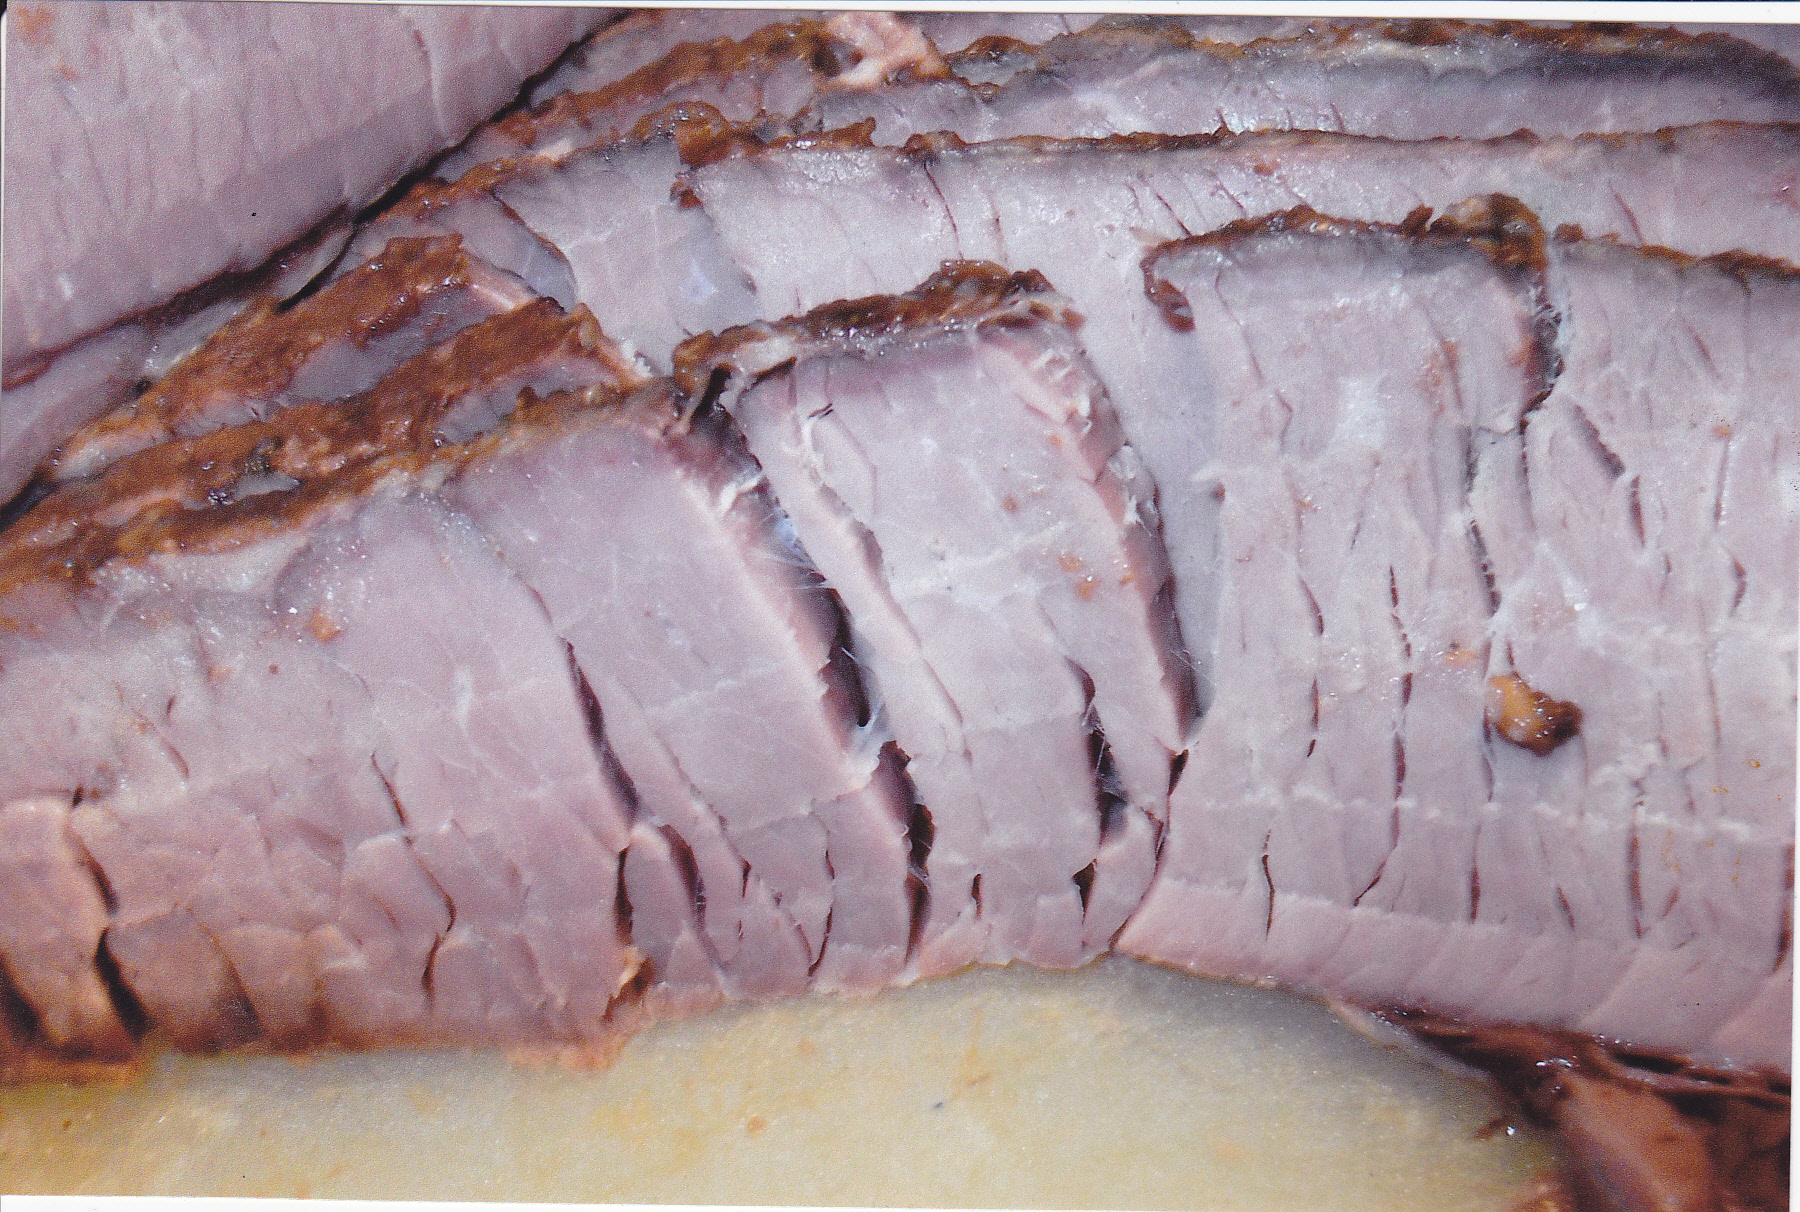
Took about 3 1/2 hours at that temp before the internal temp was 130, and at that point I pulled the roast out. I let it rest on the counter for a bit under foil while I got the rest of the meal ready. I did have my aujus ready though. That again was the Lipton Beefy onion soup with extra garlic that I added. I sliced the roast and put the slices in the aujus. This is important with lean slices of beef. Keeps the meat nice and moist. Here are some pictures.

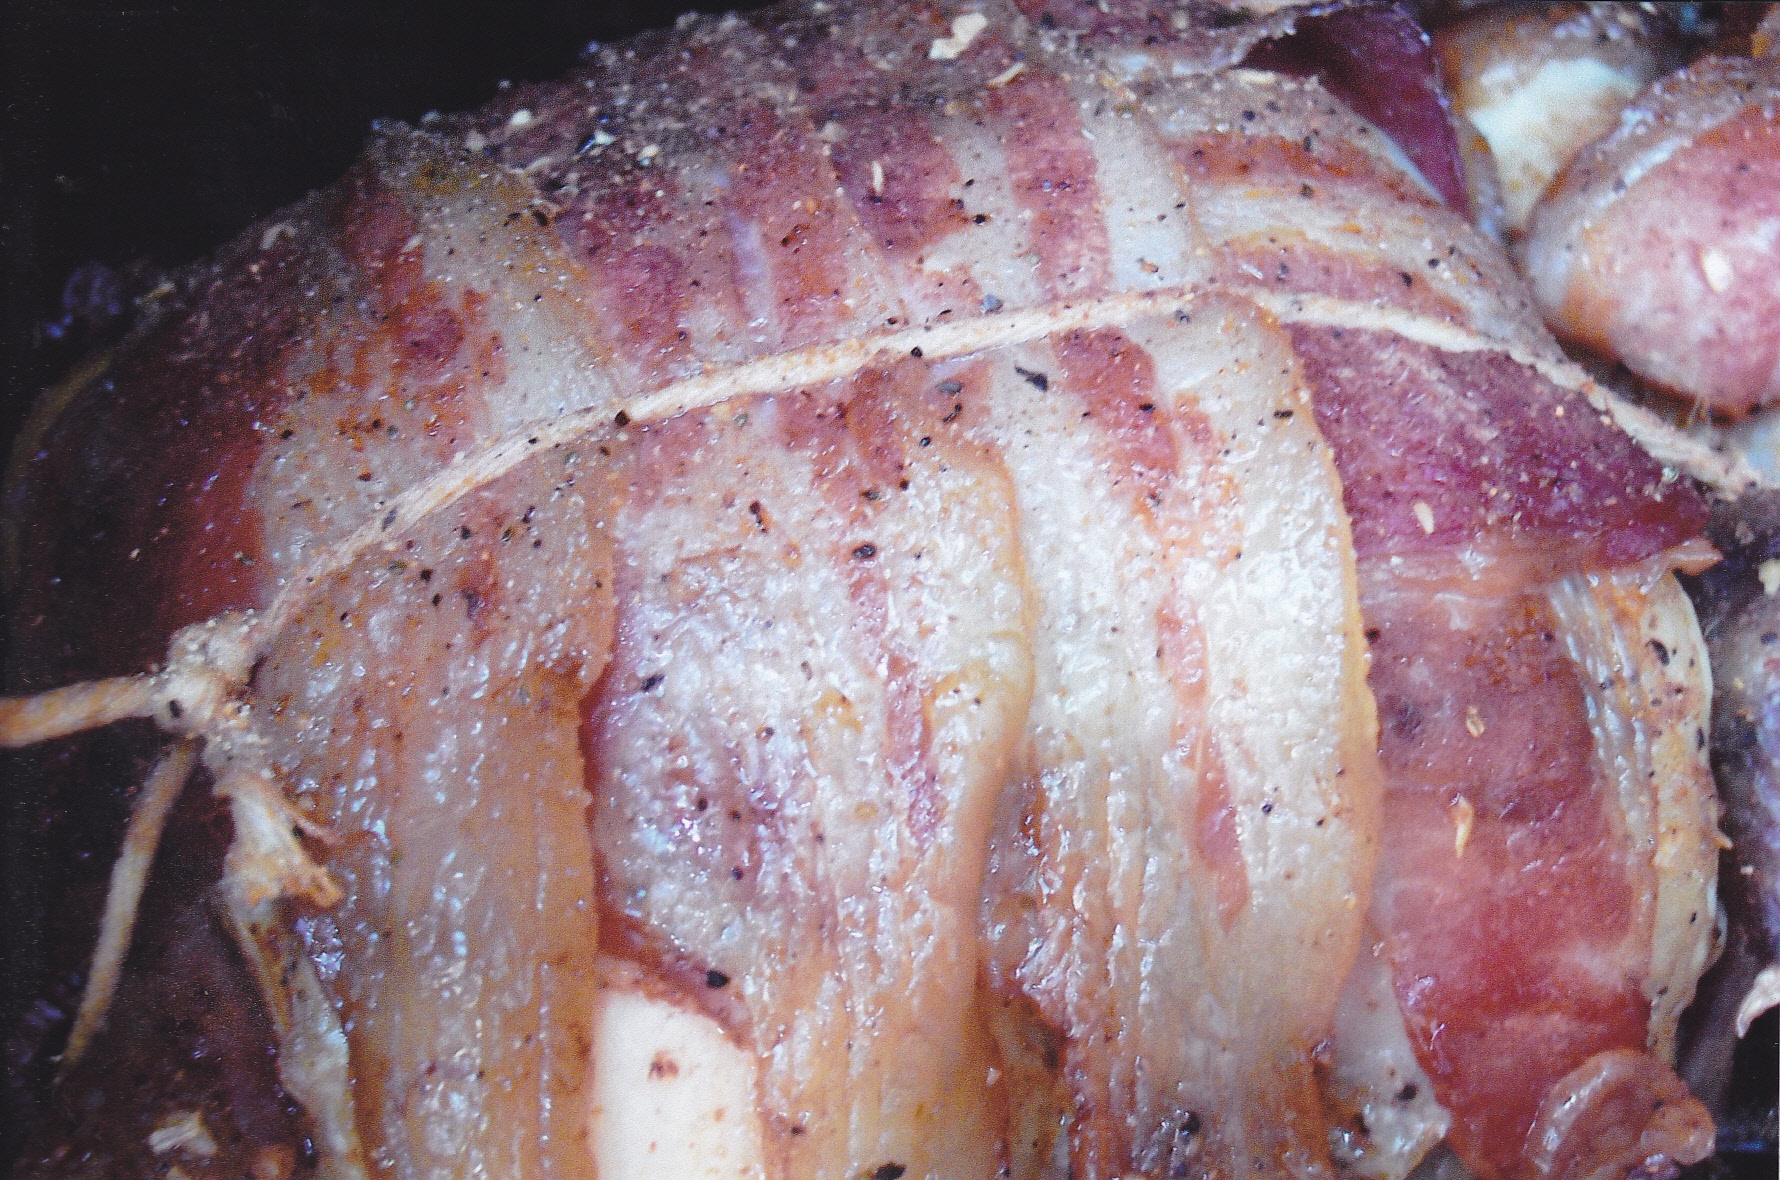
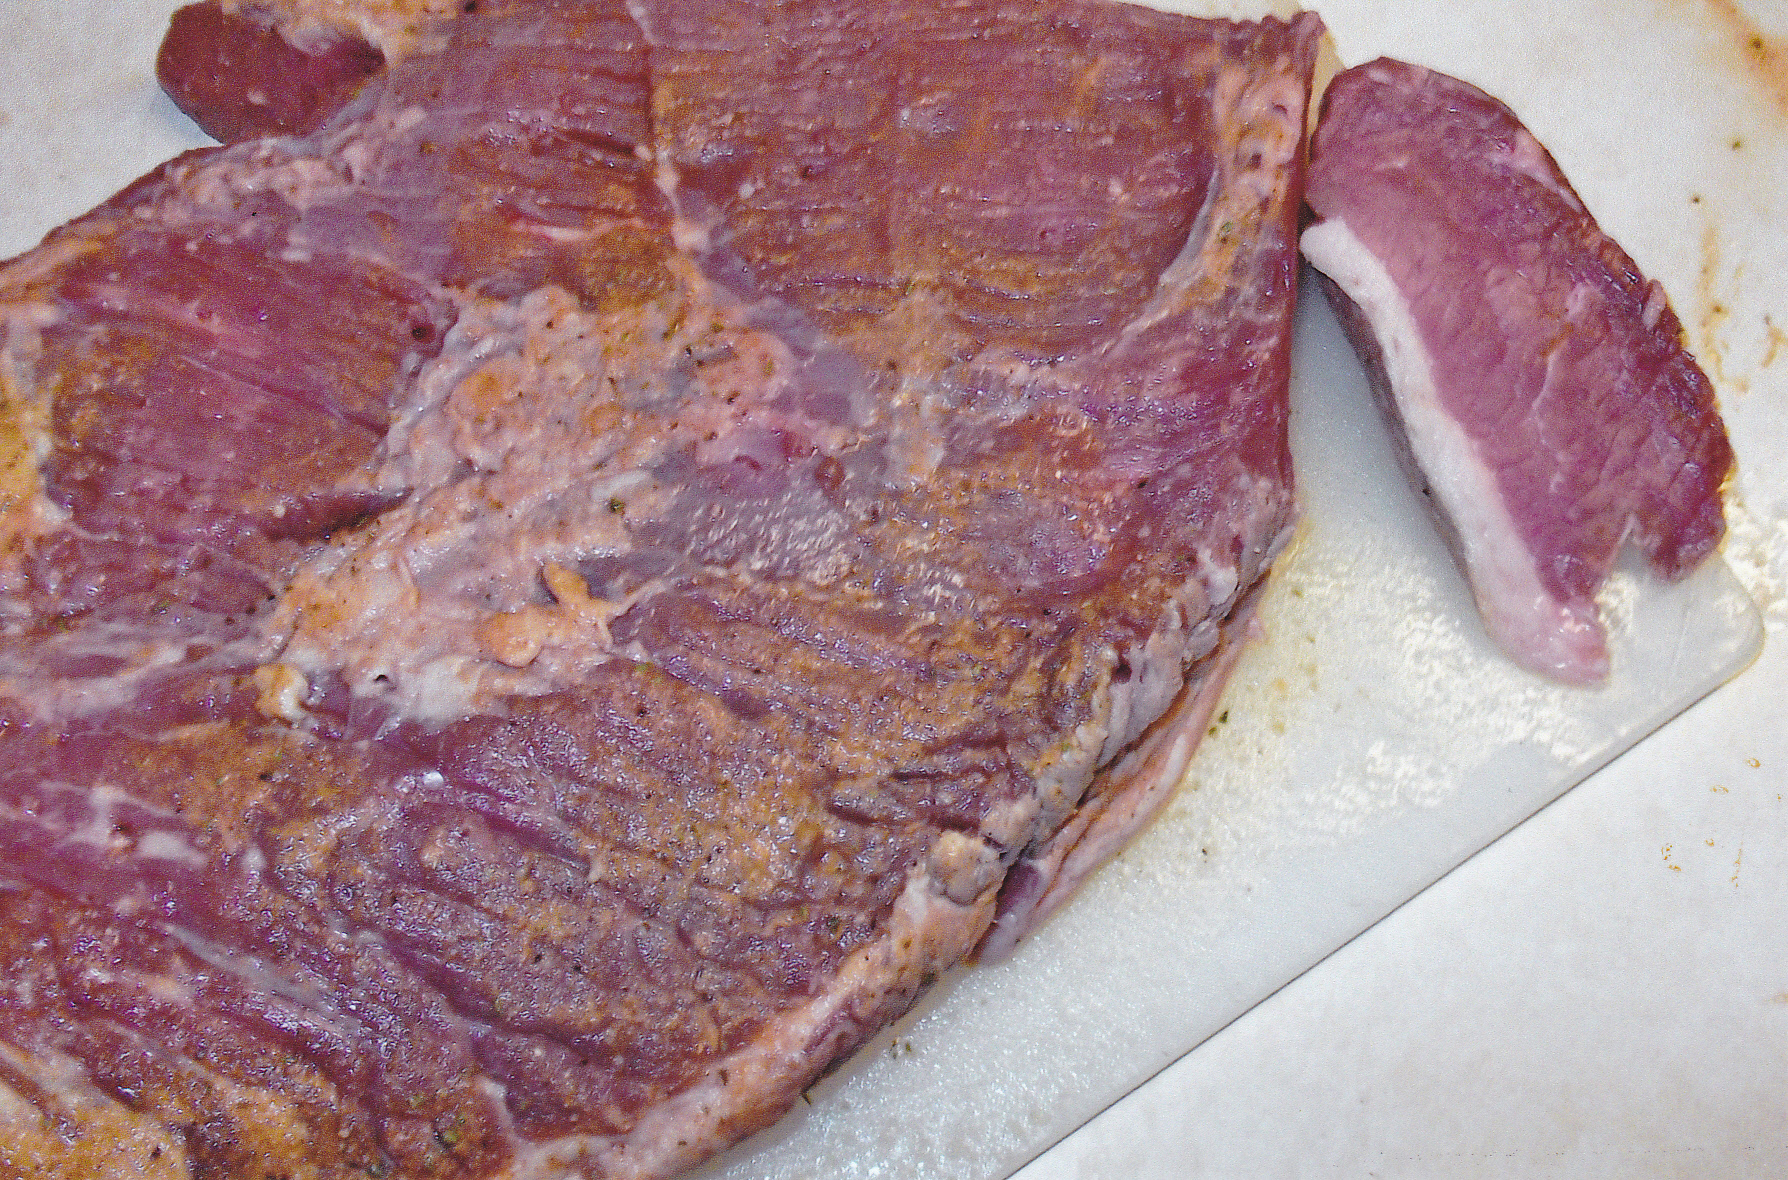
As you can see the bottom sirloin really has no fat cap.
Here is the roast after I injected it.

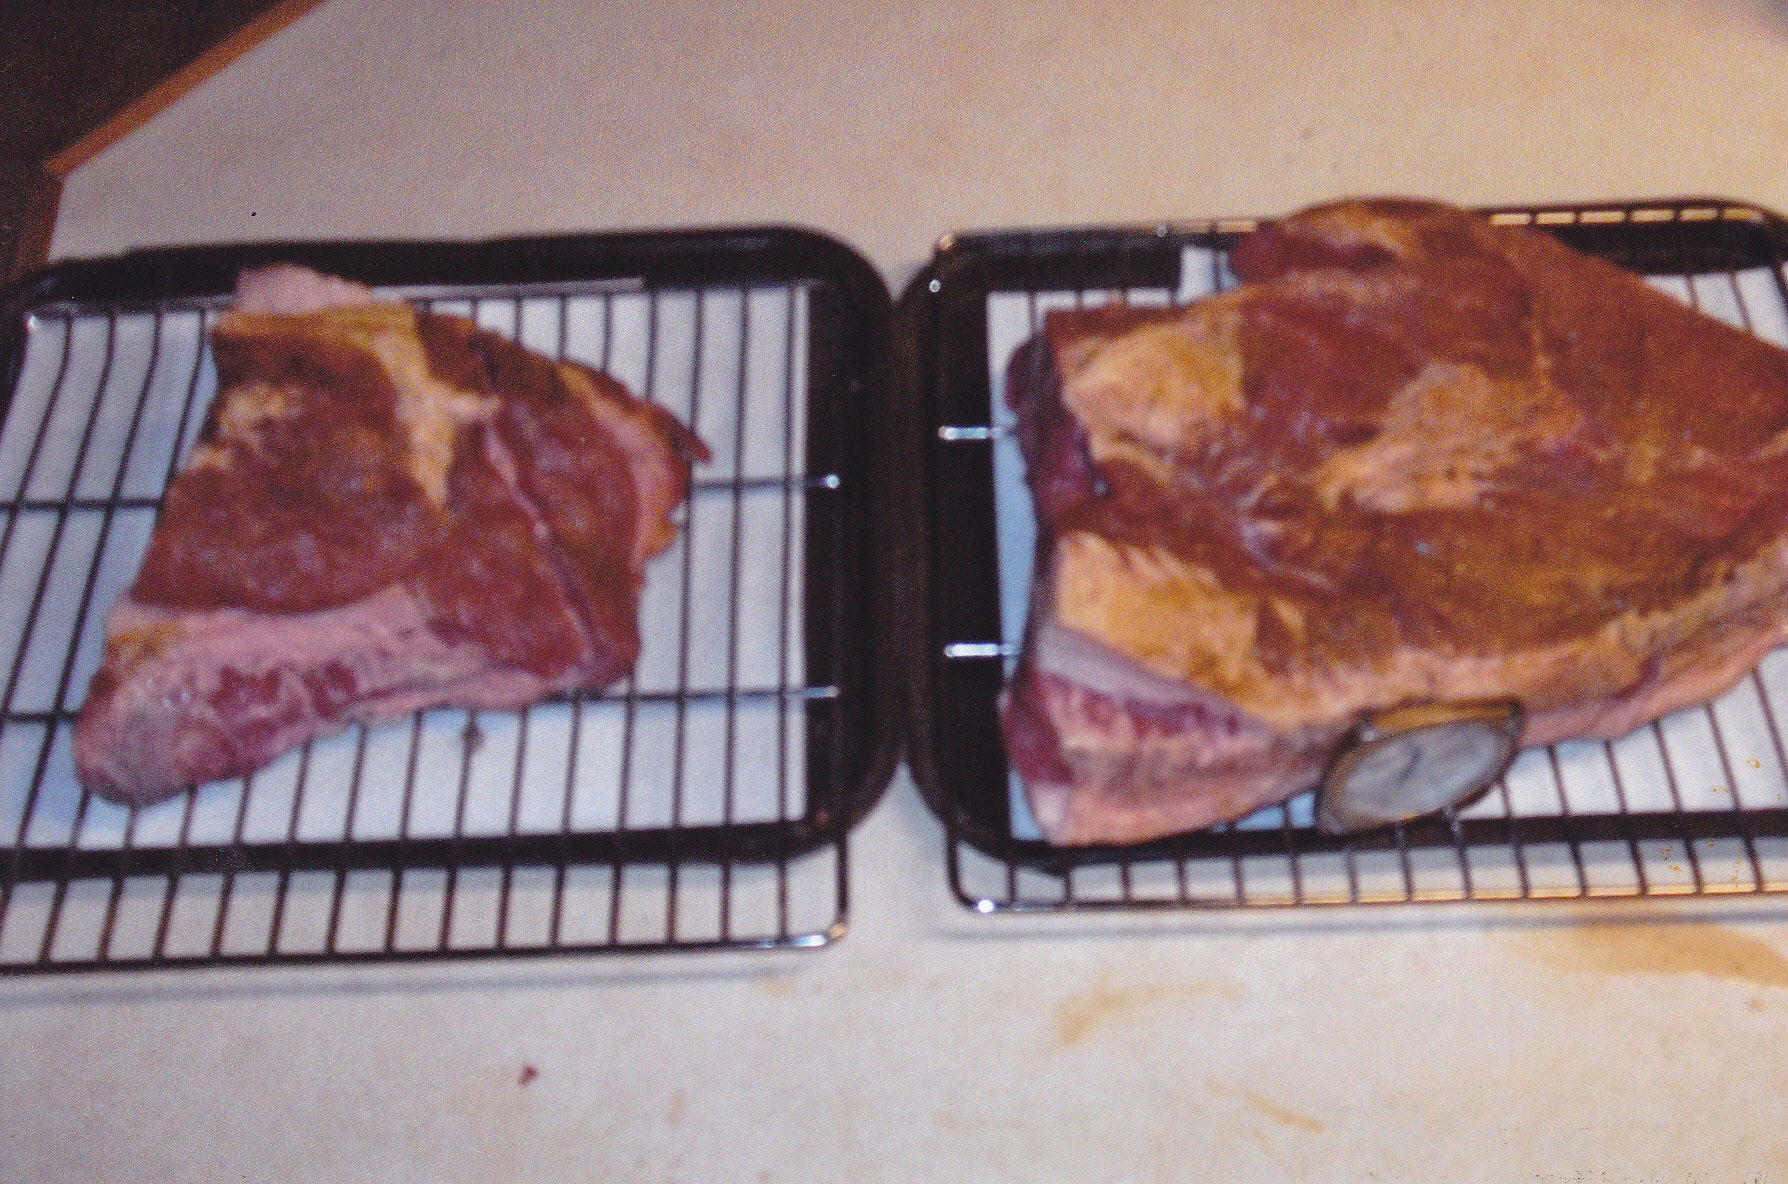
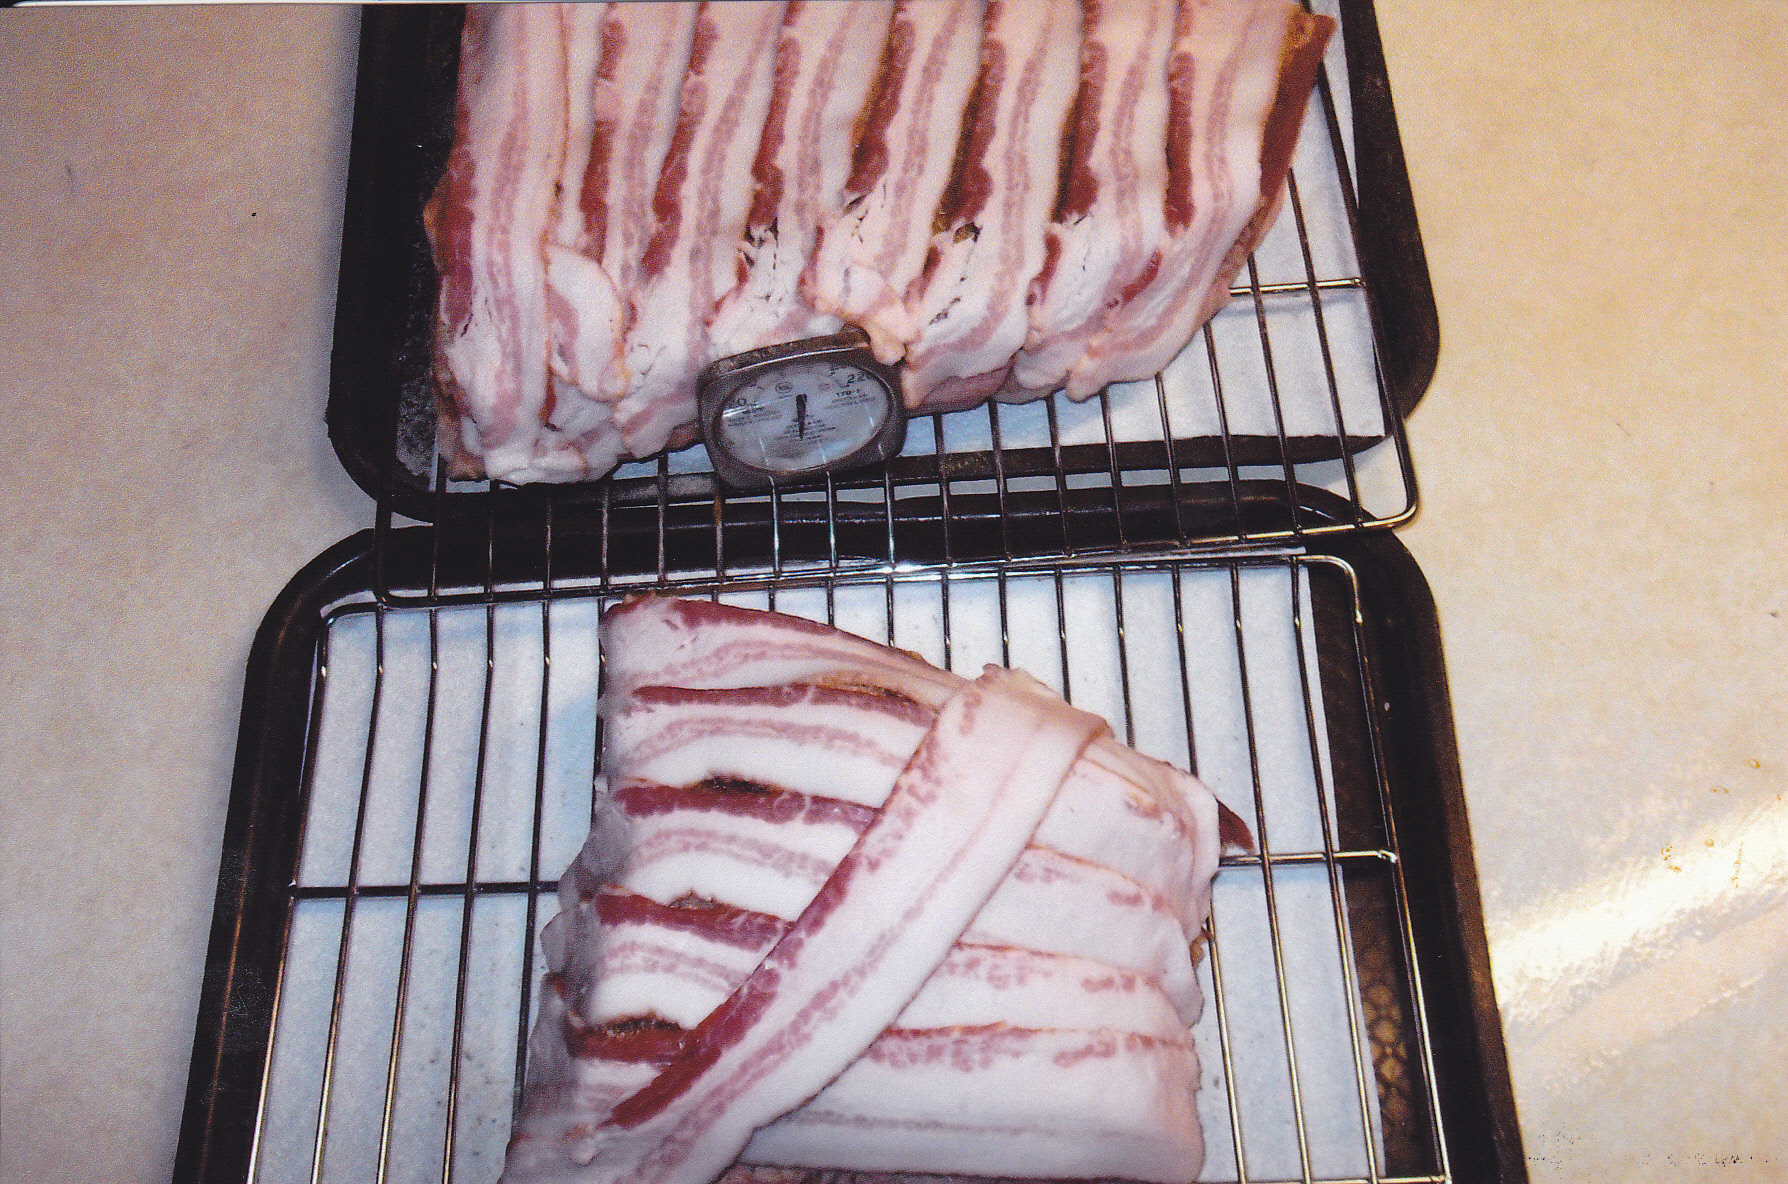
No fat cap so I created one, with bacon. Can’t go wrong with bacon. Helped to keep the meat moist.
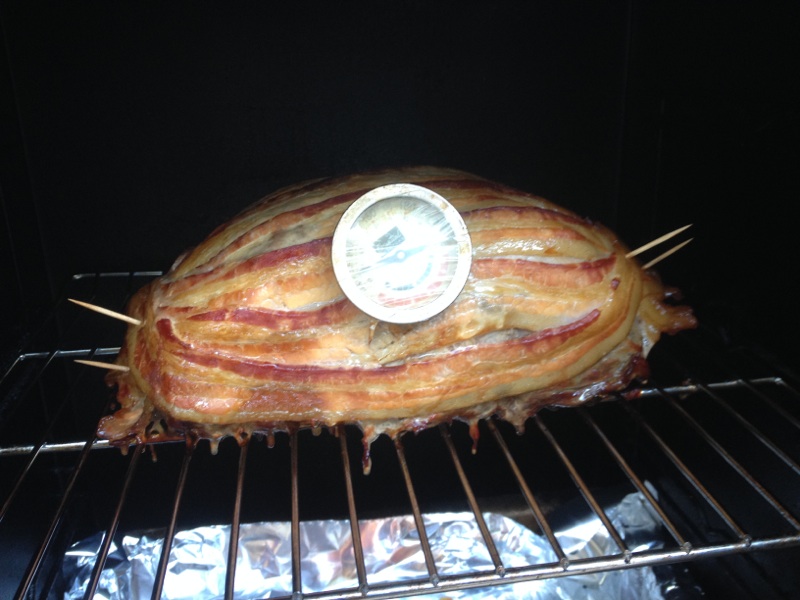
About 3/4 way’s done here. Waiting for an internal of about 130 deg. Still old school with the standard meat thermometer. Planning to get me a digital soon.

Starting to slice the roast.
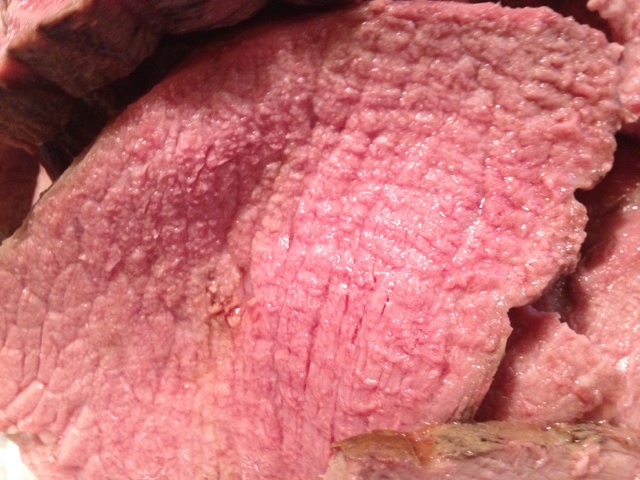
Turned out nice and pink in the middle.
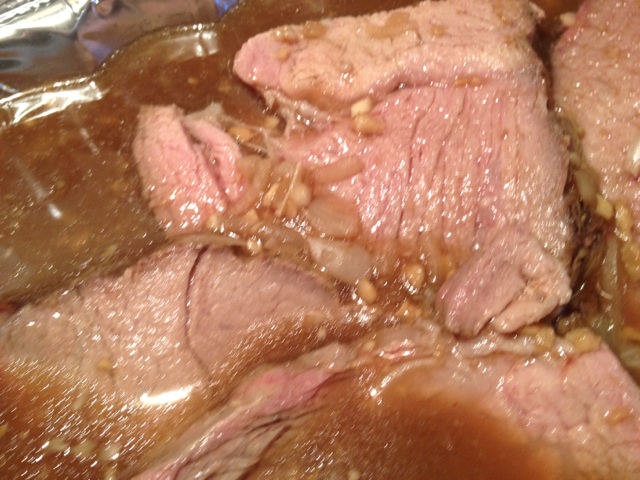
Put the slices in the aujus. This is important with any lean meat. Otherwise the meat can get dry. I even do this with prime rib.
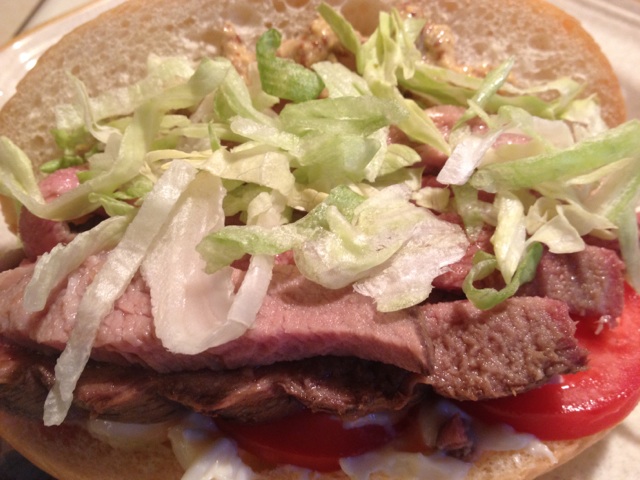
Finally my hoagie is ready to go. Turned out real nice and tasty.
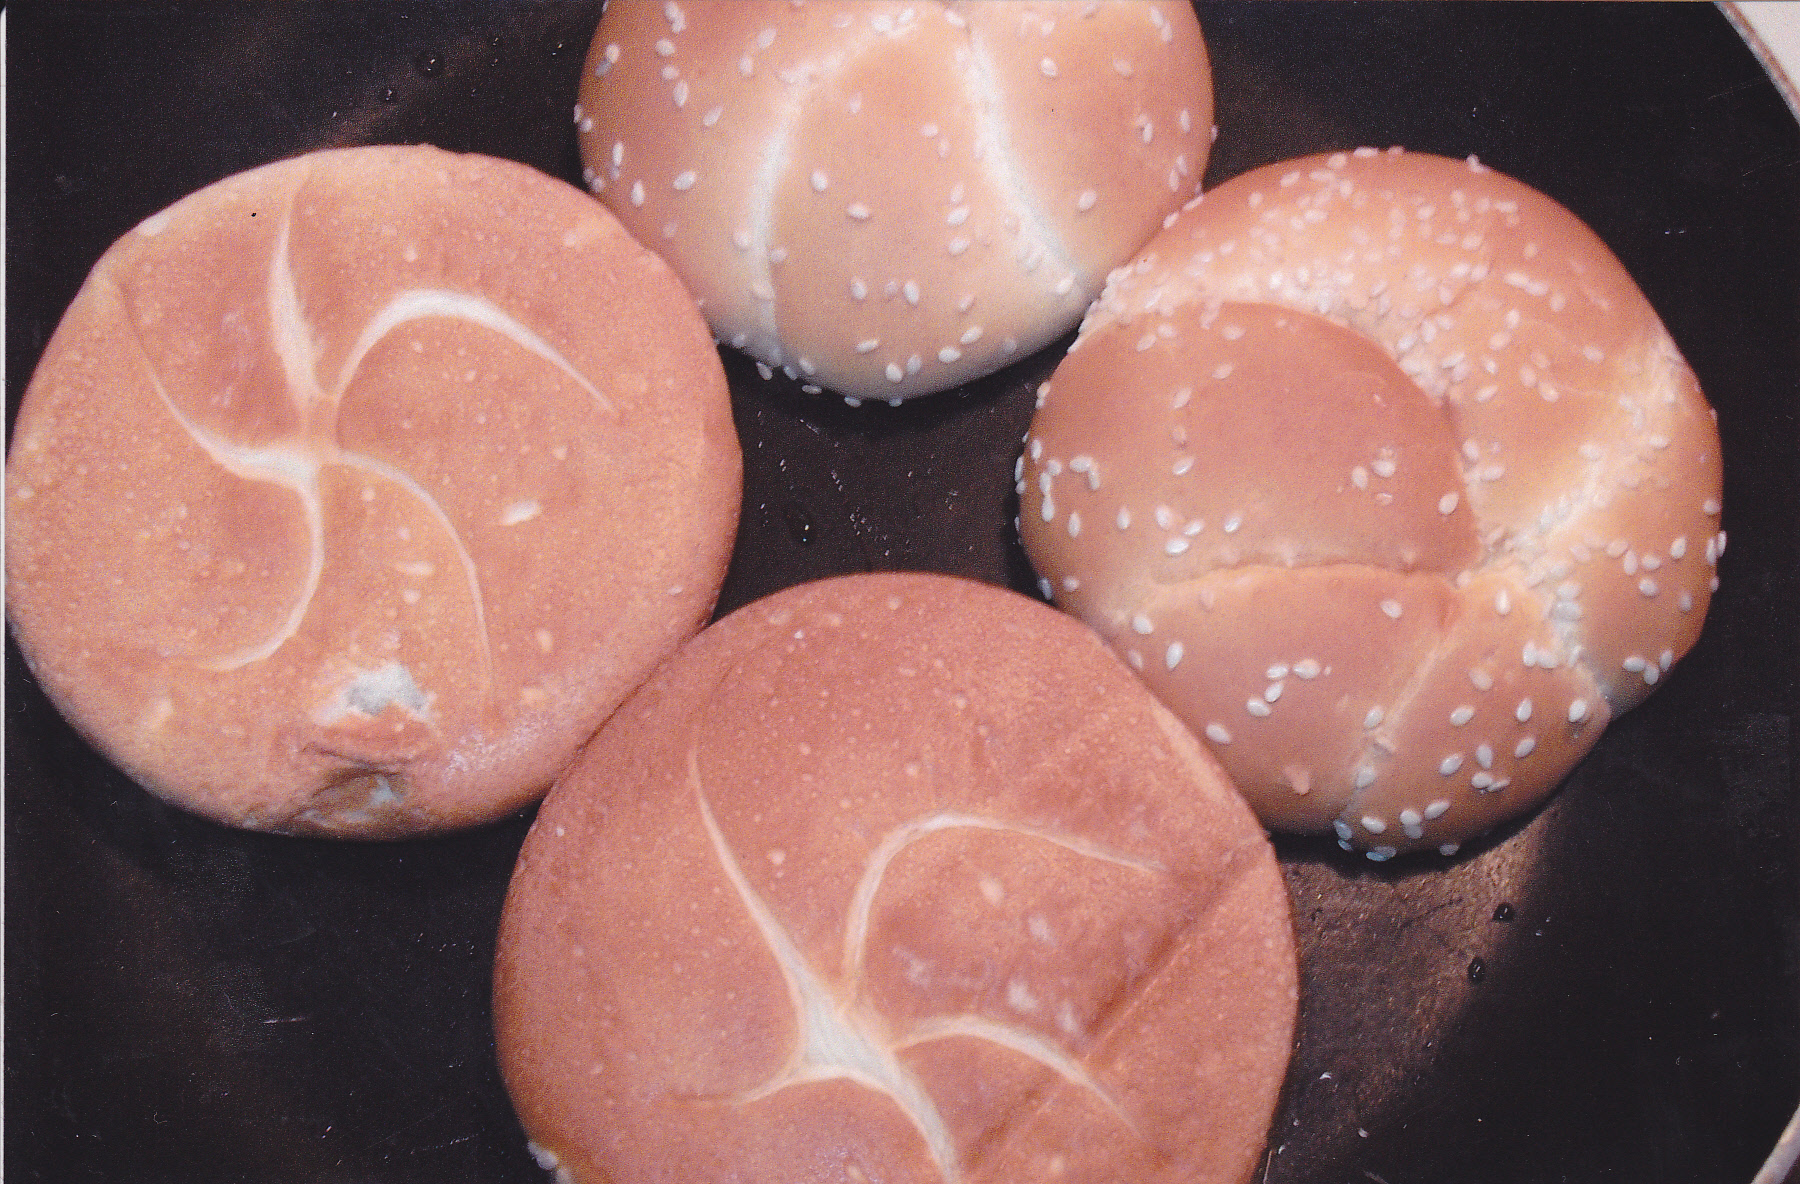
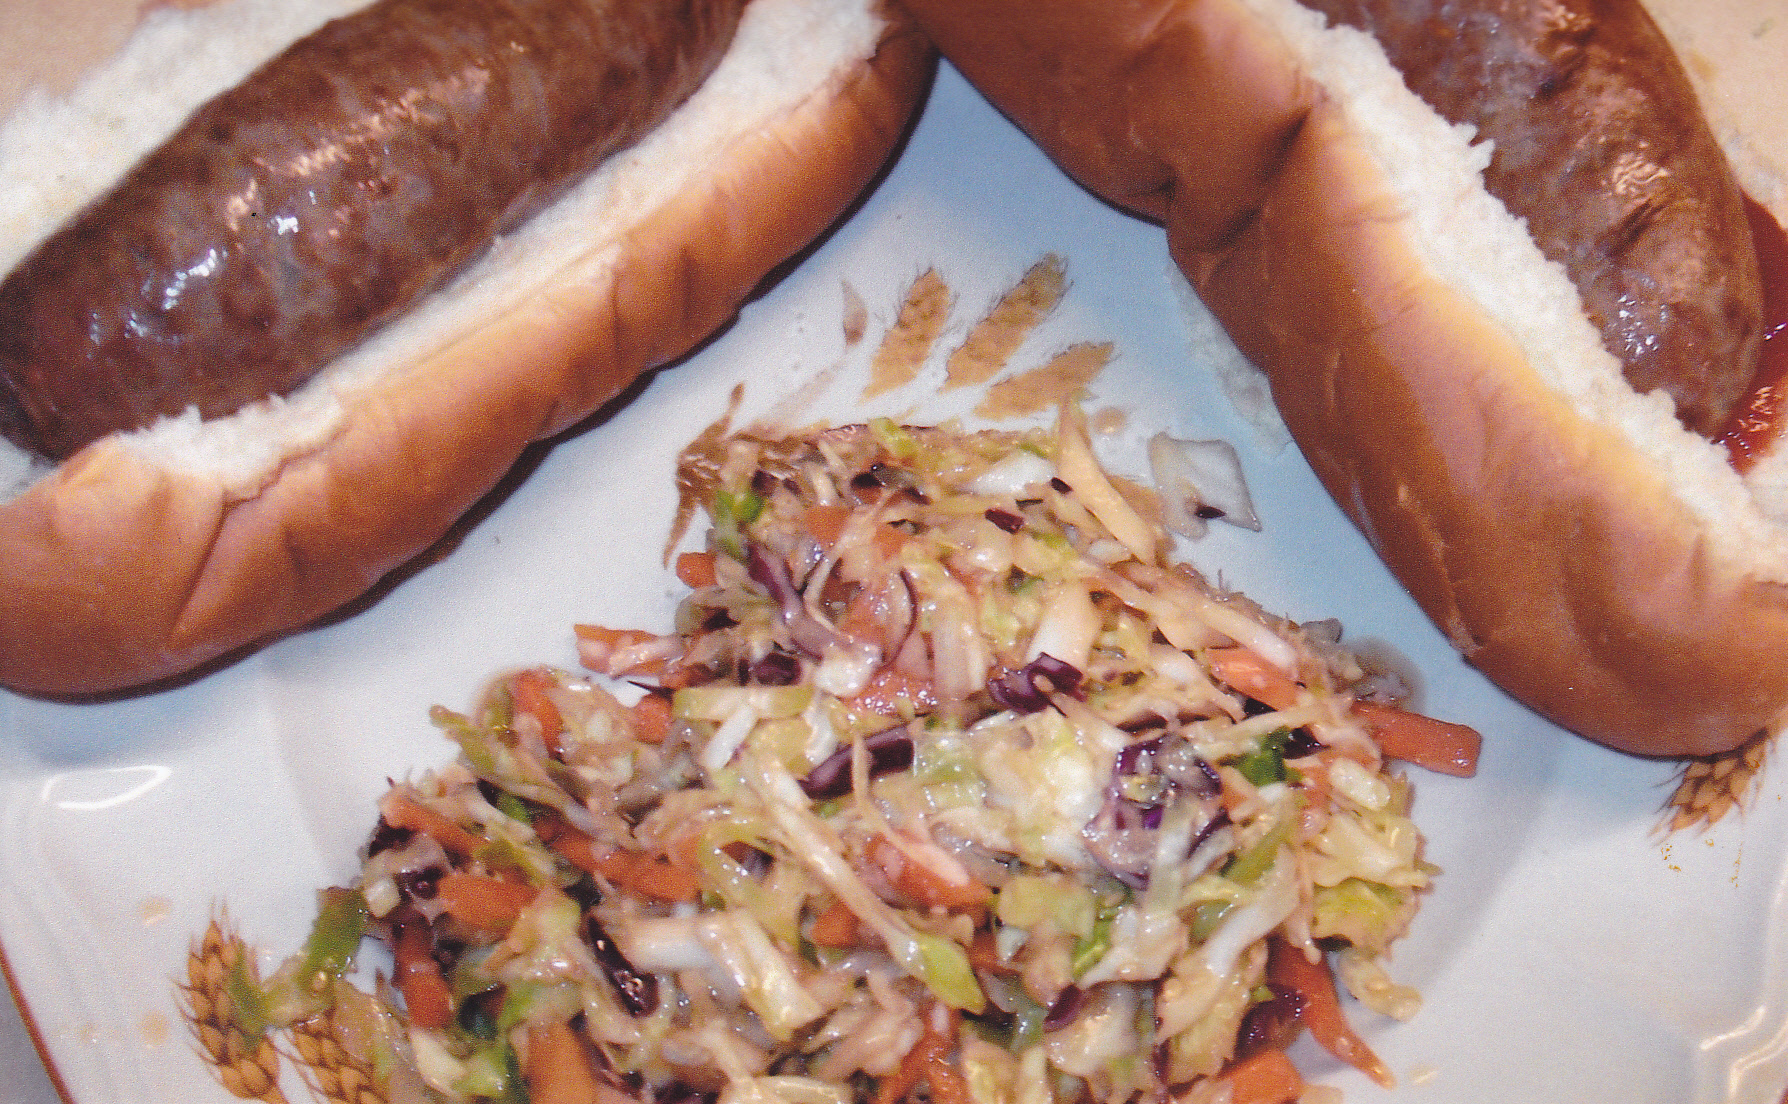
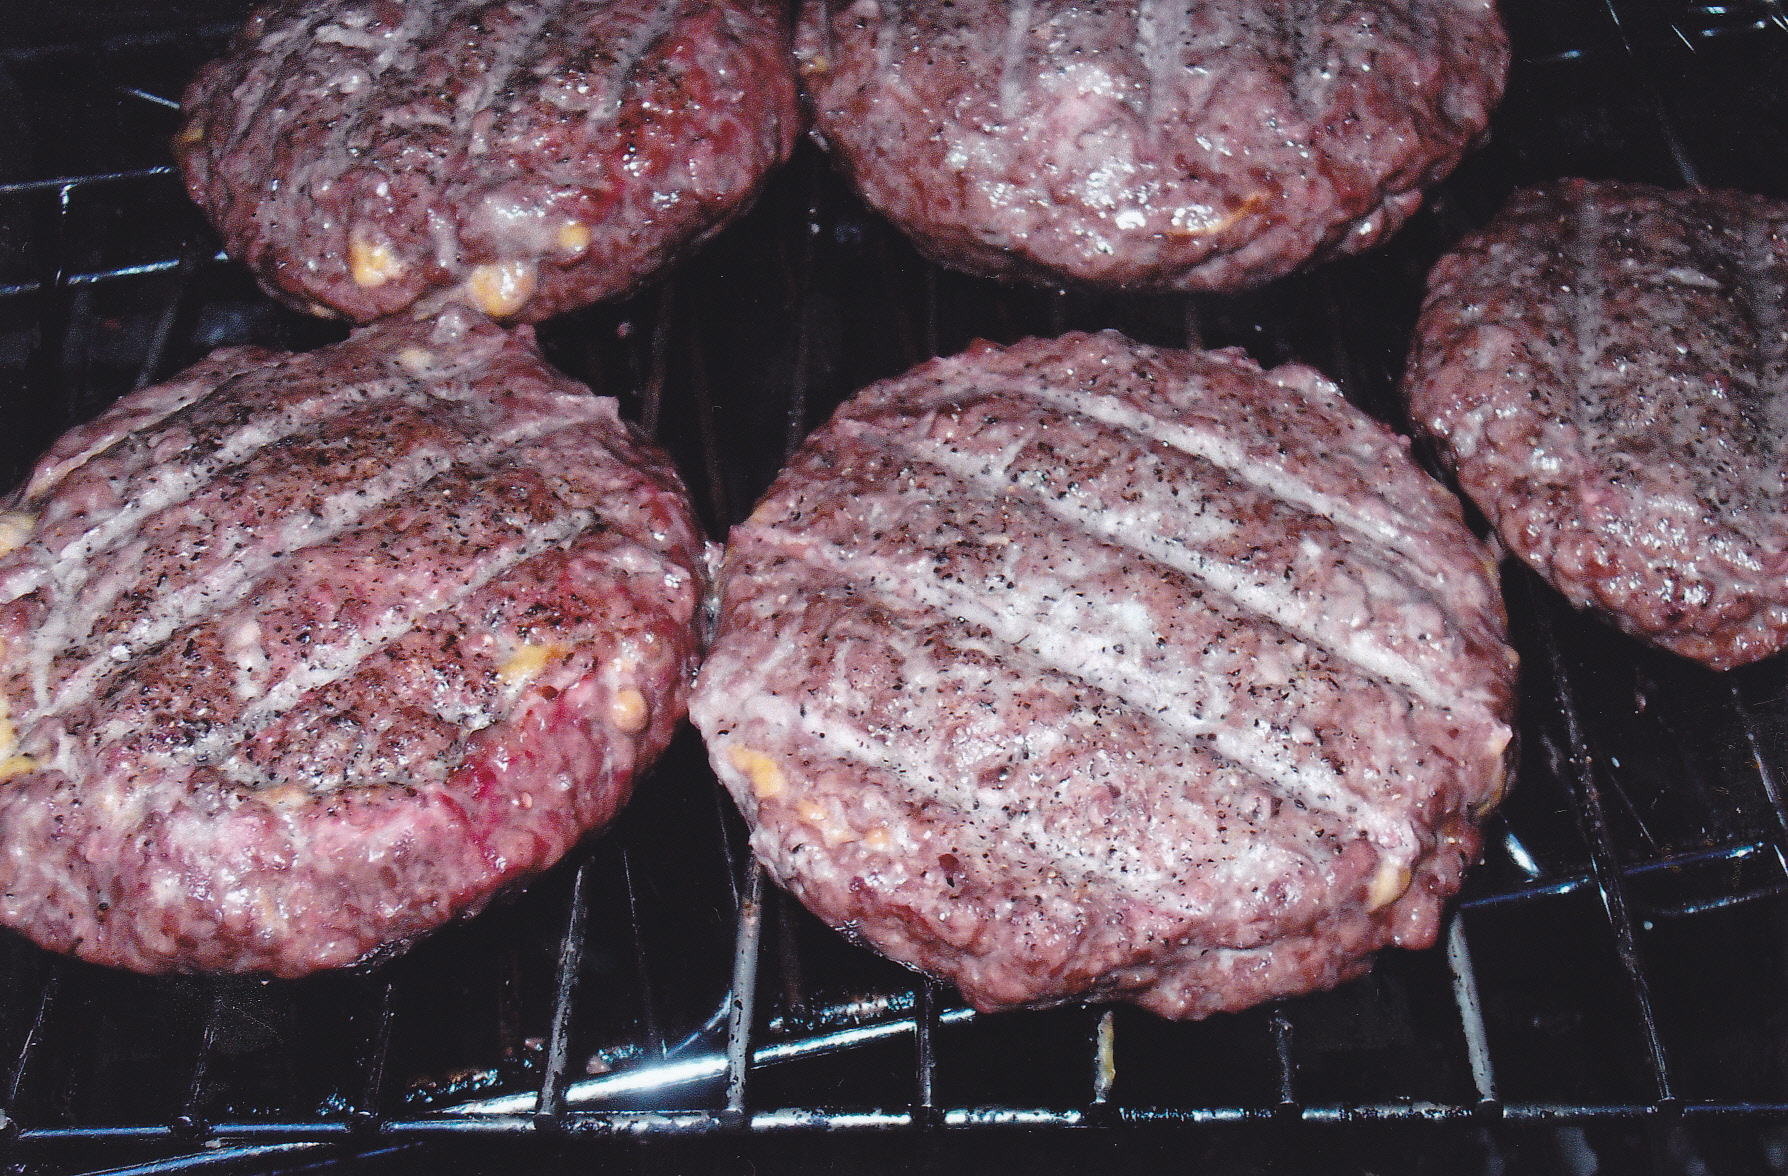
BEER CAN BURGERS
This could be your favorite burger to make!! Certainly is mine. It’s like a Juicy Lucy but without the extra patty. Best part is, you can put in your favorite filling in your burger and make someone else’s burger to their liking. Better yet, show them how to make their own. These can be done in the smoker, on the grill, or even in your oven [just make sure you have a drip pan under the burgers]. Here is how I made some a couple of days ago:
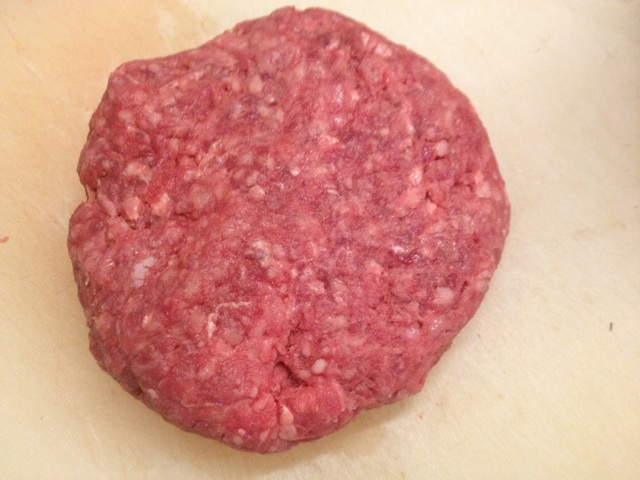
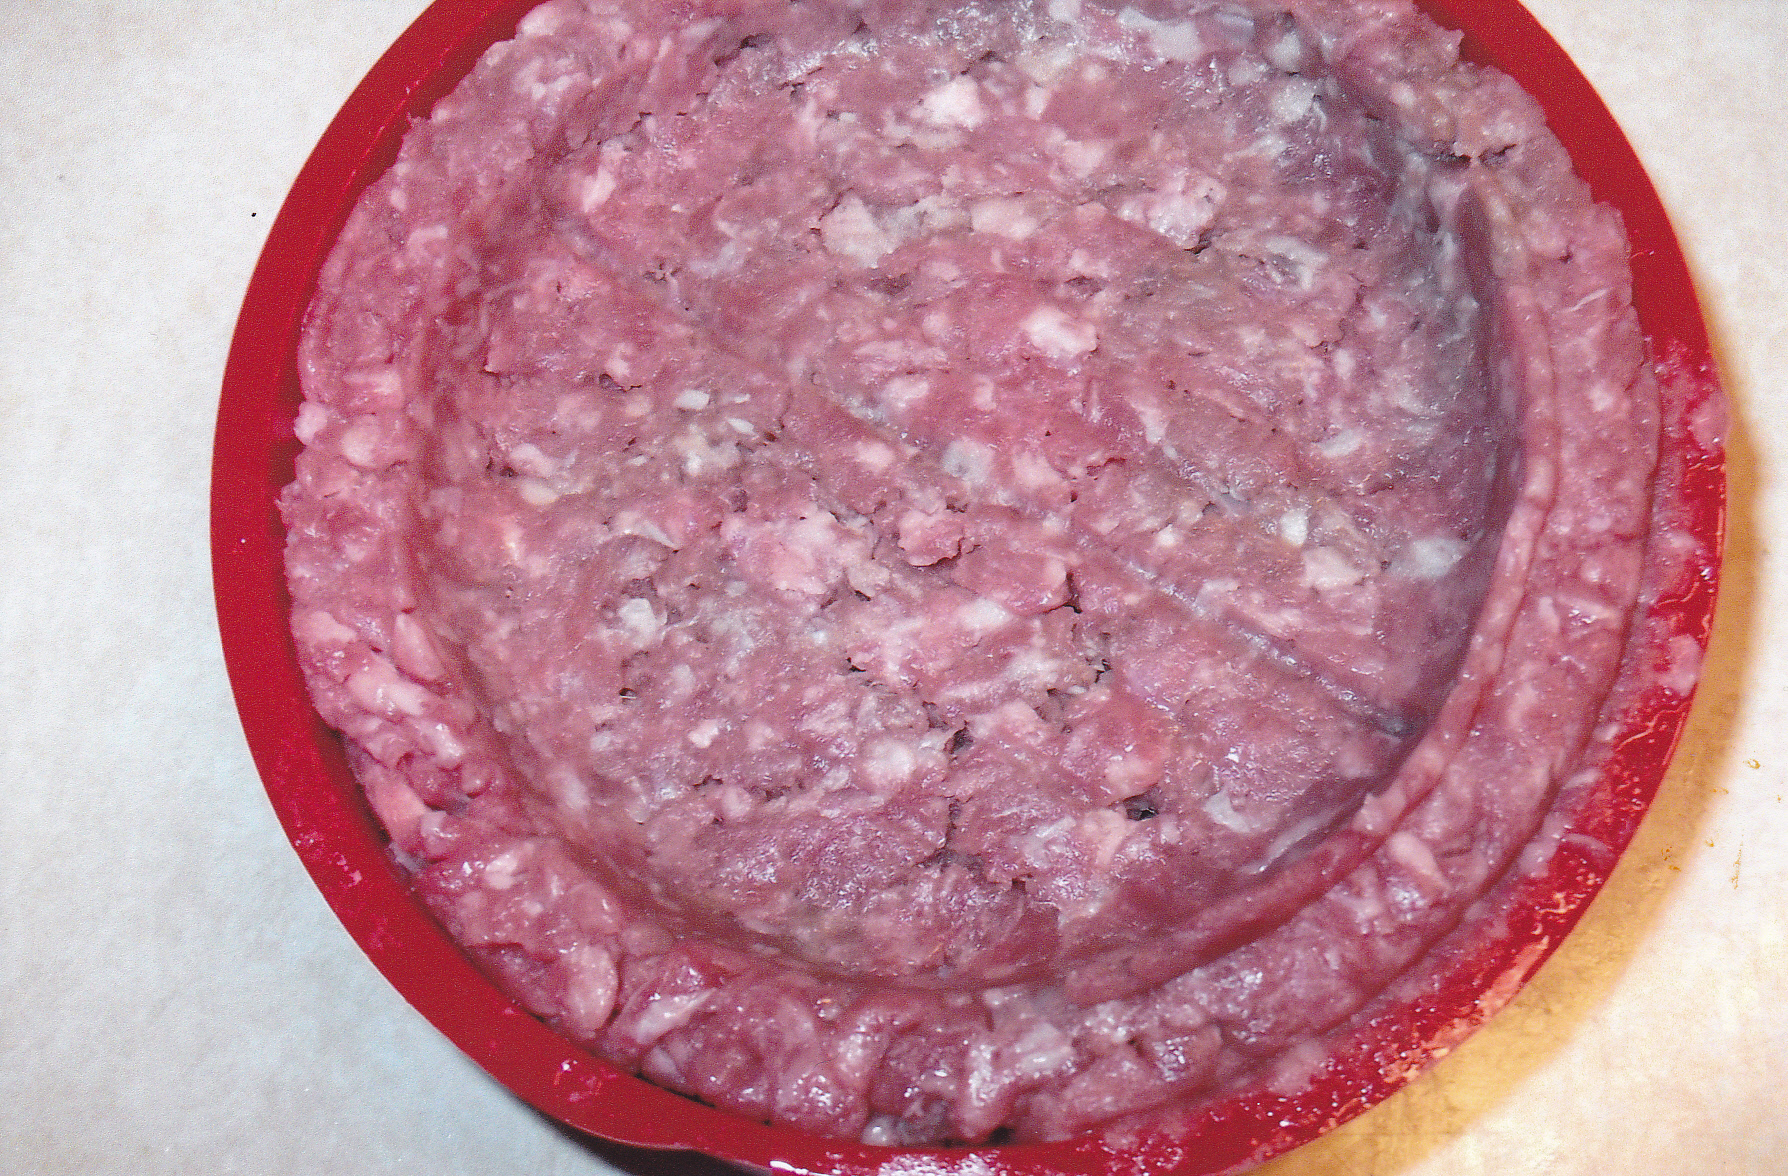
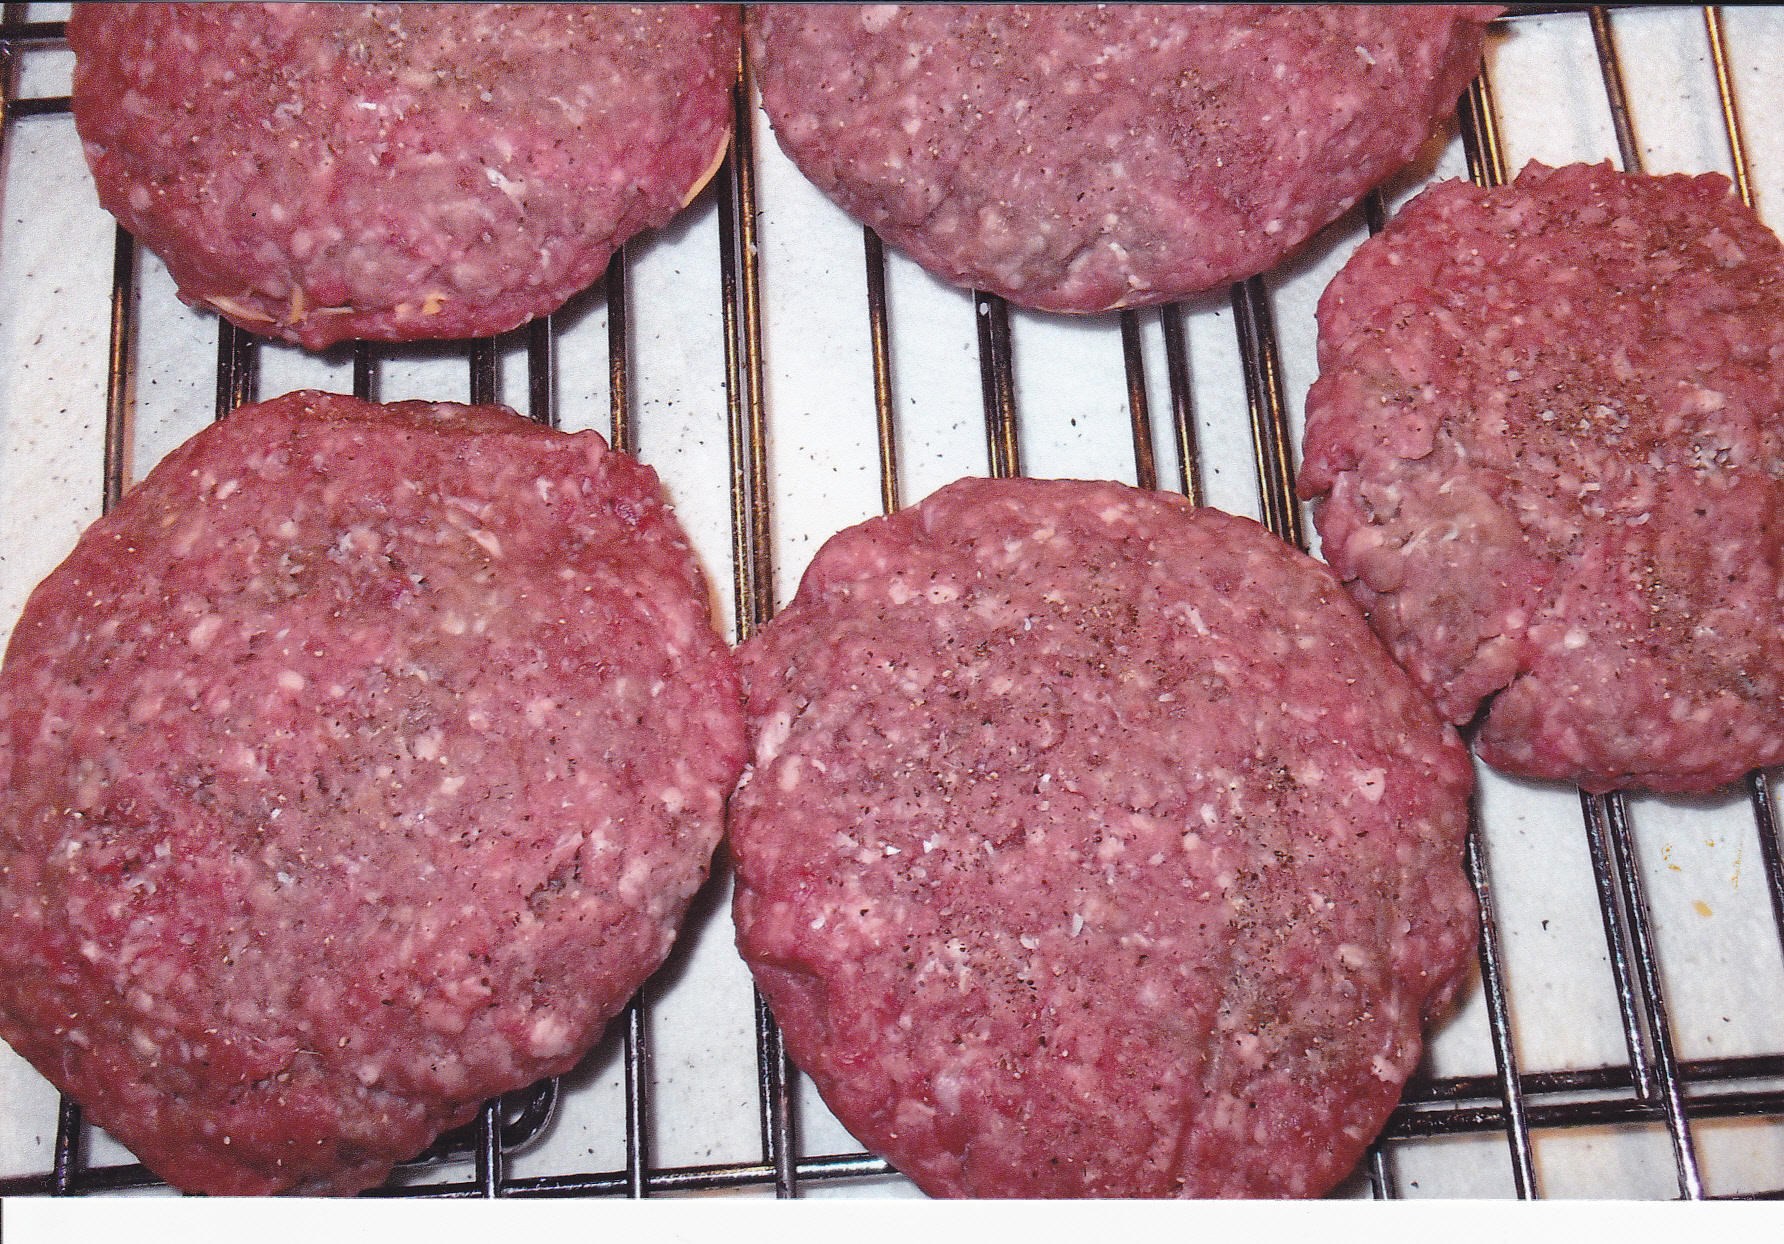
Start off making your own patty by hand like I did here.
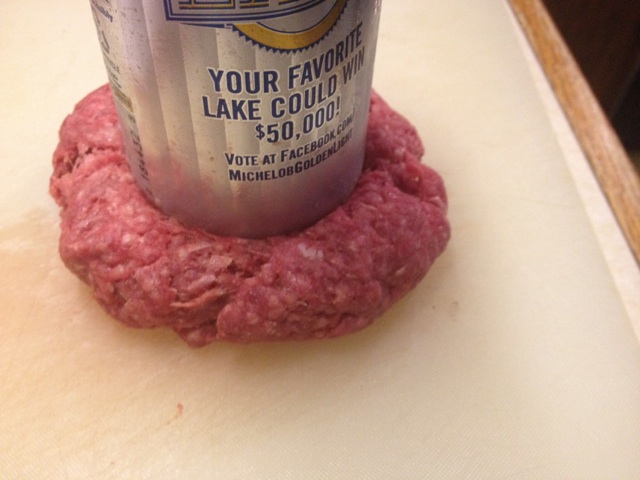
Take a beer can and press down the center like this about half way to the bottom.
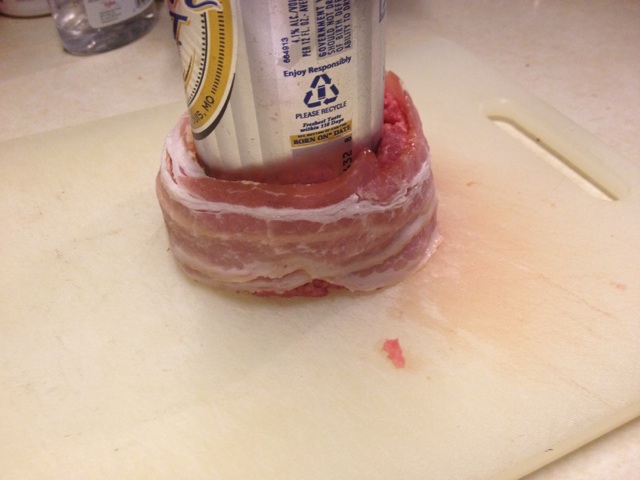
After pushing the beer can down half way, form the meat up the can some to form a bowl. Then take a strip of bacon and wrap it around the burger.
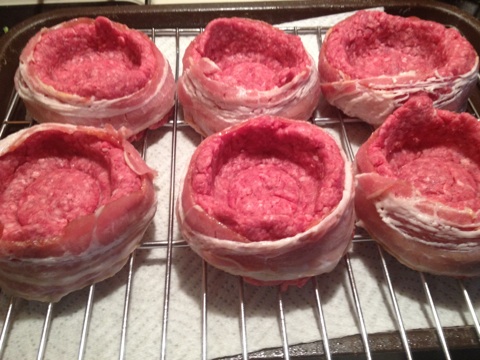
Here you can see the six burgers I made with the strip of bacon around them.
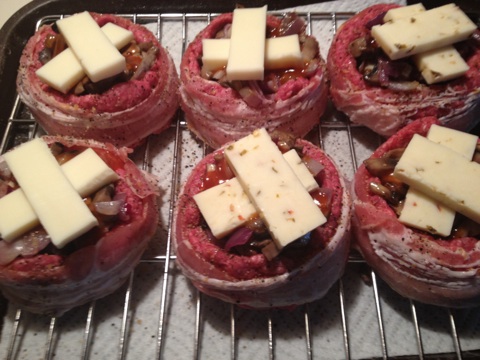
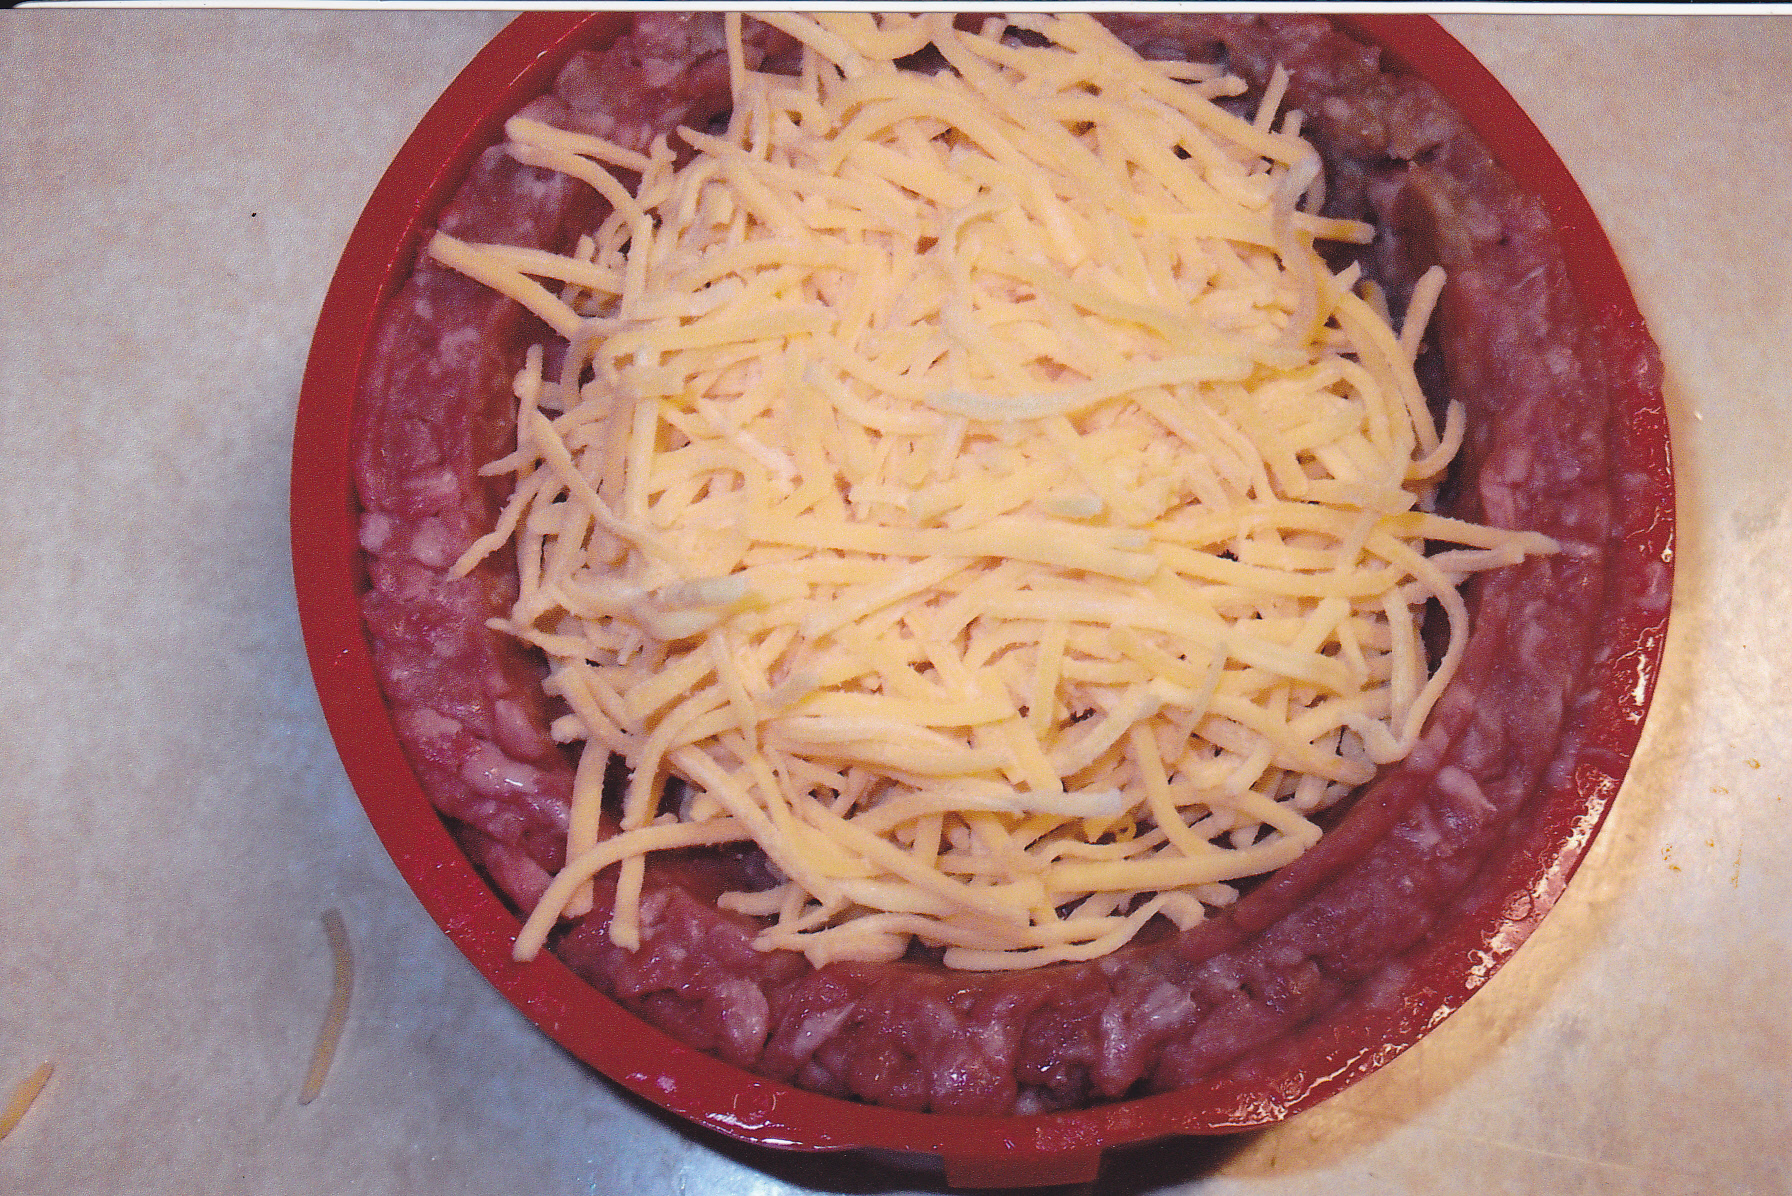
Ok, now comes the fun part. Filling the burger. This time around I fried up some onions and mushrooms. I put a tablespoon of my Reinhards Caught A Buzz sauce in the bottom of the bowl and added some mushrooms and onions. Then a couple of chunks of pepper jack cheese and added some more mushrooms and onions. Topped that off with another tablespoon of my sauce and a couple of strips of pepper jack cheese.

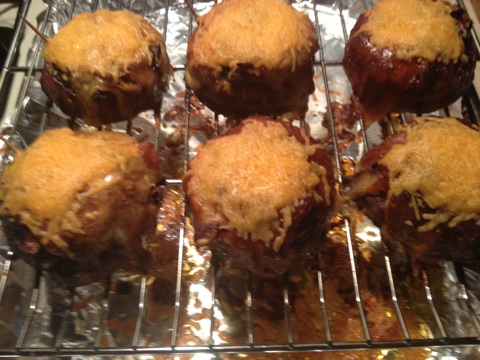
Popped the burgers in the smoker. Had the temp set at 270. Here they are almost done.
Figured I had 5 minutes more to go on the burgers so I could not help myself and added some cheddar cheese on top of the burgers.
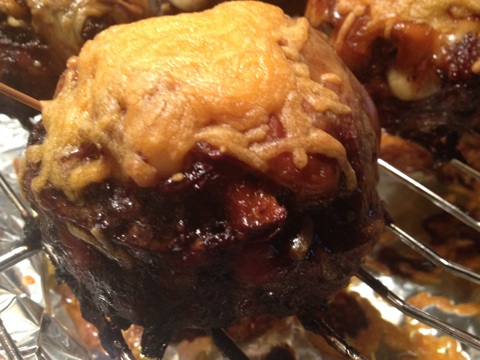
And that’s what a beer can burger looks like when it’s done!!
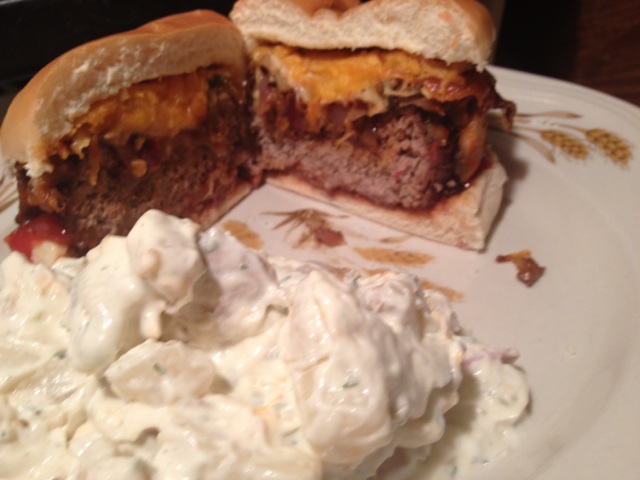
Some homemade potato salad and a beer can burger. That was a meal!!! Give one a try!!
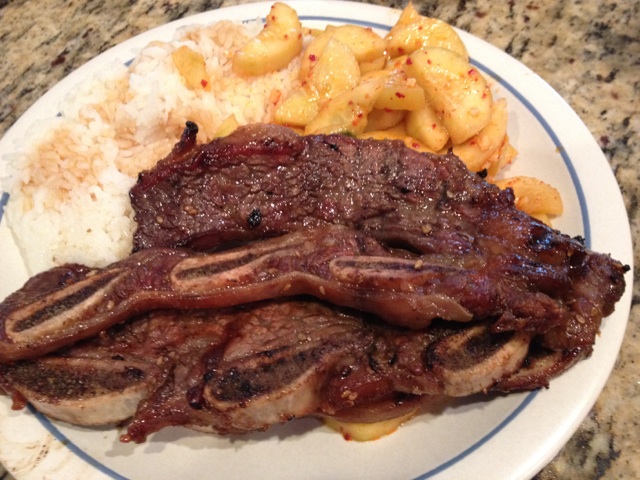
NEW YORK STRIP ROAST [ BONE IN ]
Most of us have had strip steaks on the grill for years. However I would bet having a strip in roast form is not used as often. The store I shop at had bone-in strip roasts or steaks on sale so I bought a 4 pound strip roast. I figured I would make it the same way I make a rib eye roast. Here is how I made it:
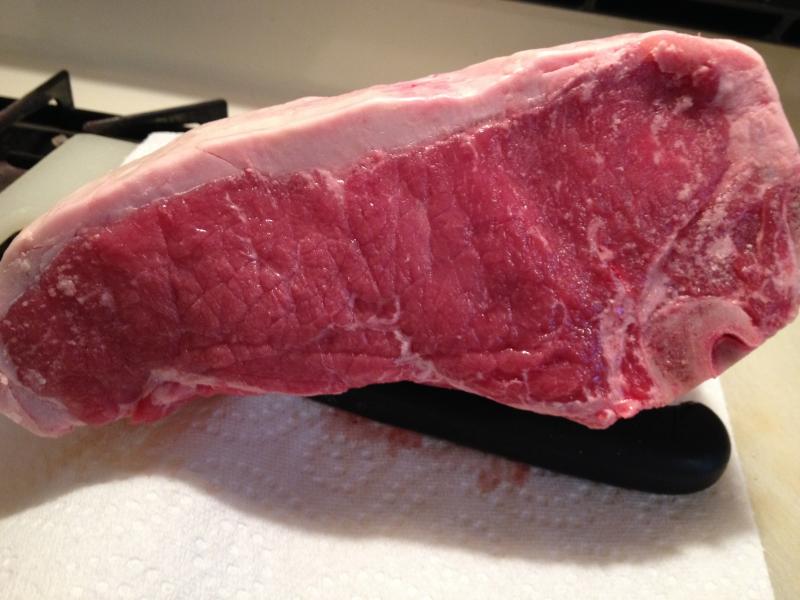
Here is the roast. I let the roast sit on the counter at room temp for an hour or so. I don’t like to put a roast in a smoker or oven cold out of the fridge. Make’s for a shorter cooking time.

I injected the roast with beef broth mixed with garlic and butter. This helps with the flavor and moisture. I just put some salt and pepper along with diced garlic outside the roast. Strip roasts [like the steaks] are mostly on the lean side so it’s important to not over cook it and watch the internal temp to know when to take it out and let it rest. I set the oven to 425 deg and put the roast in there at that temp for one hour to sear the roast [ to help retain the internal juices]. Then after the hour at the higher temp I turned the oven down to 225 deg and waited for the internal temp to hit around 130 deg. Then I take the roast out and let it set under foil for 15 minutes. This helps in distributing the juices.
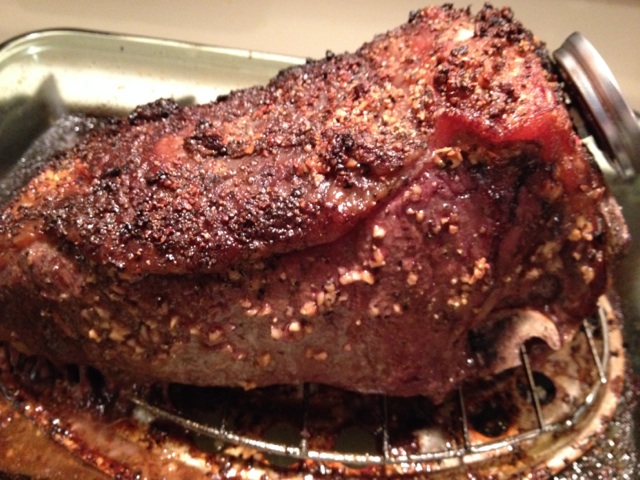
Pulled the roast out after the internal temp hit 130 deg. If I were to do this in the smoker I would have put the roast in the oven at 425 for the first hour and then put the roast in the smoker at 225 until the internal temp is achieved. I would had a little cherry wood or apple chips also.

You can see that beautiful pink color in the meat as I start to slice it. Here are some more pics of the slices and the roast.
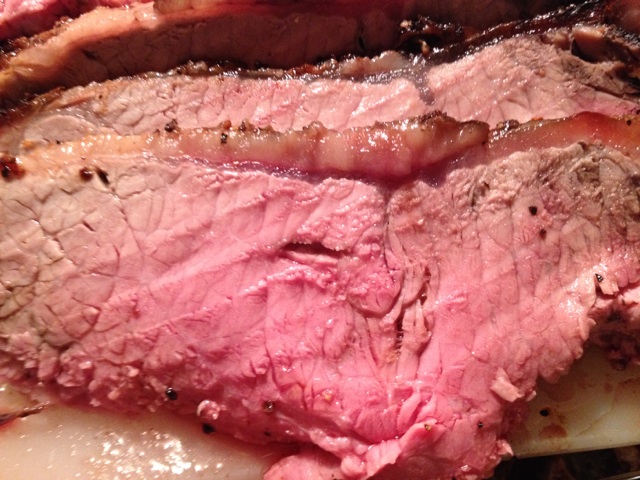

I sliced the roast on the thin side so I made up a simple au jus to keep the meat nice and moist. Just a package of Lipton beefy onion soup mix and a little extra garlic mixed in 4 cups of water. Simmered it up and put it in a baking dish and placed the slices inside. Try a strip roast when you see a nice center cut like this one. Very tasty!!!
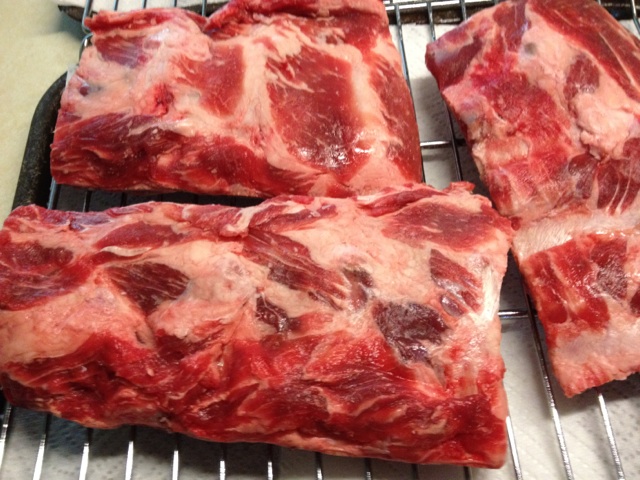
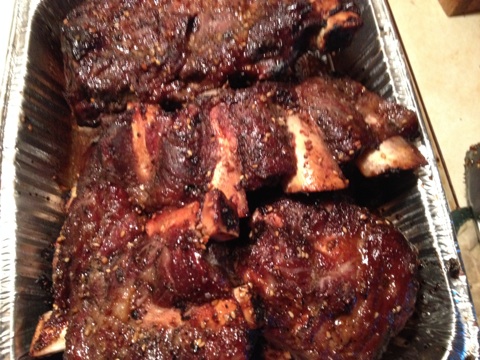
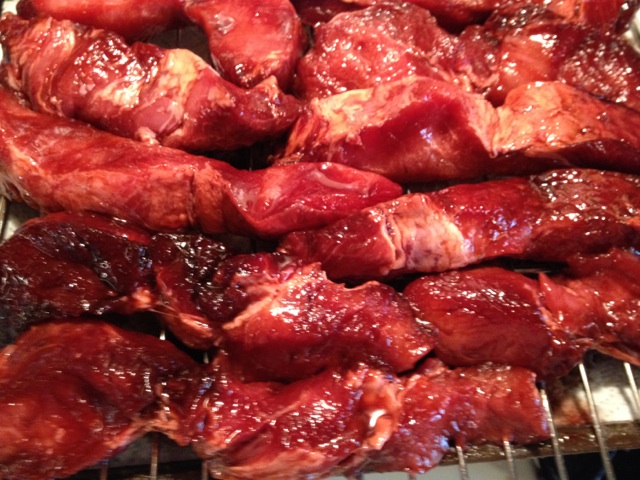
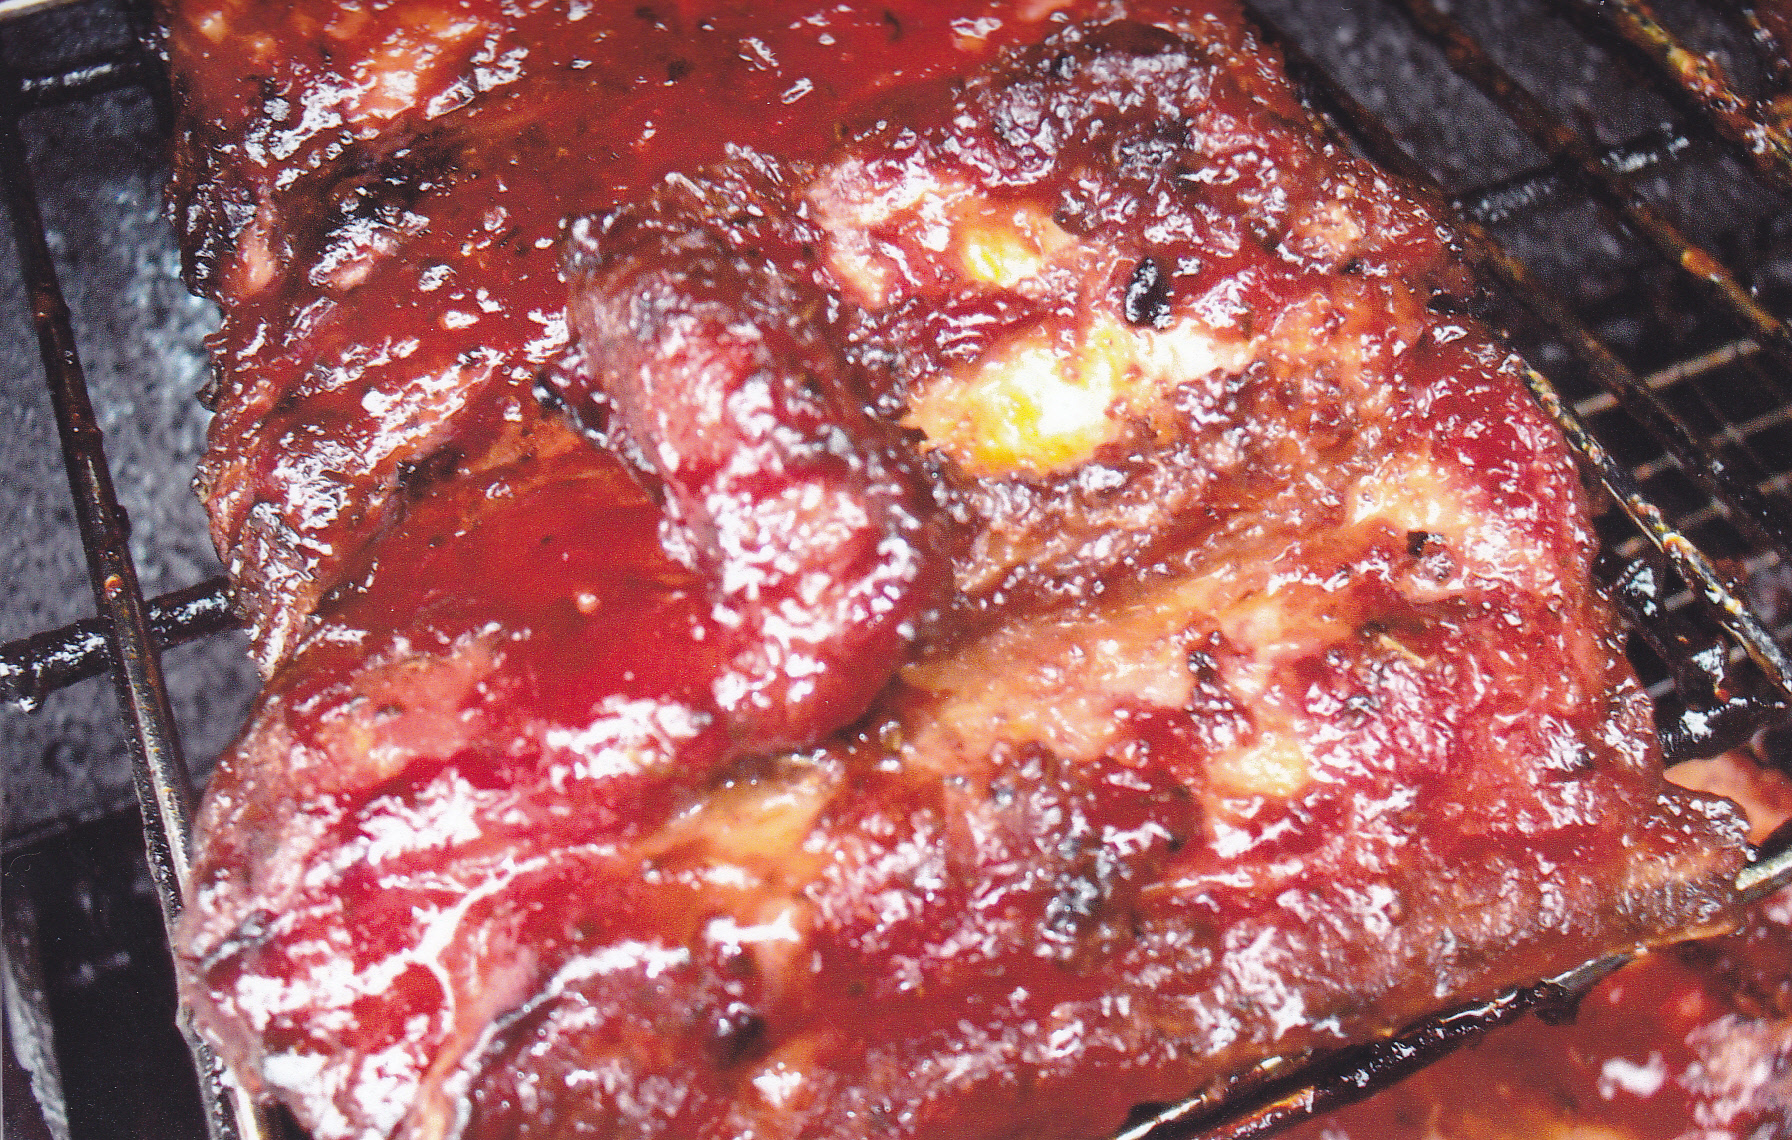
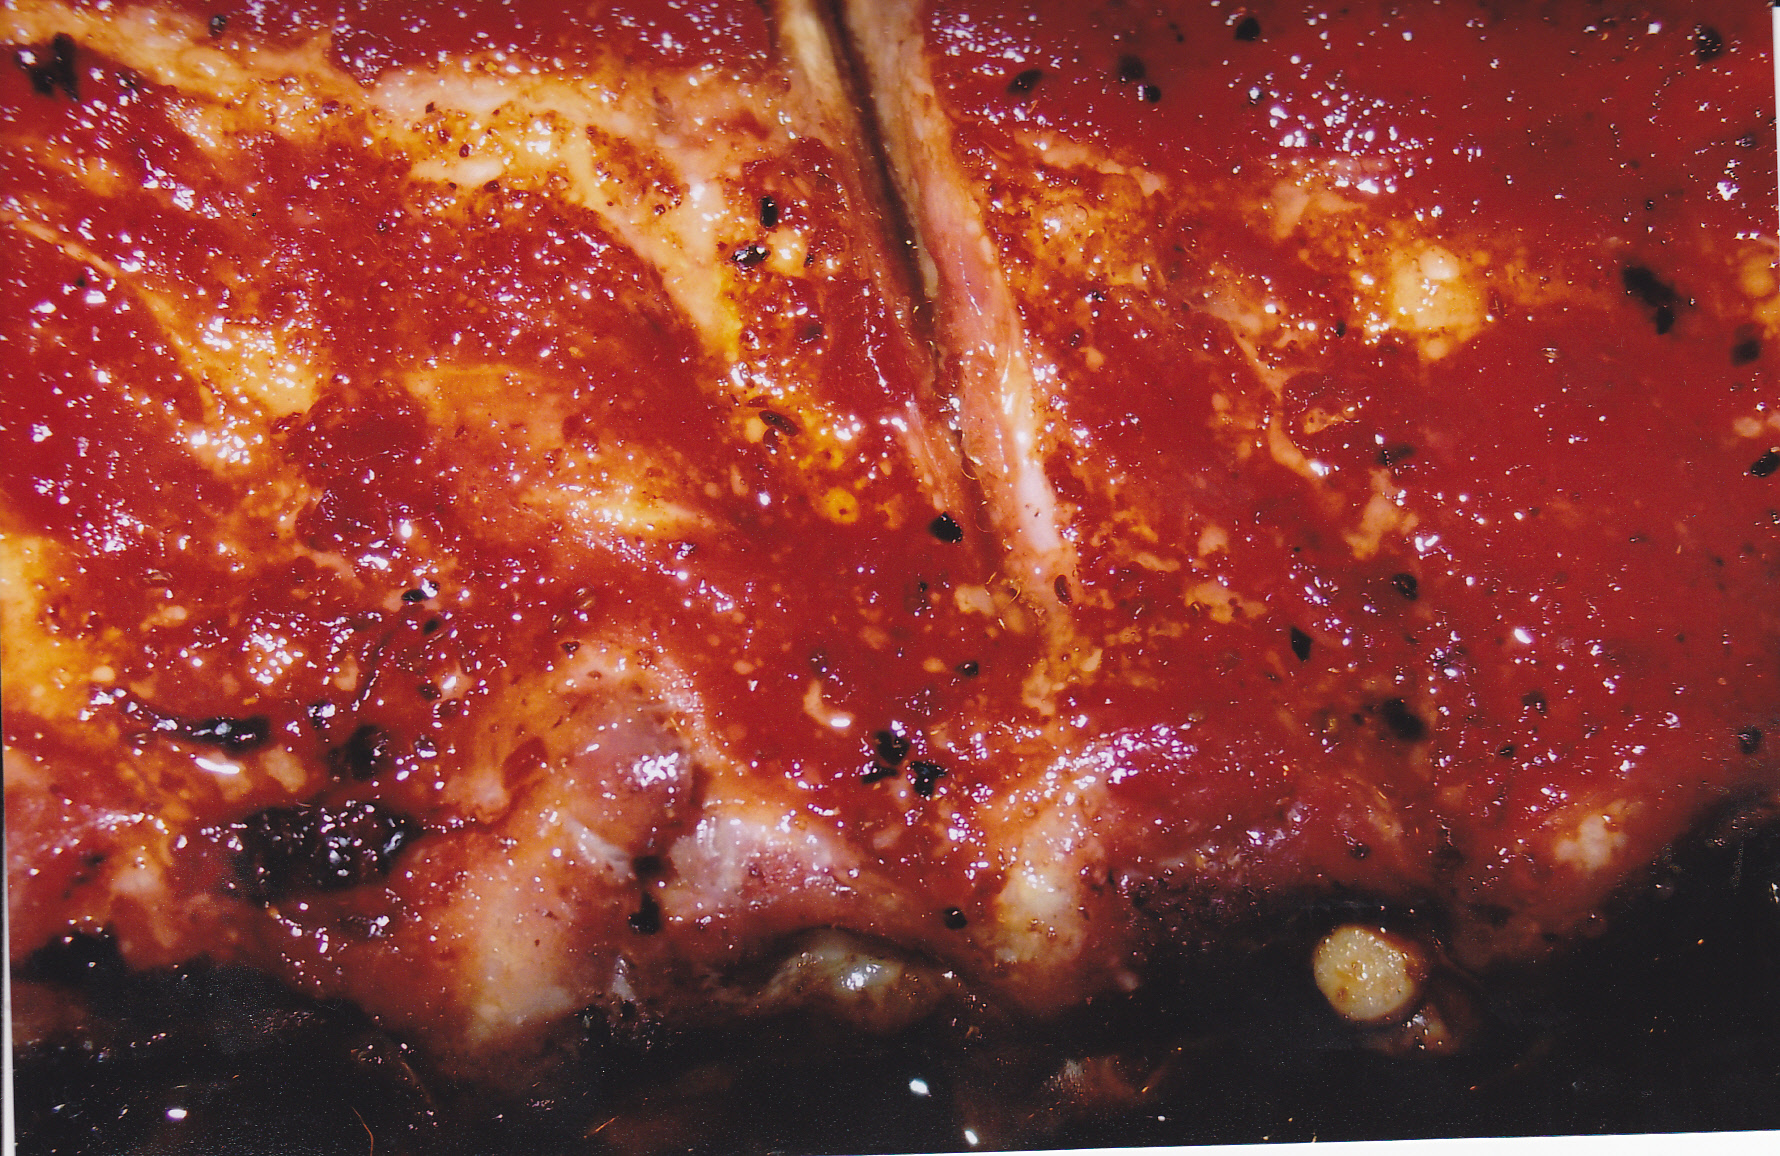
BEEF TEXAS RIBS
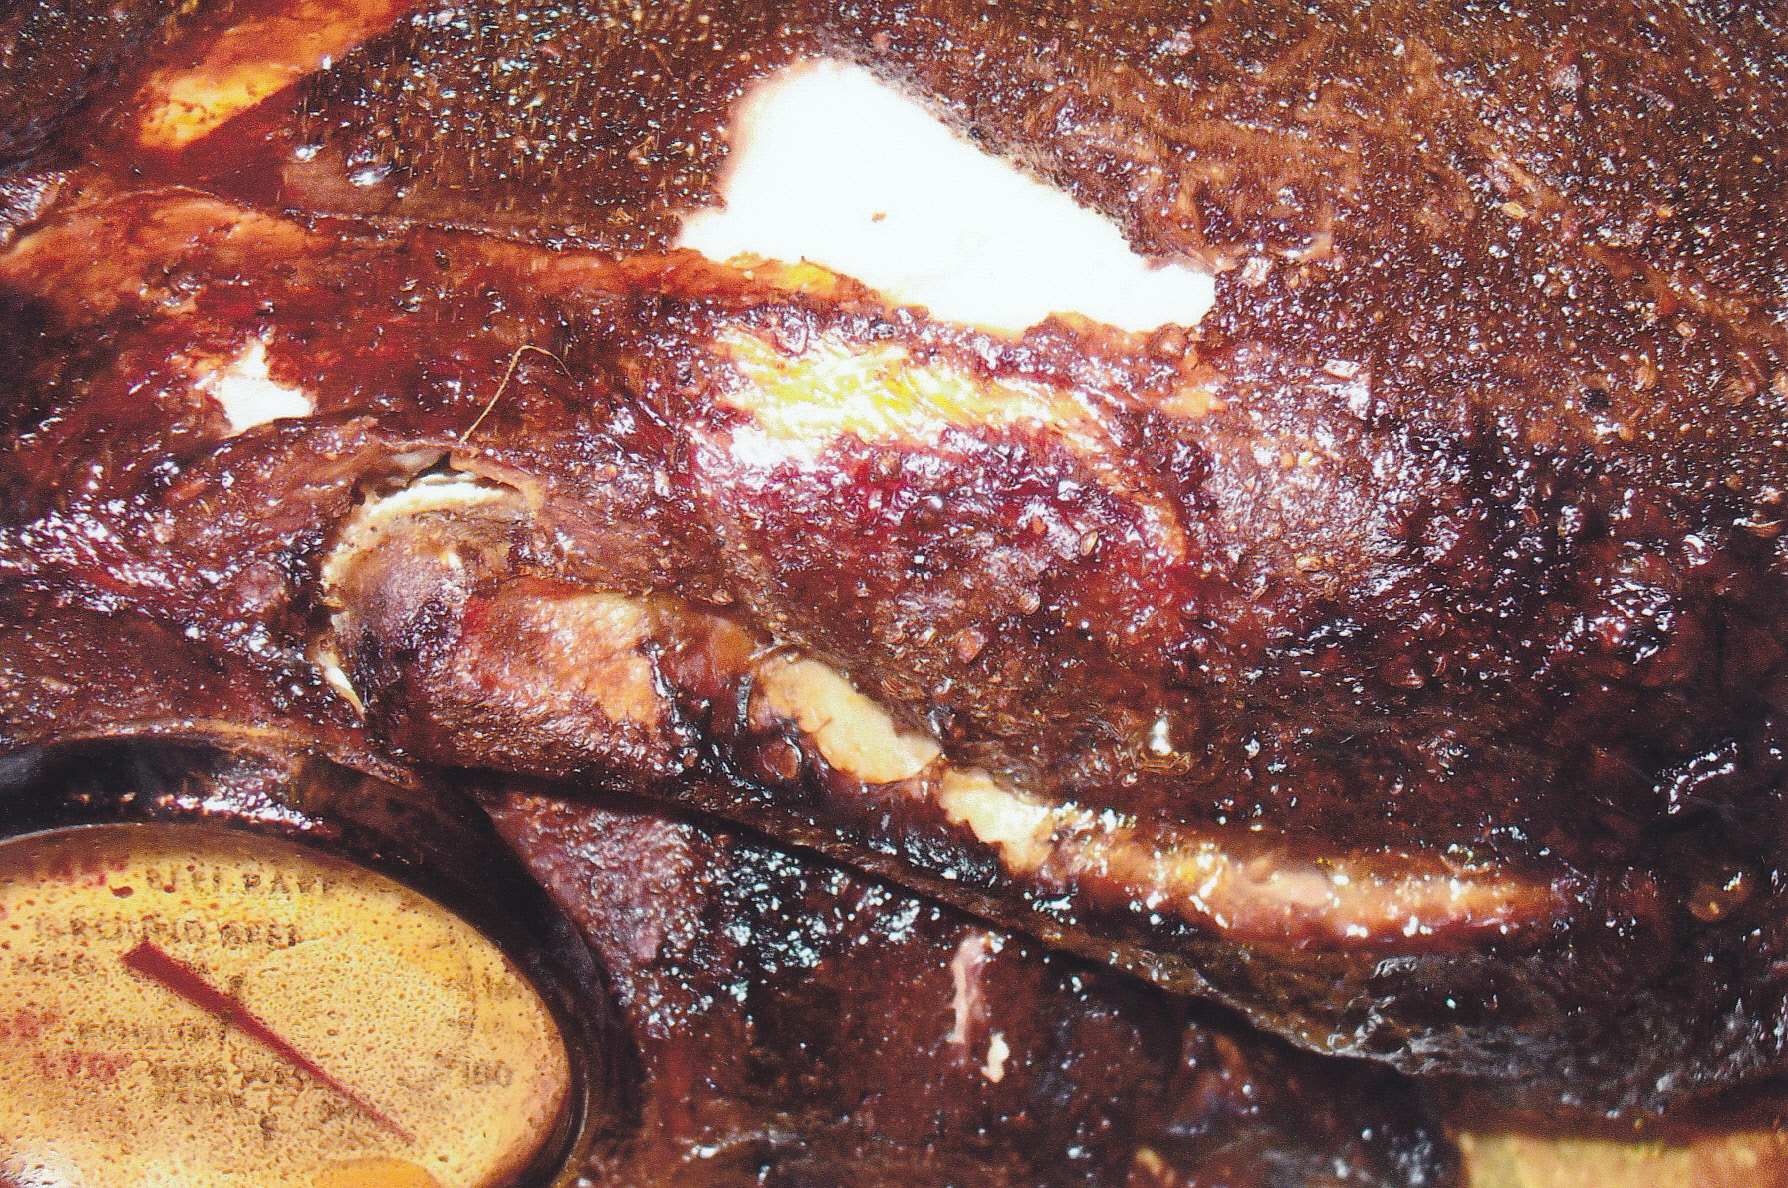
Otherwise known as beef back ribs, these ribs are very tasty!!! Sometimes however they are hard to find. Especially the one’s freshly cut off the prime rib or standing rib roast. Most of the time you will find them in the m
eat department whole or split in cryovac packs. The ribs in the cryo packs are not as meaty as the ones freshly cut off the rib roast, so you will have to eyeball them well to choose the packs that look like they have the most meat on them. The freshly cut ribs are those that the meatcutters cut off the standing rib so they can use the boneless rib eye for steaks.
Stores will have standing rib roasts on sale during holidays like Christmas and Easter for example. If they don’t sell all the roasts and have some left over after the sale, most meat departments cut off the ribs from the standing roasts and discount those ribs to move them out fast and sell the boneless rib eye as steaks at a reduced price. That is the time to look for them and stock up on them. That’s how I found these in the pictures below. However these I found just recently when they had rib steaks on sale and had standing ribs left over after the sale [August].
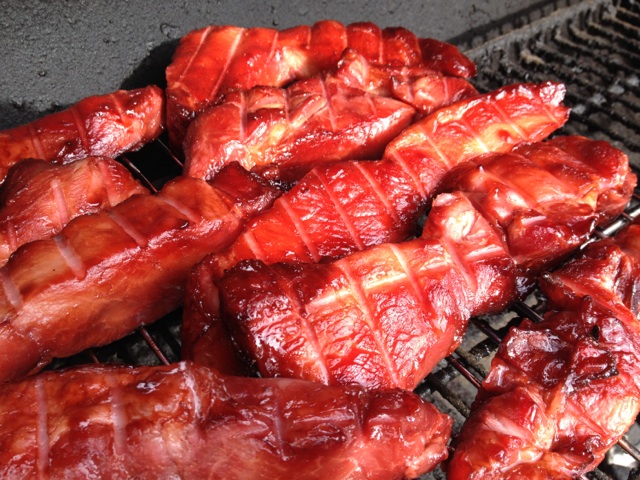
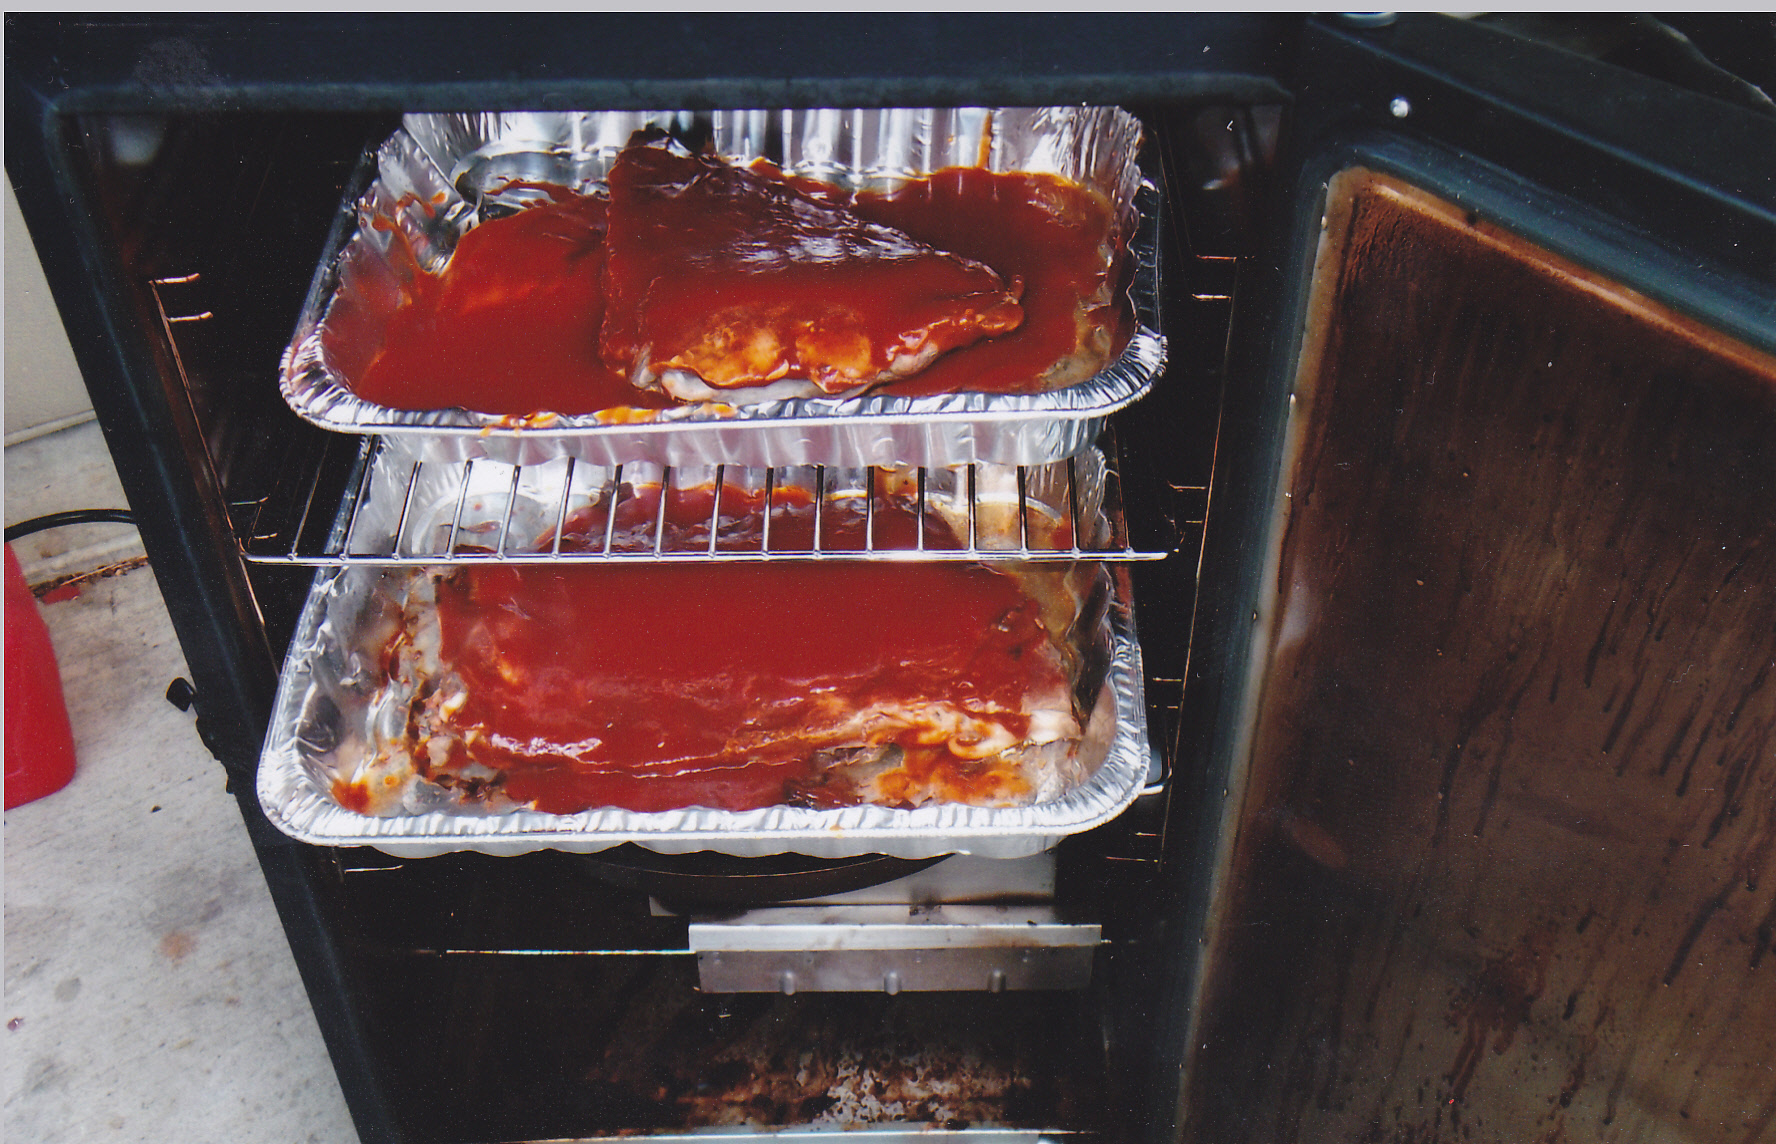
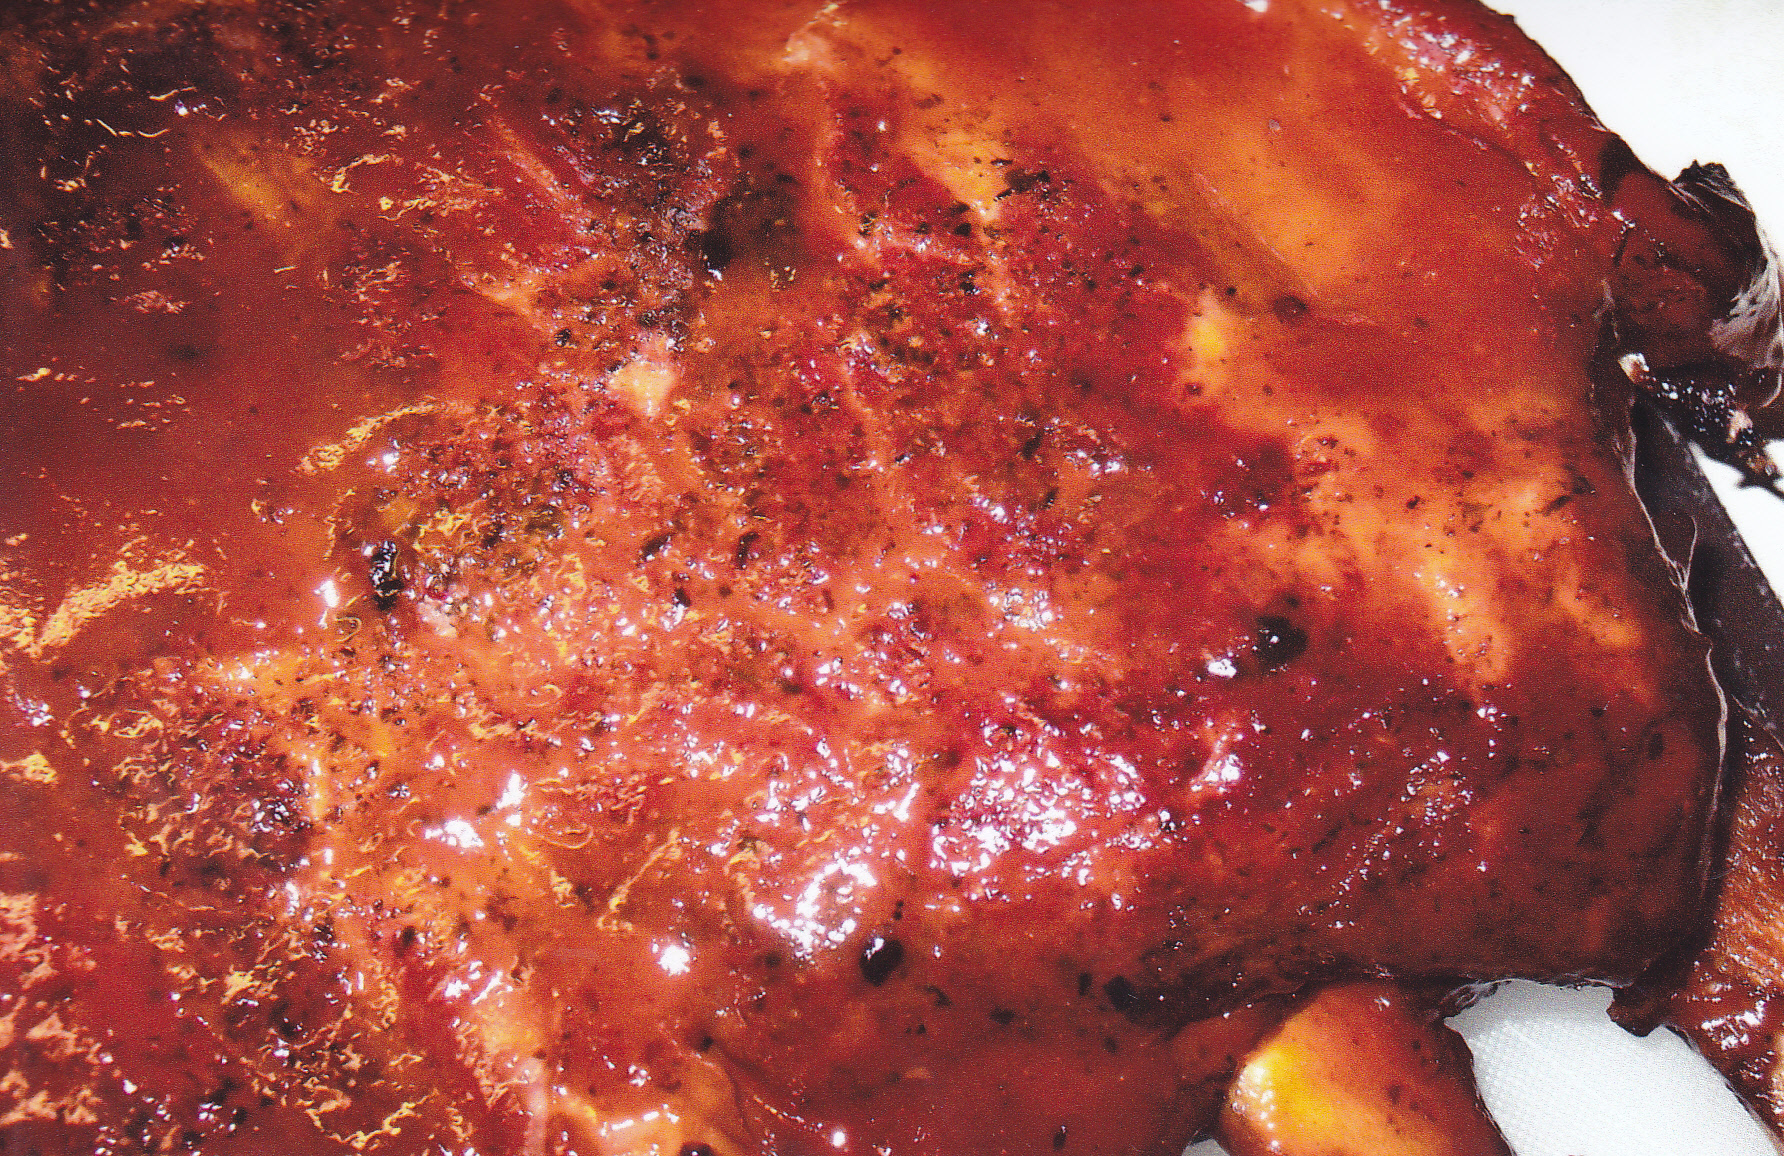
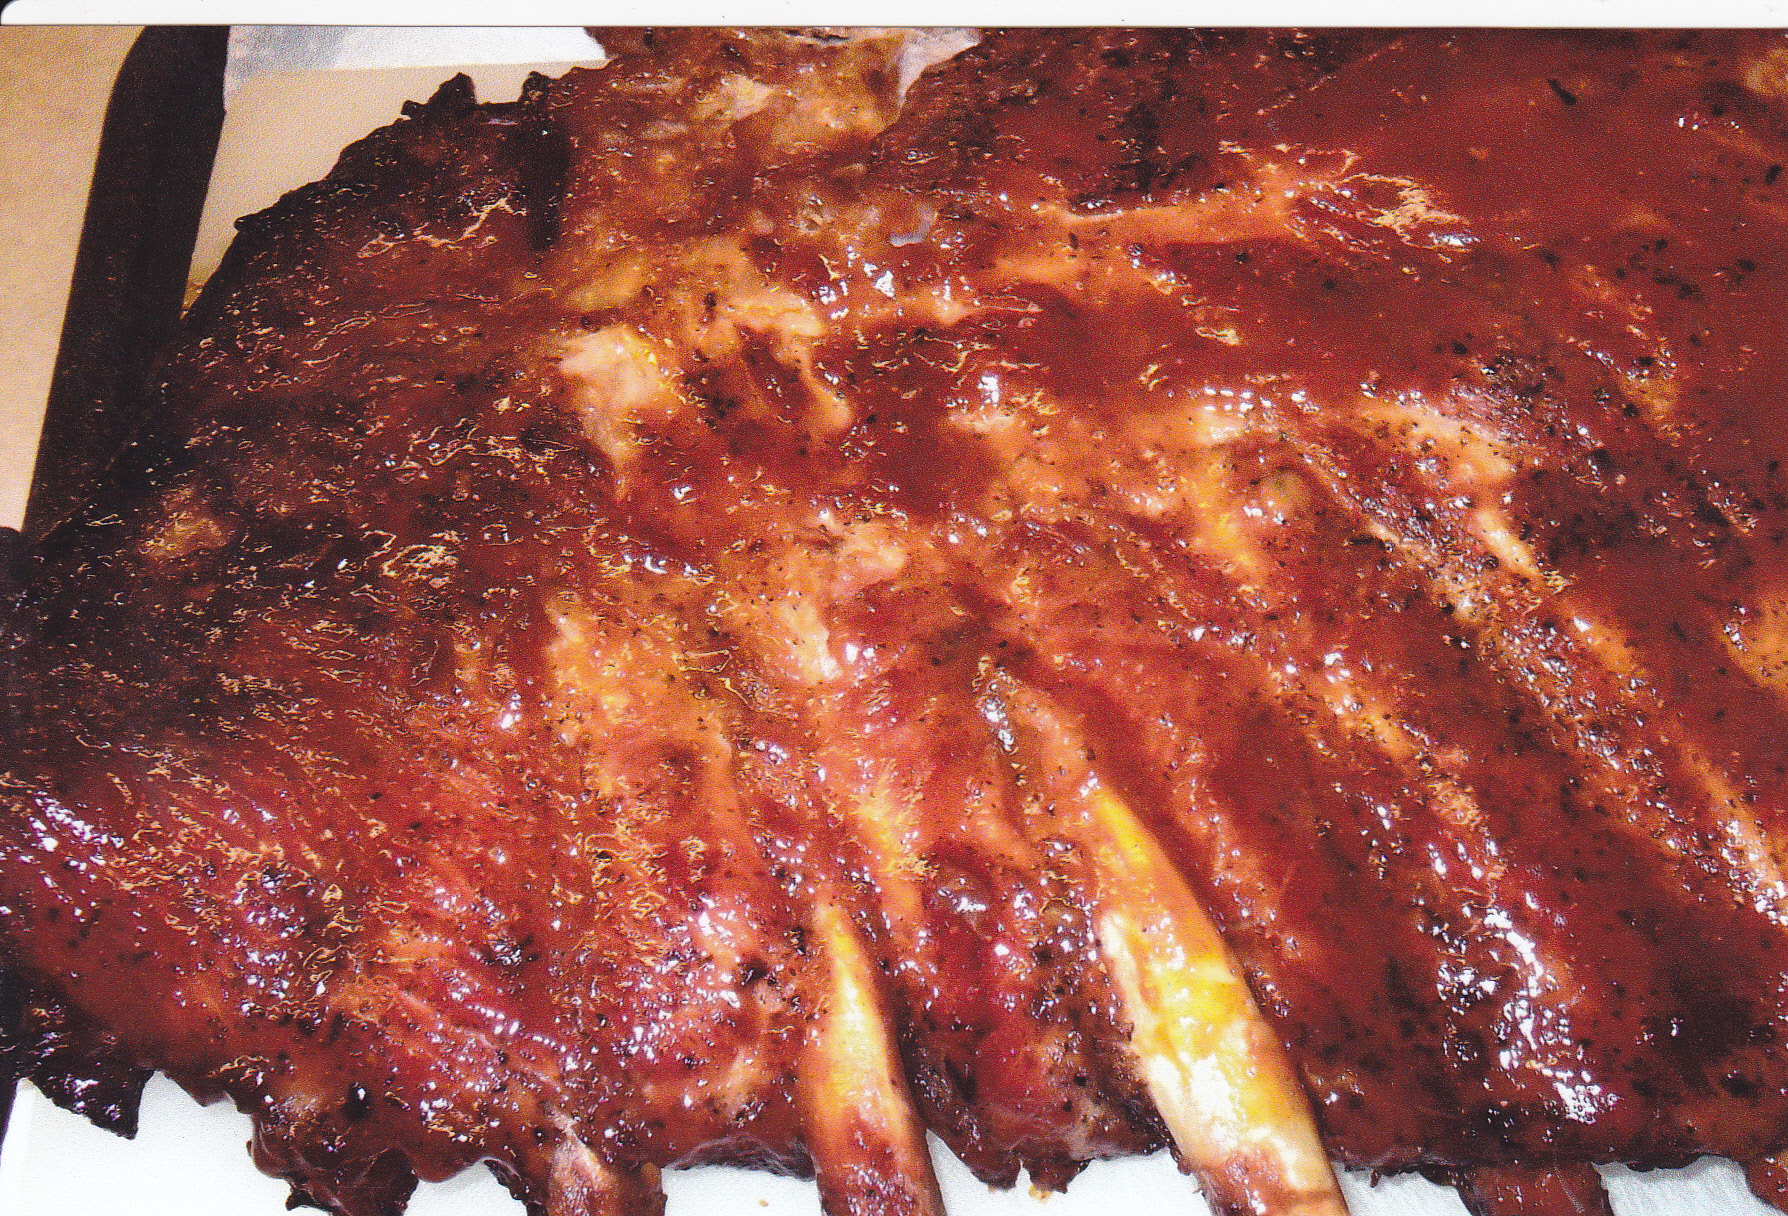
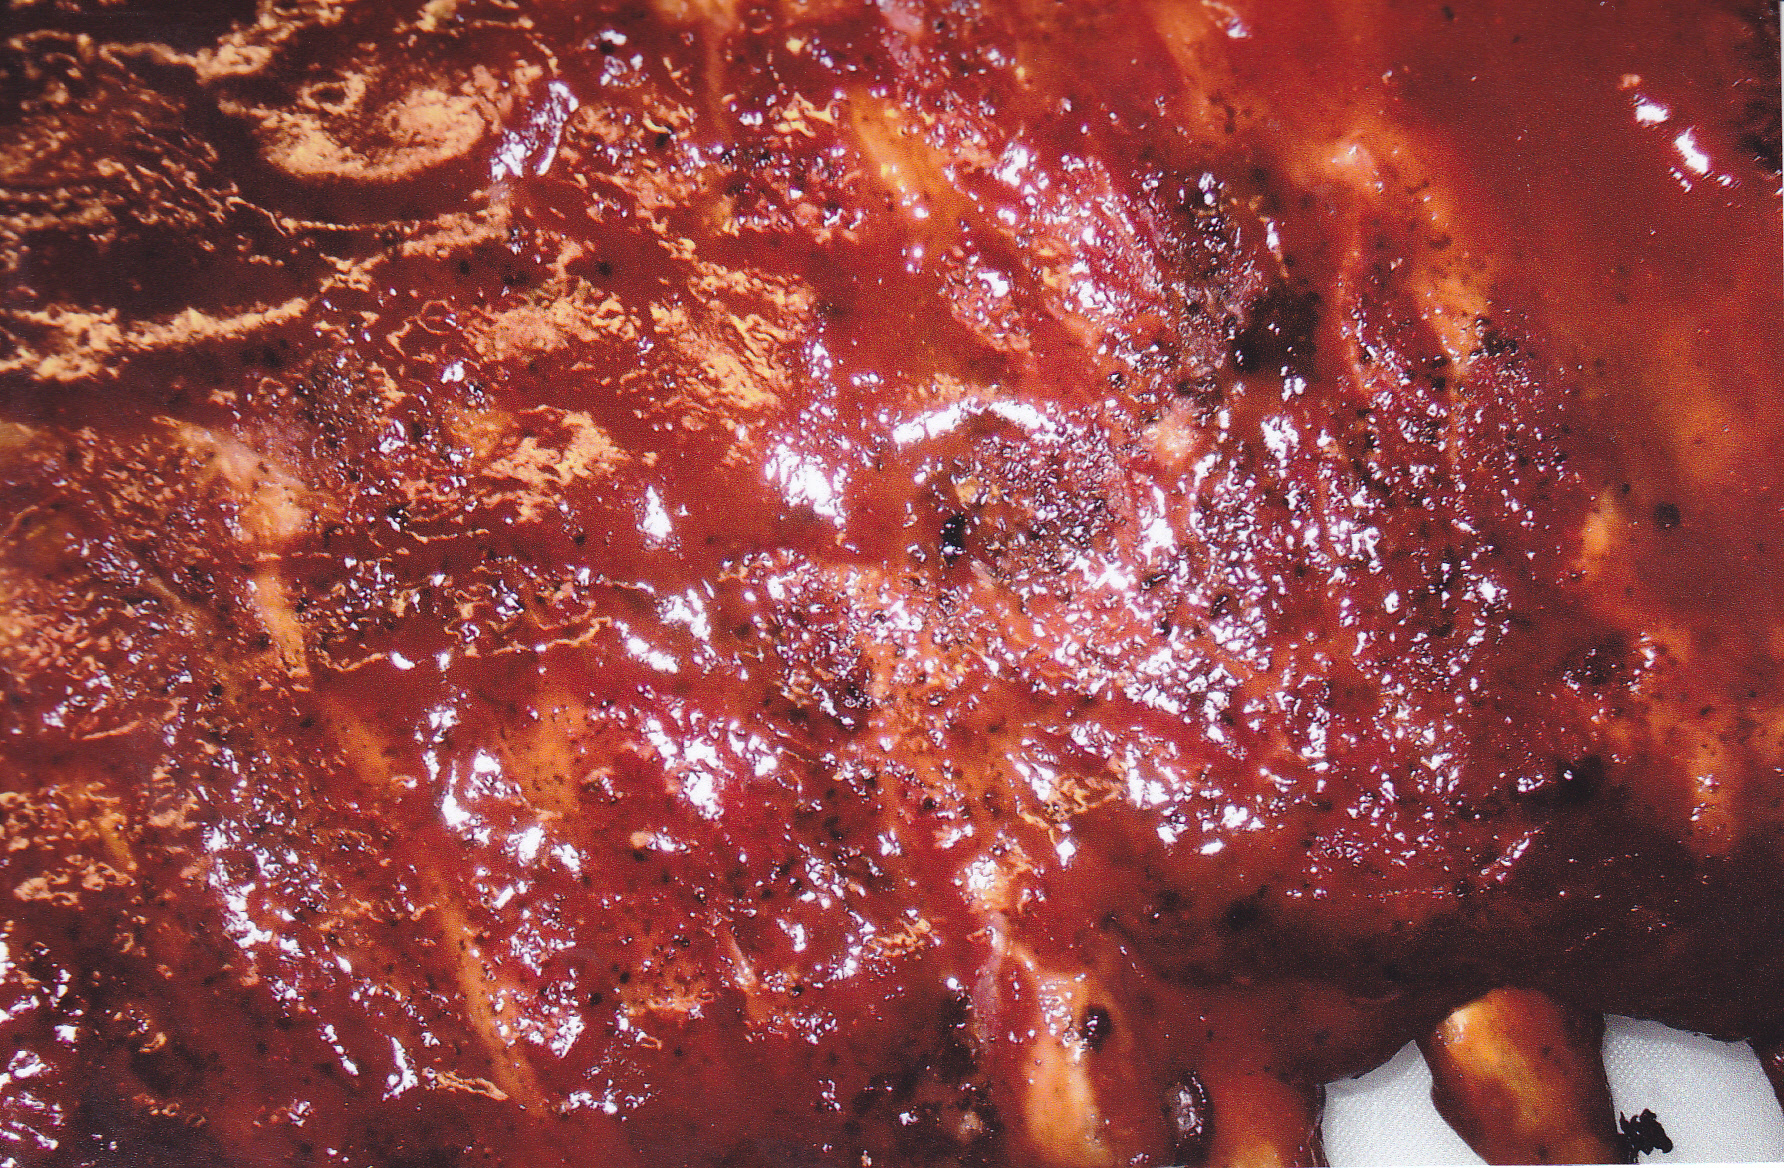
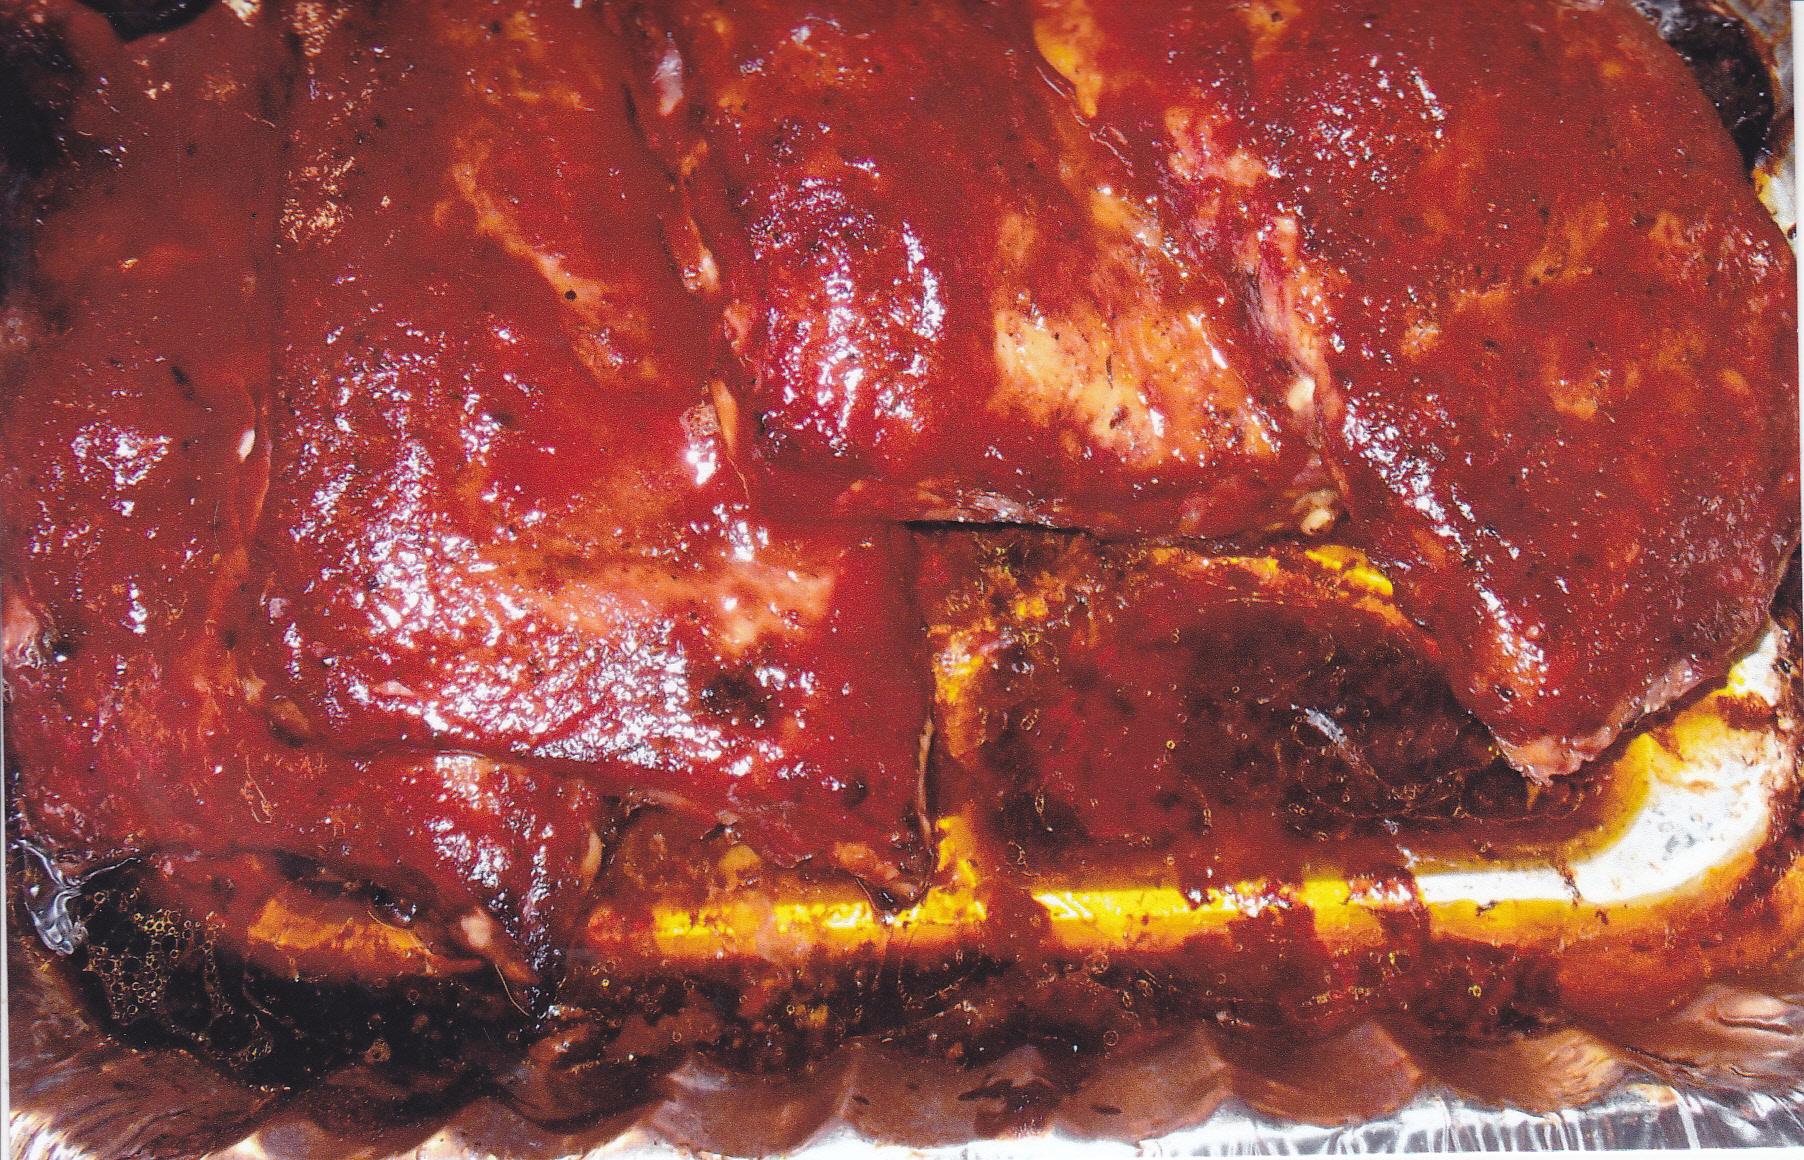
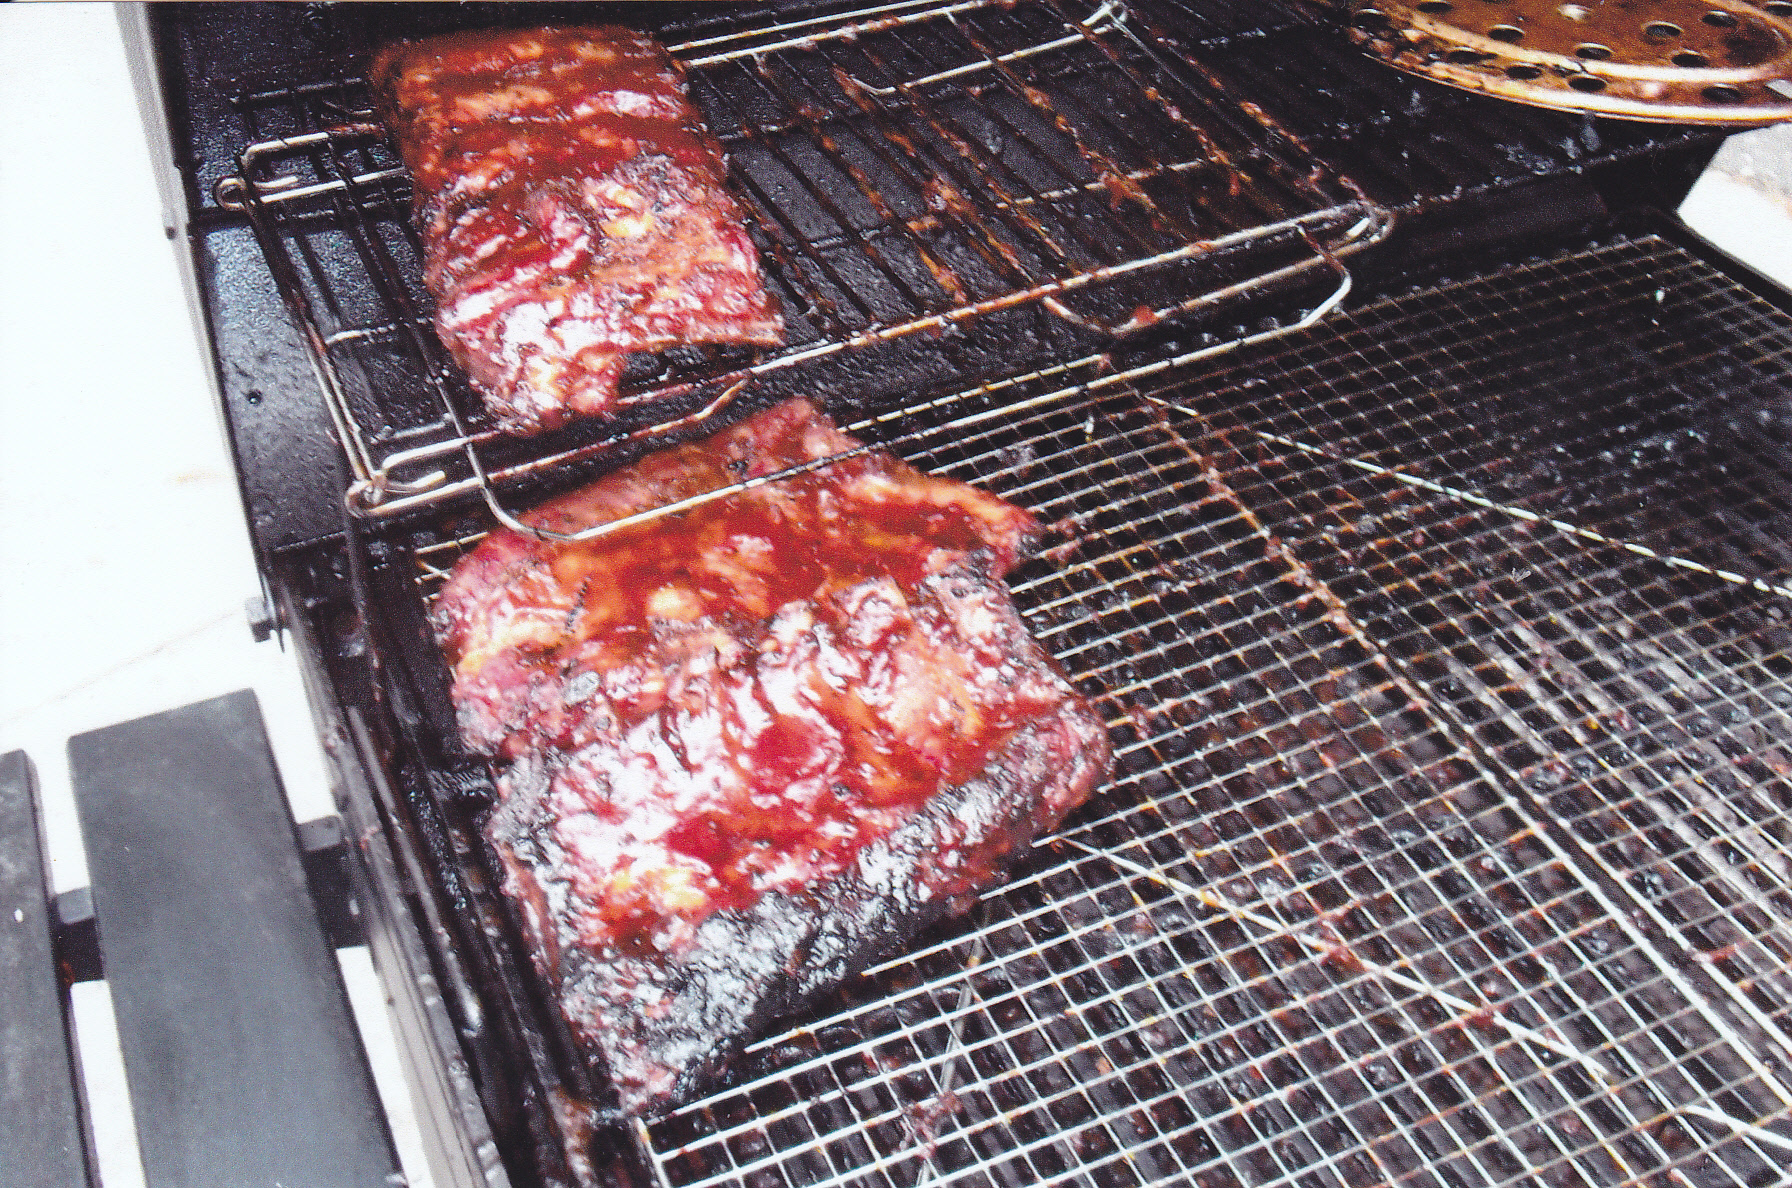
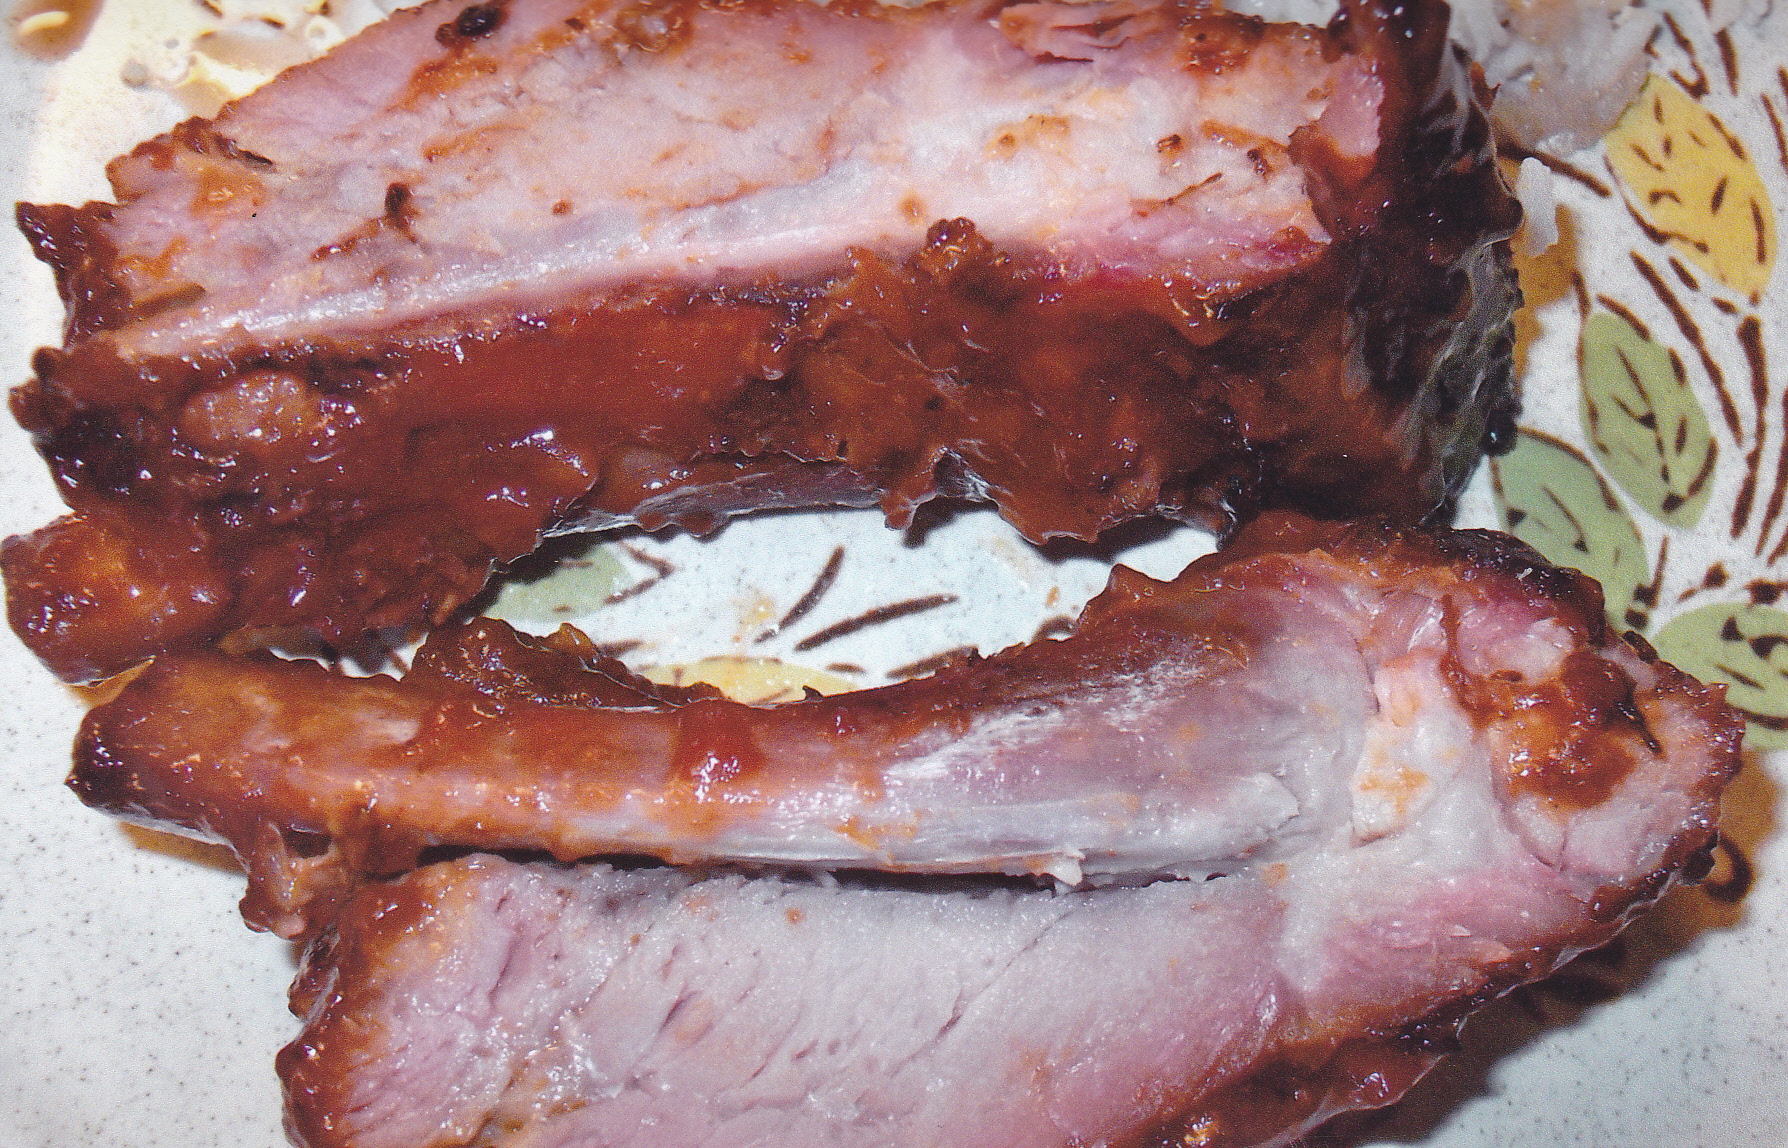
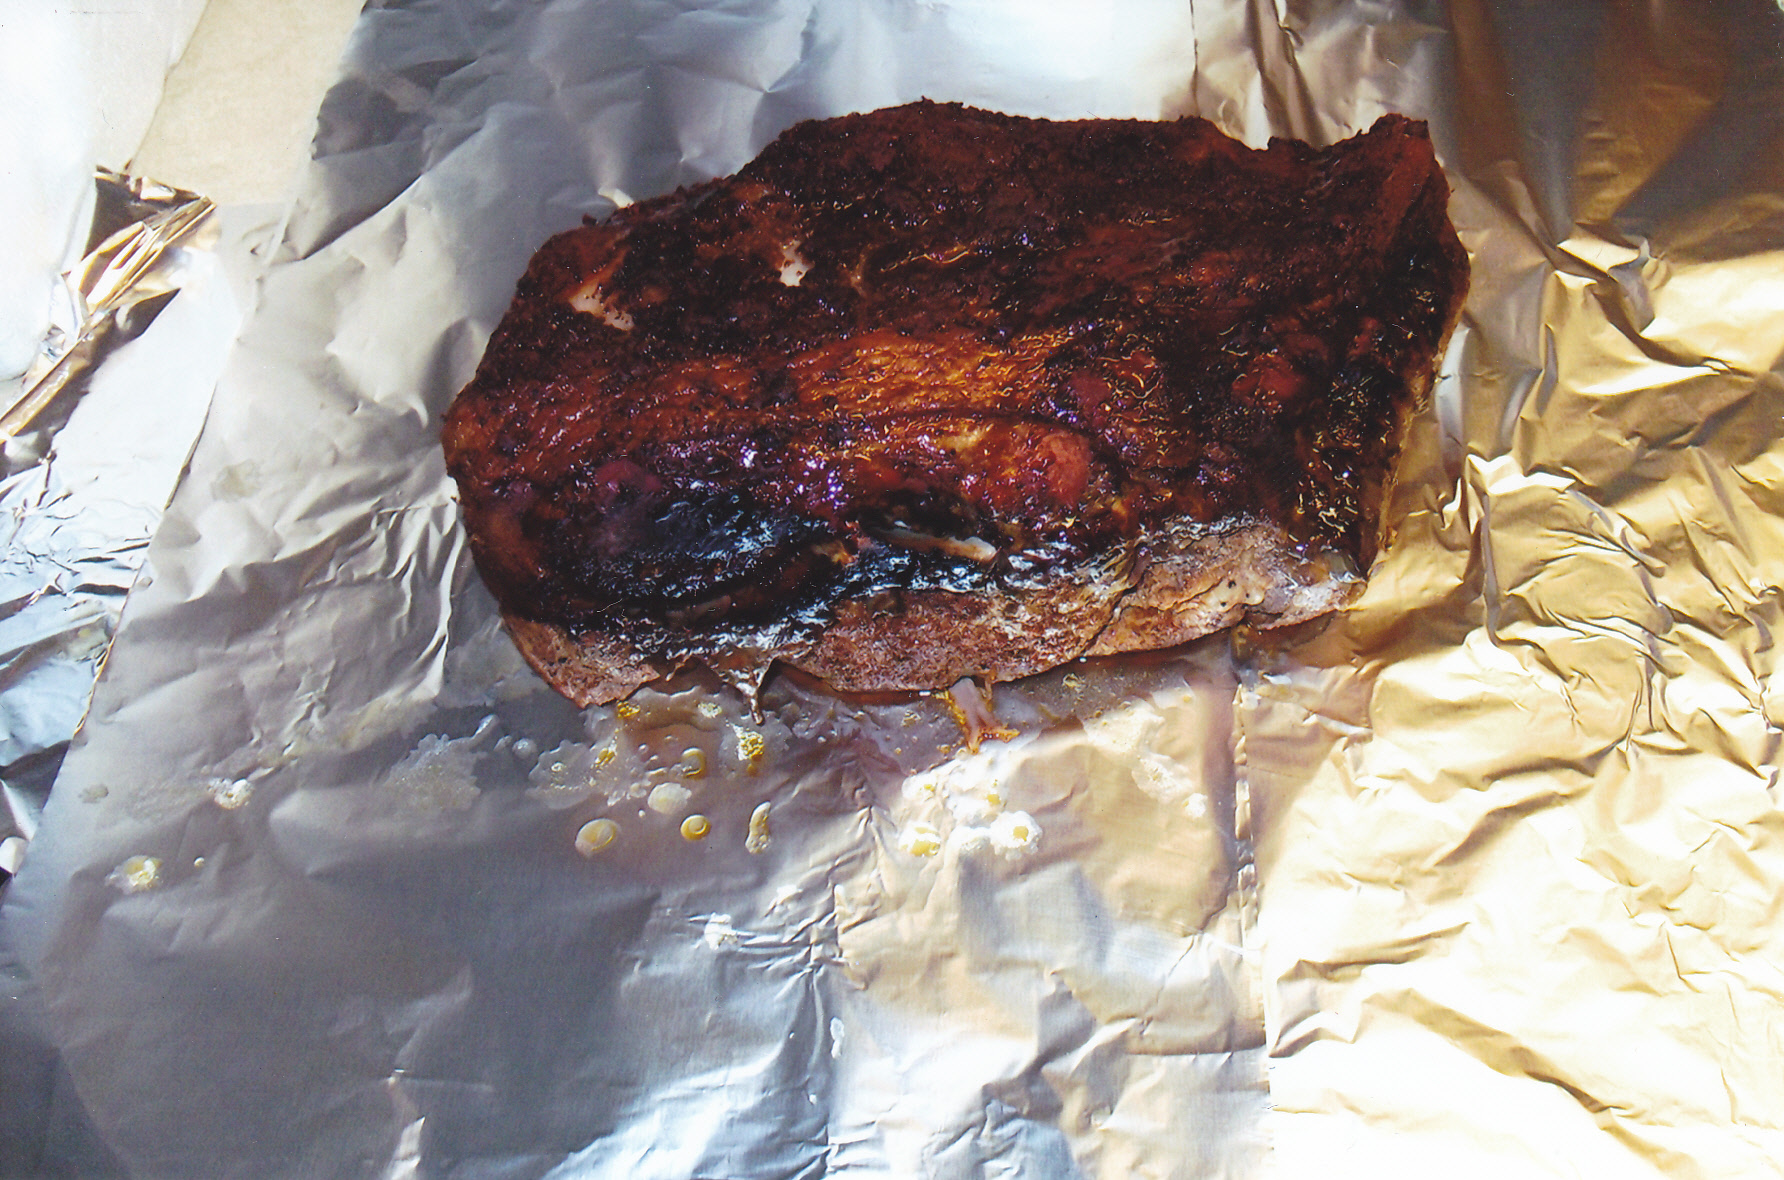
I set the temp on my smoker to 250. Always take the membrane off the back of the ribs. Makes a big difference. This allows the seasonings to penetrate both sides of the ribs. Plus leaving the membrane on makes for a chewy event as you bite trough this membrane to get to the tasty meat. The rub was simple. Just some salt, course ground pepper, and garlic. Didn’t use any wood chips on these ribs this time, for I basted the ribs with my Korean marinade I have posted on this page. When I do not use the marinade I do give these beef ribs some love from a mix of maple and oak chips. It took 4 1/2 hours at 250 to get the ribs where I wanted them. Not fall off the bone, but tender enough to bite off. Had some grilled veggies as a side. Potatoes, carrots, mushrooms, and squash. Put some pepper, thyme, basil, and some Korean beef base powder on the veggies along with some olive oil. Here are some pics of the day–
Here I am taking off the membrane from the back of the rib. Just put a butter knife under the membrane between the bones and pull back a little. Take a paper towel and grab the membrane and pull it off the back of the rib.
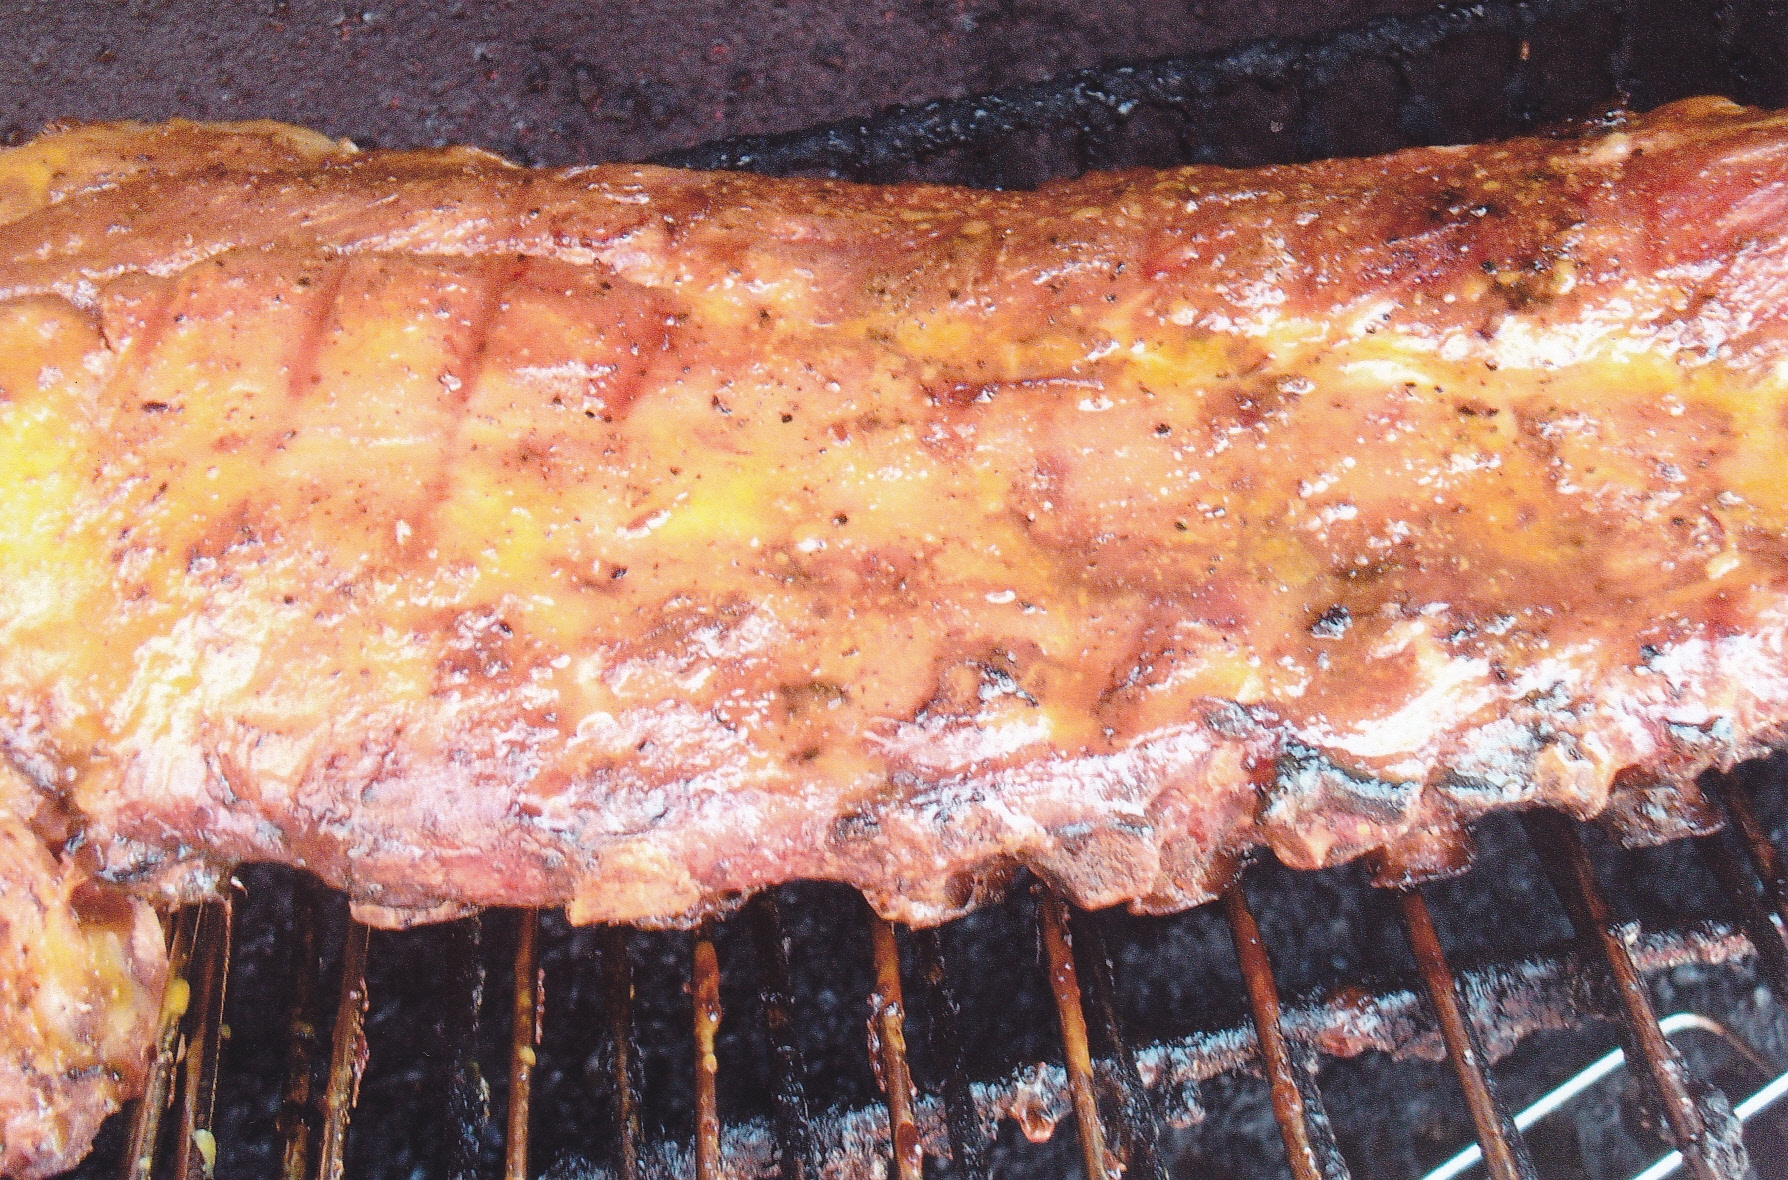
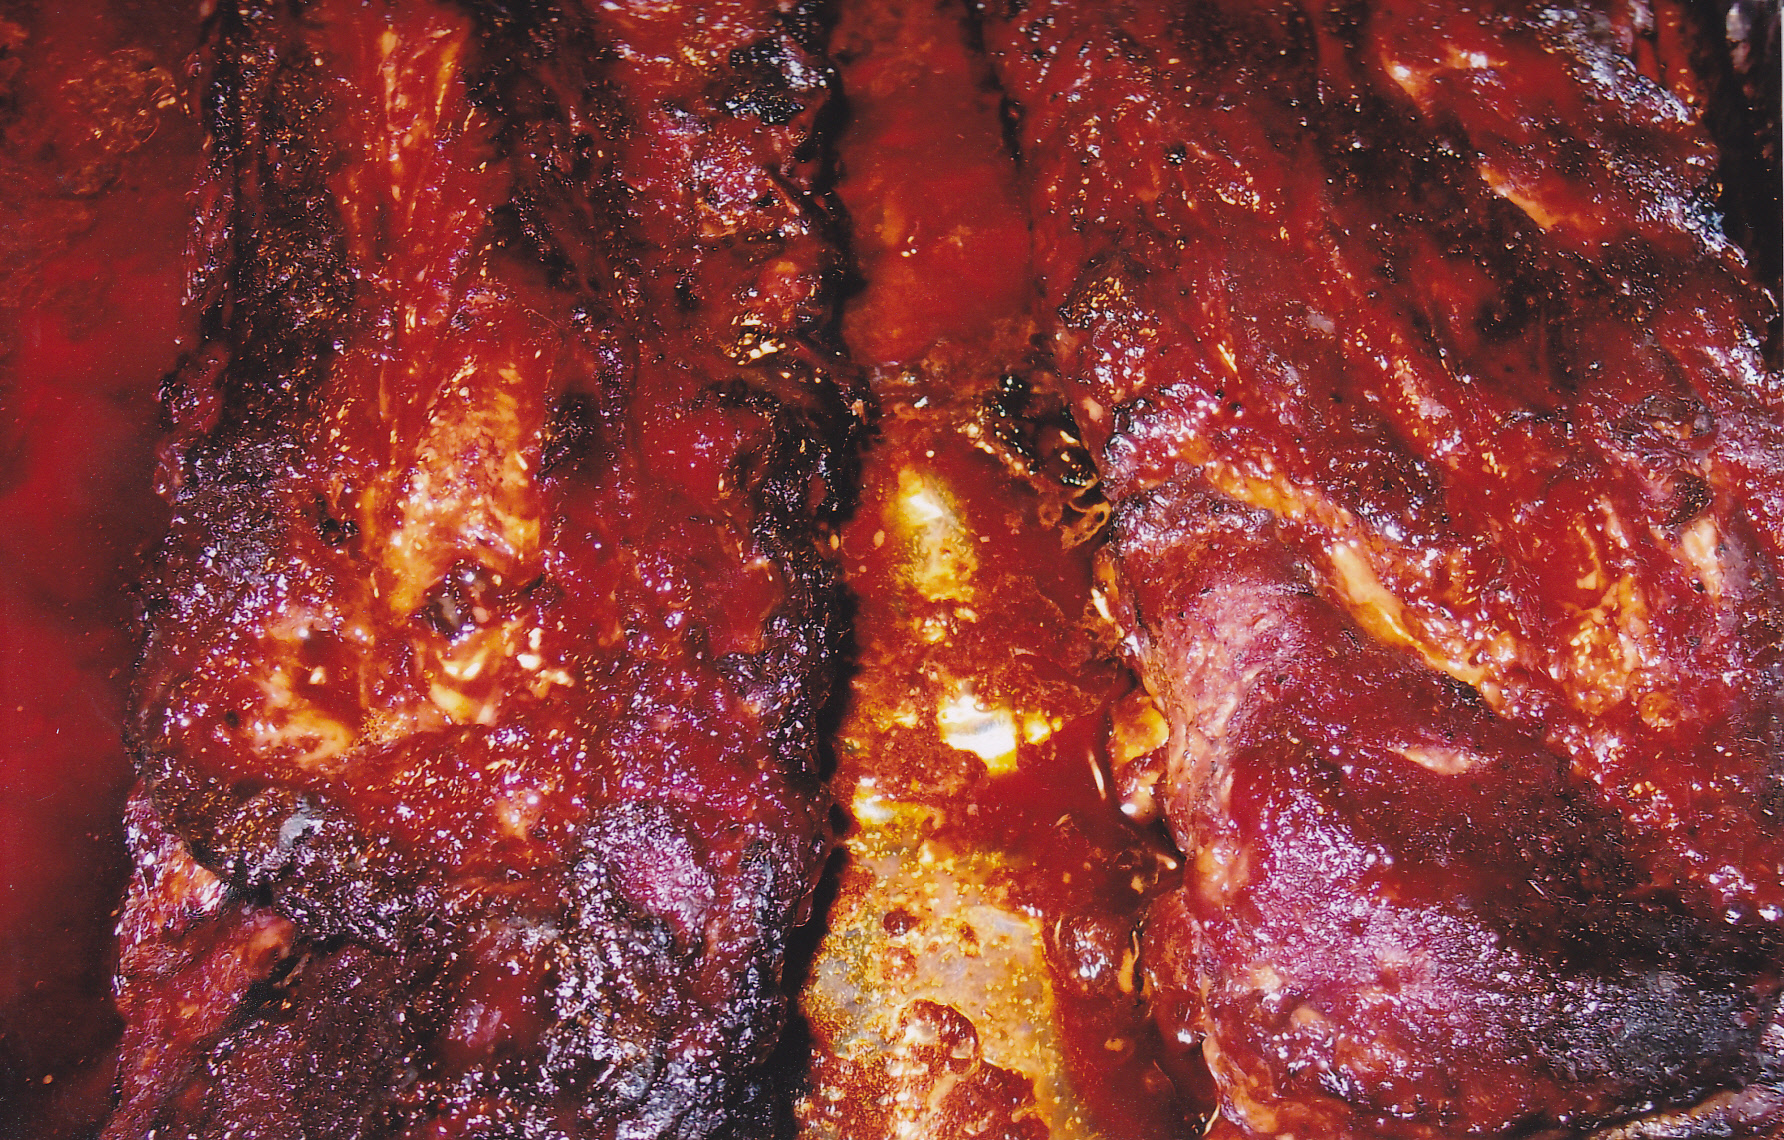
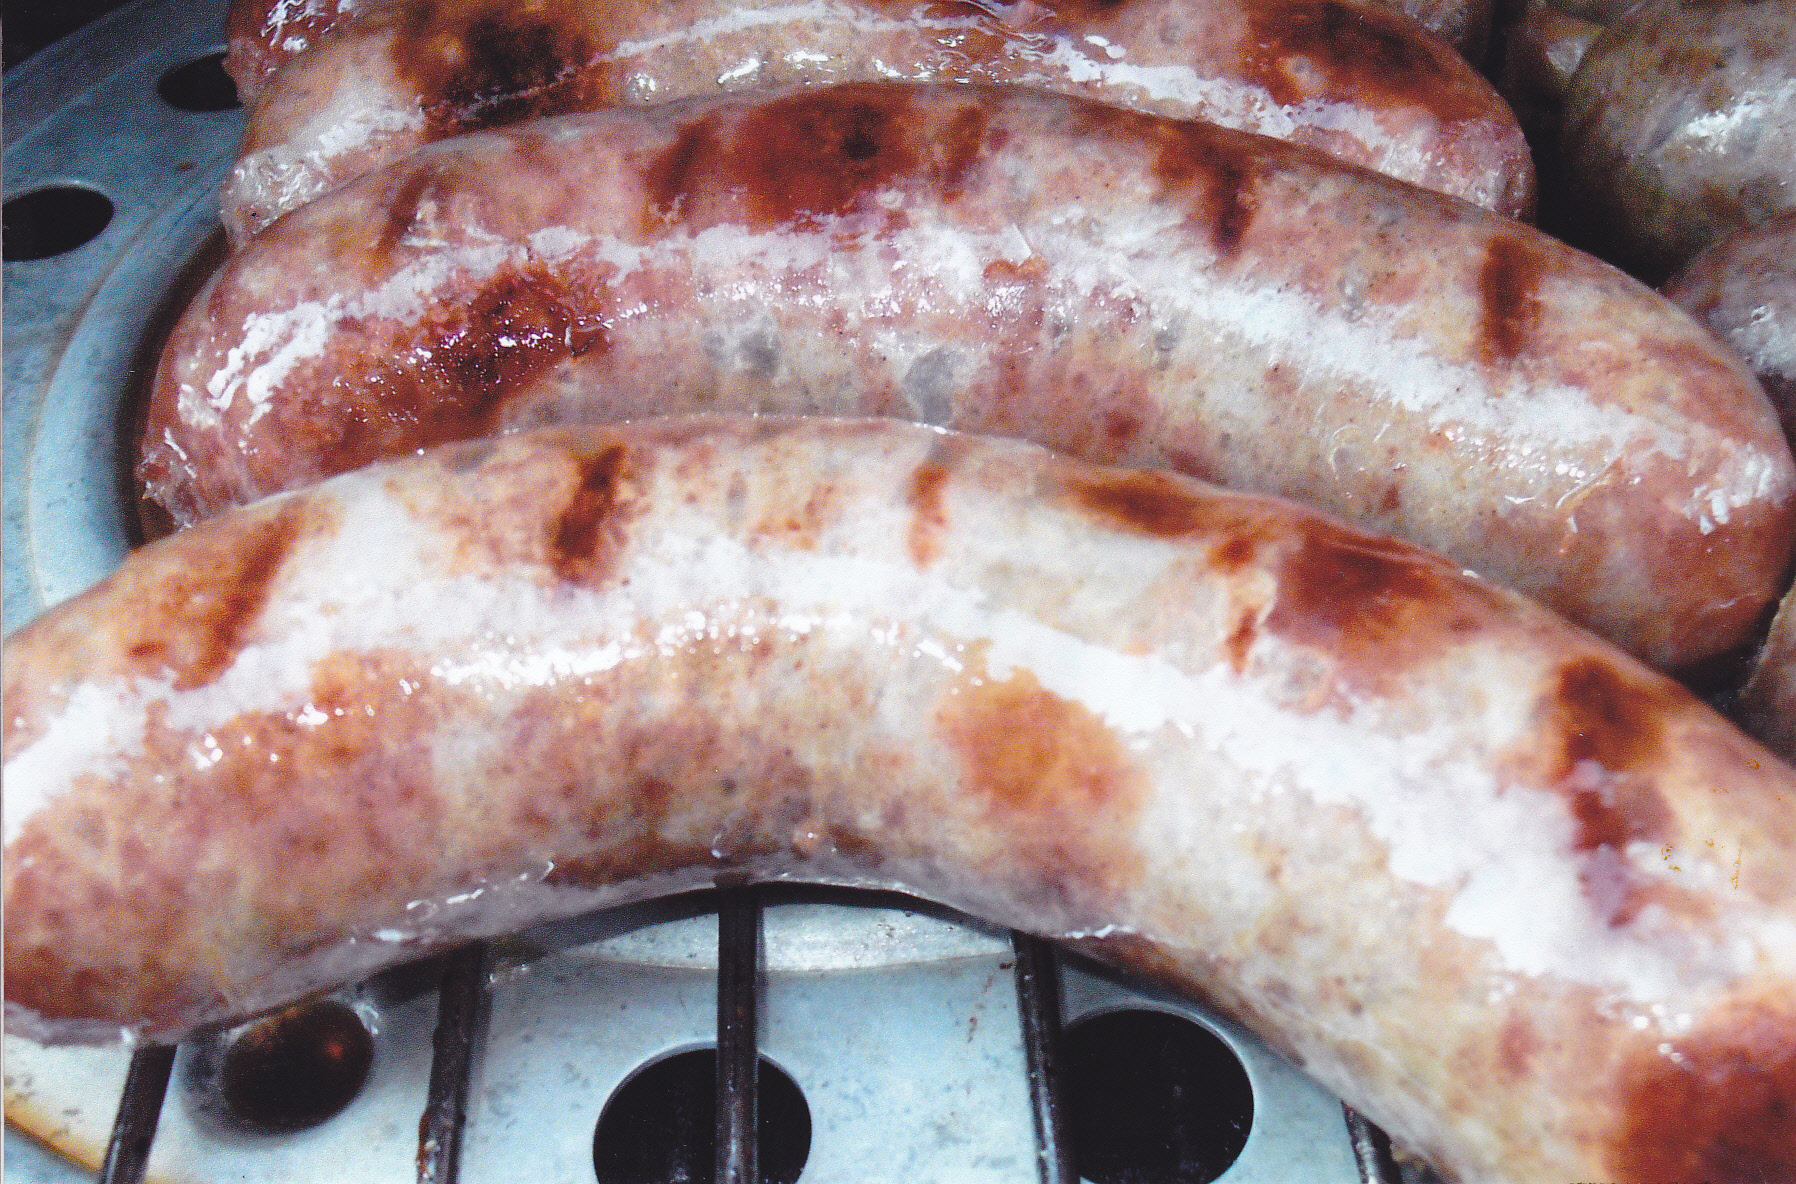
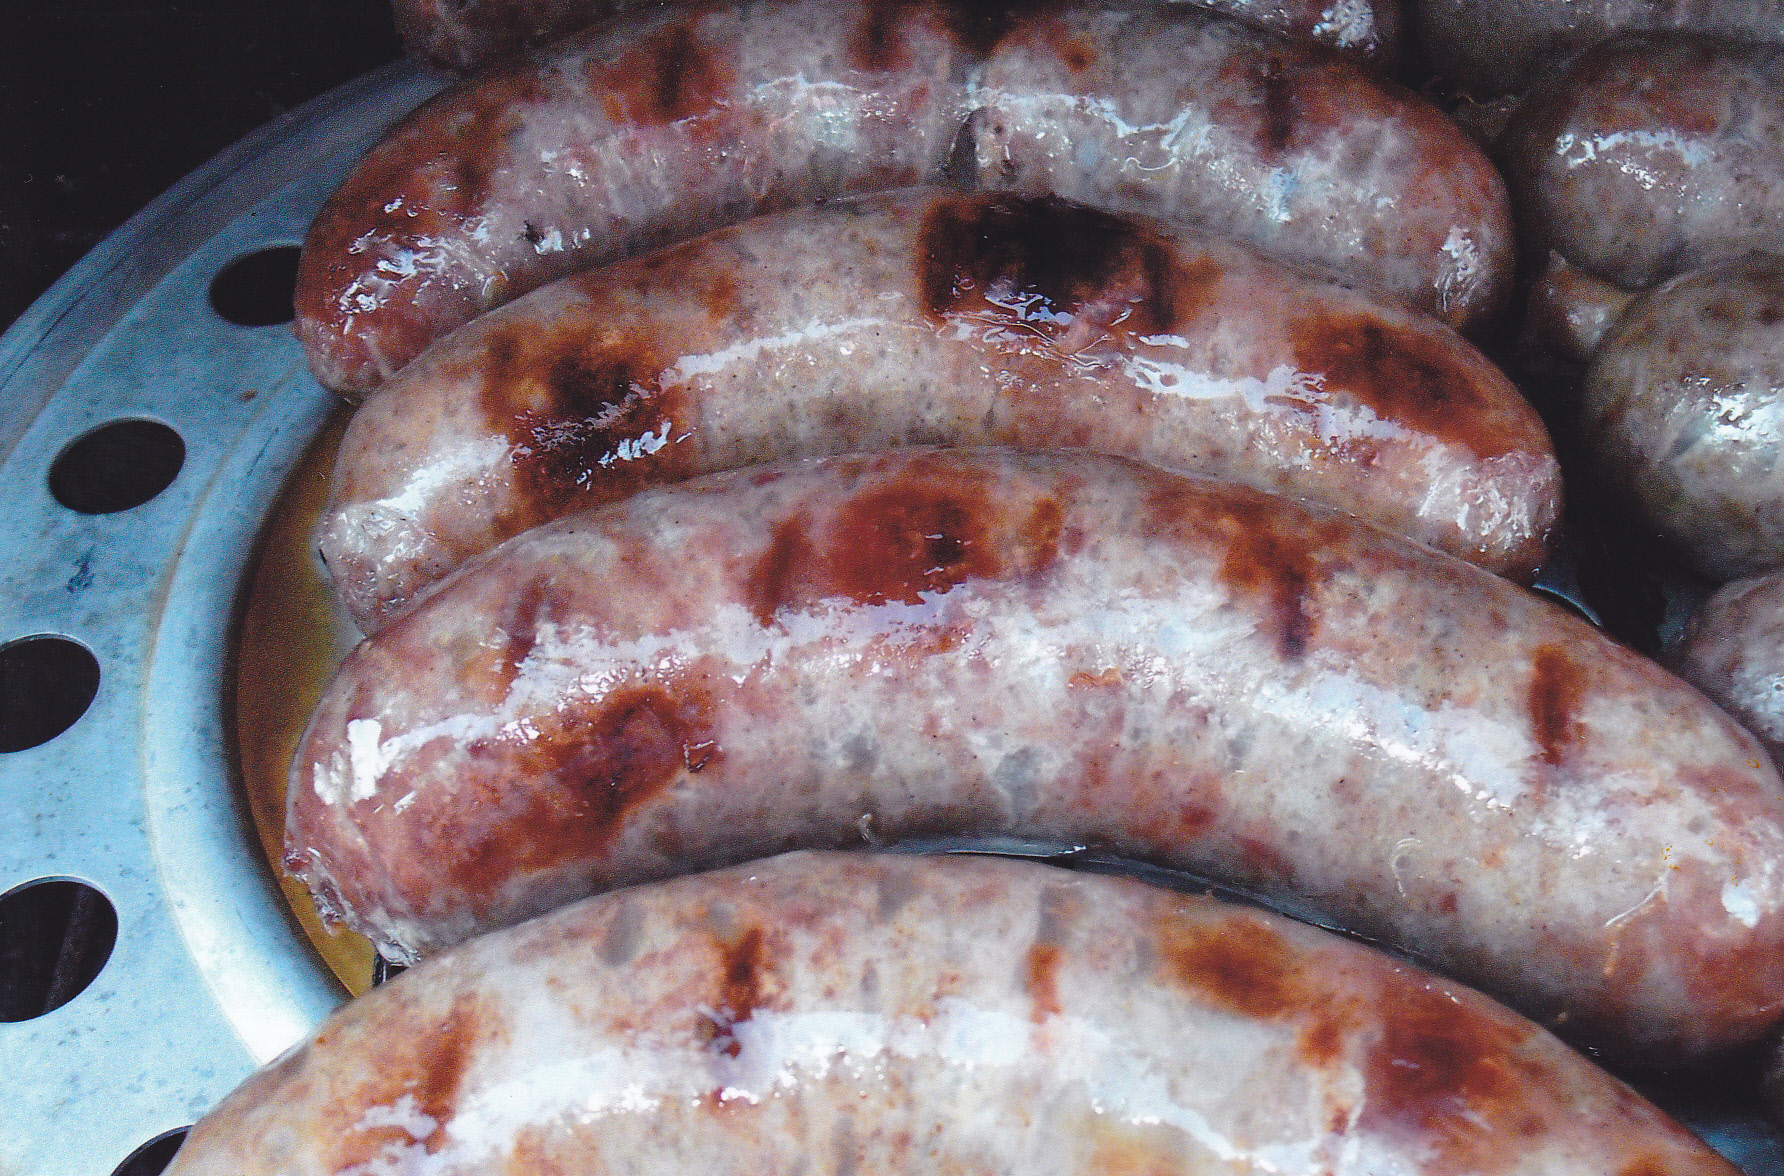
Here are the beef ribs on my smoker racks.
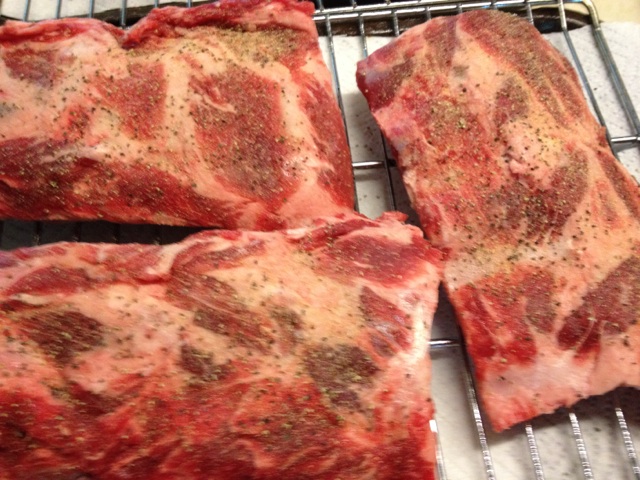
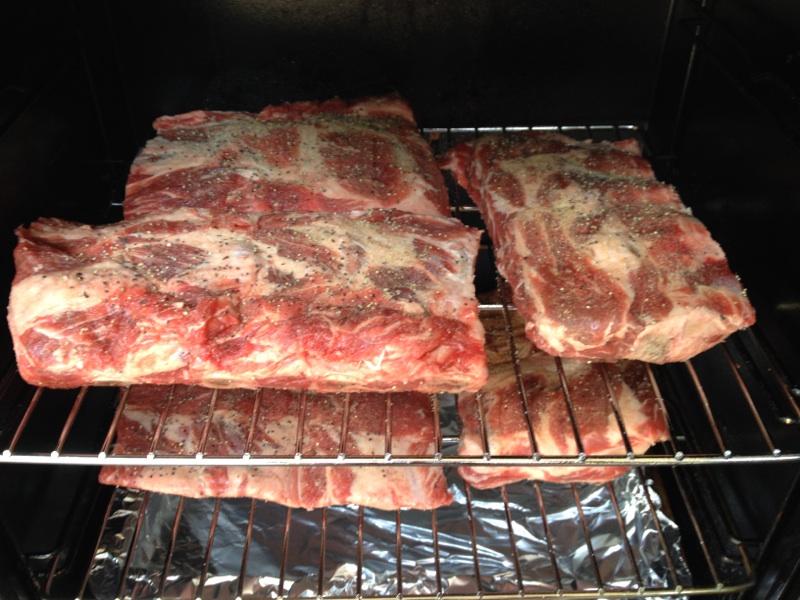
All seasoned up and in the smoker they go.
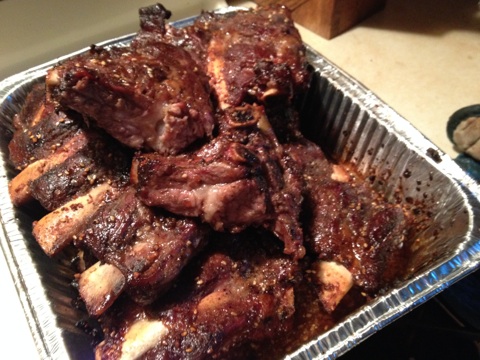
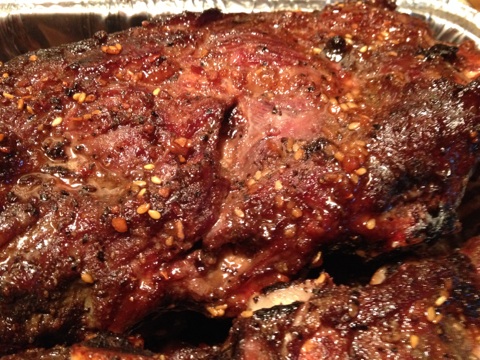
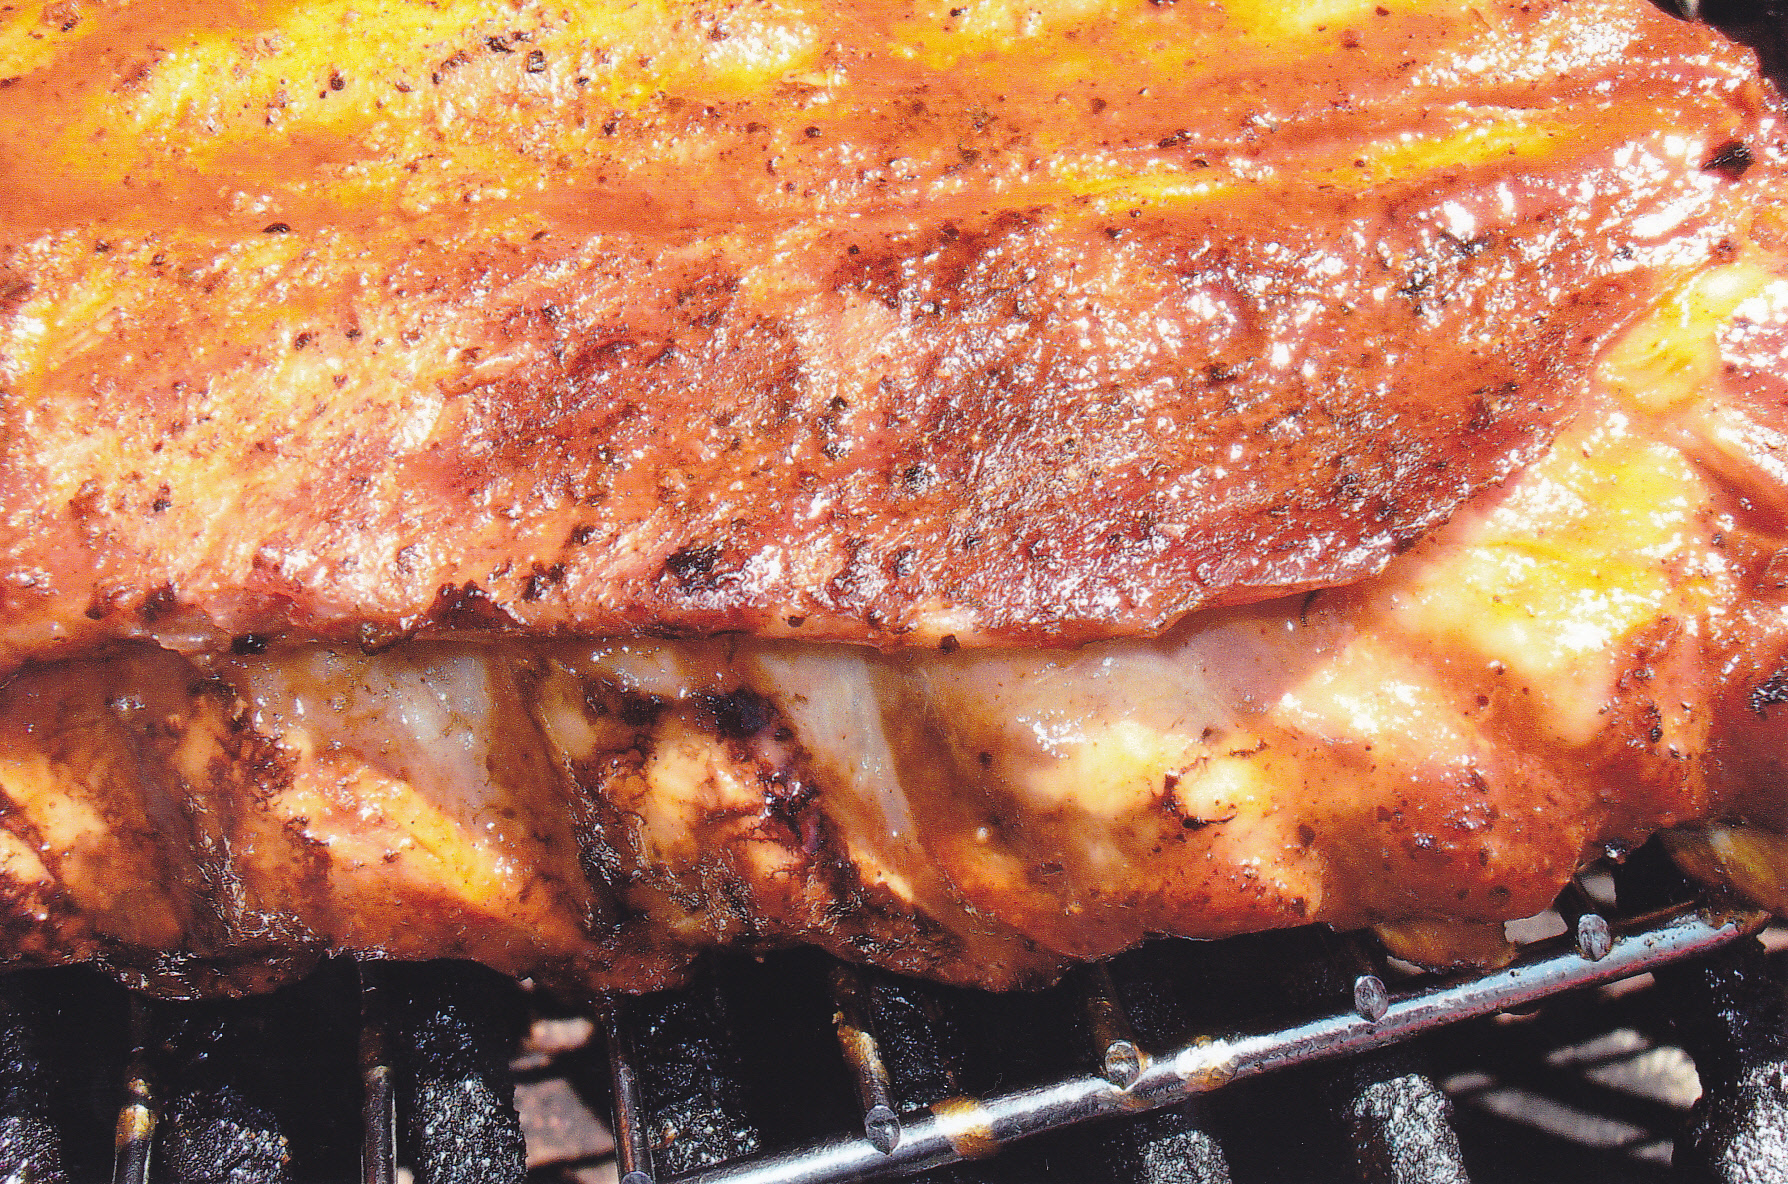
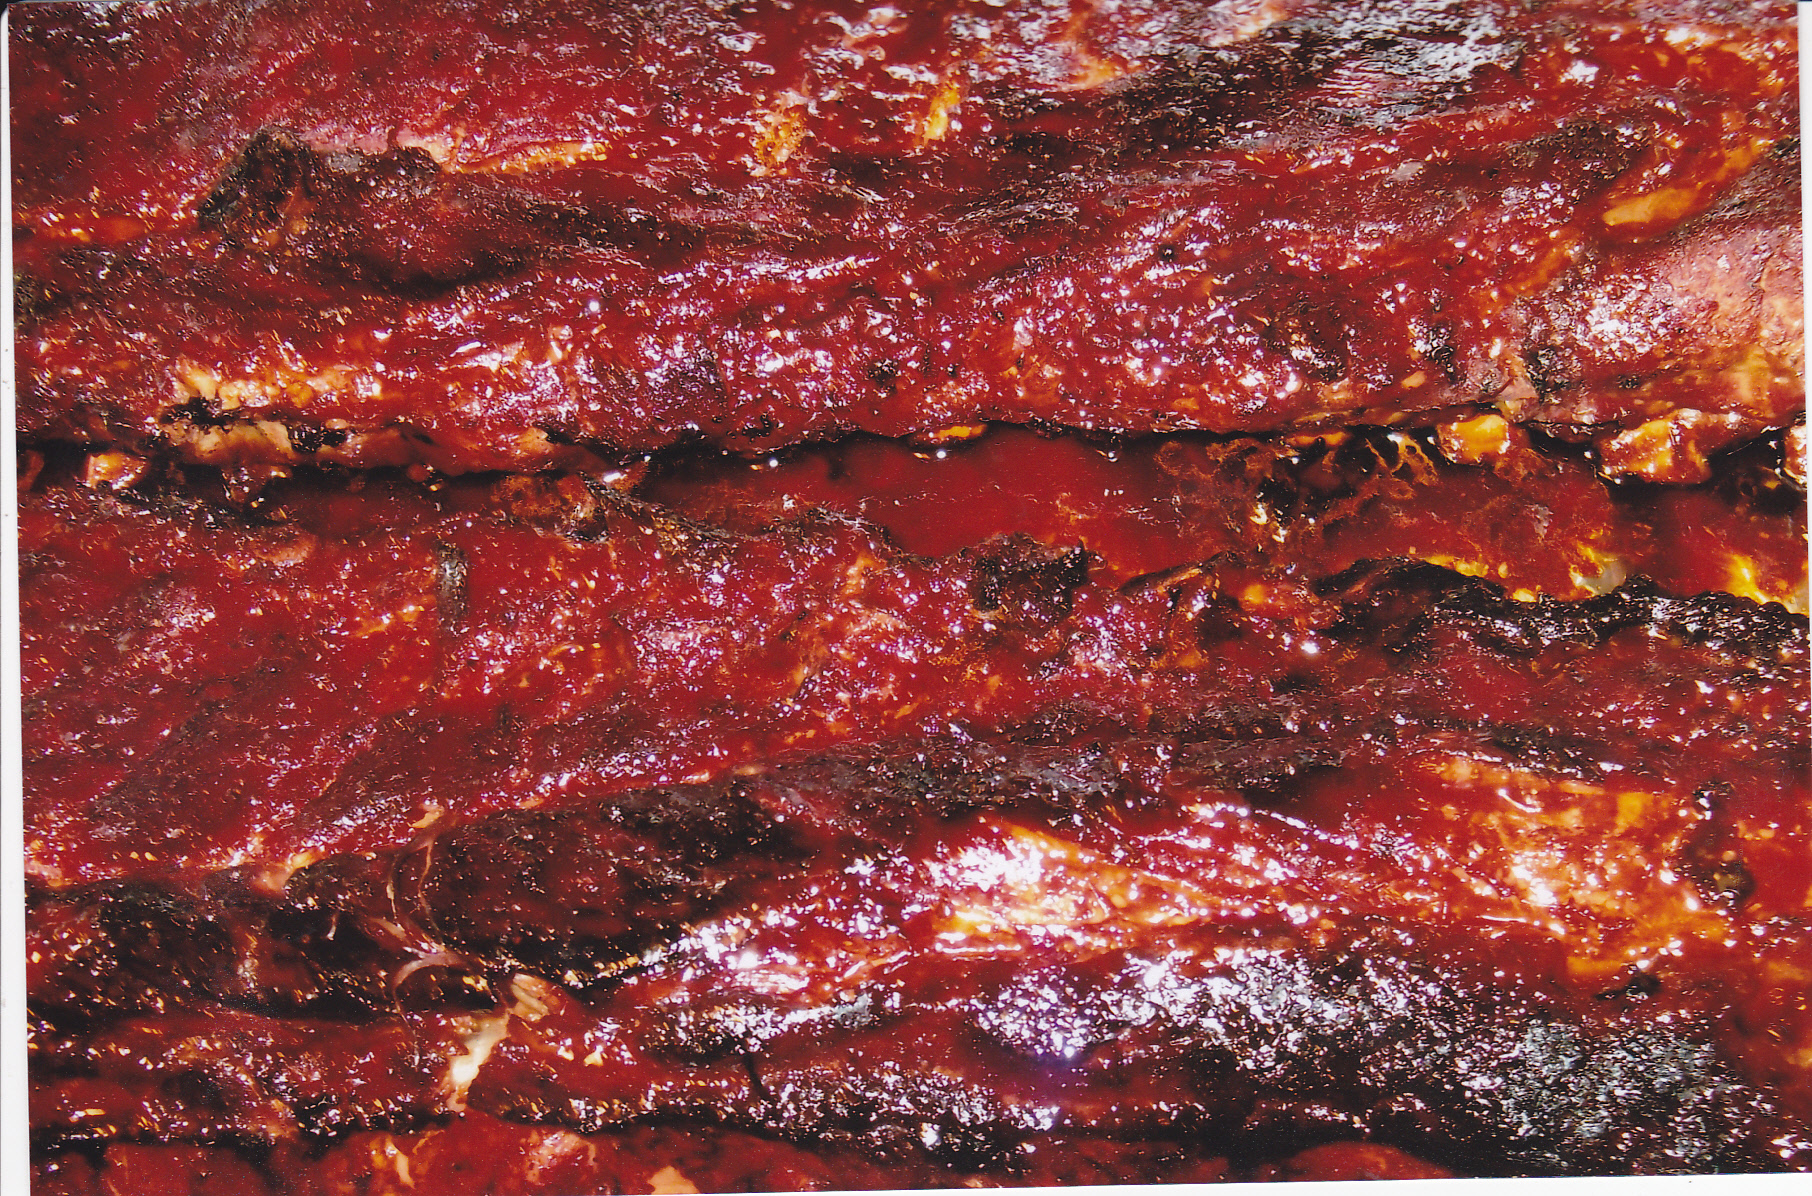
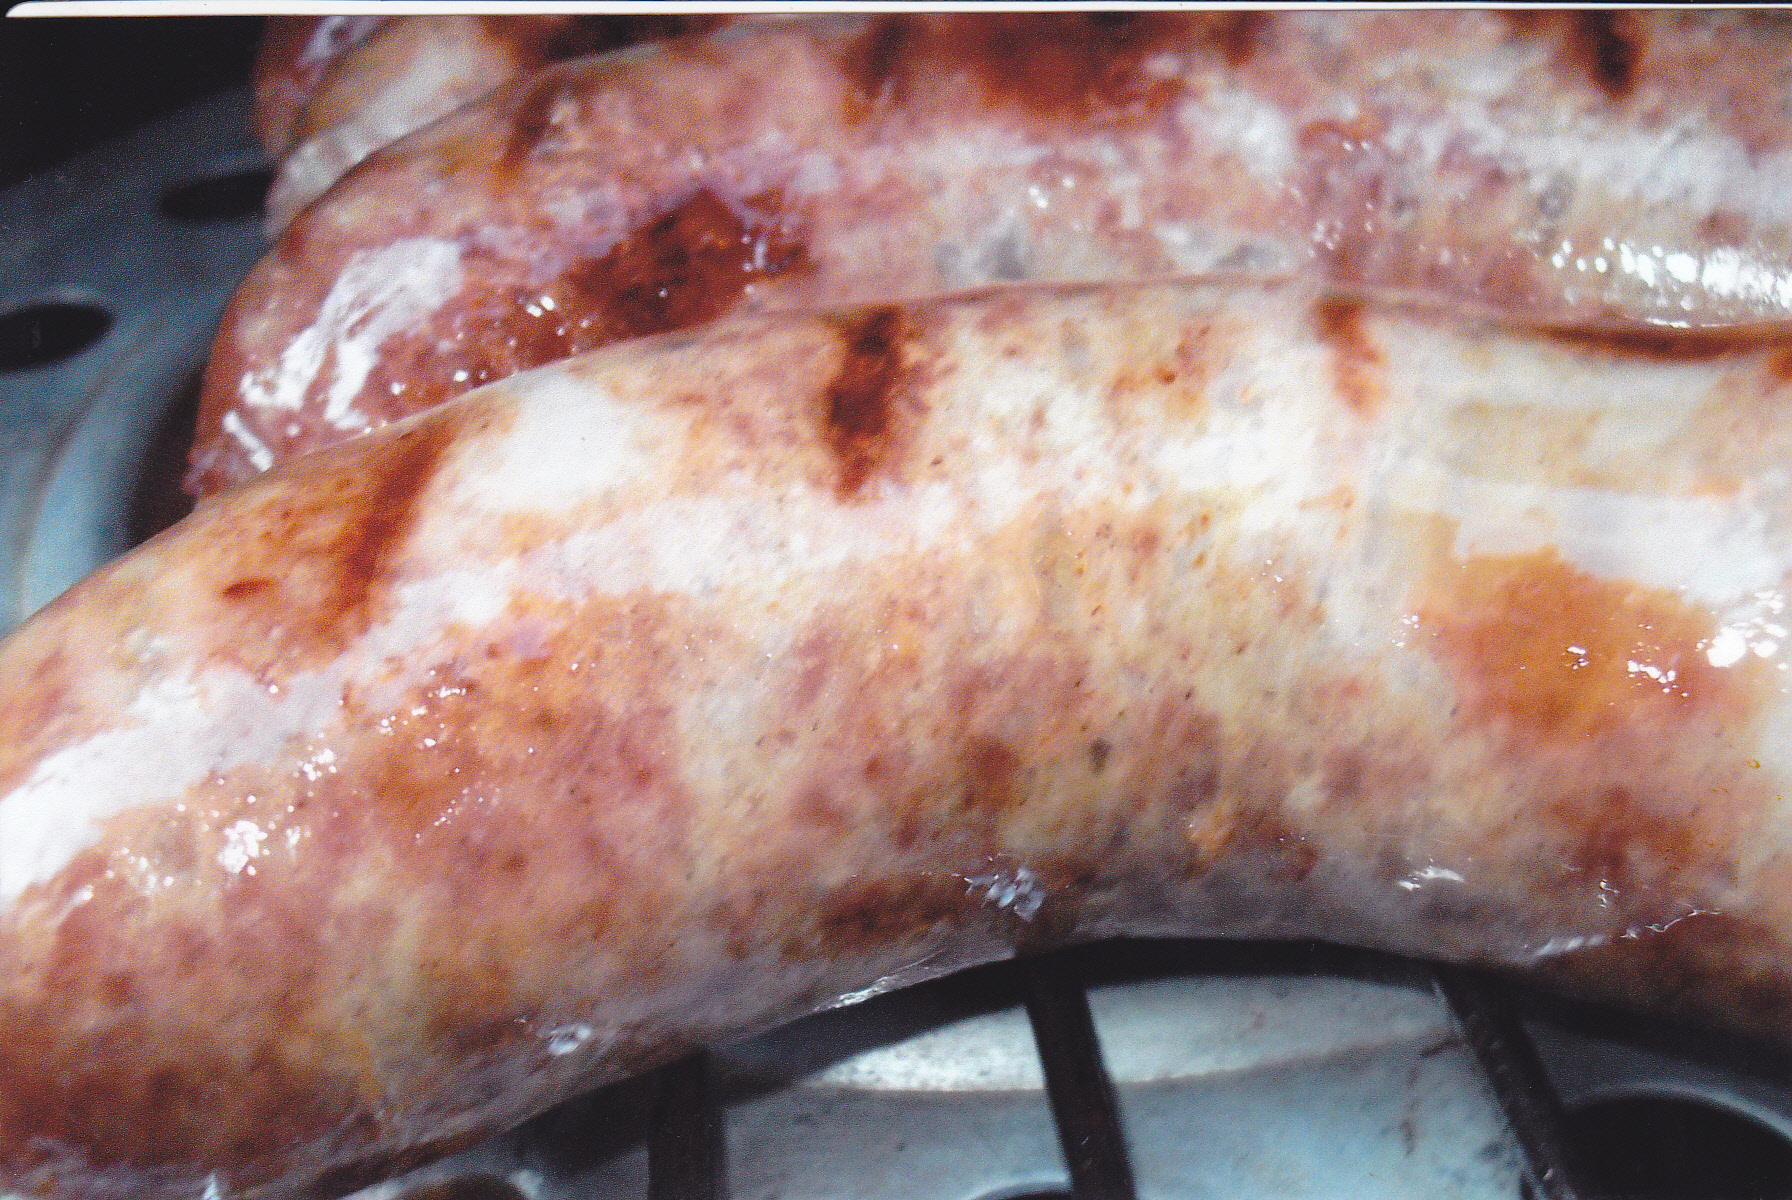
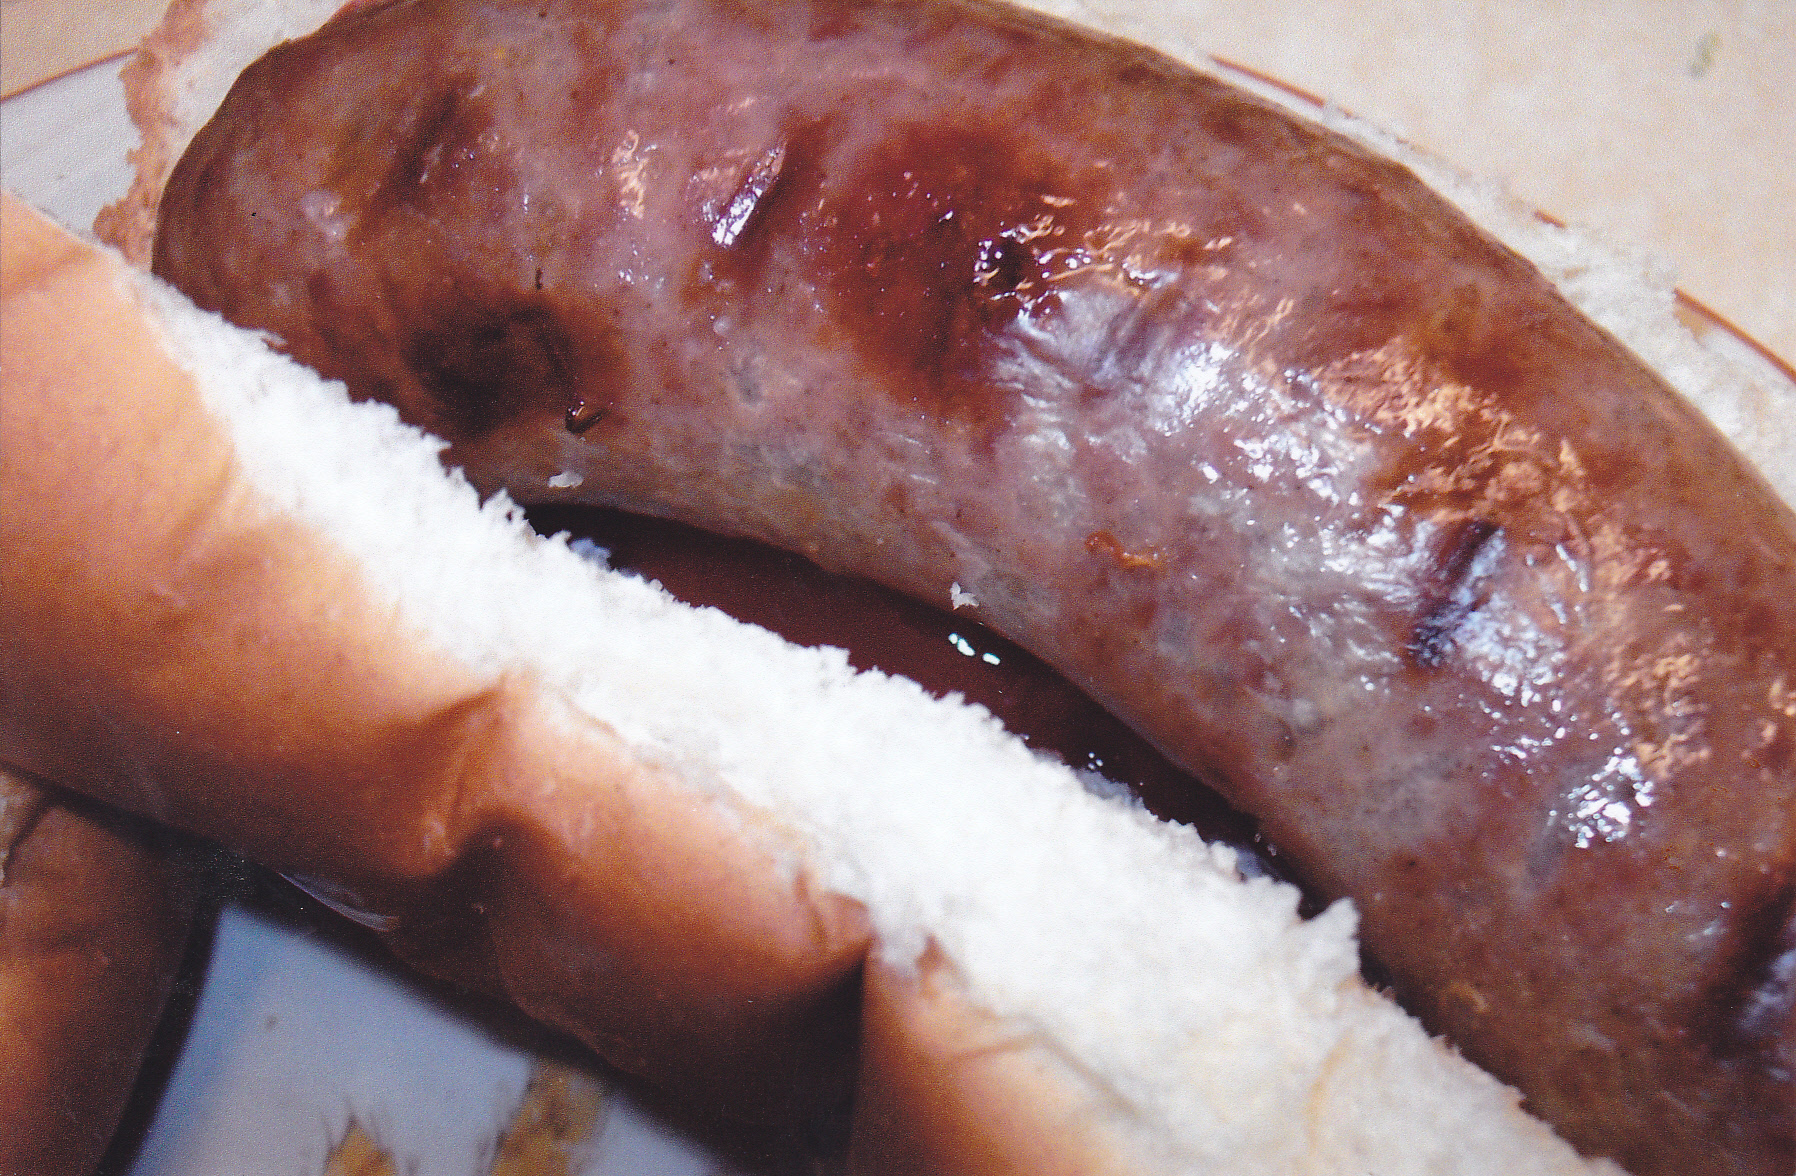
Here they are after they have been basted with the Korean marinade and ready to serve.
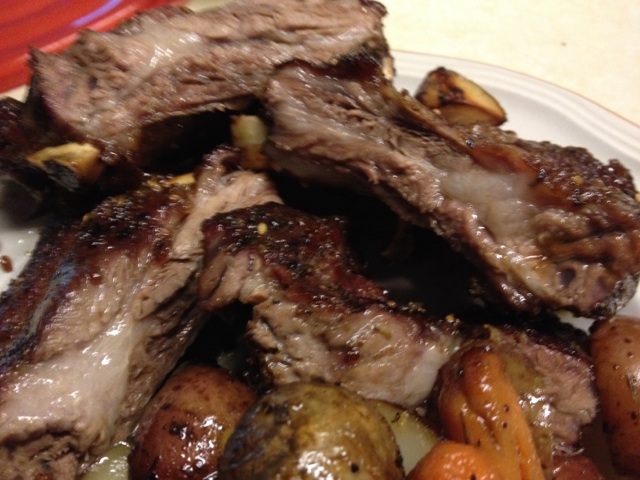
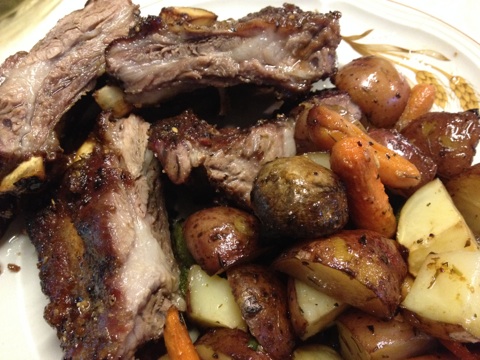
Could not wait to dig in to this plate. If you love the taste of prime rib, you will love these ribs!!!!
KOREAN KALBI
Hands down my favorite thing on the grill. Not the easiest cut of meat to get but you can find it. Kalbi is Korean for ribs. These ribs are beef short ribs cut thin, about 1/4 inch thick. Normally when you buy short ribs they are cut from the beef plate down one bone at a time with the meat on top of the bone. With kalbi the ribs are cut across the plate bones in slices with about 3 or bones in each slice as you can see in the pictures. You can get this cut of beef here in the Twin City area at Sam’s Club already cut and packaged. Once you marinade them overnight and grill them as shown below you will be a fan of these as well. But don’t just use this marinade for these tasty ribs, use it for pork and chicken as well. Here is the marinade I make up—-
1/2 cup soy sauce
1/2 cup pineapple juice
1/4 cup honey
1/3 cup brown sugar
1 tsp black pepper
1 medium onion minced
1 T minced fresh ginger
2 T sesame oil
2 T sesame seeds
3 pounds of kalbi style short ribs
Mix all ingredients well. Put the ribs in a zip style plastic bag and pour the marinade in the bag over the ribs. Put the bag in the fridge overnight and grill the next day over medium direct heat. Usually only takes about 5 to 6 minutes over the grill. Keep turning the ribs until done. Don’t overcook them. I like mine medium rare. Take a taste test with one [or two LOL] until you get them the way you want. Here are some pics—-
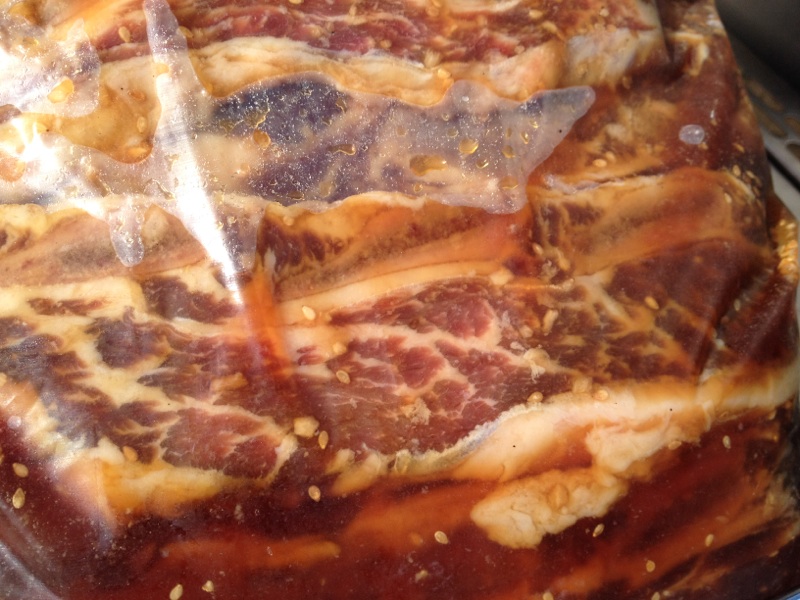
Here are the ribs in the plastic bag marinading.

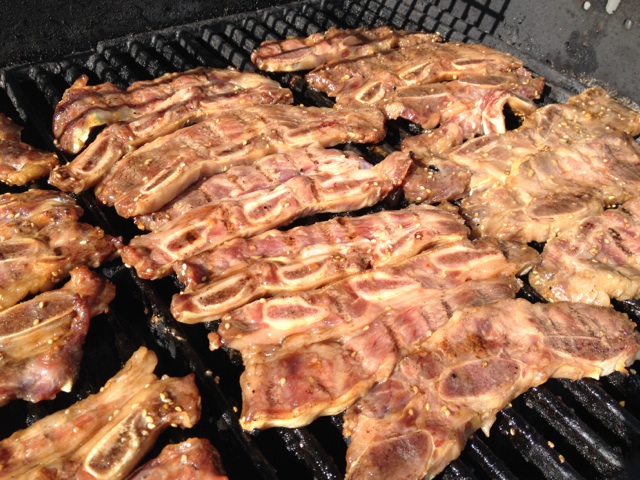
Ribs on the grill just starting to get some love from the grill.
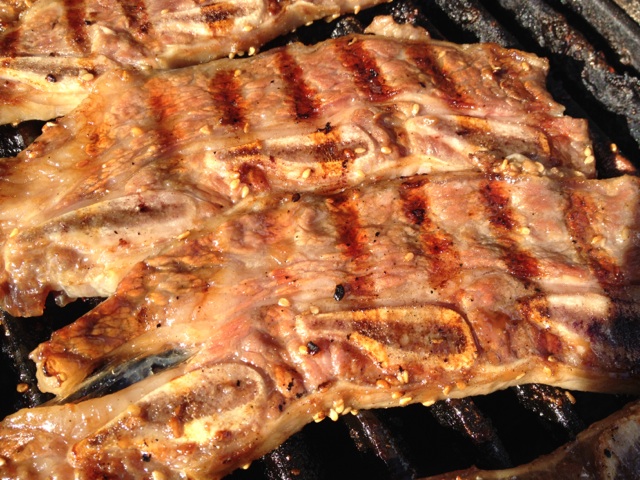
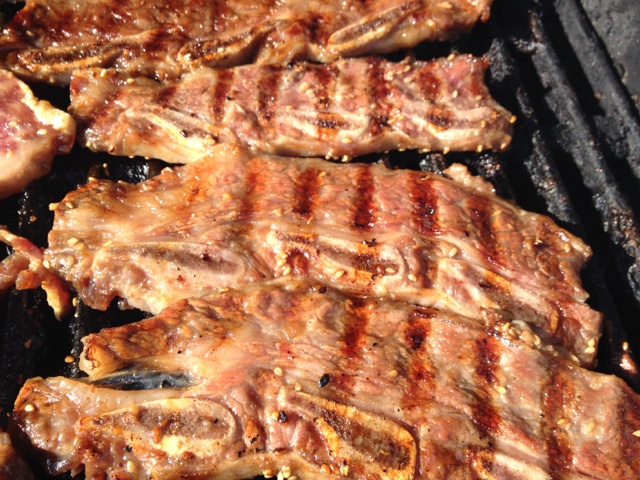
Check out those grill marks!!! These are ready to take off the grill. You can see how these ribs are cut against the short rib plate.
My plate with some rice and fresh cucumber kimchi along with these awesome ribs!!!!!
CHAR SIU PORK RIBS
I’m always a sucker to try new Asian recipe’s. I seen a picture of someone grilling boneless pork ribs using this recipe and I knew I had to try it. More sweet than heat, the way this recipe is formulated so if you want more heat I would increase the Sriracha sauce or maby add some hot pepper flakes to it to your taste. This is a Chinese marinade which I will try for chicken as well. Next time I make this I will make a small batch of this marinade for basting toward the end of the grill time. This will really improve the whole process. The way the recipe was written it didn’t call to baste the ribs toward the end but I think this will enhance the flavor and texture just as mopping pork ribs aid in the final product. Here is the recipe and the process:
1/2 cup of soy sauce
2 T hoisin sauce
1/2 tsp of five spice powder
1 tsp sriracha hot chili sauce
1 cup brown sugar
1 tsp red food color
2 pounds of boneless pork country ribs [ It’s best to use strips of pork butt for this ]
Mix all these ingredients well. Put the pork ribs in a bowl and add the marinade and blend in the marinade with the ribs. Let the meat marinate over night and grill them over indirect heat the next day. Make a extra batch of marinade for basting. Here are some pictures of the day I made these:

Here are the boneless pork ribs in the marinade.
It’s important that pork butt is used for these ribs. They have the right amount of fat needed to have a tender and moist strip of meat. Lot’s of times butchers put out lean cuts of “cushion” meat as boneless country ribs and in my opinion, that meat is just too lean. You could buy a small pork butt roast and cut your own strips or have the butcher do it for you.
Starting to get the grill marks!!!

Love those caramelized ends and sides. Basting will increase the caramelization that is soooooo good!!!

Here is my plate!!! Char Siu ribs with rice and fresh cucumber kimchi. I also add any left over Char Siu ribs to stir fry’s and pasta dishes.
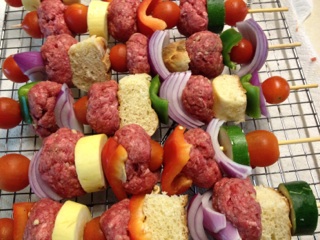
CHEESE BURGER ON A STICK
I’ve made kabob’s many times but never with ground beef. So I’m thinking meatballs, then thinking cheeseburger at the same time. When I make meatballs I usually add bread crumbs and a egg to the mix to act as a binder to hold in moisture and for the meatball [or meatloaf] to hold it’s shape without crumbling. I also had some buns I made left over, and decided to cut some in chunks to add on the stick as well.
I made some other kabob’s with the meatballs also but I did try the cheeseburger sticks to see how they turn out. On the cheeseburger sticks I added slices of onions, jalapeno peppers, cherry tomato’s, and chunks of my homemade buns. Slices of cheese were added at the end to melt on the meatballs. The other sticks had the meatballs, onions, bell peppers, squash and cherry tomato’s. I used 3 pounds of ground chuck, salt and pepper to taste, couple tablespoons of diced garlic and about 3/4 cup of Italian bread crumbs and one egg. Mixed all that up and formed my meatballs. Toward the end of the grilling I also brushed on some of my Butcher Sauce on all the sticks. Here are some pic’s ——-

Got them all lined up on my jerky rack to go on the grill.
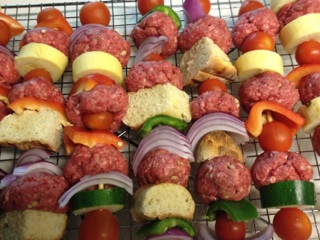
Closer look at the sticks.

On the grill they go on in-direct heat.
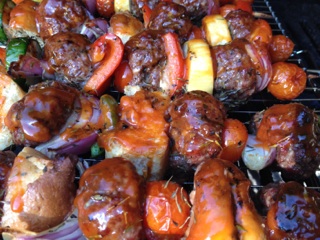

Putting some of my Butcher Sauce on them near the end of the grilling process.
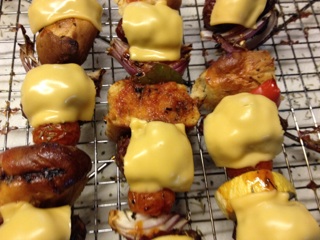
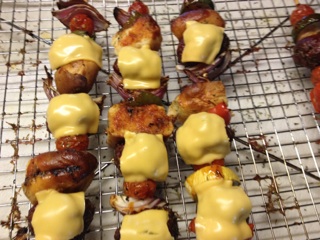
The chunks of my homemade buns are brown and the cheese has melted. The sticks are ready to come to dinner!!

Everything turned out great!!!!!!
RIBS RULE

 One of my favorite style of ribs on the grill or in the smoker, the meaty pork baby back ribs.
What are some way’s to make those ribs some of the best you ever had? Maby you have heard about the 3-2-1 method for spareribs and the 2-2-1 method for baby backs. These methods work best if you keep the temps around 225 deg. Here is how it breaks down:
Spareribs
3 hours unwrapped
2 hours wrapped in foil
1 hour again unwrapped
Spareribs take longer to cook than baby backs. They also have a higher fat content. St. Louis ribs are spareribs without the brisket and the same timeline would apply. The whole slab below has the brisket on and a strip of meat along with the membrane that should be taken off.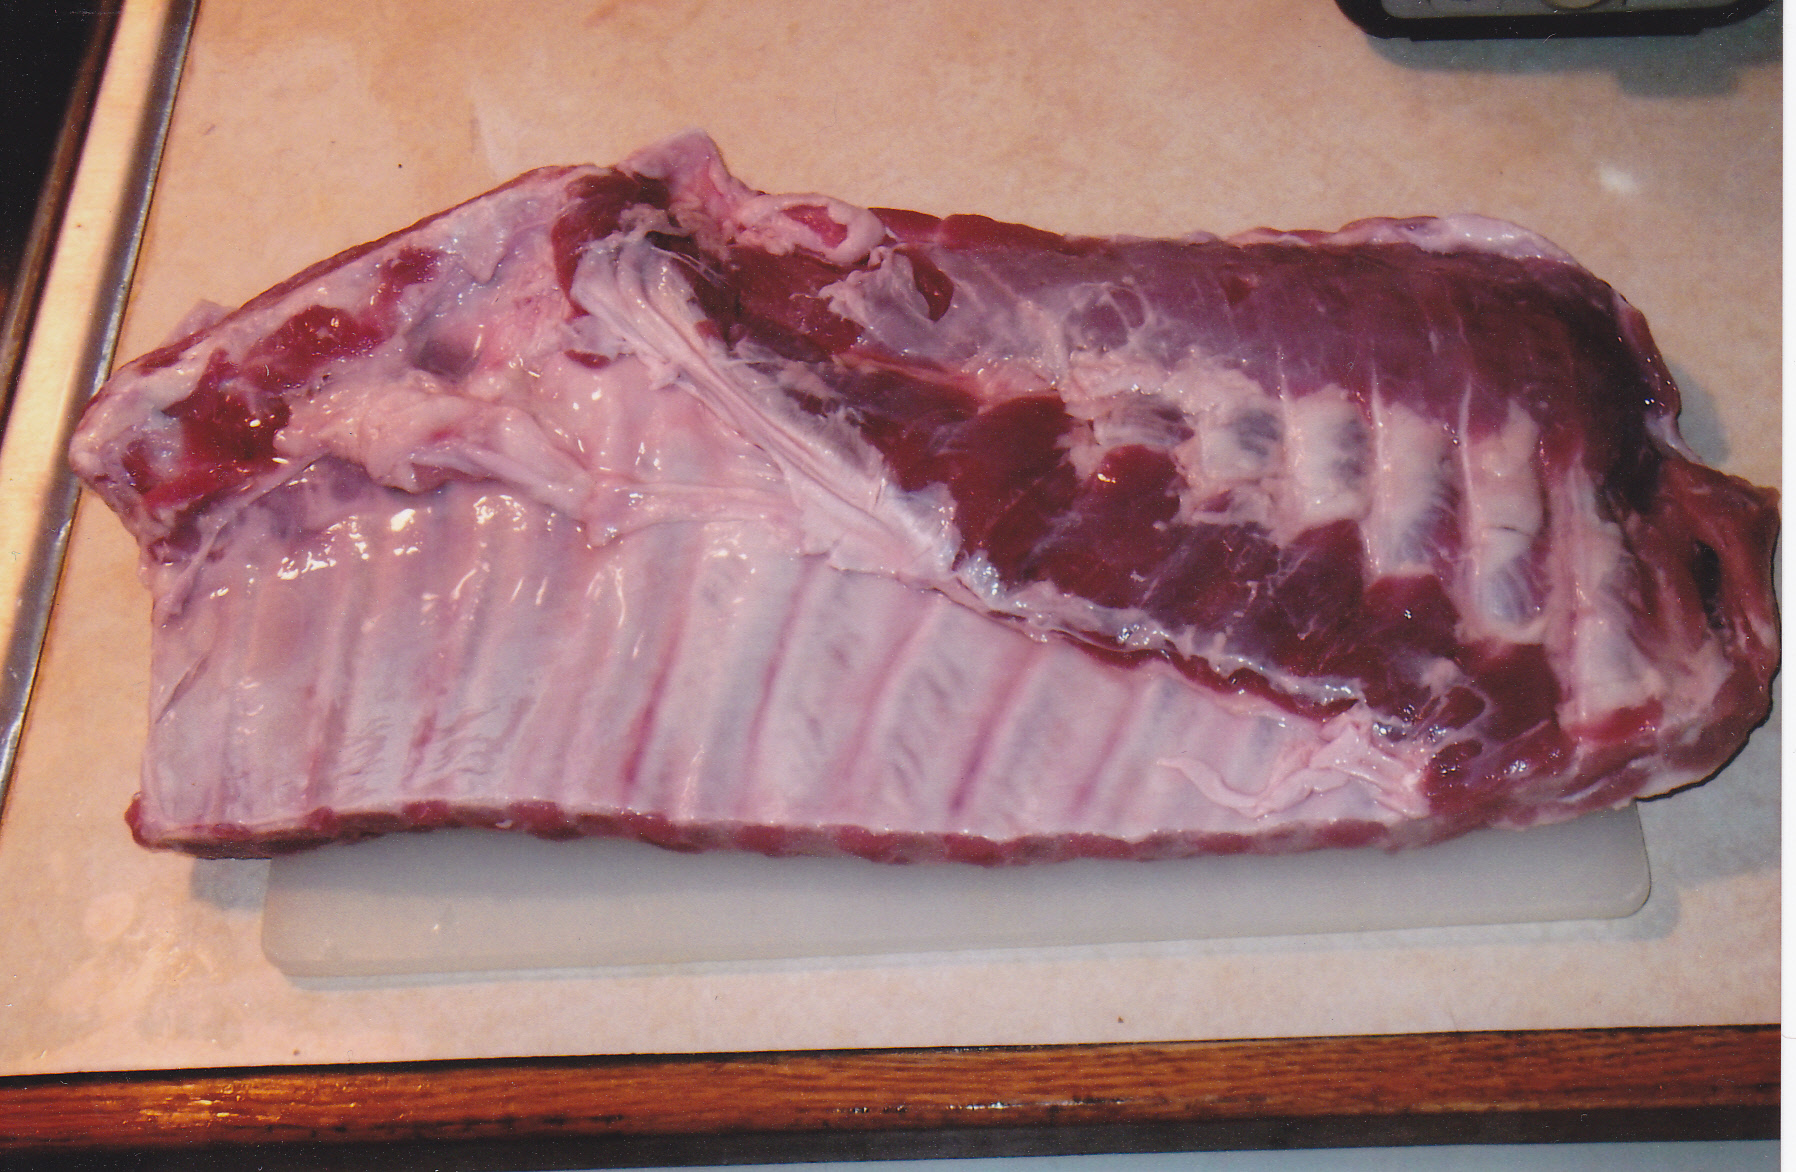 Just cut the strip of meat off as shown. Some people leave it on but I find it tough and I use it for sausage.
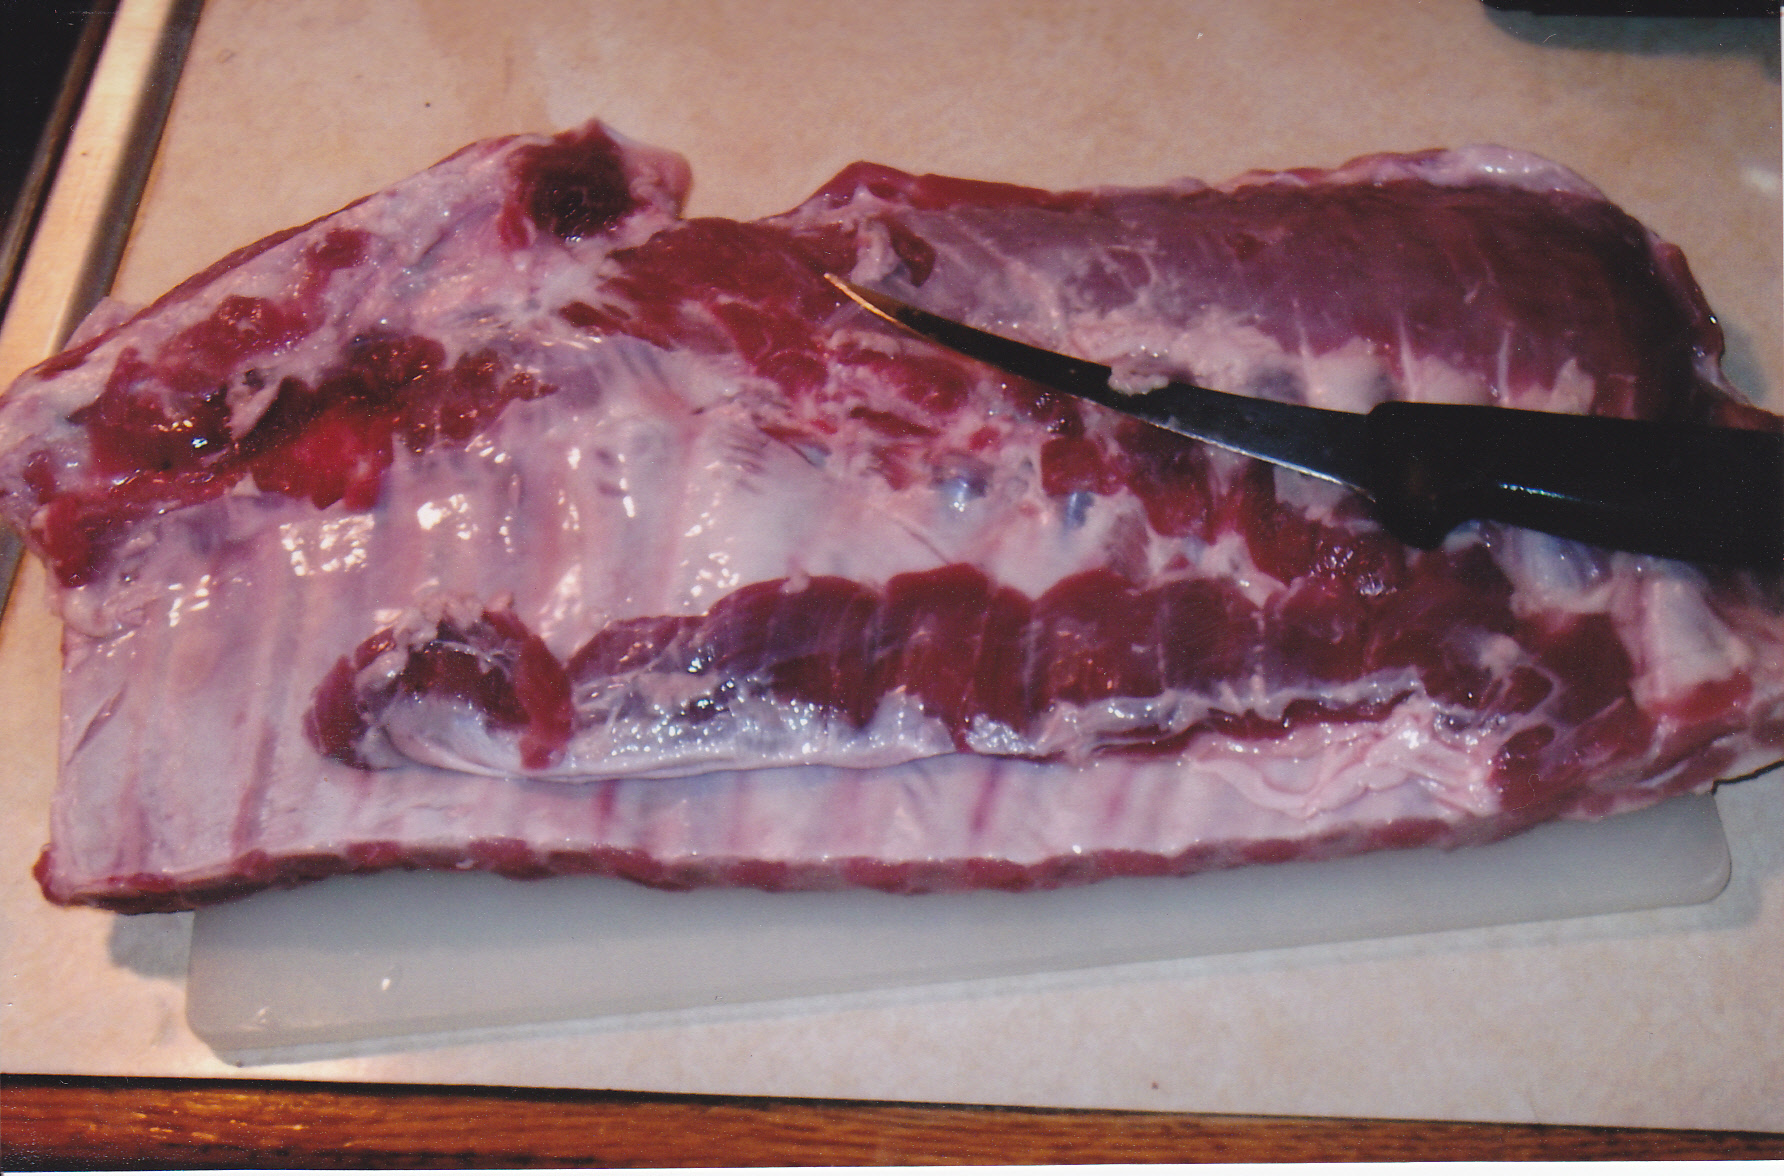 Then I cut the brisket off. Some people leave it on, and at time’s I do as well. I freeze the brisket so I can get a few saved up and brine them. Then i smoke them, chop them up, and use them in bean soup and other dishes. Next make sure you take the membrane off. I put a butter knife between the ribs and pull at the membrane. Then I take a paper towel and with my fingers pull the membrane off.
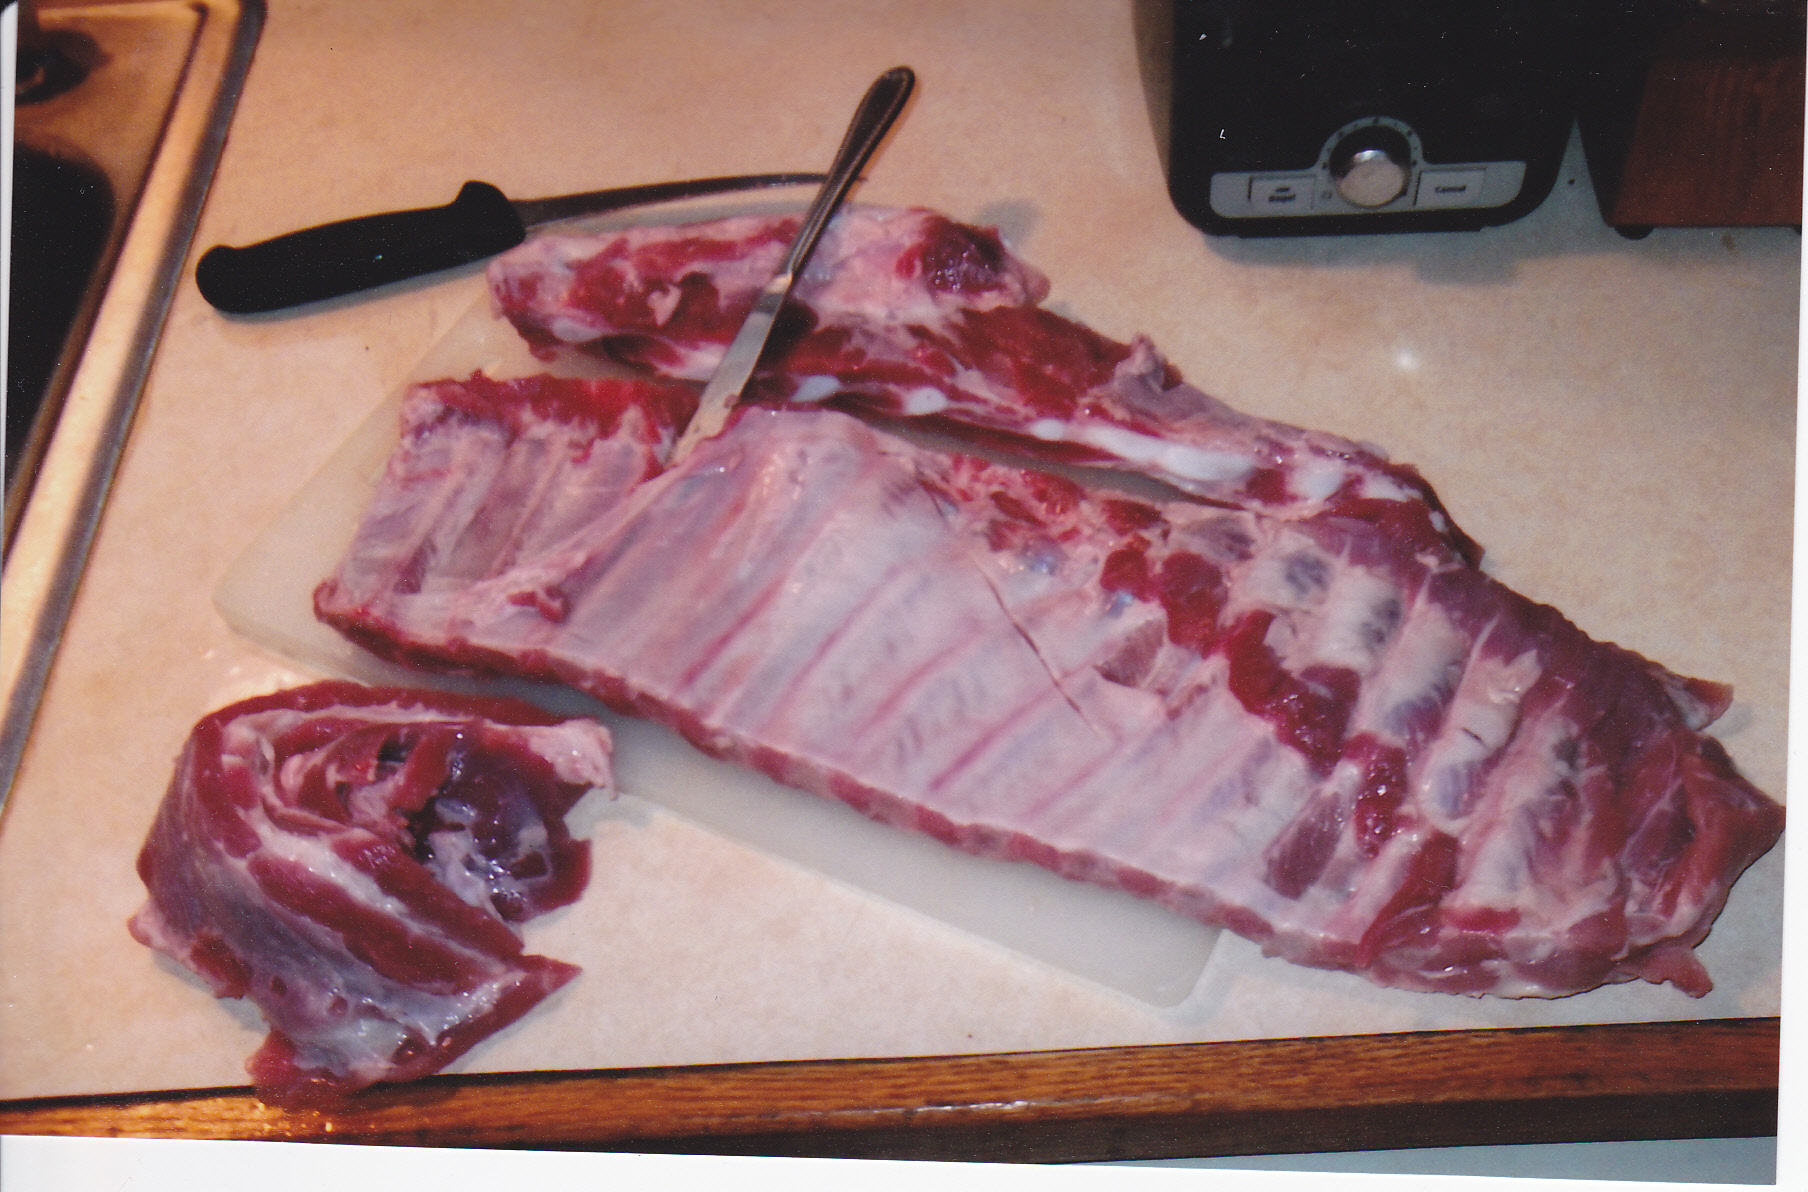 The meat from the brisket as I stated, I freeze and save for sausage. You can see where i have the butter knife positioned with some of the membrane pulled away. What’s left is the St. Louis rib shown below and a couple of pics of some sauced ribs at the end of the 3-2-1 cycle. The slab was too large for the smoker to leave whole so i cut them in half.

 The ribs turned out great with some fried rice as a side.
Baby back ribs also can be prepared with a timing method such as the 2-2-1 method. This method works best at temp right around 225. Time may vary a little depending on the thicknes of the baby back’s.
2 hours with no foil
2 hours with foil
1 hour with no foil [sauce or mop time]
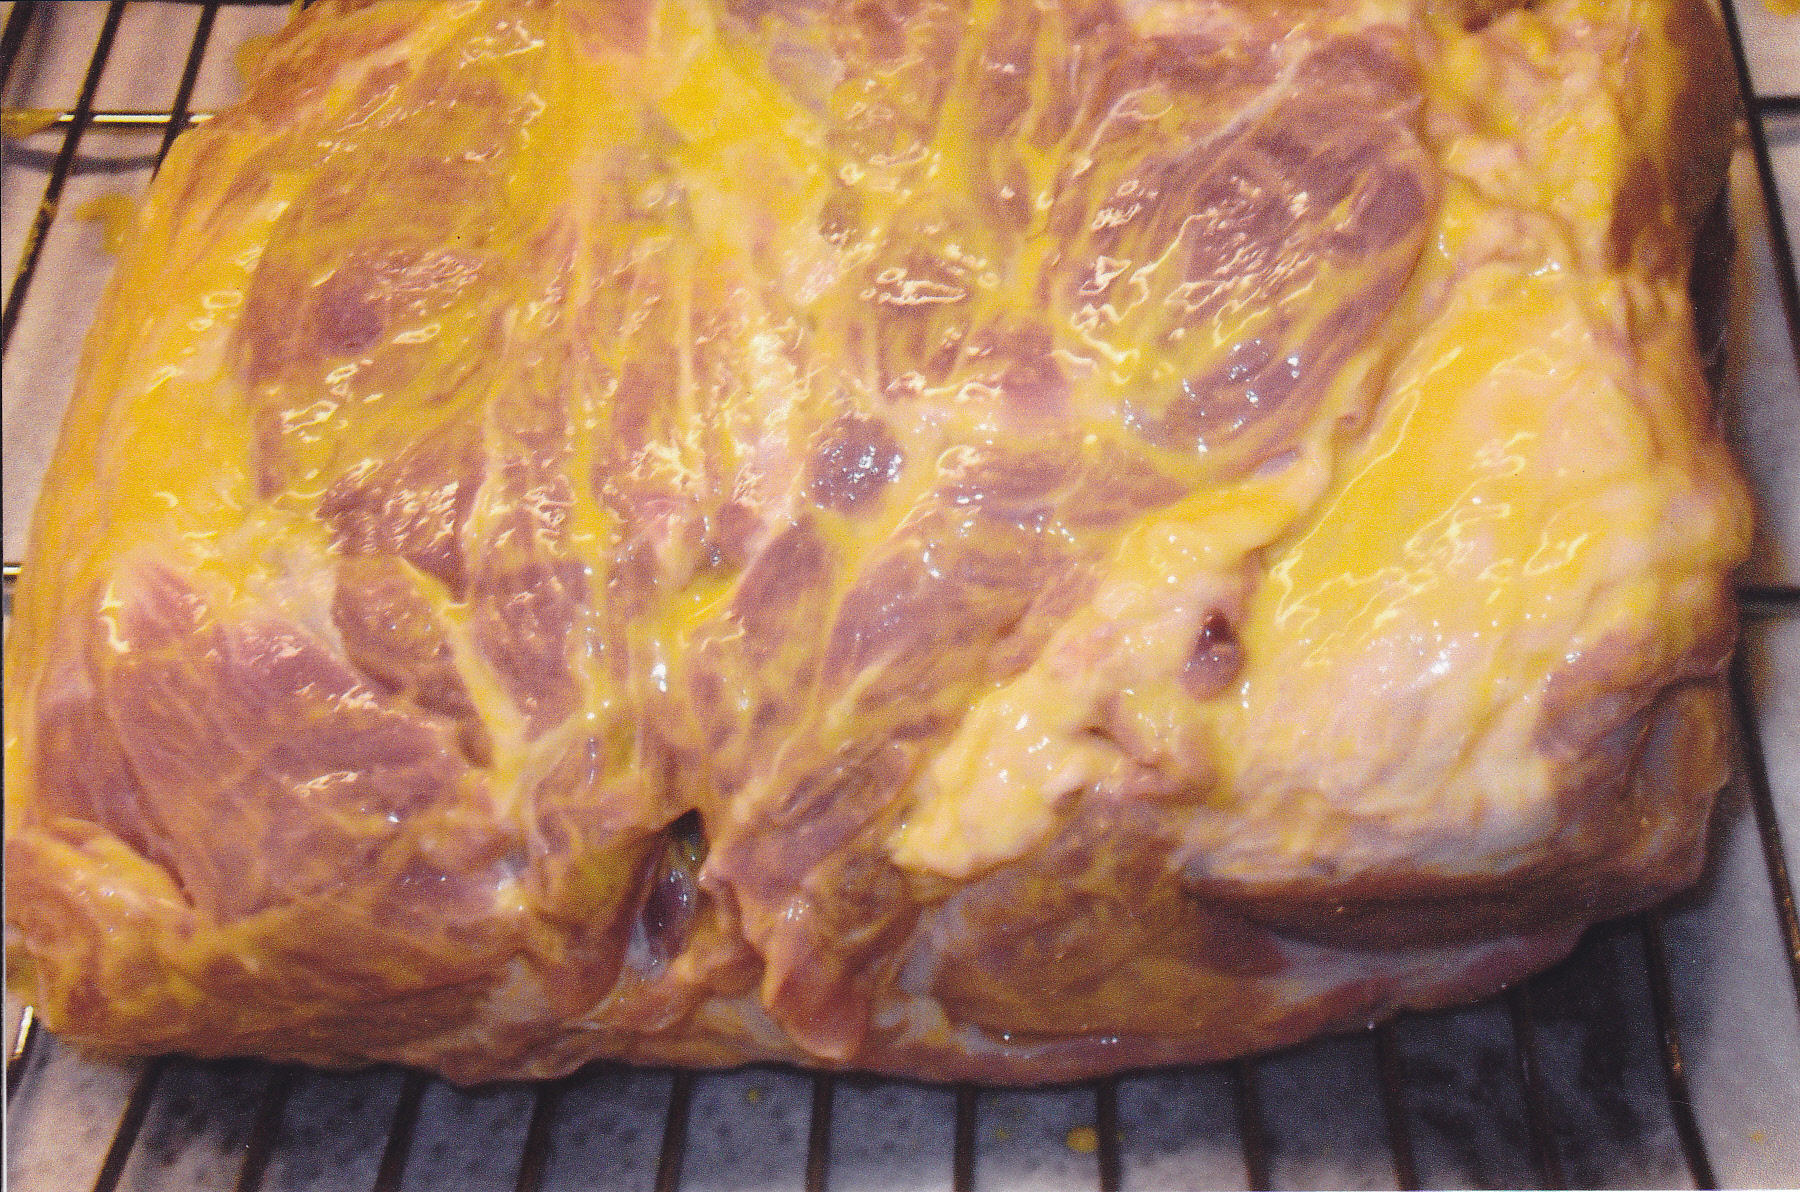
Always pull the membrane off the back of the ribs. Not only is the membrane unpleasant to eat, it also hinders the spices or sauce to enter the meat on that side of the rib. Before you put on your favorite rub, smear some yellow mustard on both sides of the ribs. This is what is called the “glue” in many parts of the country. The mustard helps the seasonings of your rub to stick on the meat much better.
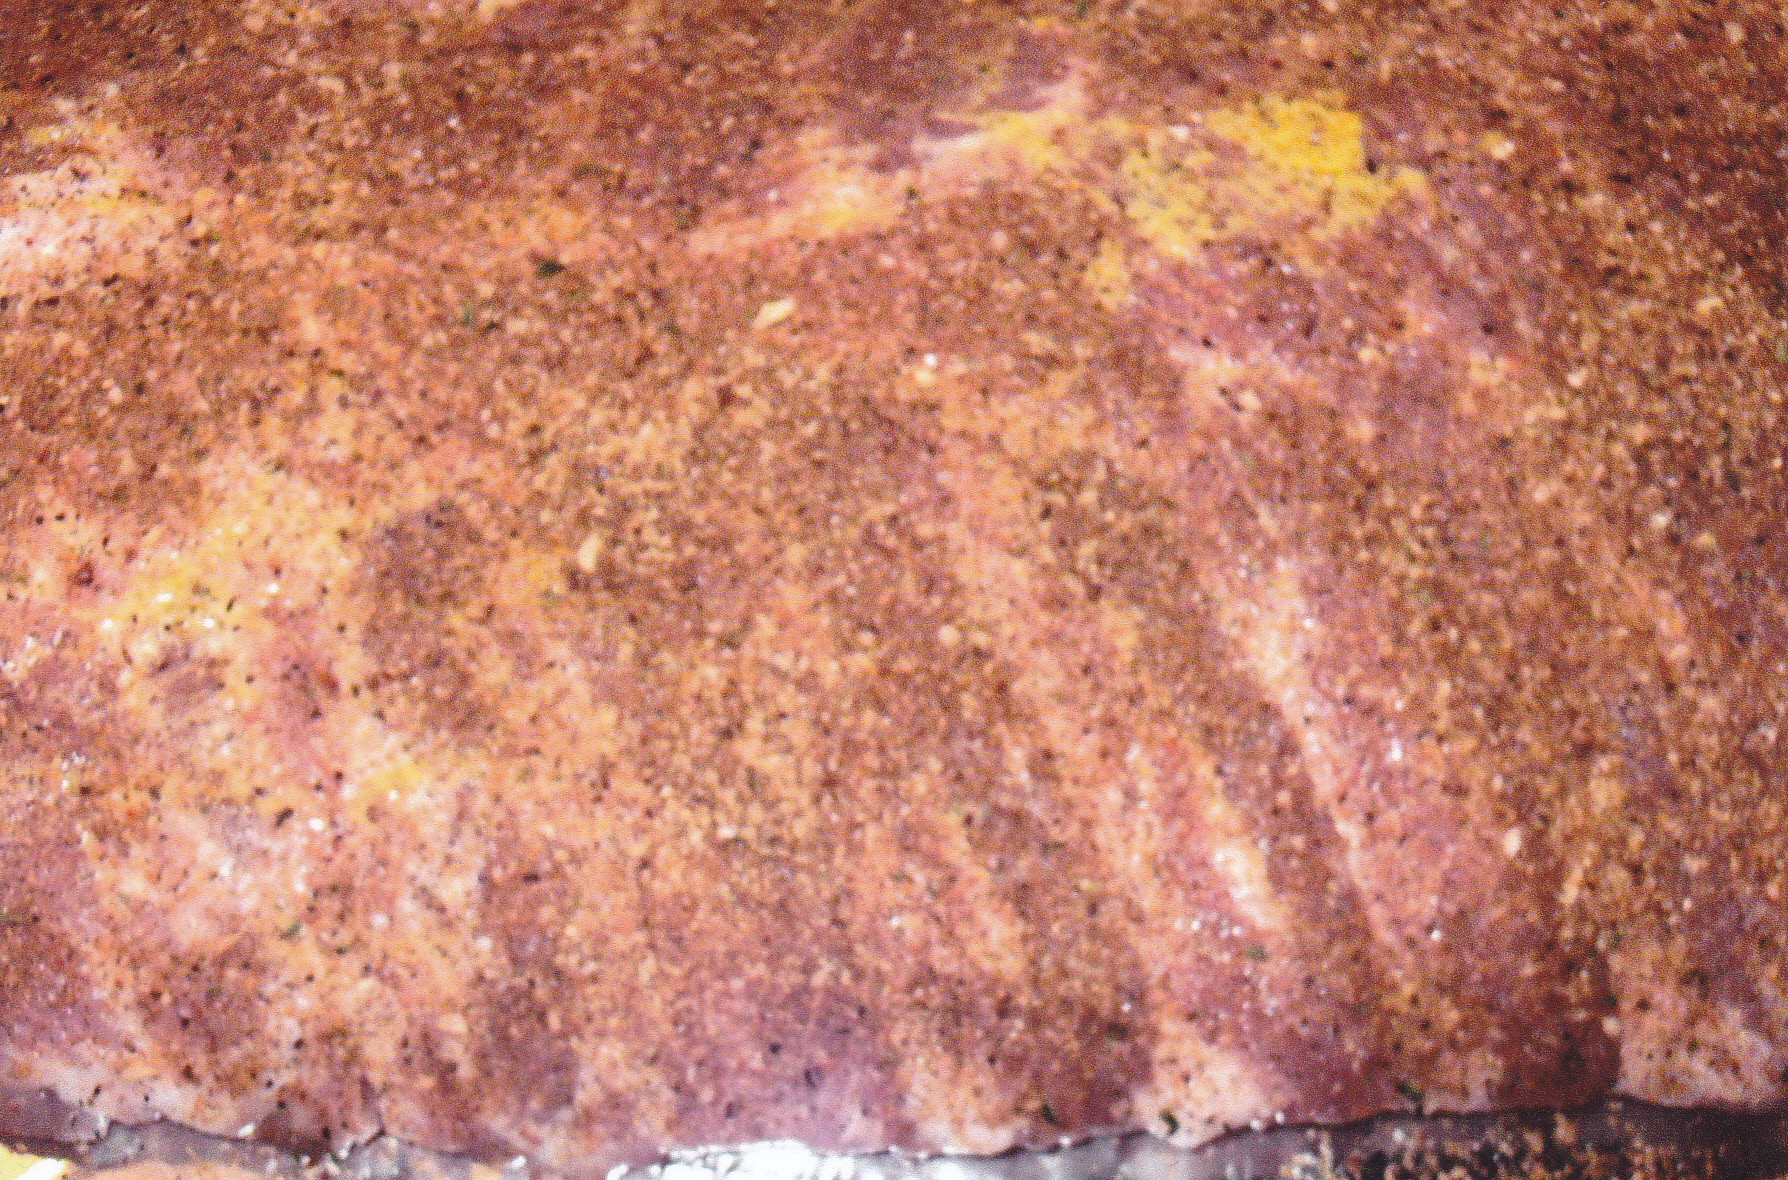
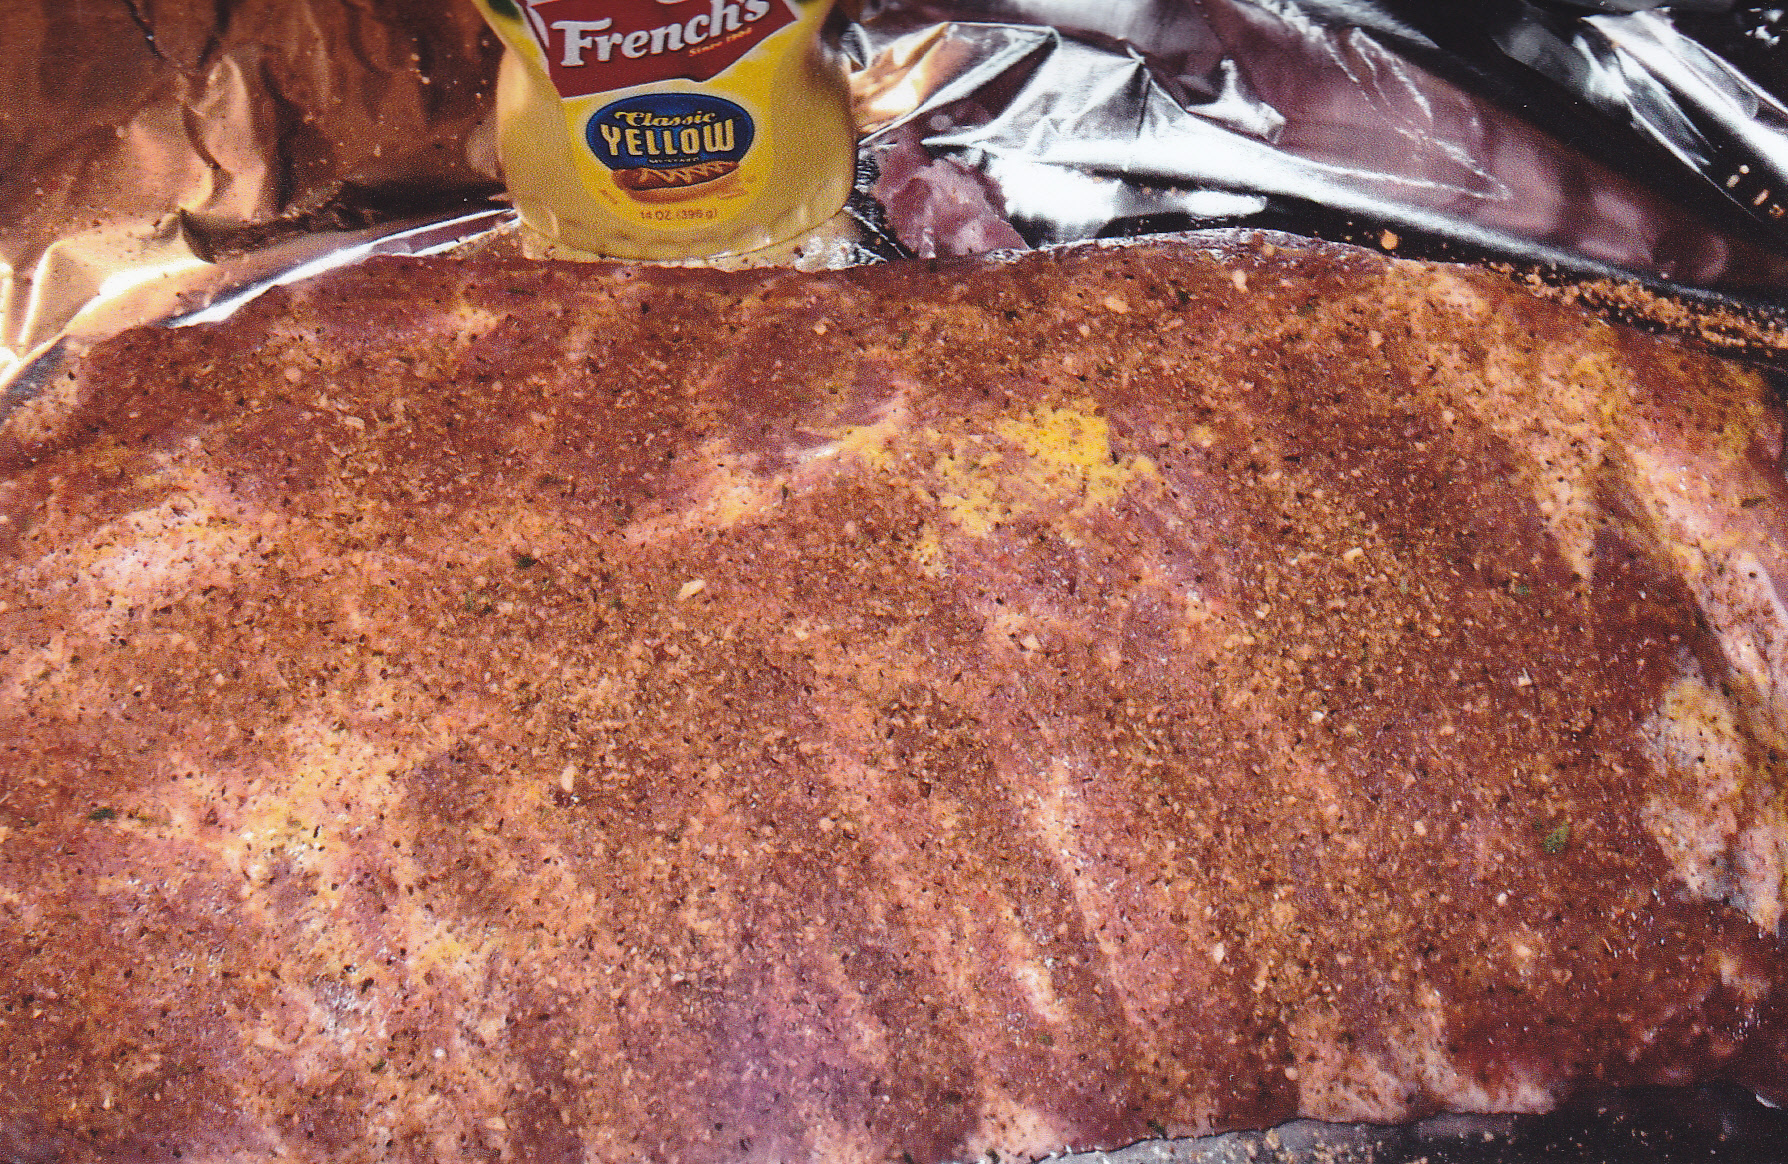 Now the mustard and the rub is apply’d.
 After some time without foil and with foil, my favorite part of grilling the ribs [and smoking] is MOP time. I don’t use store bought sauce. I make my own. With these ribs above I use my simple Butcher Sauce as I call it. After all I was a butcher for over 35 years. It’s realy simple, but is very good.
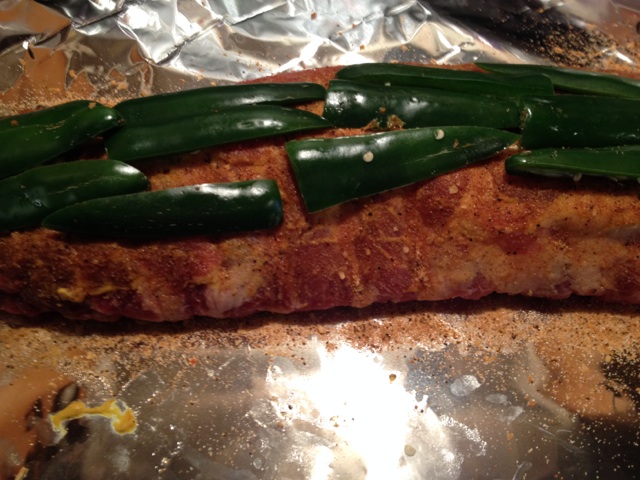
JALAPENO BABY BACK RIBS
I wanted some heat for my ribs so I came up with this idea. Sure I could go with a hot sauce, but I have my own sauces. Add some red pepper flakes would do it as well. But I wanted to try some jalapeno peppers. When cooked, the peppers do loose some of the heat but retain some of it. I did scrape the seeds out this time around. Those seeds do make a difference if you leave them in.
So I had two racks of baby back ribs. My wife and her mom like the ribs just with the rub and sauce on the side. As for me, I like everything on them. I normally use the 2-2-1 method on baby backs as I mentioned above and planned on doing the ribs that way. However plans change as everyone knows. So I had less time, and I went to the “whatever works method” LOL. Instead of the smoker, I went to my Char-Griller barrel type grill/smoker with the side fire box. Now that fire box can keep your barrel at 225 pretty much consistent with charcoal. But again, no time to use that as well.
First step as always is to take the back membrane of the ribs. Next I smeared mustard on both sides of the ribs. This is the glue that holds the rub to the meat. Then I put the rub on. I took the jalapeno peppers and cut them in half length wise and scrapped the seeds out. Put the halves on one of the slabs and left the other slab as is just with the rub. I then double wrapped the slabs in foil. Had the charcoal ready and put the ribs in the barrel on in-direct heat. The temperature inside the barrel stayed around 300 during the whole cooking time.
I left the ribs in the foil for about two hours and checked them. Was getting some pullback so they were ready to escape the foil. Took the foil off and put the ribs back on the grates. I spritzed the rack with the rub with a mix of brandy and apple juice to keep the meat moist. The other rack I put my sauce, Reinhard Caught A Buzz Sauce [the recipe is on this page]. This took another hour and the ribs were ready. Here are some pics of the day:

Always take that back membrane off. This allows for the seasoning and whatever else you put on the ribs to meld in on both sides instead of just one. That membrane acts as a barrier, so take it off.
Put just the rub on this one.
Sliced the jalapeno peppers in half and on the slab they went.
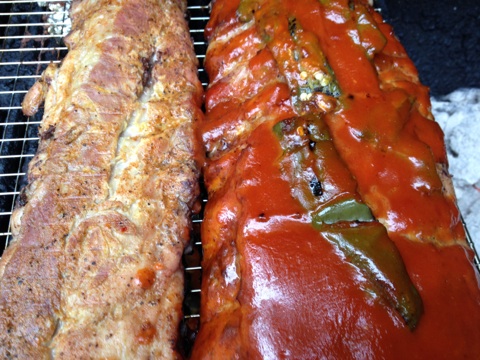
Here are the slabs of ribs side by side getting some spritzing and saucing.
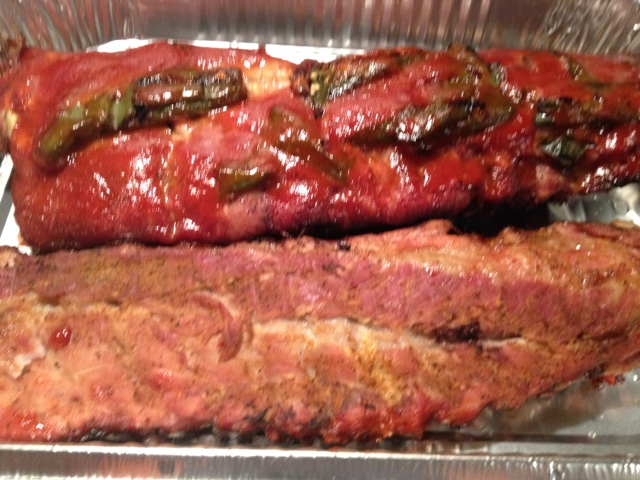
When the ribs were done I put them in a foil pan and covered the pan with foil until I got the plates ready to serve.
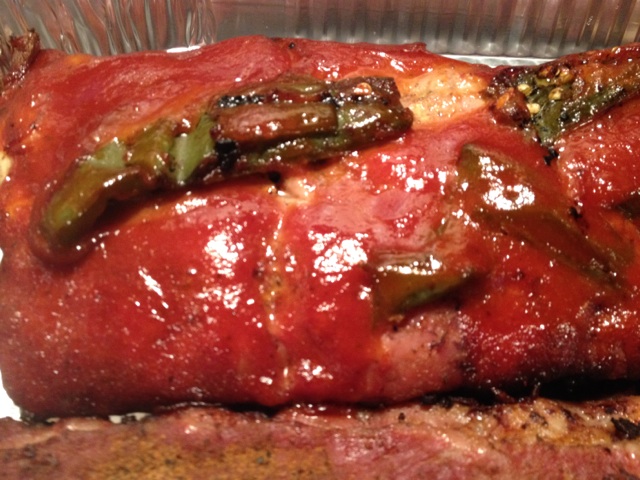
Another shot of the slab with the peppers. Those peppers were nice and tender and gave the meat some heat. Just the right amount for most folks I think, kind of scale of 4 out of 10. Next time I think I may scrape just a few of the seeds out of each pepper and leave some in.
Here is my plate. As if I could not get enough heat I added some more. Sprinkled some crushed red pepper on my rice along with some sesame oil and soy sauce. The peppers were good too. Give it a try.
Butcher Sauce
1 cup ketchup
1 cup Western Salad Dressing
Enough apple juice to thin the sauce to your liking for mopping.
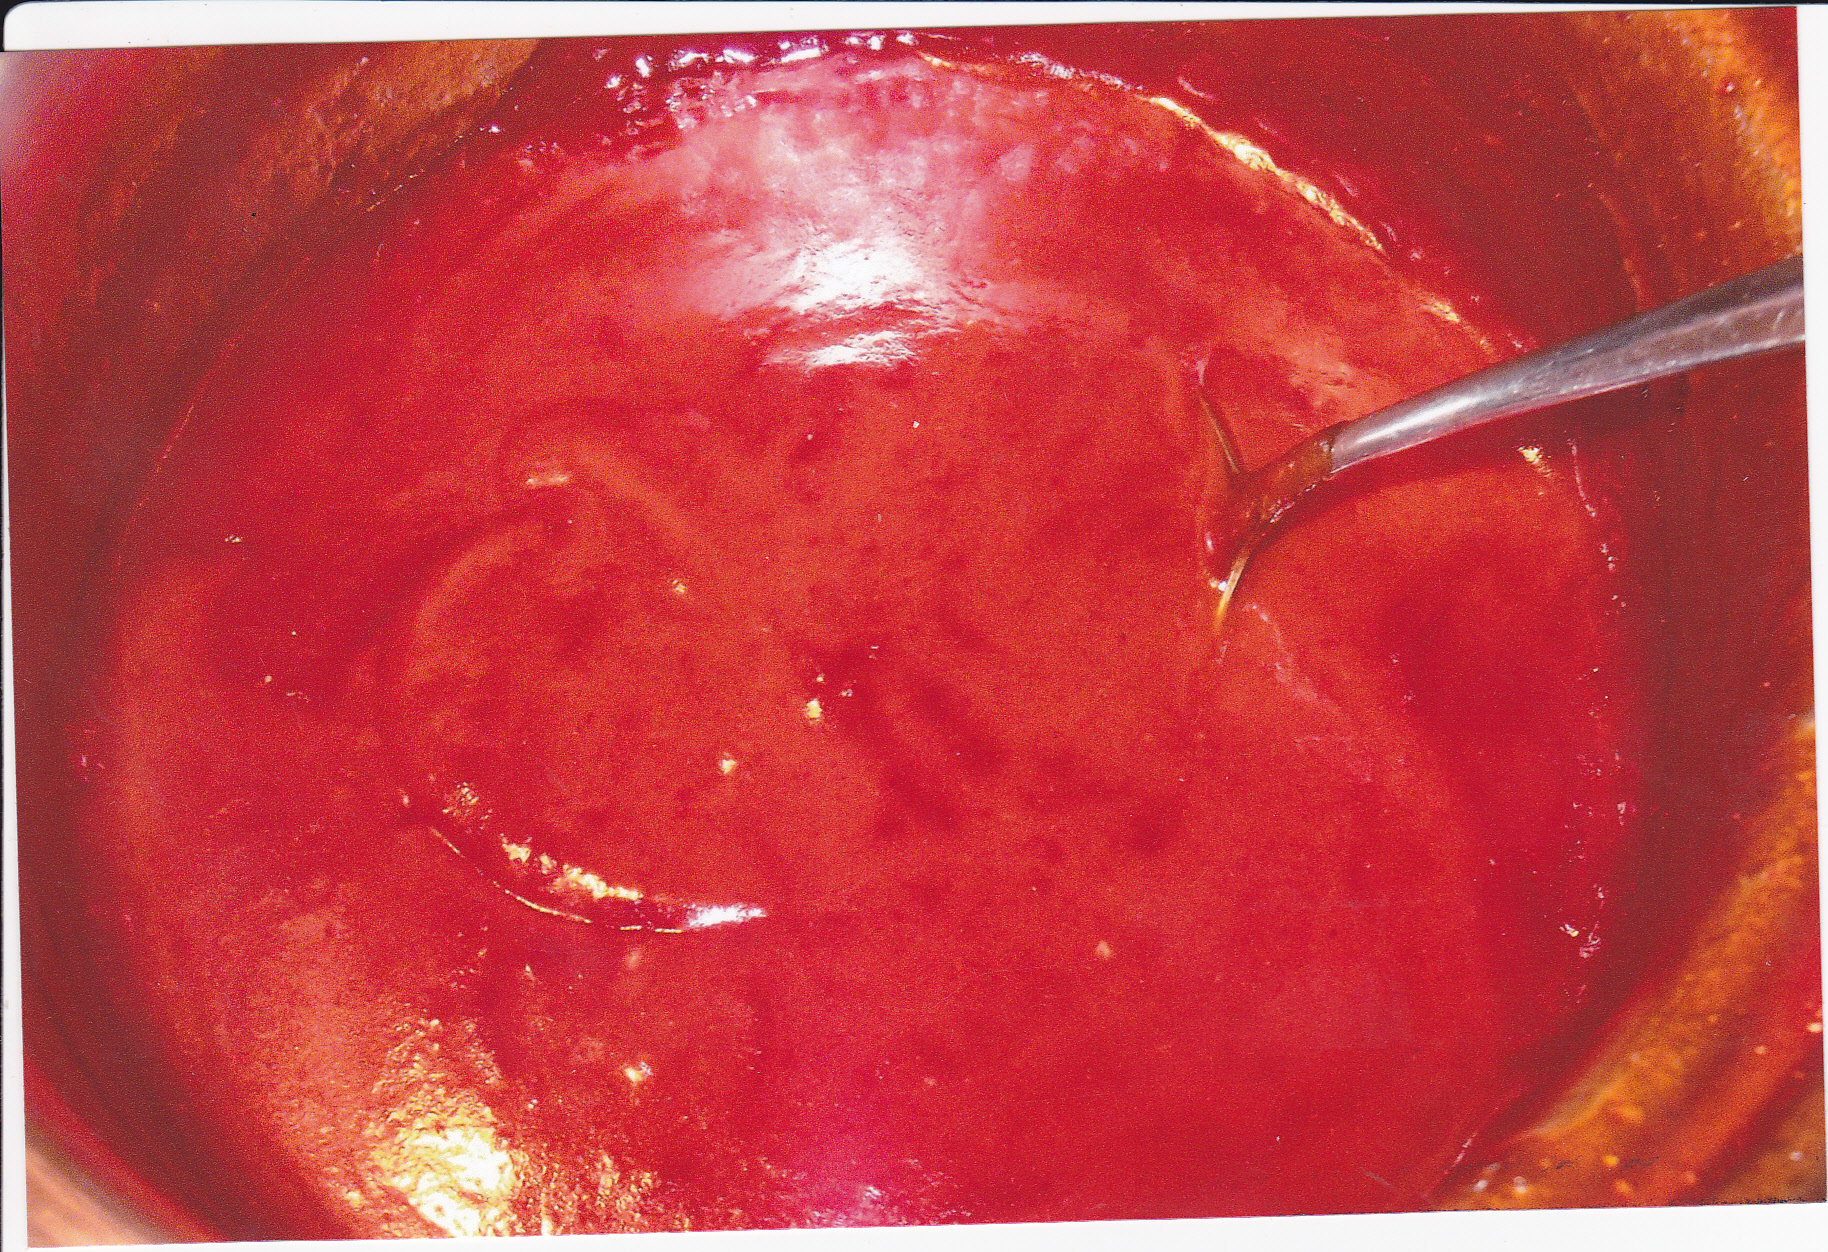
Put the ketchup and Western Salad Dressing in a saucepan. Put it over low heat till it starts to simmer a little. Then add the apple juice and stir until you get the texture you like. Let it heat over low heat and then slop it on the ribs. During the last hour of smoking or grilling the ribs. Mop the ribs a few times until they are done to your liking. I dont like fall off the bone ribs. Tends to be overcooked for me. I pull the ribs when they are tender to the bite. One reason I like the last hour of the process. I can take a rib off the center and take a taste test. This way i can take them off to serve or leave them on a little more until done.
Here is a rub I made up after a few try’s at developing a rub that i liked. The only thing that is missing is some added cayenne pepper which are optional as it is at this house. I love some heat but my wife and her mom [who lives with us] not so much. If I make a couple of racks of baby backs I will make two versions of the rub. One without the cayenne pepper and some with. Here is my rub recipe:
Rino’s Rub [the fellow workers used to call me that]
4 tsp kosher salt
2 tsp. ancho chile powder
2 tsp. sweet paprika, preferably Hungarian
1 tsp. ground cumin
1 tsp. celery seed
1 tsp. ground black pepper
1 tsp. onion powder
2 tsp. garlic powder
1 tsp. cayenne pepper [optional]
Mix everything up good and store in a sealed container. This wont make a big batch of rub but you can double it or more. Try this amount first and go from there.
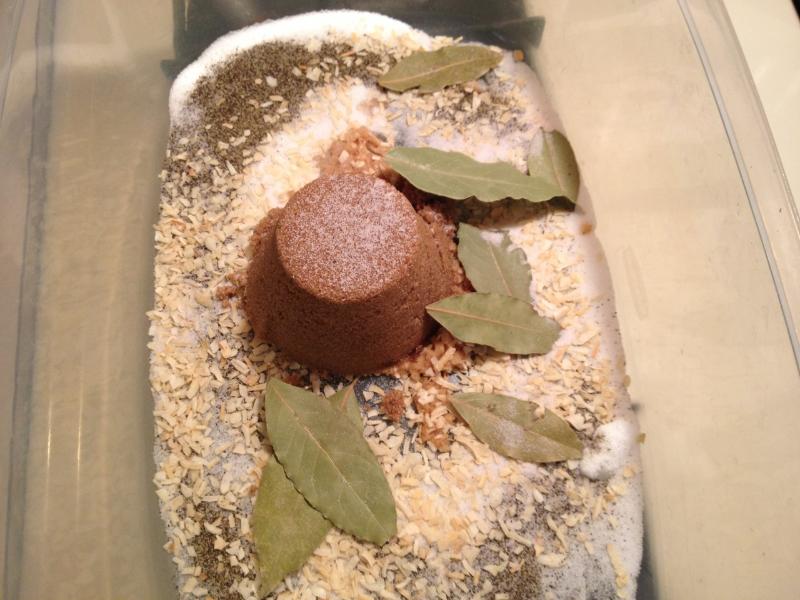
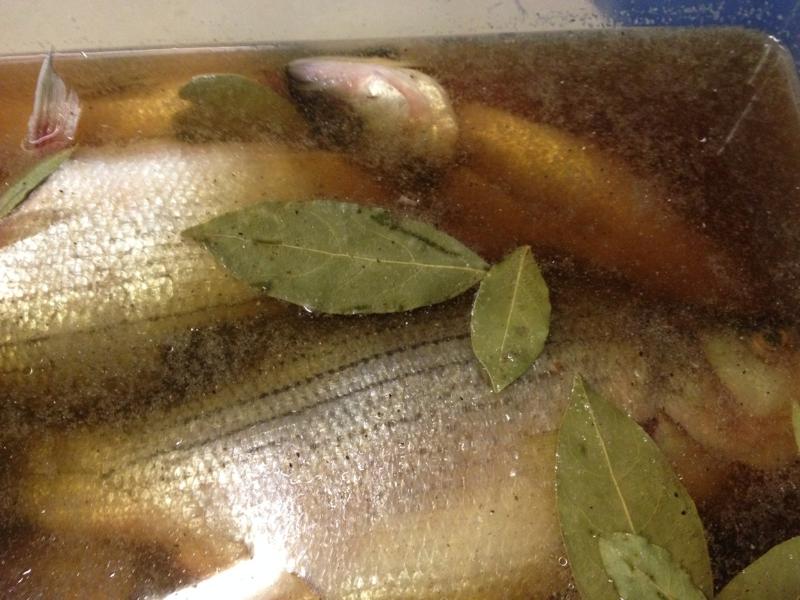
Let’s try smoking some fish!! A friend of mine gave me some tullibees to smoke. Well, I got a brine together and went from there. Here is what I did:
Up North Fish Brine
1 gal. water
1 cup brown sugar
3/4 cup pickling salt
1/8th cup black pepper
2 T diced garlic [I use the stuff in the jars]
7 bay leaves
2 T onion powder
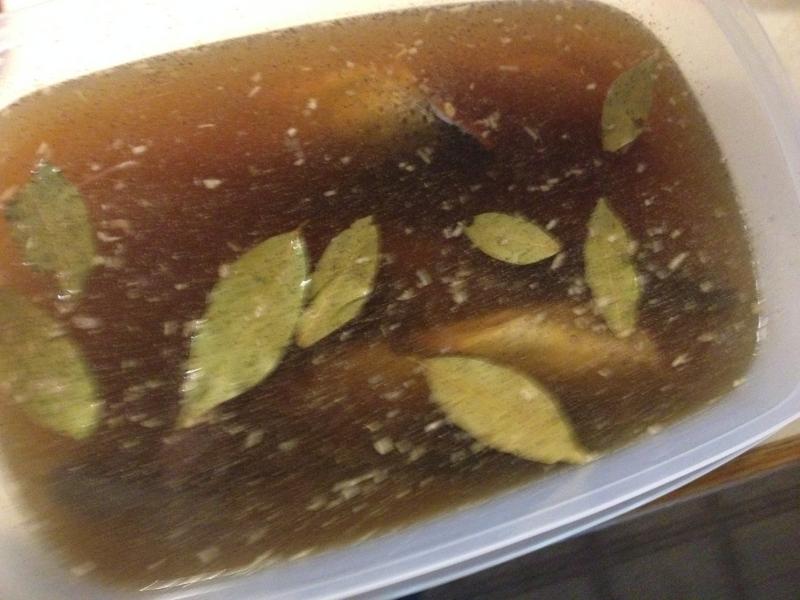
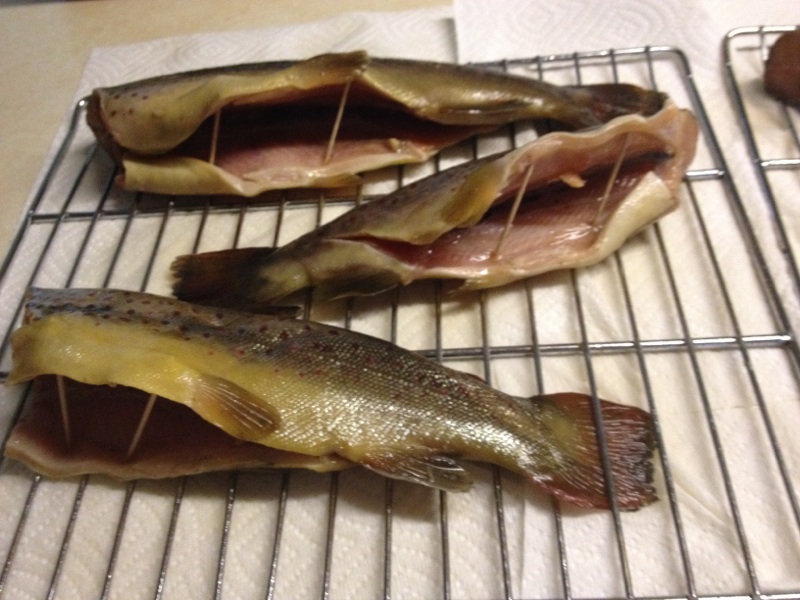
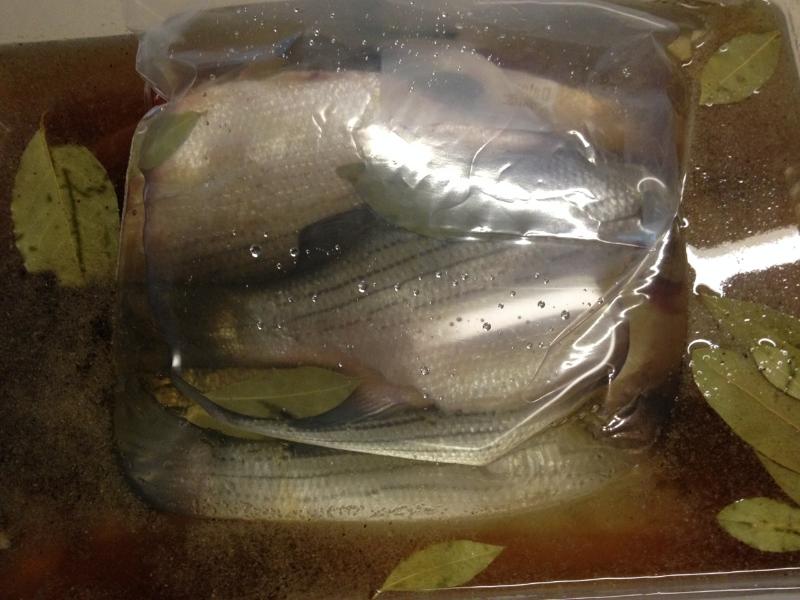
Mix all the ingredients well with the water. Put the cleaned Tullibees in the brine and put the fish in the fridge for 18 hours. Whole fish take longer than fillets. The next day after the brine, rinse the fish with cold water and pat them dry with paper towel’s . Spray the smoker racks with Pam and put the fish on the racks. I left the fish on the rack for about 2 hours until a pellicil formed. That is a thin film that covers the exposed flesh. This will help prevent fat or moisture from leaking out of fillets or whole fish during exposure to heat. The pellicle is also important for this lets the smoke adhere to the fish.
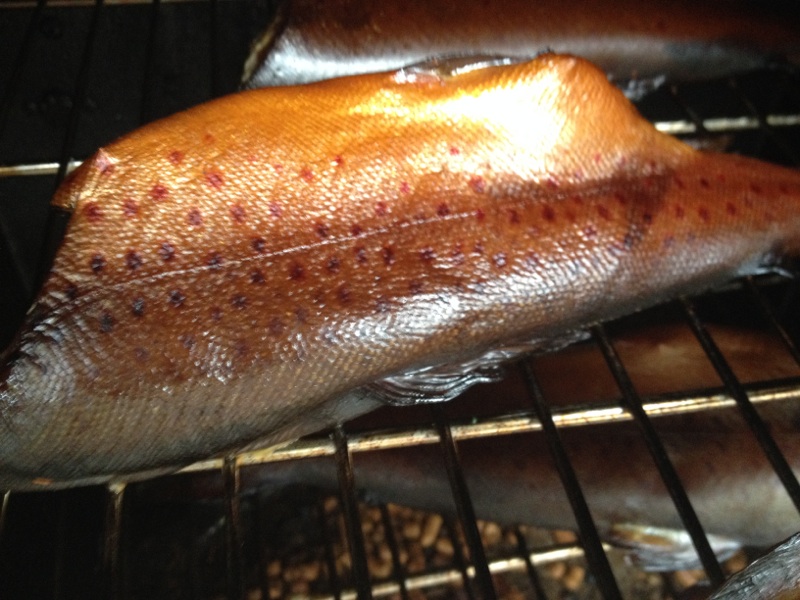
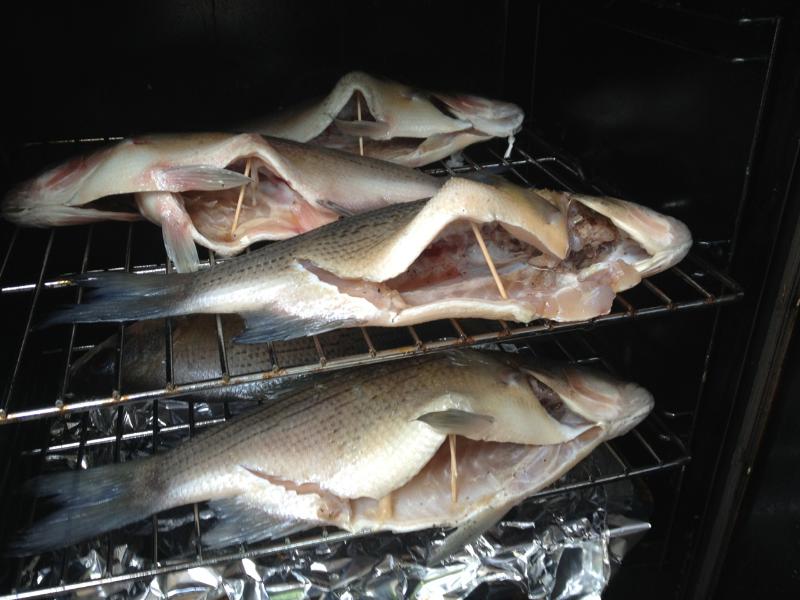
Set the smoker to 225 and leave the vent open. I dont use a water pan for this. I do have a drip pan underneath the fish. Tullibees will have more oil than most freshwater fish so you will see some dripping from the oils.
These fish took 4 hours before the internal temp was 160 deg. The USDA says 145 is a safe internal temp for fin fish but I go between 155 and 160. That’s just my personal preference. That’s when i took them out to cool on the racks. After they cooled I put them in a container and in the fridge they went until the next day. The next day ate one and cryovac’d the rest. I thought they were flavorful and moist. Not salty at all. My friend liked them as well. This will be my brine for fish from this point. Here are some pics from the day:
 In the brine the fish went for 18 hours.
 After brining the fish, I rinsed them in cold water and patted them dry. Sprayed the racks with Pam and placed them on the smoker racks. I left them on the rack for about 2 hours and then put them in the smoker.

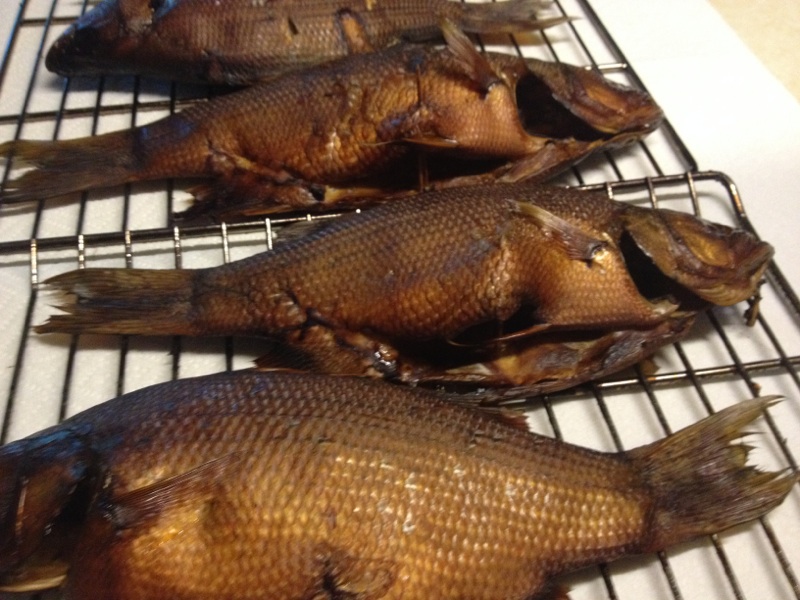
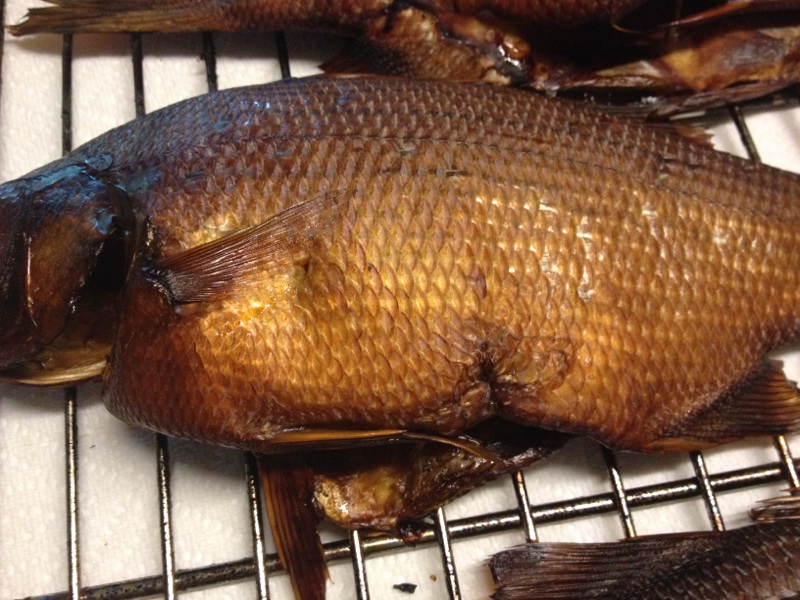
 The final results of the process. Love that golden color from the smoke of the cherry wood chips. Cherry is a milder smoke but I would also use hickory for this also. Cant wait to get some more tullibees or some trout and salmon coming up this year.
SMOKED BROWN TROUT
Thawed out some brown trout that I caught this past June. I used the same brine [Up North Brine] but I changed it just a bit with one added ingredient. That ingredient was Cure#1. I wanted to add some color to the flesh of the fish plus the cure does enhance the flavor a bit. The results were very nice as you will see in the last picture. The cure did give the trout a nice pink color. I only added a teaspoon of cure to the brine [one gallon]. I smoked the trout starting with a 130 deg. temp and started the smoke with a mix of oak and maple. Of course I did let the trout dry for a couple of hours until a pellicle formed. I gradually set the temp up to 140 deg for another two hours and the last hour I got it up to 200 deg. until the internal temp was 150. Then I pulled them out and let them cool off on the counter. After they cooled I put them in the fridge for a overnight stay. Next day I ate a couple and the rest went into vac pacs and in the freezer. Here are some pics:
Here are the dry ingredients for the Up North Brine with the cure included.
Brown trout in the brine.
Here are some of the brown’s drying out to form a pellicle.
Getting some nice color.
Yep, I think they are done!.

Cooling them off and later putting them in the fridge for a stay overnight.
Had to eat a couple!!!
You can see the pink color that the cure gave the trout’s flesh. Really good. I’ll be using this cure with the Up North Brine in the future.
WHAT’S A PELLICLE [COOKING]
A term that is commonly used in the process of smoking fish. A pellicle is a skin or coating of protiens on the surface of meat, fish or poultry, which allow smoke to better adhere the surface of the meat during the smoking process. Useful in all smoking applications and with any kind of animal protien, it is best used with fish where the flesh of, say, salmon, forms a pellicle, the surface that will attract more smoke to adhere to it than would be the case if you had not used it. Without a pellicle; the fish would be inedibly dry from enough smoking to produce a tasty finished product. It is the pellicle which permits the transformation creating delectable smoked salmon or any fish you smoke.
Before cured foods are smoked, they should be allowed to air-dry long enough to form a tacky skin, known as a pellicle. The pellicle plays a key role in producing excellent smoked items. It acts as a kind of protective barrier for the food, and also plays an important role in capturing the smoke’s flavor and color.
Most foods can be properly dried by placing them on racks or by hanging them on hooks or sticks. It is important that air be able to flow around all sides. They should be air-dried uncovered, in the refrigerator or a cool room. To encourage pellicle formation, you can place the foods so that a fan blows air over them. The exterior of the item must be sufficiently dry if the smoke is to adhere.
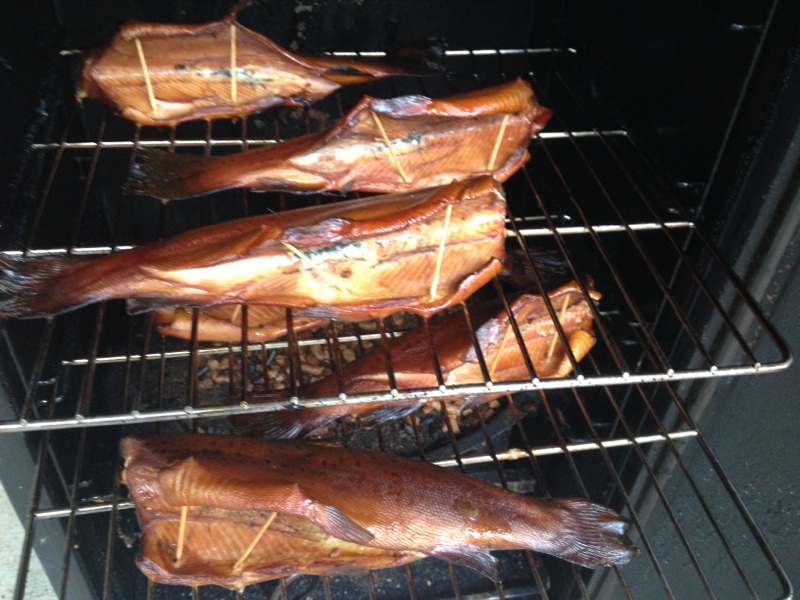
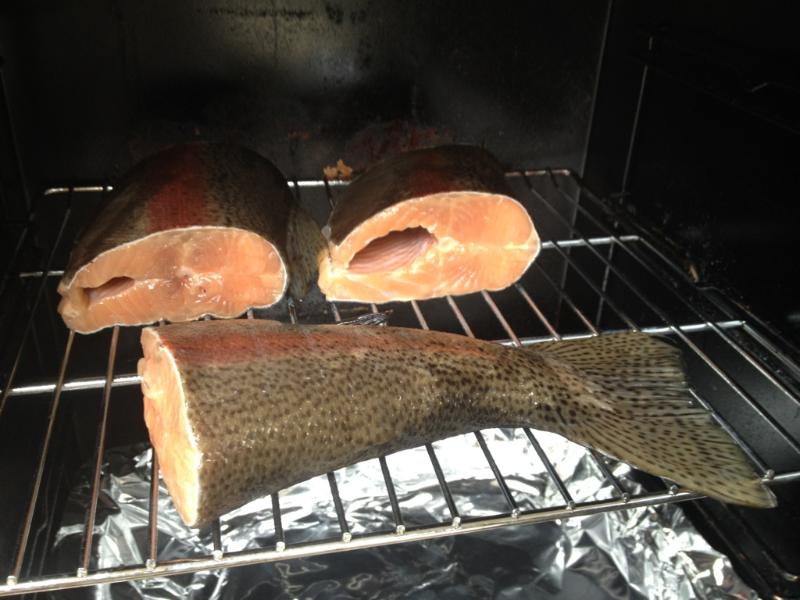
SMOKED WHITE BASS
Made some smoked white bass for a friend of mine. Using the same brine as above with the same process, except since these white bass were larger than the tullibees they took one hour longer [5 hours]. Here are some pictures of the process—–
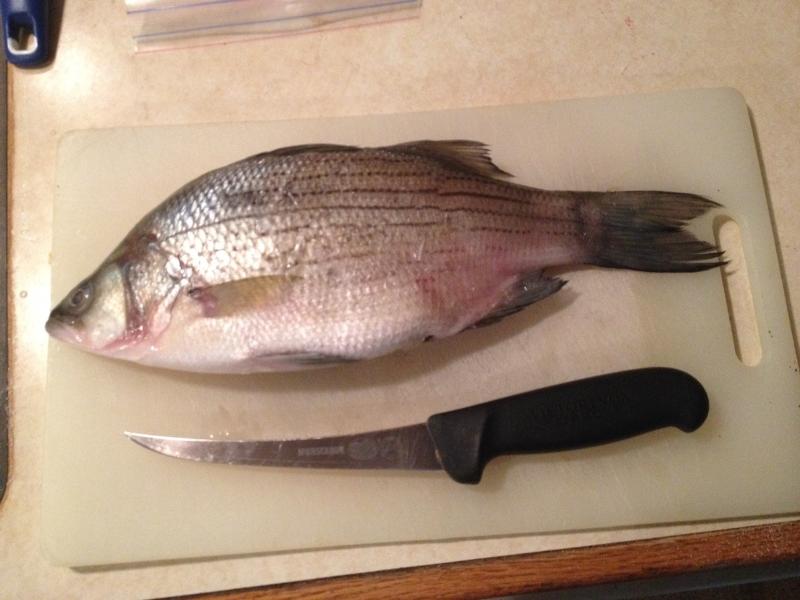
To clean the white bass I just take out the guts, gills, and clean the rib area well.
Mixed up the brine and put the bass in my plastic container. To keep the fish submerged in the brine, I filled up a zip lock bag half way with water and put it on top of the fish.
 A
A
After 24 hours in the brine, I rinsed the fish with cold water, patted them down with paper towels, and placed them on my oiled smoker racks. I let them set on the kitchen counter for about two hours so a pellicle can form. This allows for the smoke to better adhere to the fish.
In the smoker they go. I put a tooth pick in the body cavity so the smoke can travel there also.
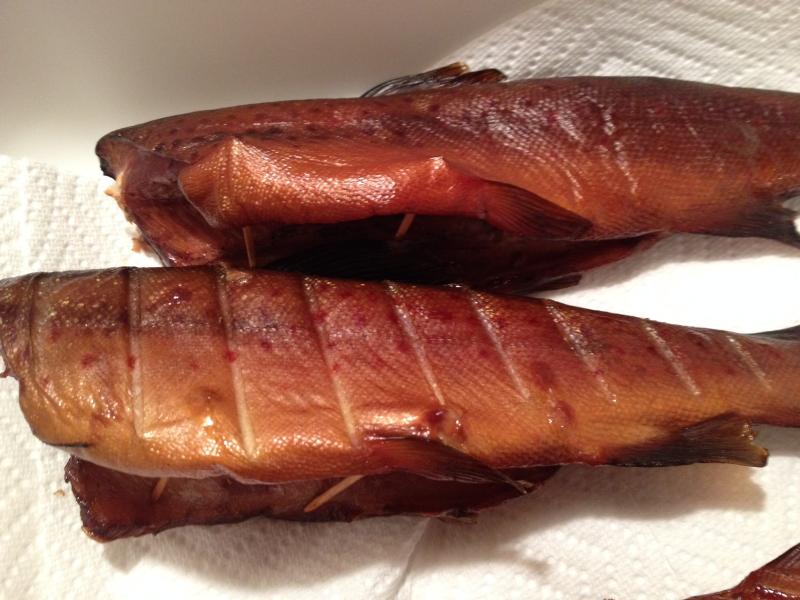
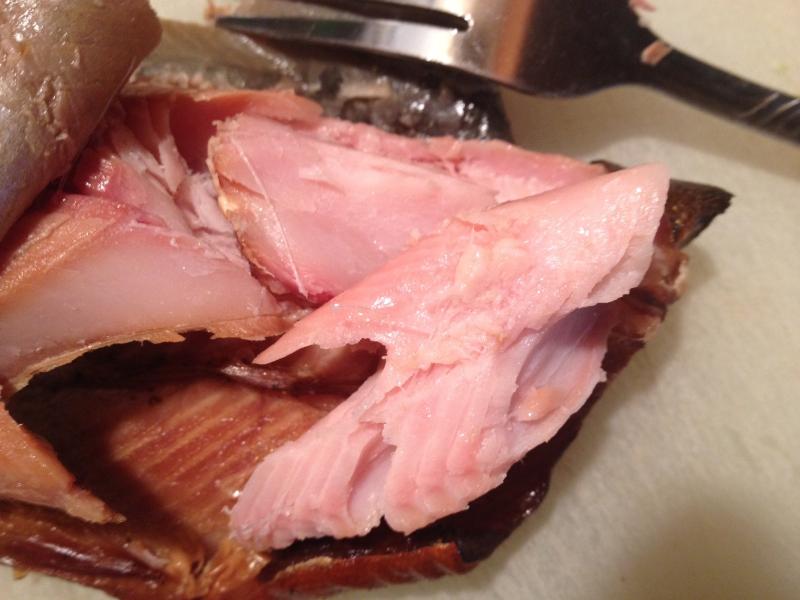
After 5 hours at 230 degrees the internal temp reached 160 degrees so I pulled them and let them cool off on my counter. Smoked them with cherry wood and some apple chips. I will put them in the fridge overnight and vac pack them for the freezer the next day.
Here is a Rainbow Trout about 5 pounds I used the same brine for. I cut the trout into 3 pieces. I also left the trout in the brine for close to 24 hours. Here are some pictures of the trout getting prepared and smoked.
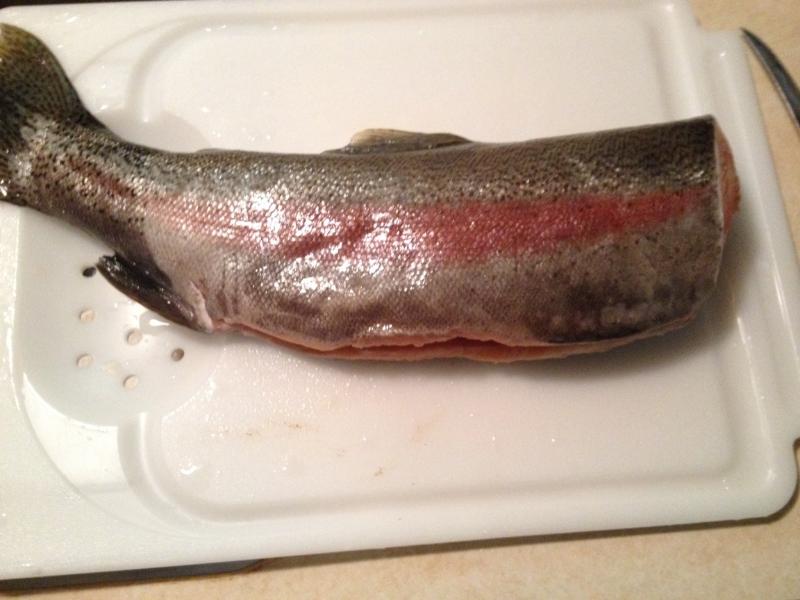
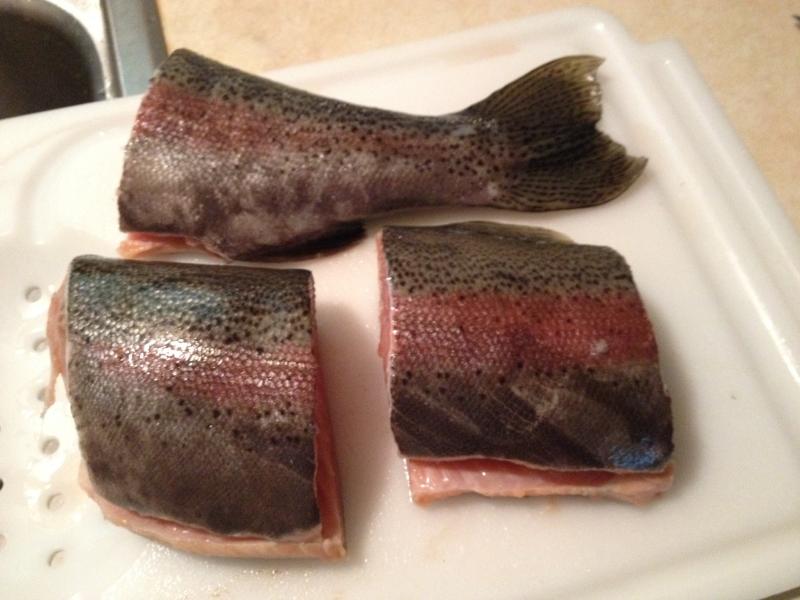
The rainbow is trimed and cut into 3 pieces.
Made up the brine and put the chunks of trout in the brine for 24 hours.


I took the trout out of the brine the next day and rinsed the chunks off with cold water. Then I patted them dry with paper towels and let the pieces set in the fridge for a couple of hours so a pellicle can form. This is when the skin feels a little sticky and that helps the smoke to adhere to the fish.

In the smoker the trout goes. After a couple of hours the trout started getting some color from the apple wood chips.
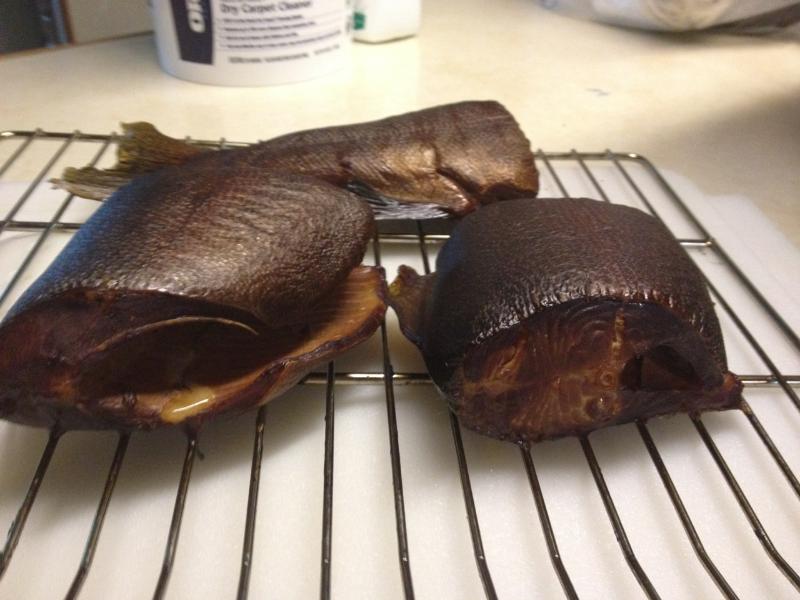
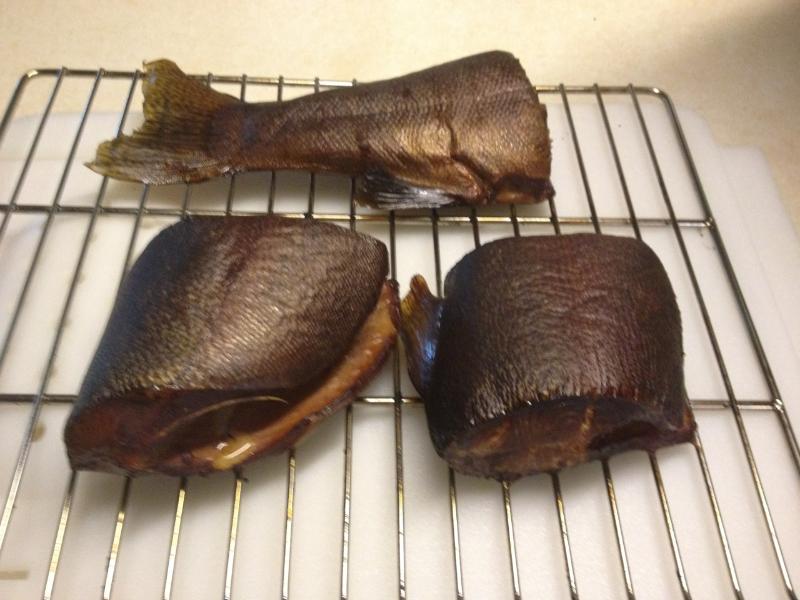
After close to 4 hours at 230 deg. the trout was done. Should be very tasty. If you have any questions, please leave a comment and I will answer quickly.
Looking for a sauce you can put on your ribs, chicken, and pork? Make it at home and quit wasting your money at the store. Here is a sauce that I made up and I have heard nothing but compliments on it. What I did was combine my sauce and a sauce recipe from a posters mom on a outdoor site I particepate on [www.lakestatefishing.com].
He asked me once if I like a mustard type sauce and I said I realy never tried any. So I told him I would try his moms recipe. It was good, but my wife wasn’t realy into a mustard based sauce. Well, then I combined my sauce with his moms and this was the ticket. The man’s name on the outdoor site is CaughtaBuzz. So I combined my name and his and came up with—-
REINHARD’S CAUGHT A BUZZ SAUCE
3/4 cup yellow mustard
1/2 cup honey
1/4 cup cider vinegar
1 T brown sugar
2 T worcestershire sauce
1 cup western salad dressing
1 cup ketchup
1 tsp of cayenne pepper [optional if you like some heat]
Put all of the ingredients in a sauce pan on low heat and bring to a simmer while stirring at times. Mop this on your favorite meat dish and enjoy. I love this especially on pork ribs and chicken.
CAUGHT-A-BERRY-BUZZ-SAUCE
Here is another great sauce. This one was also contributed by Caught-A-Buzz. This has elements of sweet and some heat. Also spices that go well with the rest of the ingredients. Perfect for pork ribs and also chicken done on the grill. Here is the recipe——
1 1/2 pints blueberries
1/4 cup brown sugar
1/2 cup balsamic vinegar
1/2 cup red wine vinegar
1 small clove of garlic minced
1/2 onion, sliced
1 small habanero pepper
1/2 bottle of dark beer
1/2 T ground corriander
1/2 T ground cumin
1/2 T ground coffee
1/2 T chipotle powder
2 racks of baby back ribs
Add all ingredients to sauce pan and simmer for two hours on med/low heat. Then blend all ingredients together in a food blender. Make sure the blender can handle the heat, otherwise wait till the sauce cools down.
ASIAN STYLE SLAW
I like to have this salad with a BBQ to balance out the heavy stuff. Cole slaw is a classic but i like Asian foods so this was one I found and tweeked it here and there. I buy the pre-shredded cabbage at the supermarket. Here is the recipe:
ASIAN STYLE SLAW
1 bunch [6 large] scallions, trimmed and thinly sliced
2 [16 oz ] bags coleslaw mix or 1 16oz bag each of shredded green and shredded red cabbage [that’s what I do, I like the color mix].
1 small red onion, thinly sliced
1/4 cup soy sauce
1/4 cup lemon juice
1/4 cup vegetable oil
2 T grated fresh ginger
2 T white vinegar
2 T dark brown sugar
2 tsp sesame oil
2 tsp toasted sesame seeds
1 tsp salt
about 20 grinds of black pepper [if you dont have the grinder, use to your taste and I would suggest the course ground pepper.
Rough up the scallion slices a little with your fingers so all the little layers of the scallion whites separate. Toss the coleslaw mix or both kinds of cabbage, the red onion and scallions together in a large bowl until everything is thoroughly mixed.
You can make the slaw up to this point up to a day in advance as long as you keep it refrigerated. Add the rest of the ingredients to the slaw and mix it up well. I actualy like to keep it overnight before I serve it. It’s a good idea to mix it up two or three times during this period before serving. It blends the flavors better. I would like to mince up a couple of jalapeno peppers and add this as well to add some hear but my wife and mother-in-law like it the way it is.
Probably make separate batches next time around. One with the peppers and one the way it is. Here are a couple of pictures of the tasty stuff—
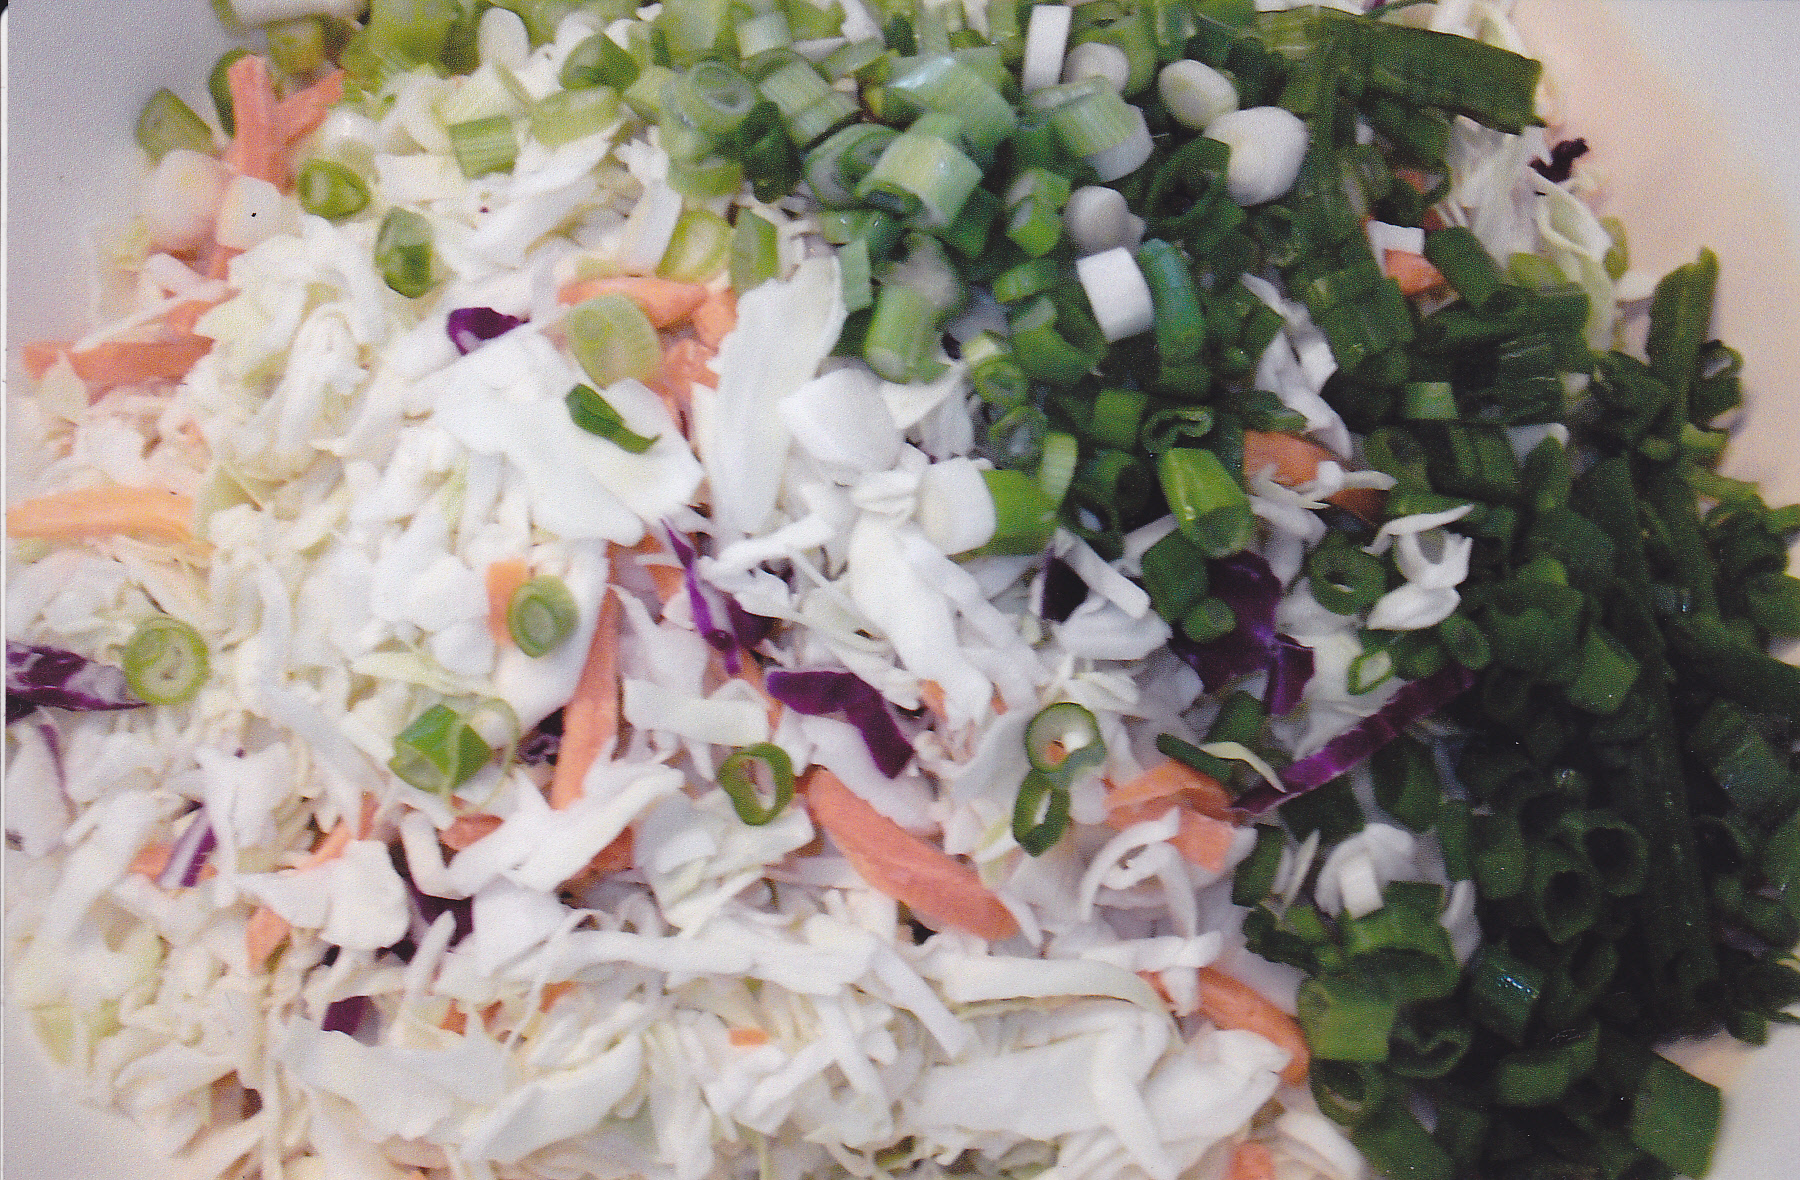 Getting the ingredients put in with the slaw.
 All mixed up and ready to serve. I let the mixed slaw set in the fridge covered overnight before serving, stirring it up a couple times in the process.
REINHARD’S RIB RUB
Great ribs deserve a great rub, and this one I made up works very well to please the taste buds. This rub works for chicken as well. The flavor of the ribs start with the meat itself along with the rub and then the sauce.
4 tsp kosher salt
2 tsp ancho chili powder
2 tsp Hungarian paprika
1 tsp ground cumin
1 tsp celery seed
1 tsp black pepper
1 tsp onion powder
1 tsp garlic powder
Mix all this up and store in a cool dry place in a sealed container. This makes a small batch so you can double or more if needed.
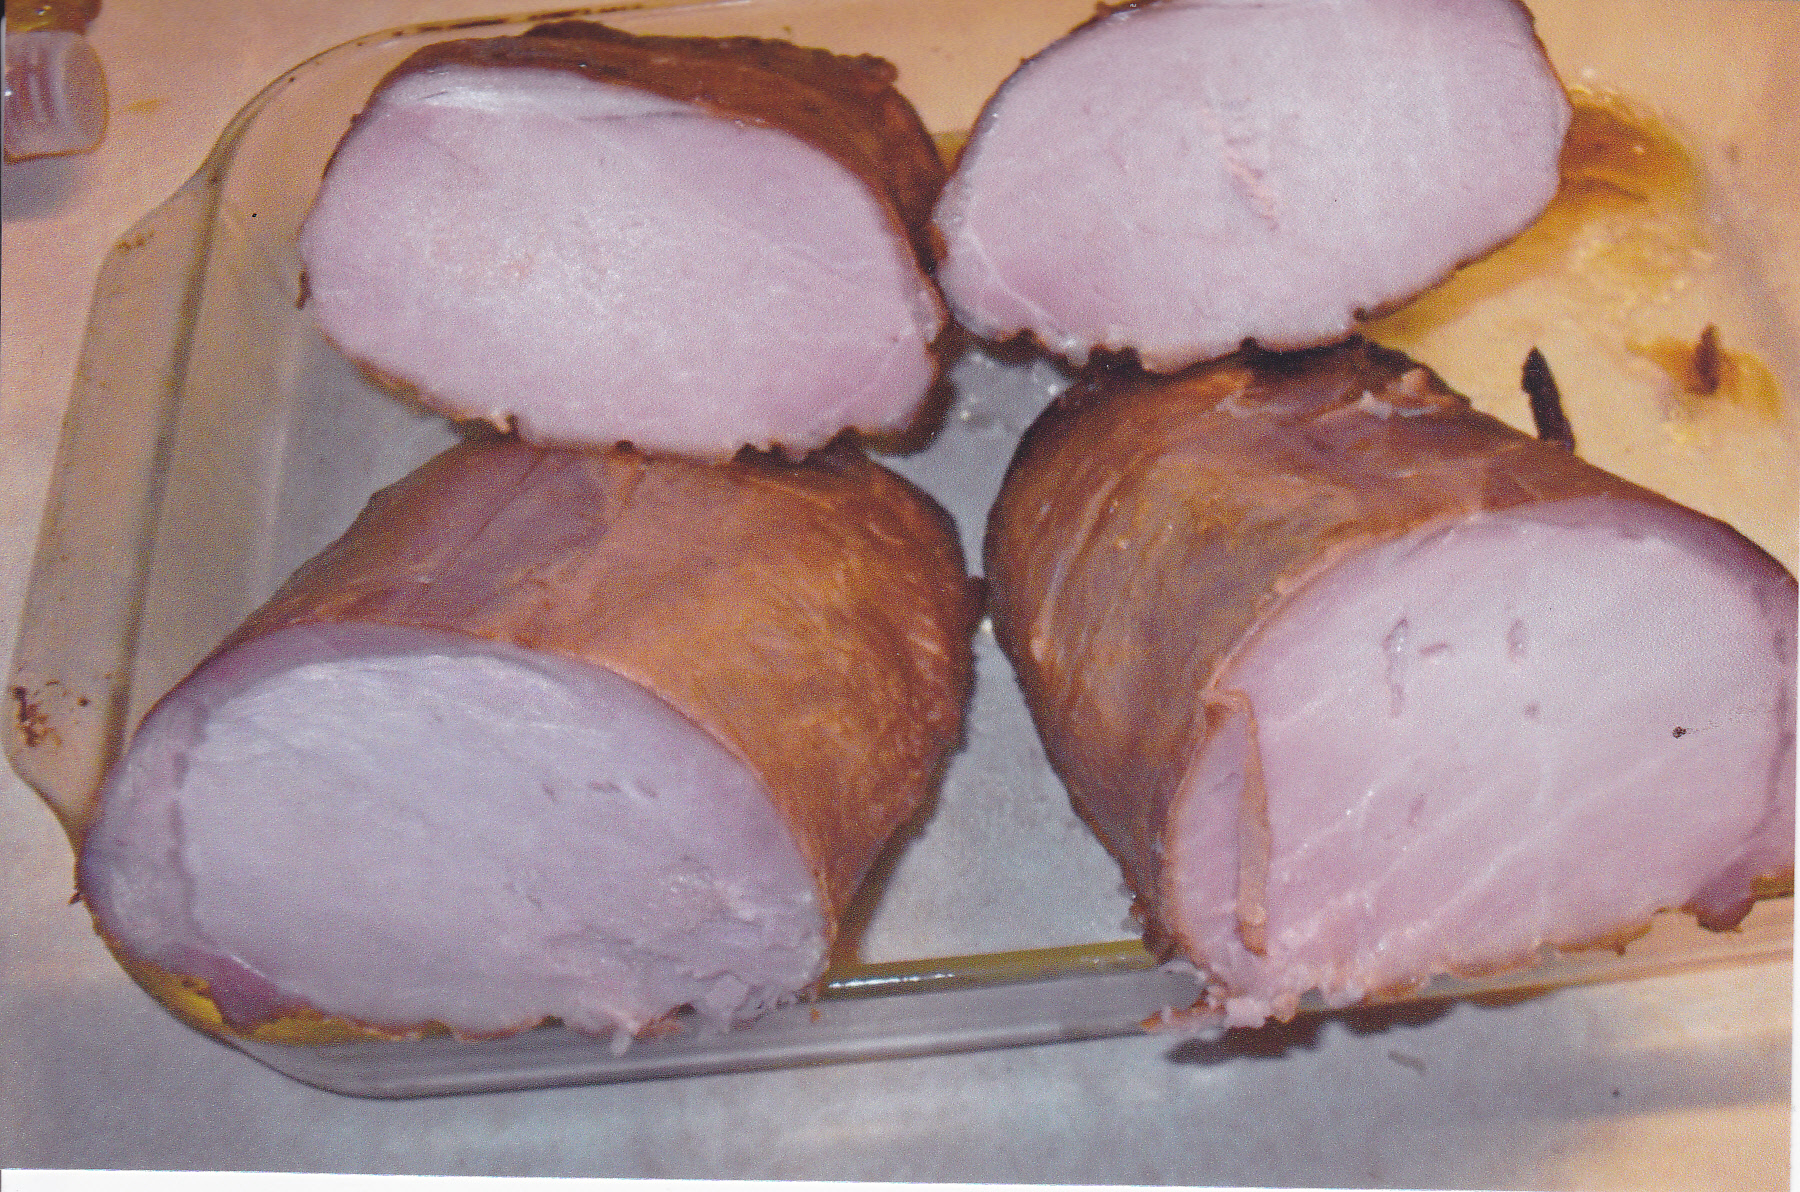
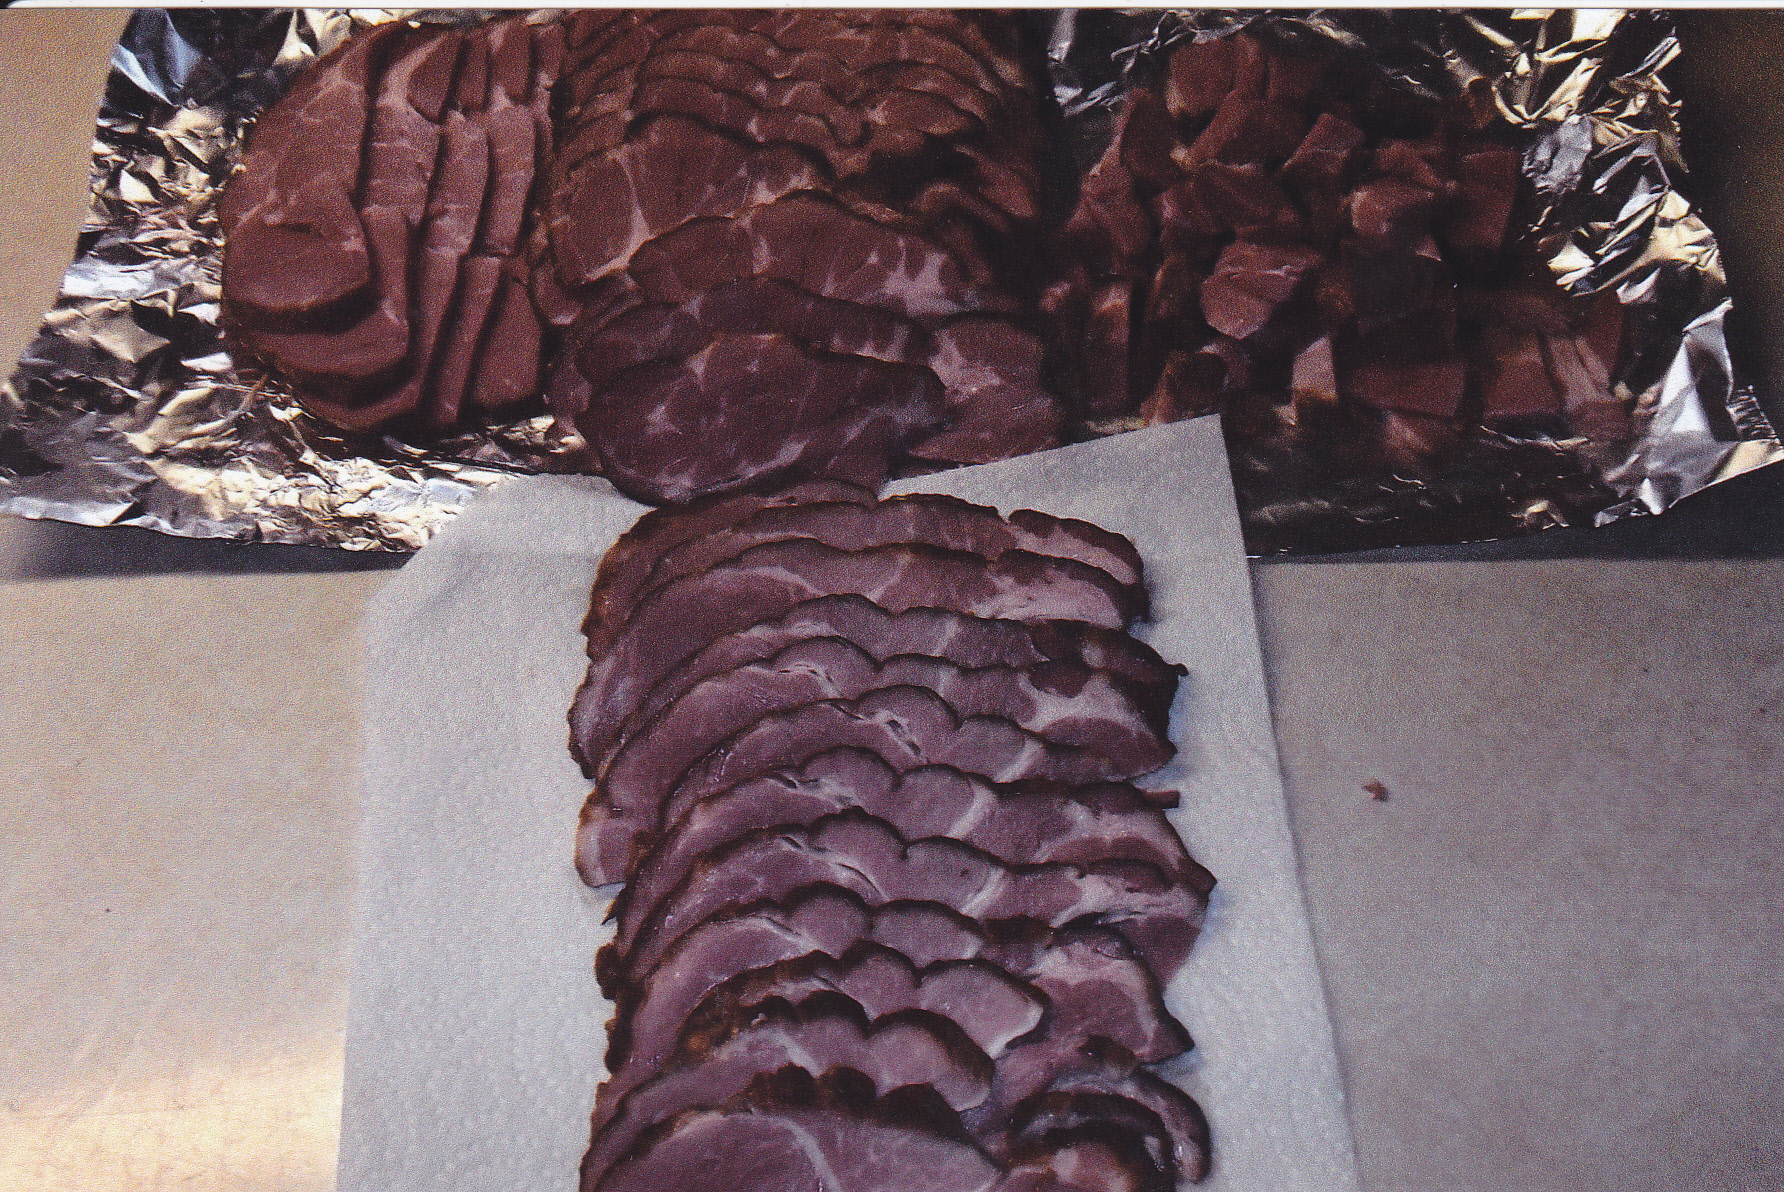
Who doesn’t like CANADIAN BACON? This can be made right at home. Why pay over $6 a pound for this lean tasty treat. You dont have to have a smoker to make canadian bacon, a oven will do. However to get that great smoky taste it’s great to have a smoker. A grill can be used as well. One of the best grills to have is the barrel type like the Char- Griller. It comes with a fire box that’s sold separately. I have a electric smoker and a Char-Griller grill/smoker. So, let’s get started on the process of making canadian bacon!!
I’m sure most are like me and when shopping look for sales to fit that family budget. Being retired I look with an eagles eye at ad’s all the time and in-store bargains. As far as what to look for to make canadian bacon, boneless pork loins are what you need. You can buy them whole, half, or smaller cuts. You should at least start with 3 pounds or so but I do 5 pound pieces nearly all the time [or close to 5]. Here is the best brine for canadian bacon or any type of ham for smoking:
POP’S BRINE
1 gal. cold water
3/4 cup non-iodized salt
1/2 cup white sugar
1/2 cup brown sugar
3 T molasses
1 T cure #1
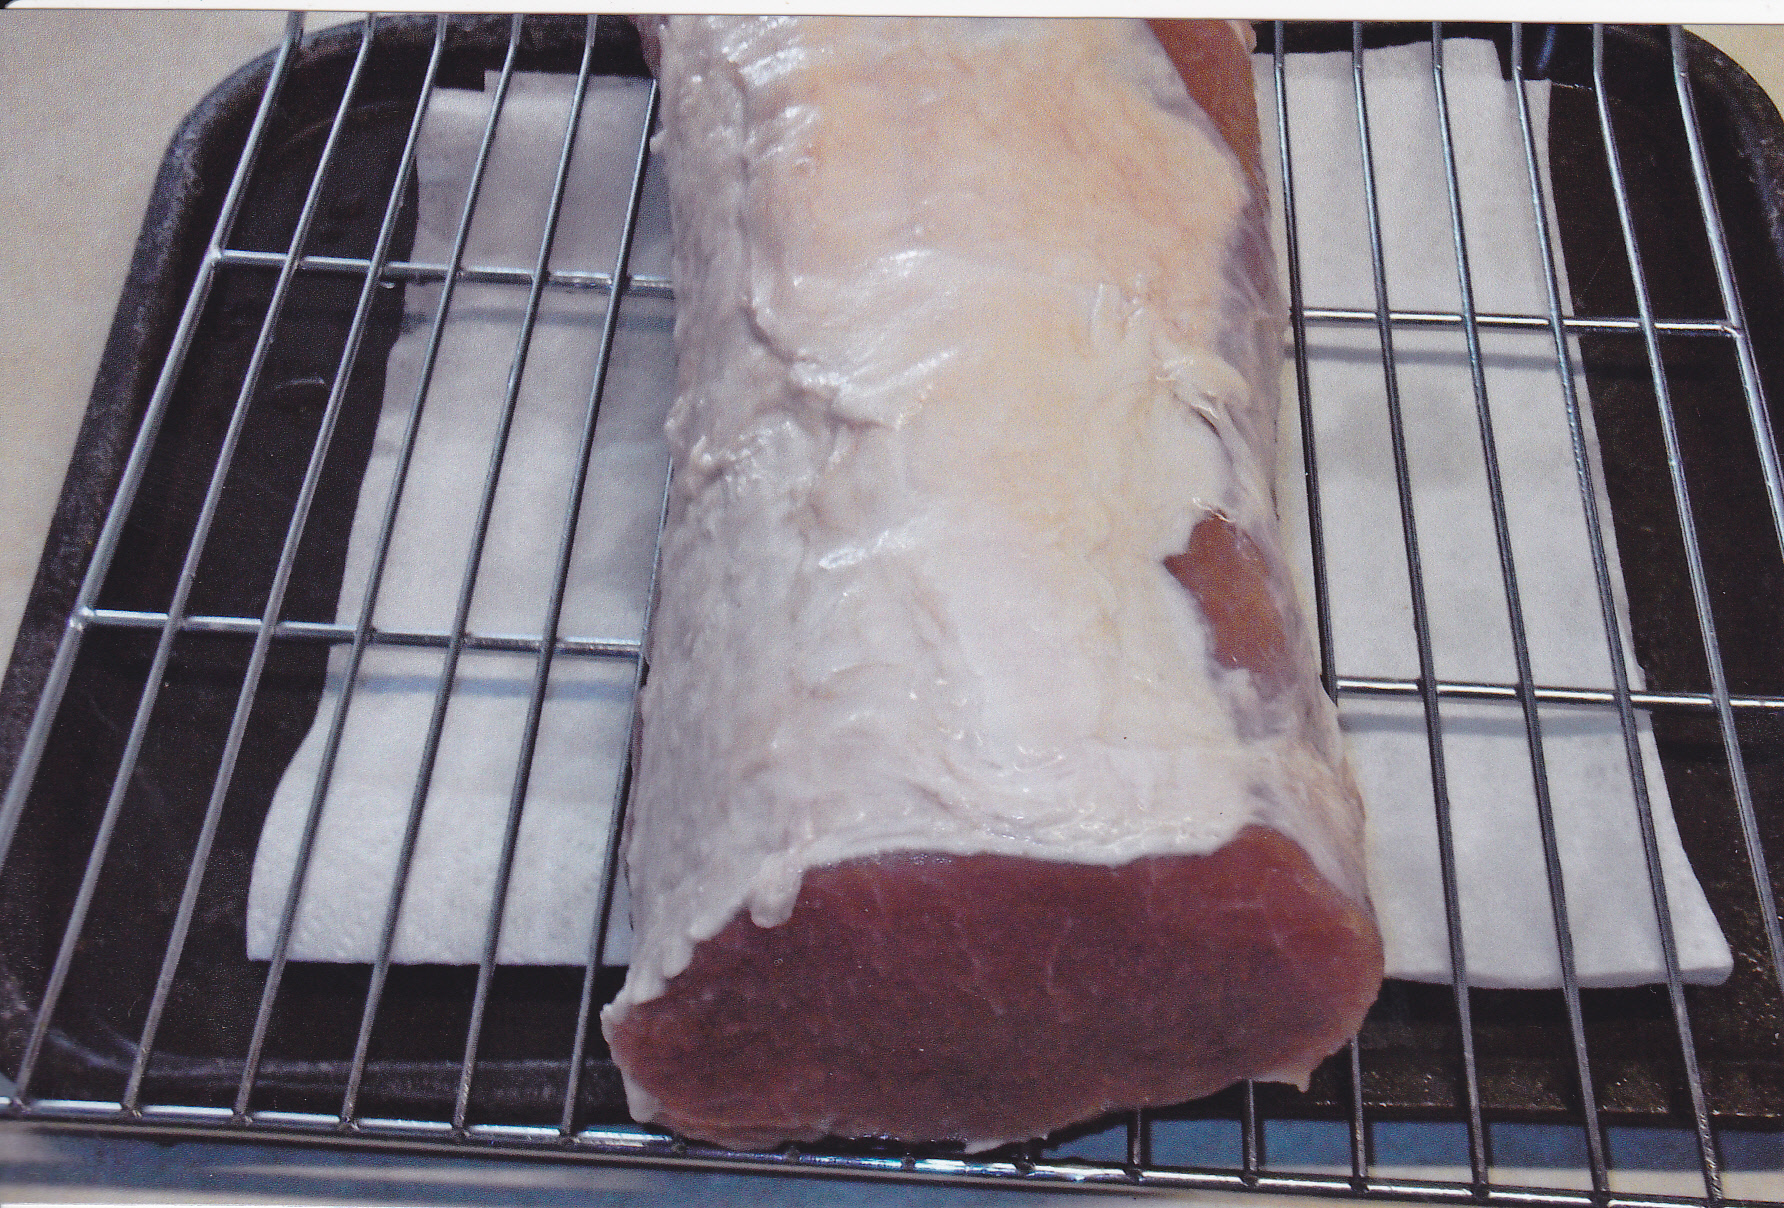
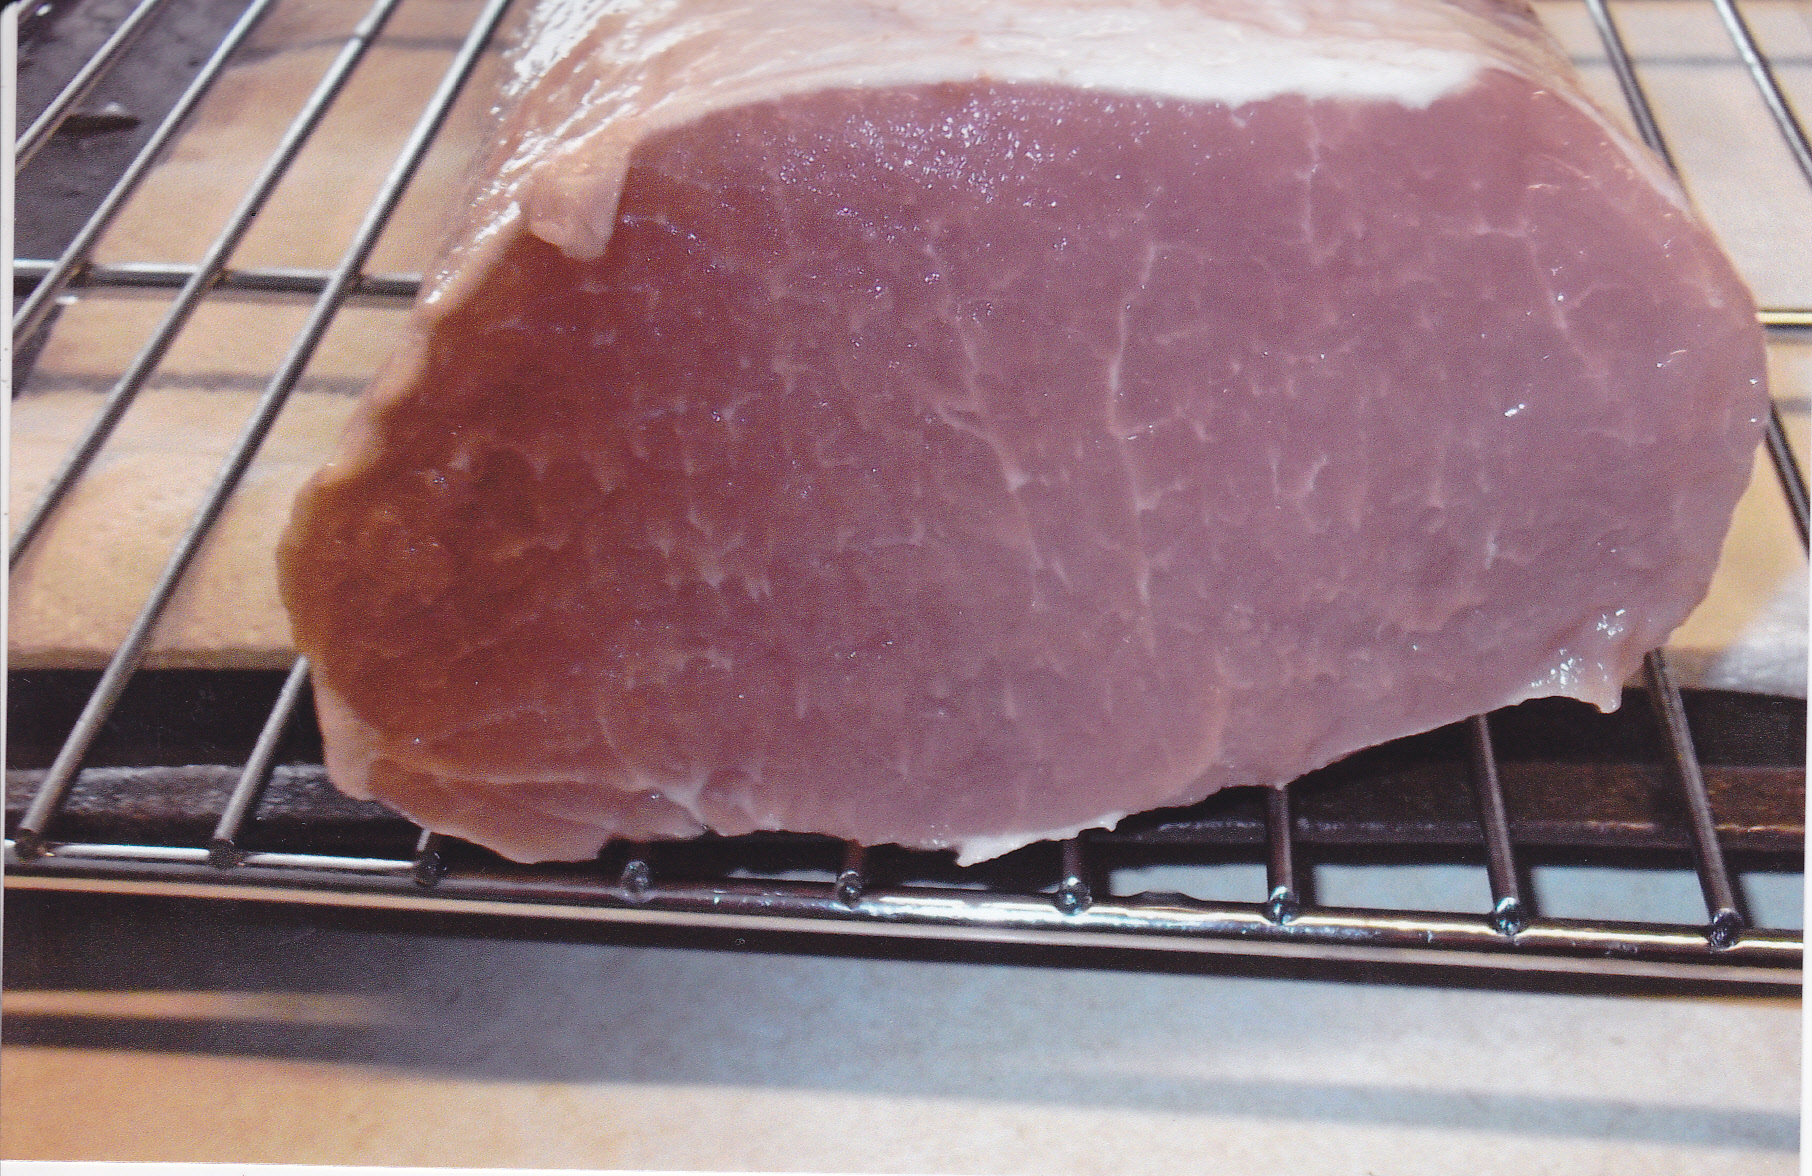
Mix all the ingredients with the water very well. Boneless pork loins realy don’t require injection of the brine but I do anyway. Injection of the brine assures that the brine with the ingredients enter the meat evenly. Don’t have to overdue it, just a few pumps here and there. Place your boneless pork loin in the brine. Make sure the meat is submerged. You can place a half filled [with water] gallon size plastic zip bag on top of the pork to keep it down. Also make sure you use a glass or plastic container for this.
Keep the meat in the fridge for 10 days before smoking so the cure and other ingredients can blend in. After the 10 days in the fridge, take the brine with the pork out of the fridge and dispose of the brine. Rinse the pork loin with cold water and pat dry with paper towels. Put the pork loin on a metal rack [sprayed with Pam] and let stand an hour to further dry.
You want a temp in your smoker of 225. With an electric smoker, it’s easy to maintain this temp. With a charcoal grill smoker it’s more difficult but can be done. Using the oven is easy as well. Once the smoker gets to 225, you can start loading in your chip tray filled with cherry or hickory chips. Keep the smoke going until you see the color you like. Once you get that nice golden look, you can just rely on the temp to finish off the canadian bacon until it reaches an internal temp of 150.
At that point take the canadian bacon out of the smoker and set the rack on the counter and foil tent it. Do not cut into it [as tempting as it may be]. Let it cool down. Then put it in the fridge overnight. The next day it is ready to slice or wrap for the freezer. I vac pack all of mine. Here are some pic’s—

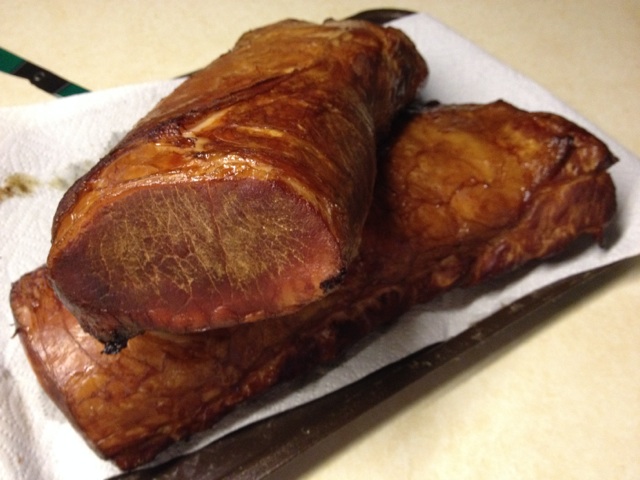
 Here are a couple of pic’s of the first two try’s at canadian bacon on my part. The top pic was when I made it in the oven and the other pic is my first time in the smoker. You can see the difference with the nice smokey appearance in the bottom pic. The two pieces I make in the oven tasted great so dont be afraid to use the oven when needed. Sometimes it’s just too cold to use the smoker here in Minnesota.
 Here is a 5 pound piece about half way done. You can see the color is just starting.
 Here are two pieces resting before i put them in the smoker. Making sure the loins are fairly dry is important so the smoke can adhere to the meat better.
 Now that’s some great color and even have some grill marks on the bottom from the smoker grates.

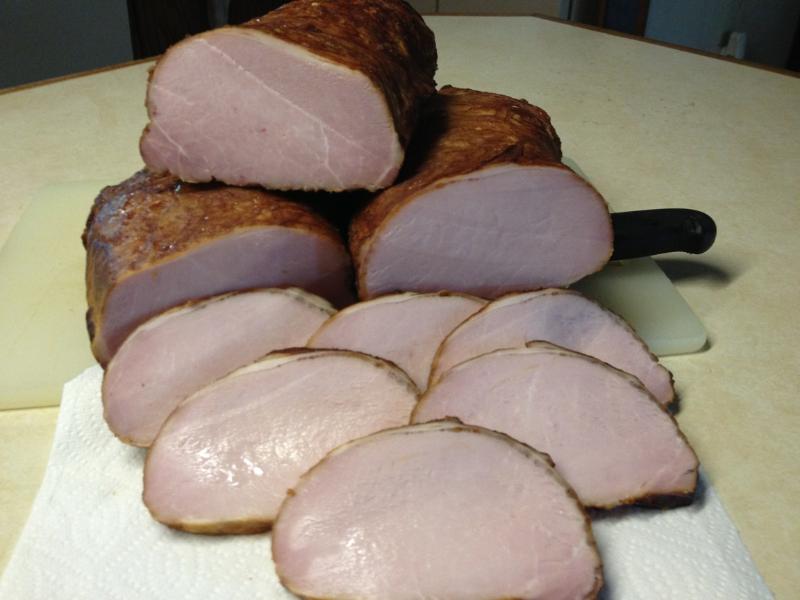
 Nice color on the outside and inside.
 Here is another 5 pound piece of boneless pork loin brined and ready for the smoker.
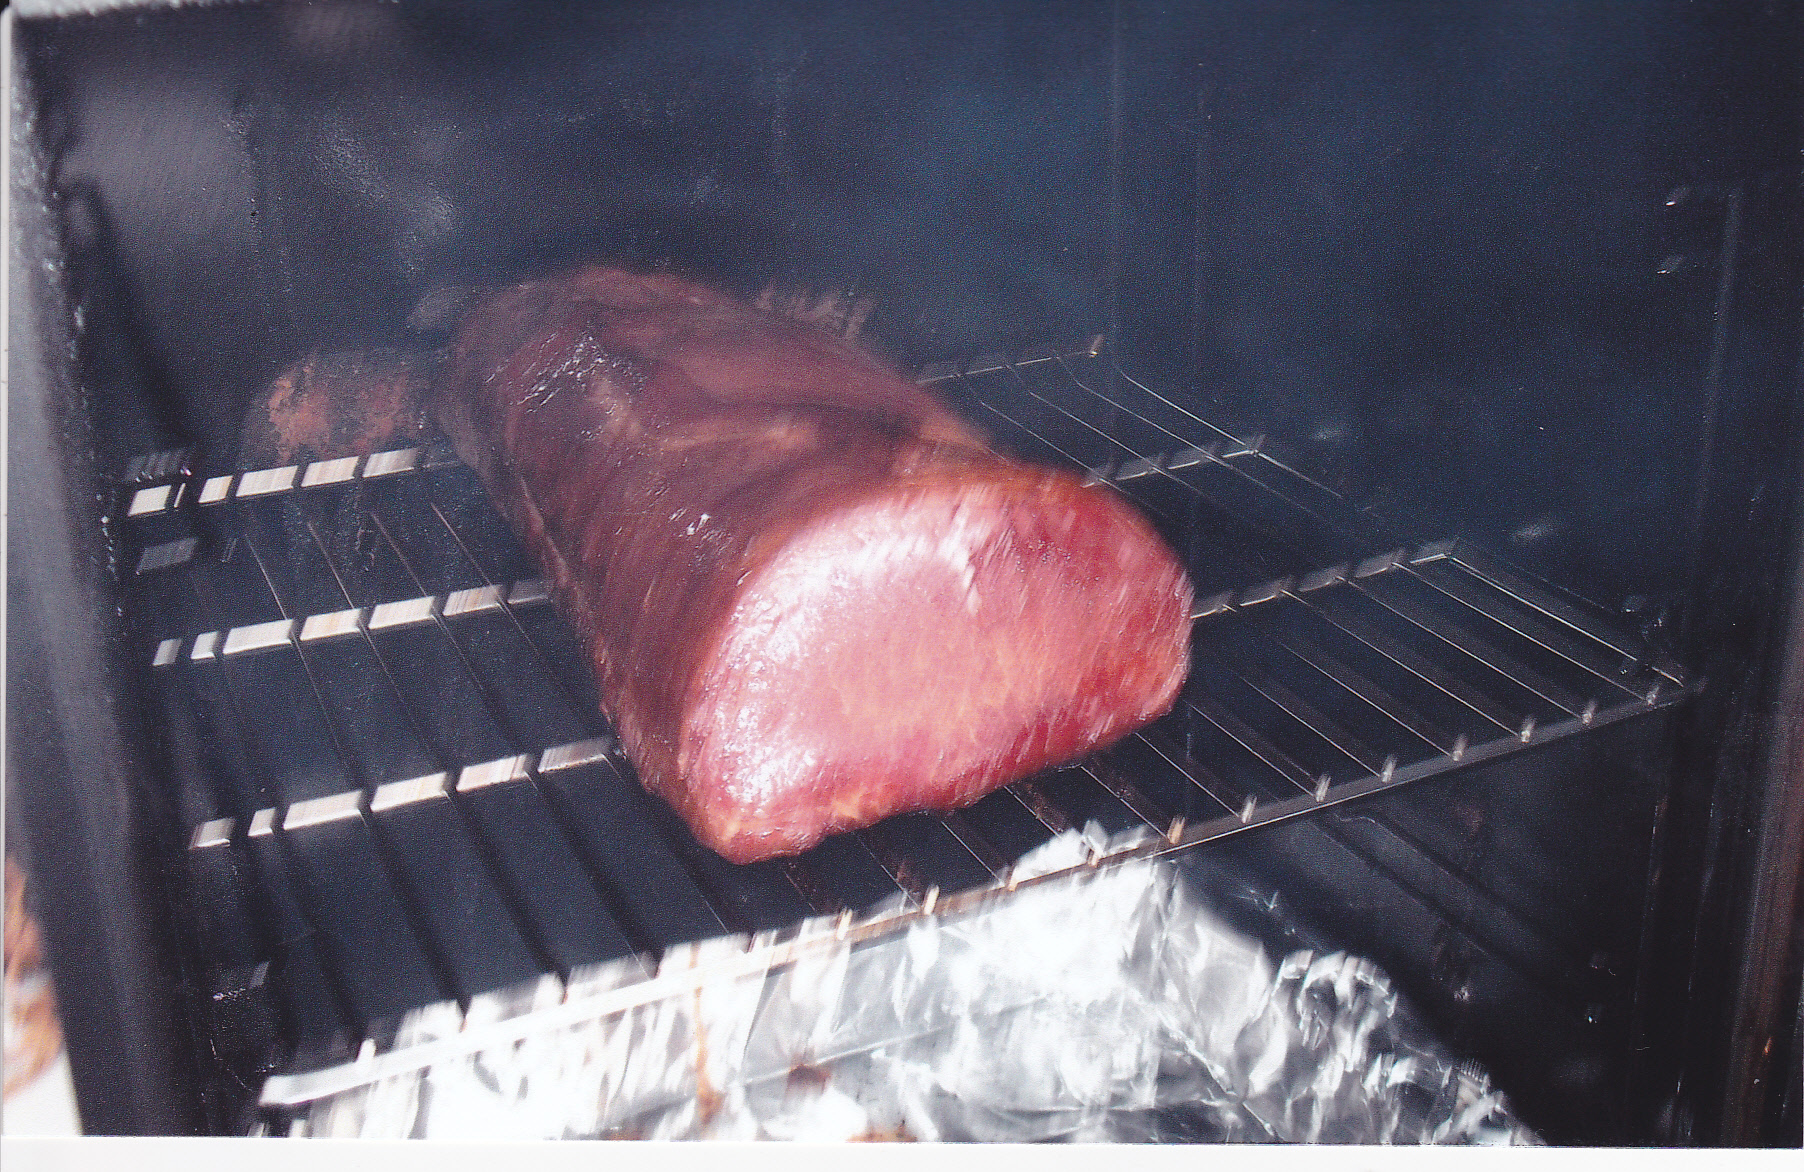
In the smoker and almost ready to pull and cool down.
 Cooling off and soon ready for some tasty meals.
Final result from two 6 pound boneless pork loins cured in Pop’s Brine. Next time boneless pork loins come on ad, try this brine and my method and you will enjoy Canadian bacon made right at your home.
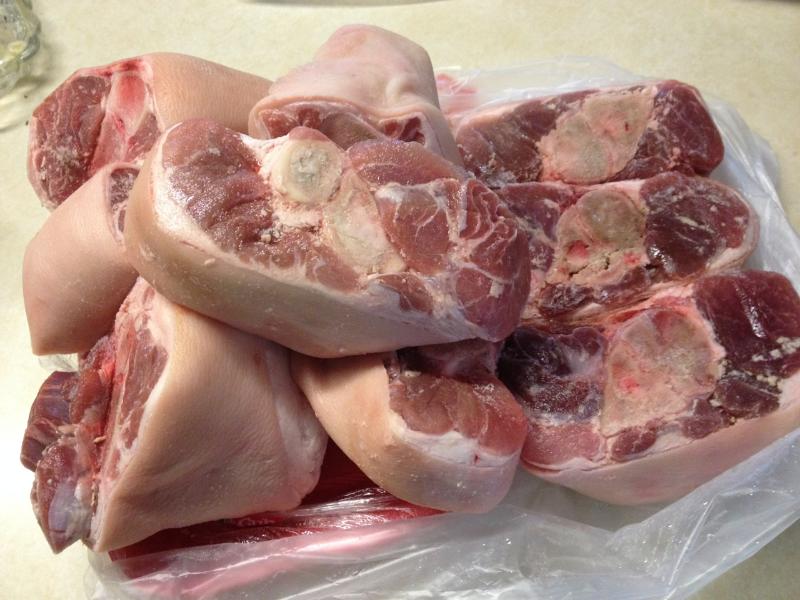
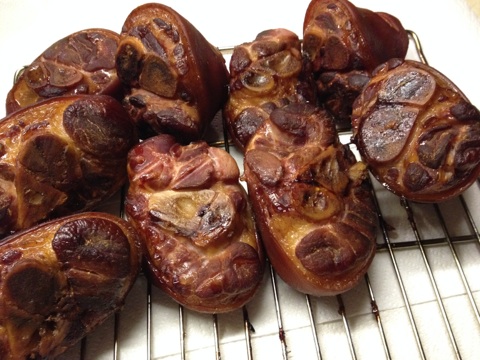
SMOKIN SOME MEATY PORK HOCKS
I smoke my own Canadian bacon not only because I love doing my own, but because of what Canadian bacon cost’s in the market. Same can be said of smoked pork hocks. Buying them fresh is so much cheaper than buying them already smoked in the stores. Besides the store bought just doesn’t have the smokey flavor that I want. Here are some fresh meaty pork hocks I bought for smoking. I used Pop’s brine just as I did the Canadian bacon above. The hocks were good sized so I brined them for 6 days.
After the brine, I took them out and rinsed them with cold water. Then I patted them dry with some paper towels and put them on my smoker grates to dry some more for a couple of hours. I set the smoker for 225 deg. and put the hocks in. They were in the smoker for 5 hours and then I pulled them. The internal temp of the hocks was at 160, which was well above the safe level of 145 deg. but I wanted these to have a good smoke for upcoming meals like my German Gumbo [on the Recipe page]. Here are some pics of the process……..
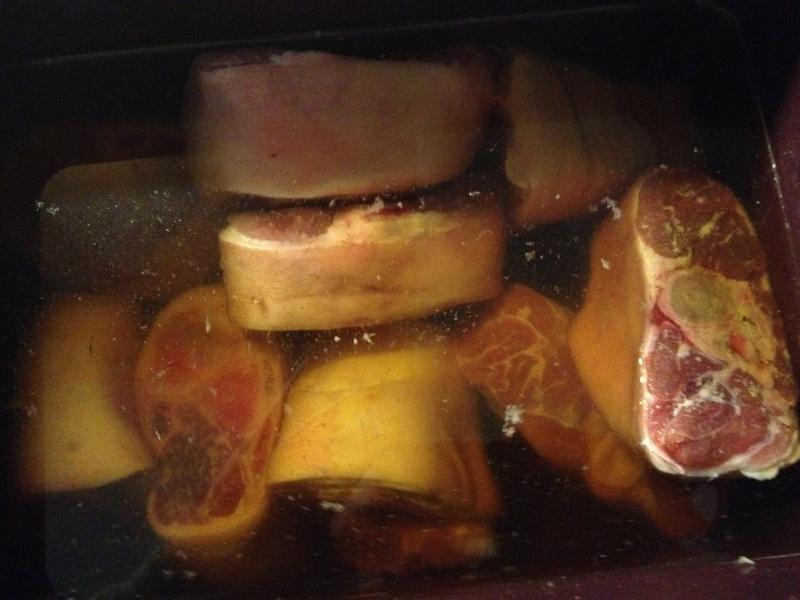
Very nice meaty pork hocks go into Pop’s brine for 6 days.
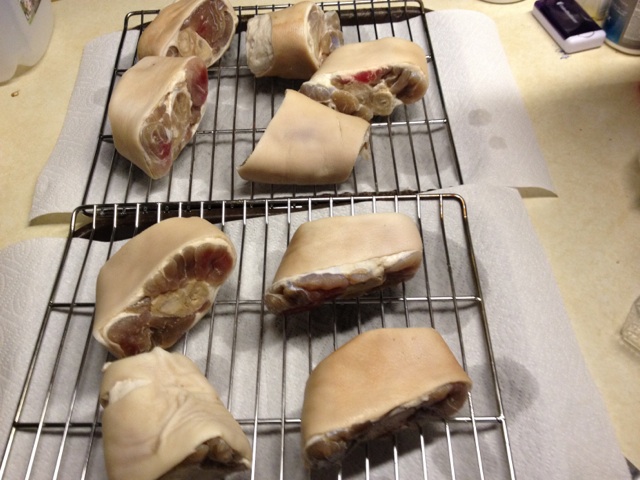

After I took the hocks out of the brine, I rinsed them with cold water and set them on the smoker grates to dry for a couple of hours.
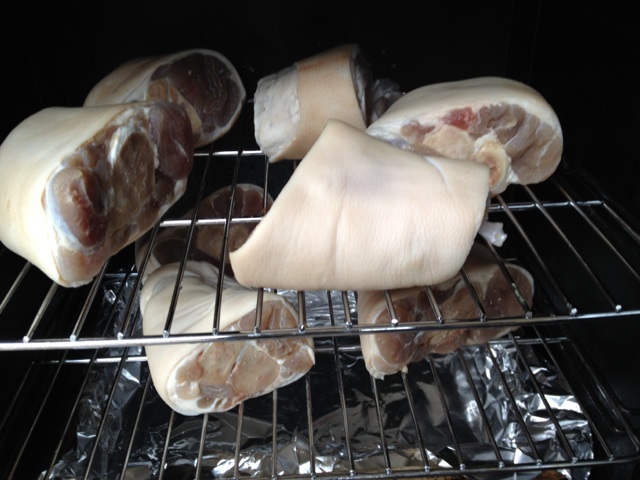
In the smoker they go at a temp of 225 degrees. I used a mix of Maple and Oak for the smoke.
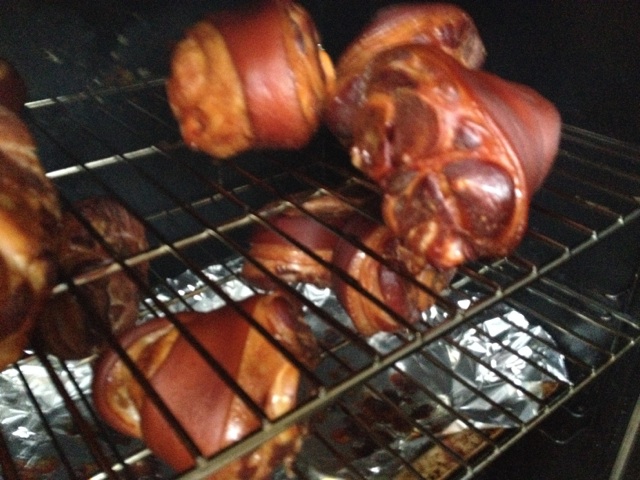
They look great and ready to take out of the smoker. I checked some for the internal temps and they were between 160 and 165 deg. The safe level for pork is 145 deg. but I left them in longer for a good smoke.
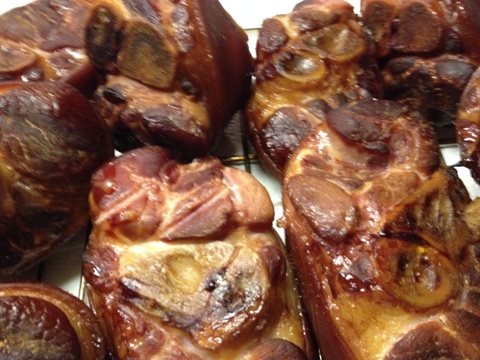
Here they are getting cool so I can vac pack them for the freezer. They smell great and are going to bring some awesome flavor.
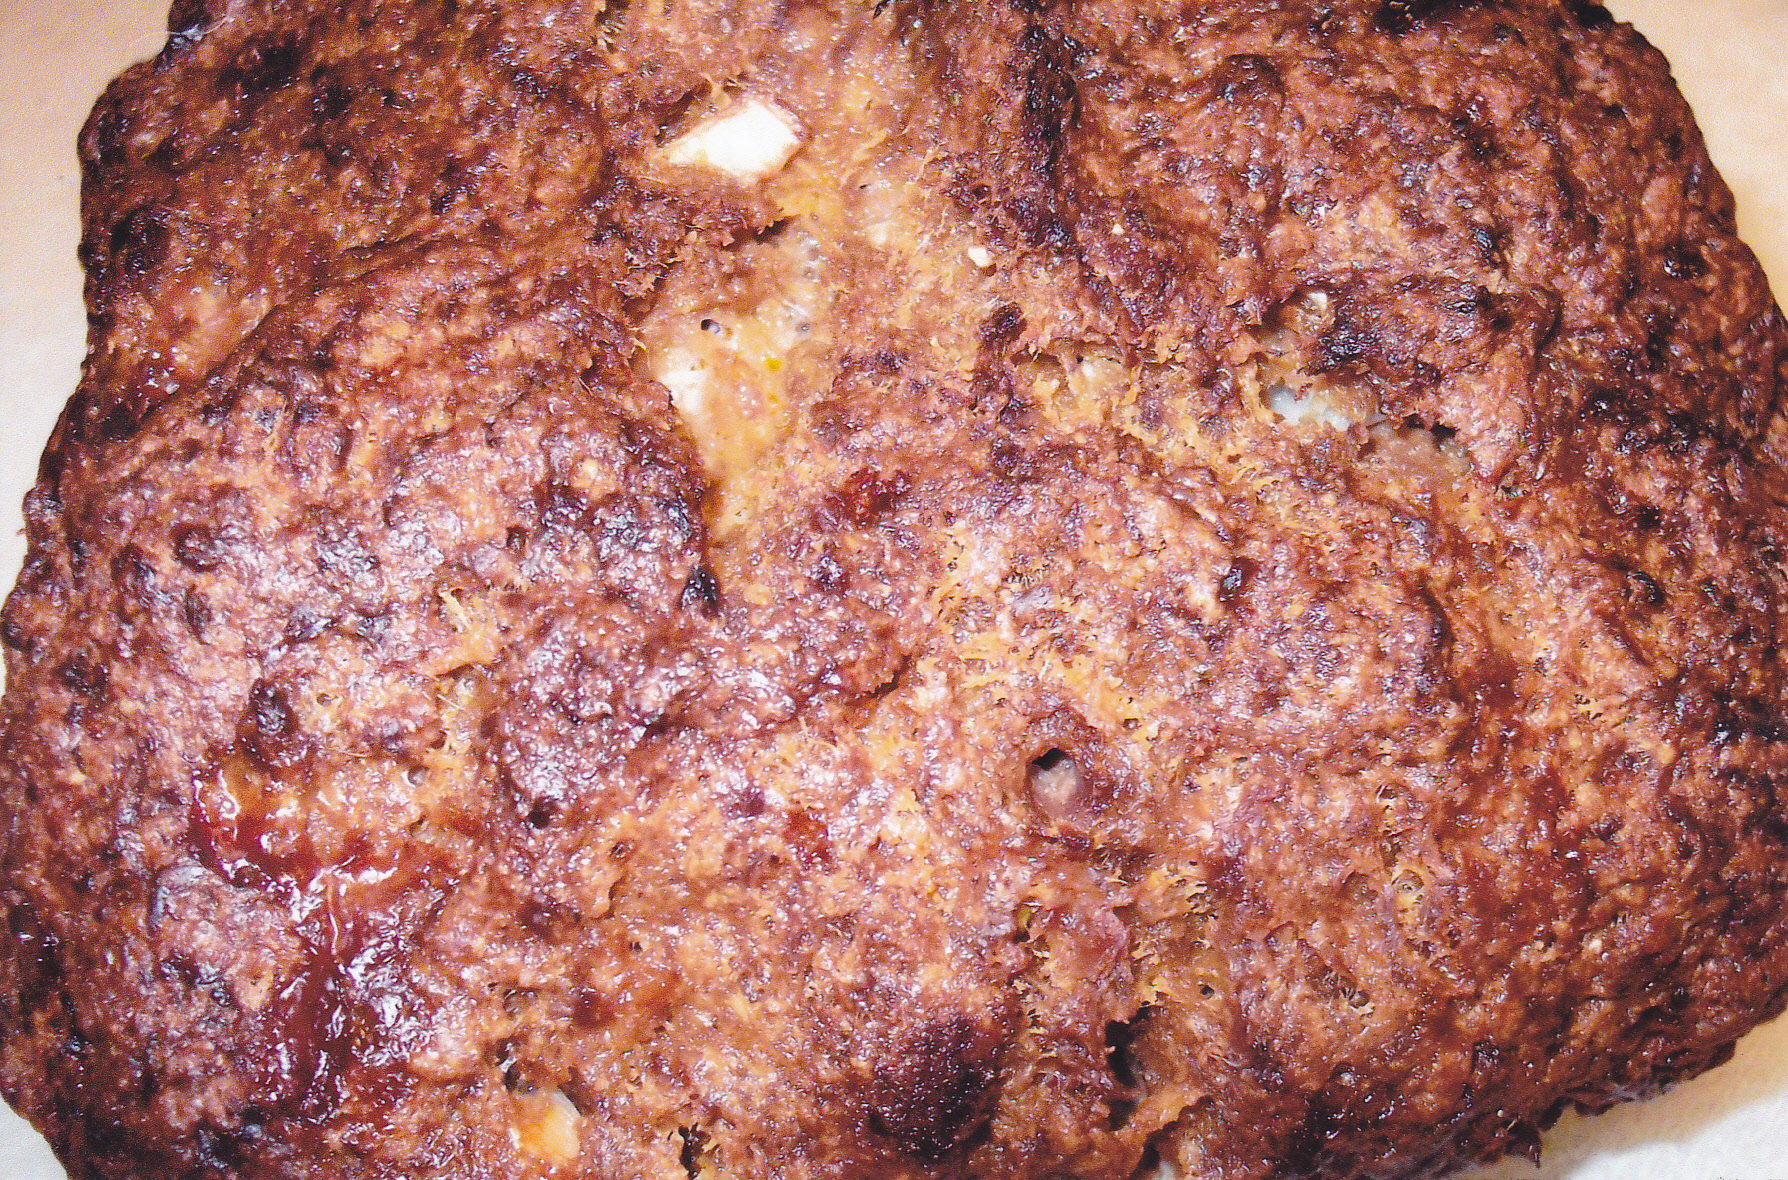
MEAT LOAF IN THE SMOKER
You can make meatloaf all year long. When it’s too hot to use your oven, you can use your grill or smoker. On the grill I put the loaf in in-direct heat. Coals on one side and the loaf on the other with a drip pan under the loaf. In the smoker I put it in the center of the rack with a drip pan underneath as well. Don’t like my loaf swimming in drippings. I do the same thing in the oven. Here is what I put together with ingredients I had on hand:
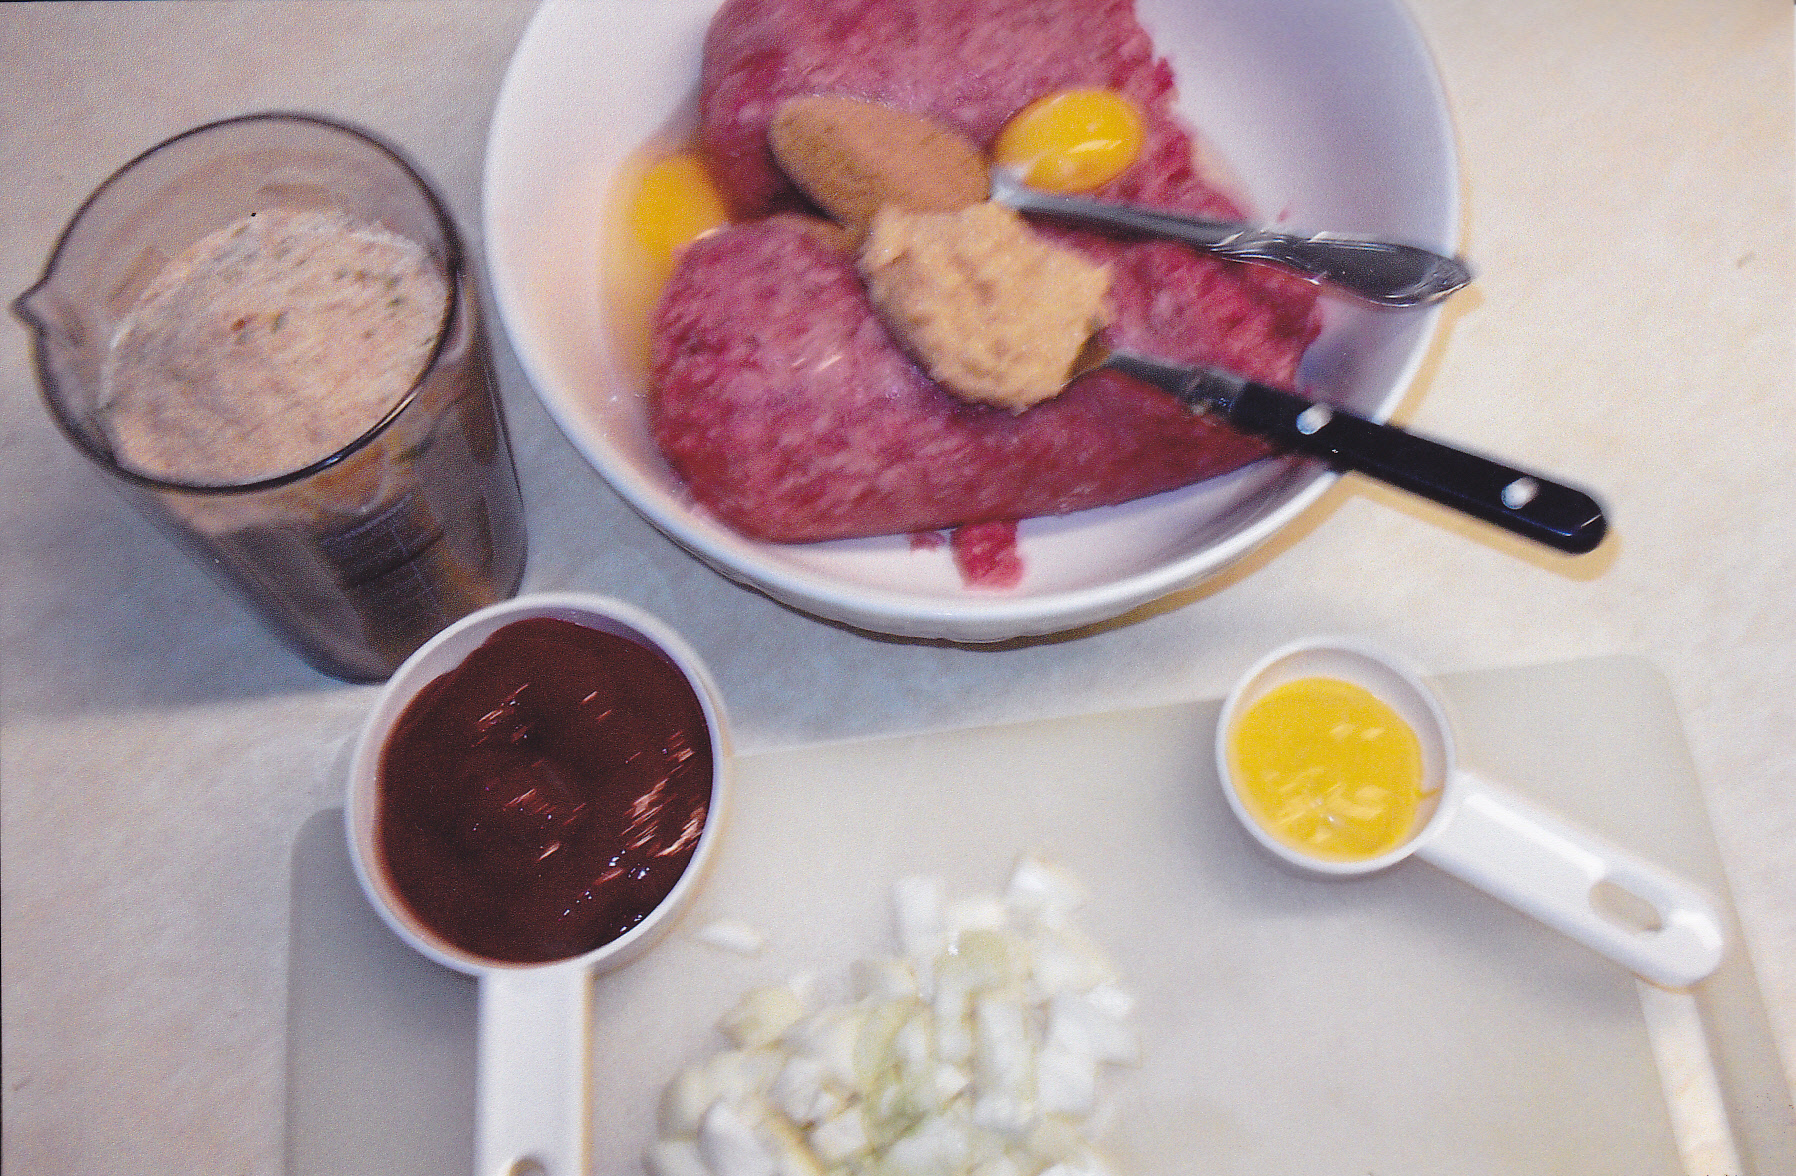
3 pounds of 80/20 ground chuck
3 eggs
1 T diced garlic [from the jar]
1 T Korean soup base [you can use a good beef bouillon of equal amount]
1/4 cup mustard
1 cup ketchup
2 cups Italian bread crumbs
1 onion chopped up
salt and pepper to taste [go light on the salt because the bouillon has salt]
Mix everything together well and form into a loaf. I put a meat thermometer in the center. Put in the smoker at 250. Add smoke [cherry mixed with hickory this time] until you get a nice color. Pull the loaf when the internal temp is 150 and put on the counter with a foil tent to rest for 15 minutes and then slice away. With a oven put the temp at 350 until the internal is 150. With a grill pull the loaf when it’s 150 internal as well. Cant control the grills temp as well as a electric smoker or oven but it gets the job done. Try to keep the temp over 250. Here are some pics—-
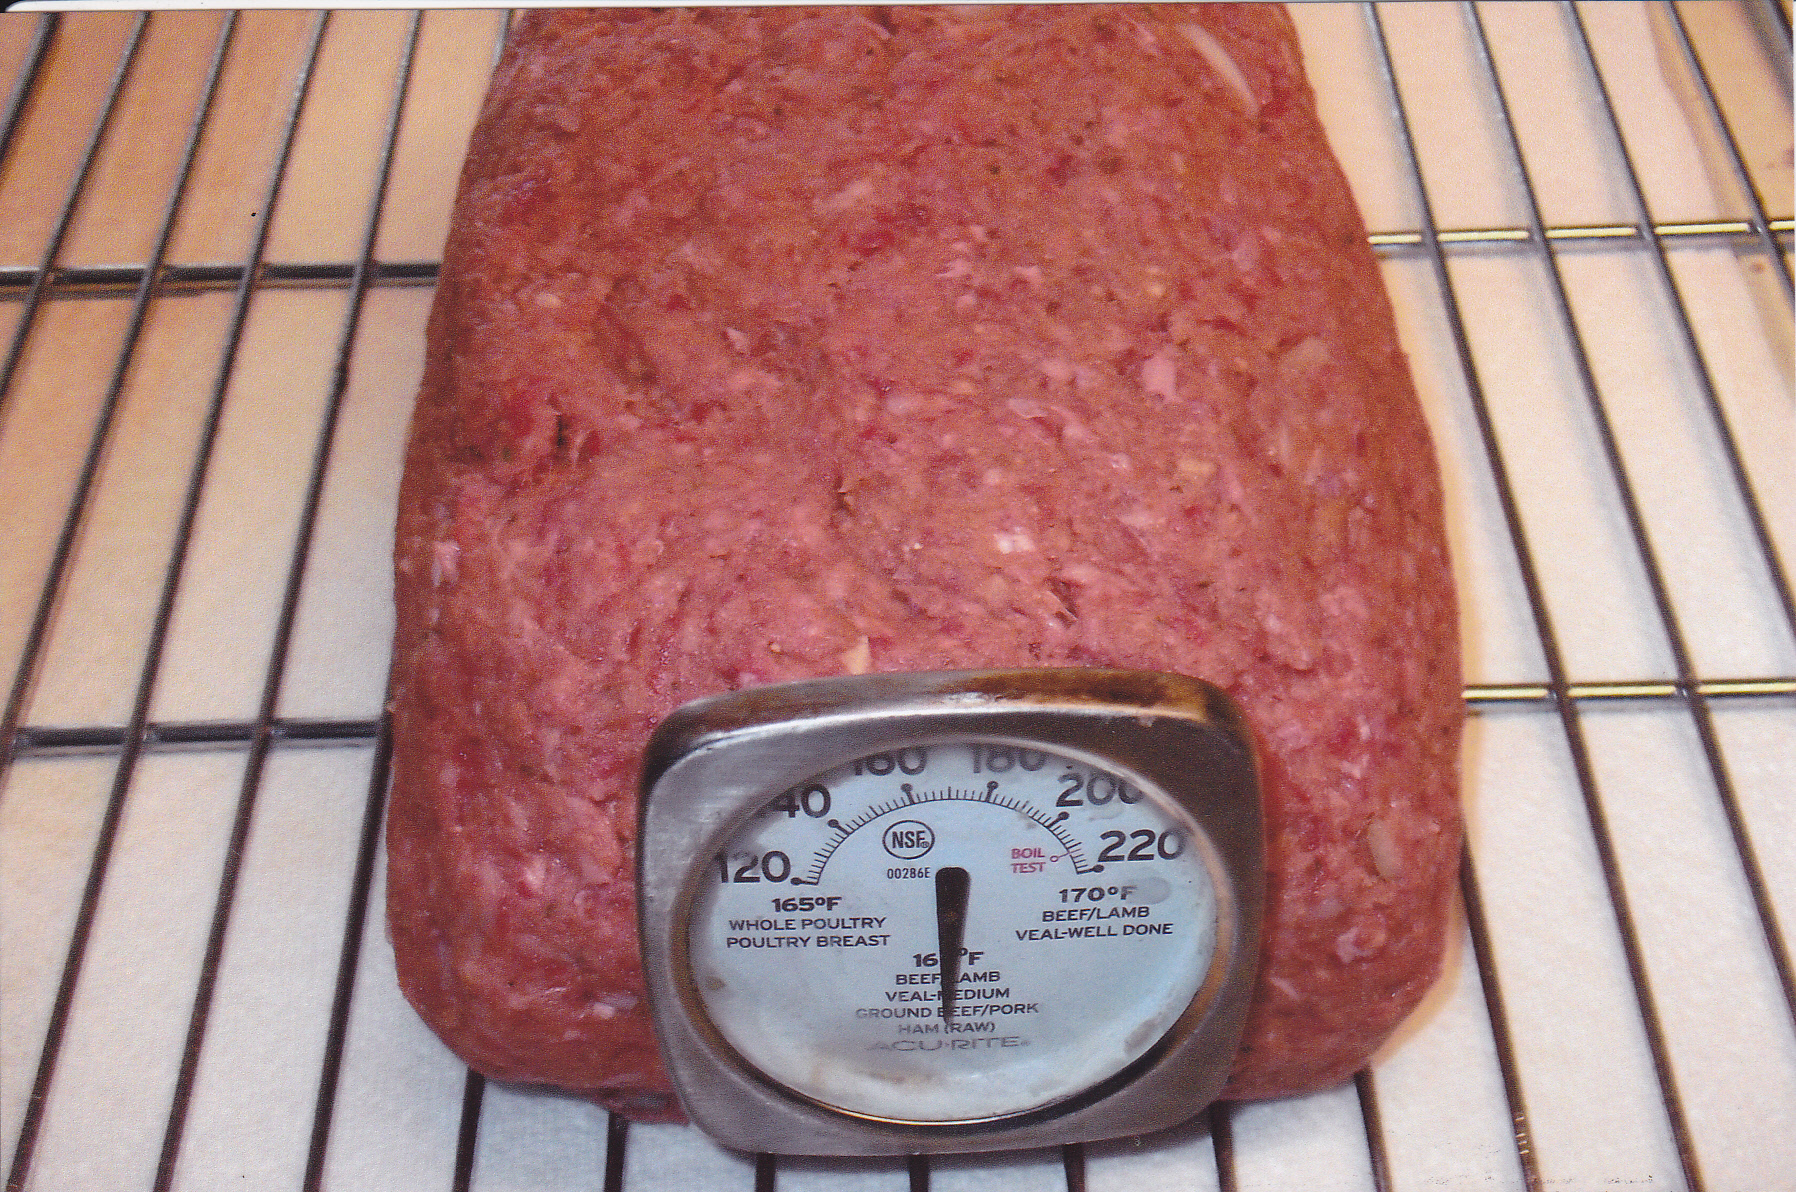 Formed and ready for the smoker.
In the smoker the loaf goes!!.
 The loaf is half way done and getting some color!!.
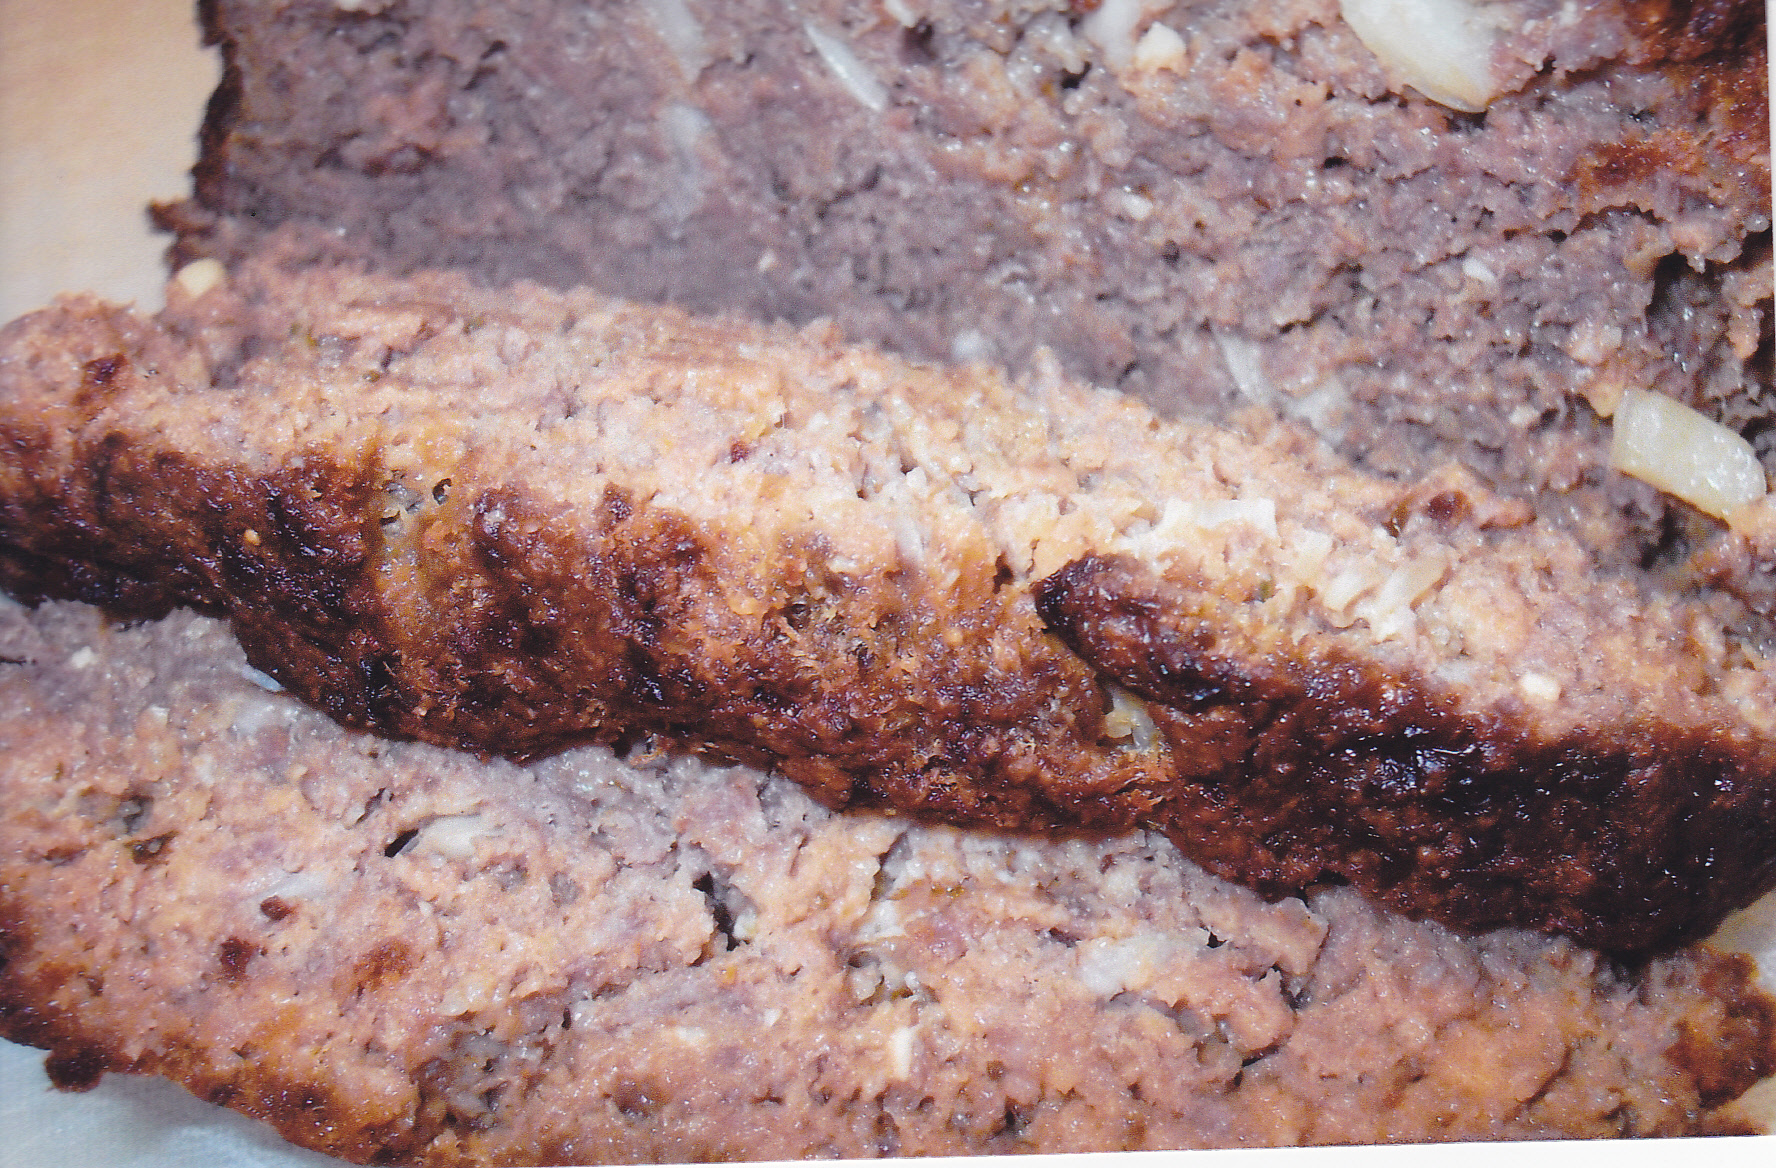 Pulled the meatloaf when the internal temp was 150 and let it rest for 15 minutes or so to hold in it’s juices before slices are made.
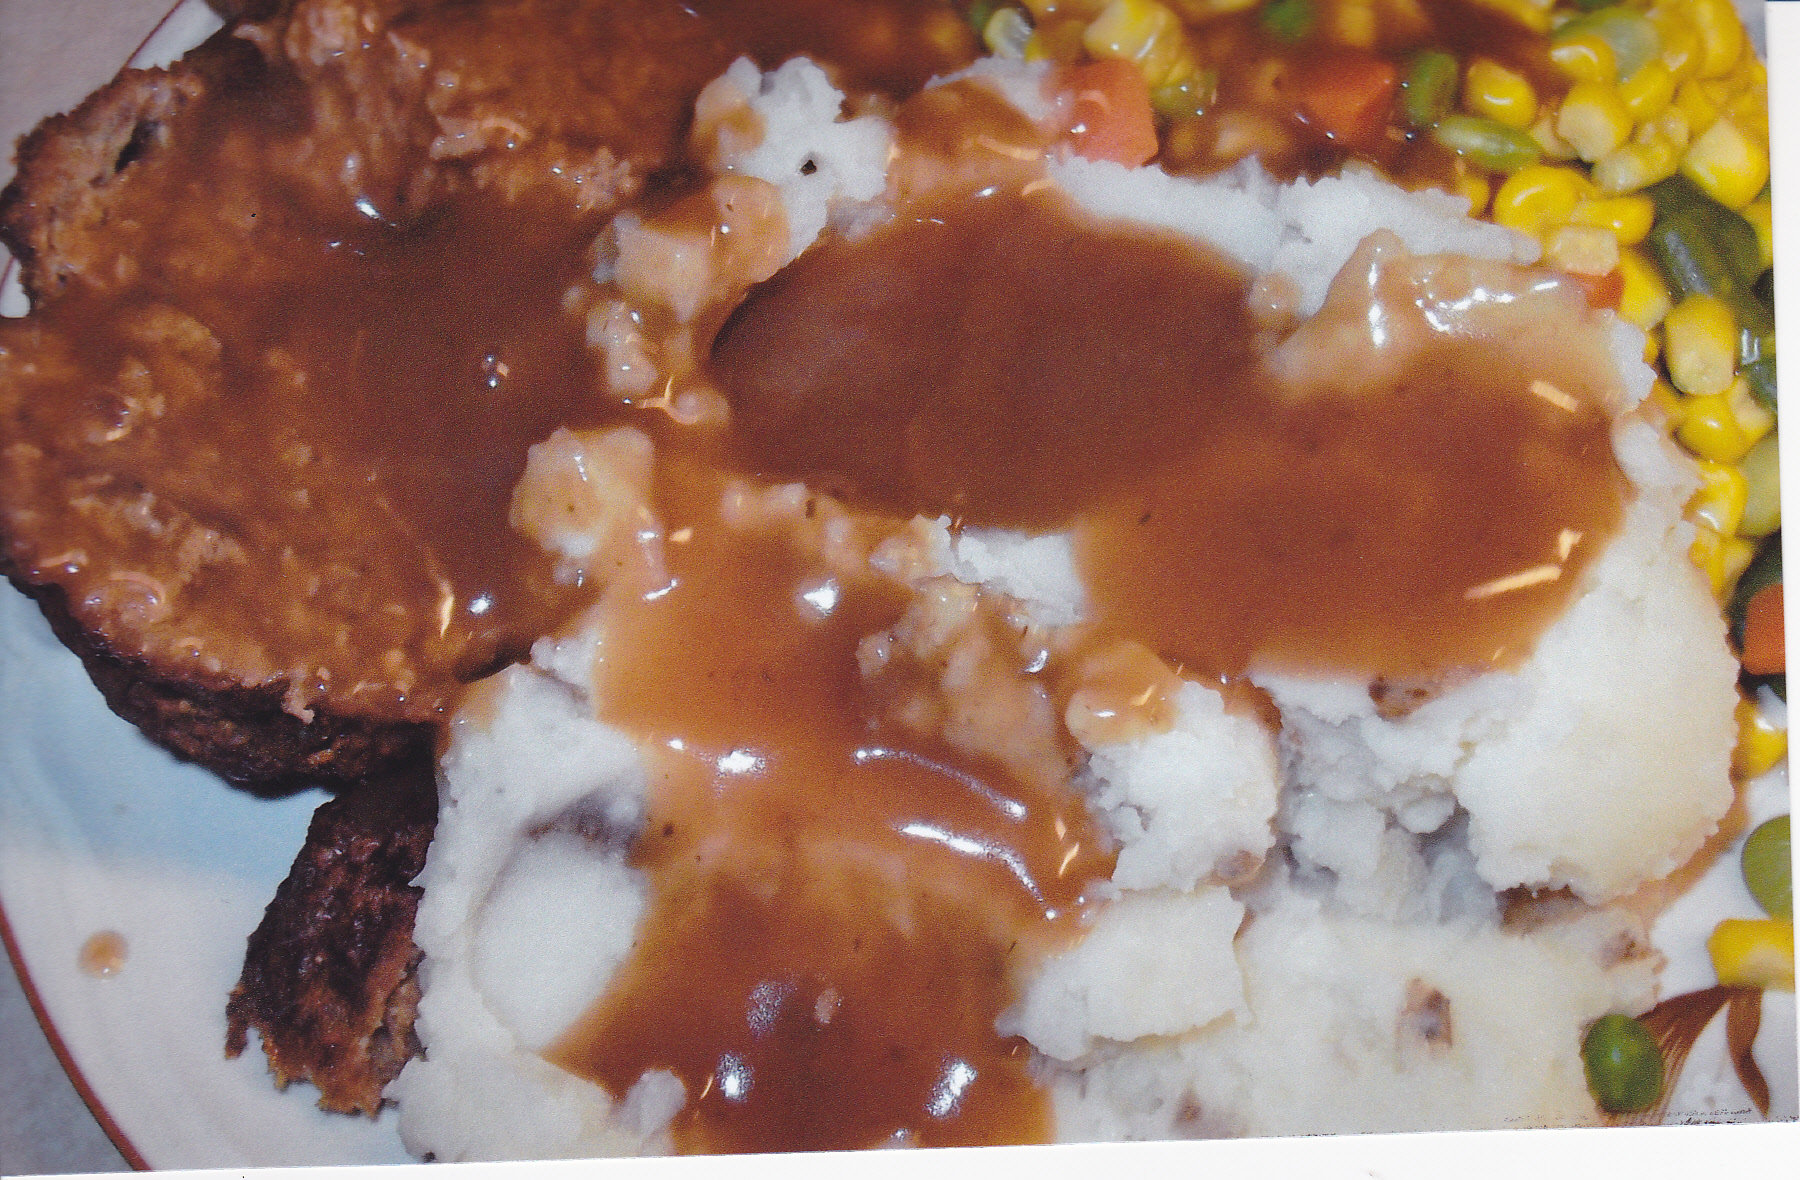 Served with smashed potatoes, vegies, and gravy.
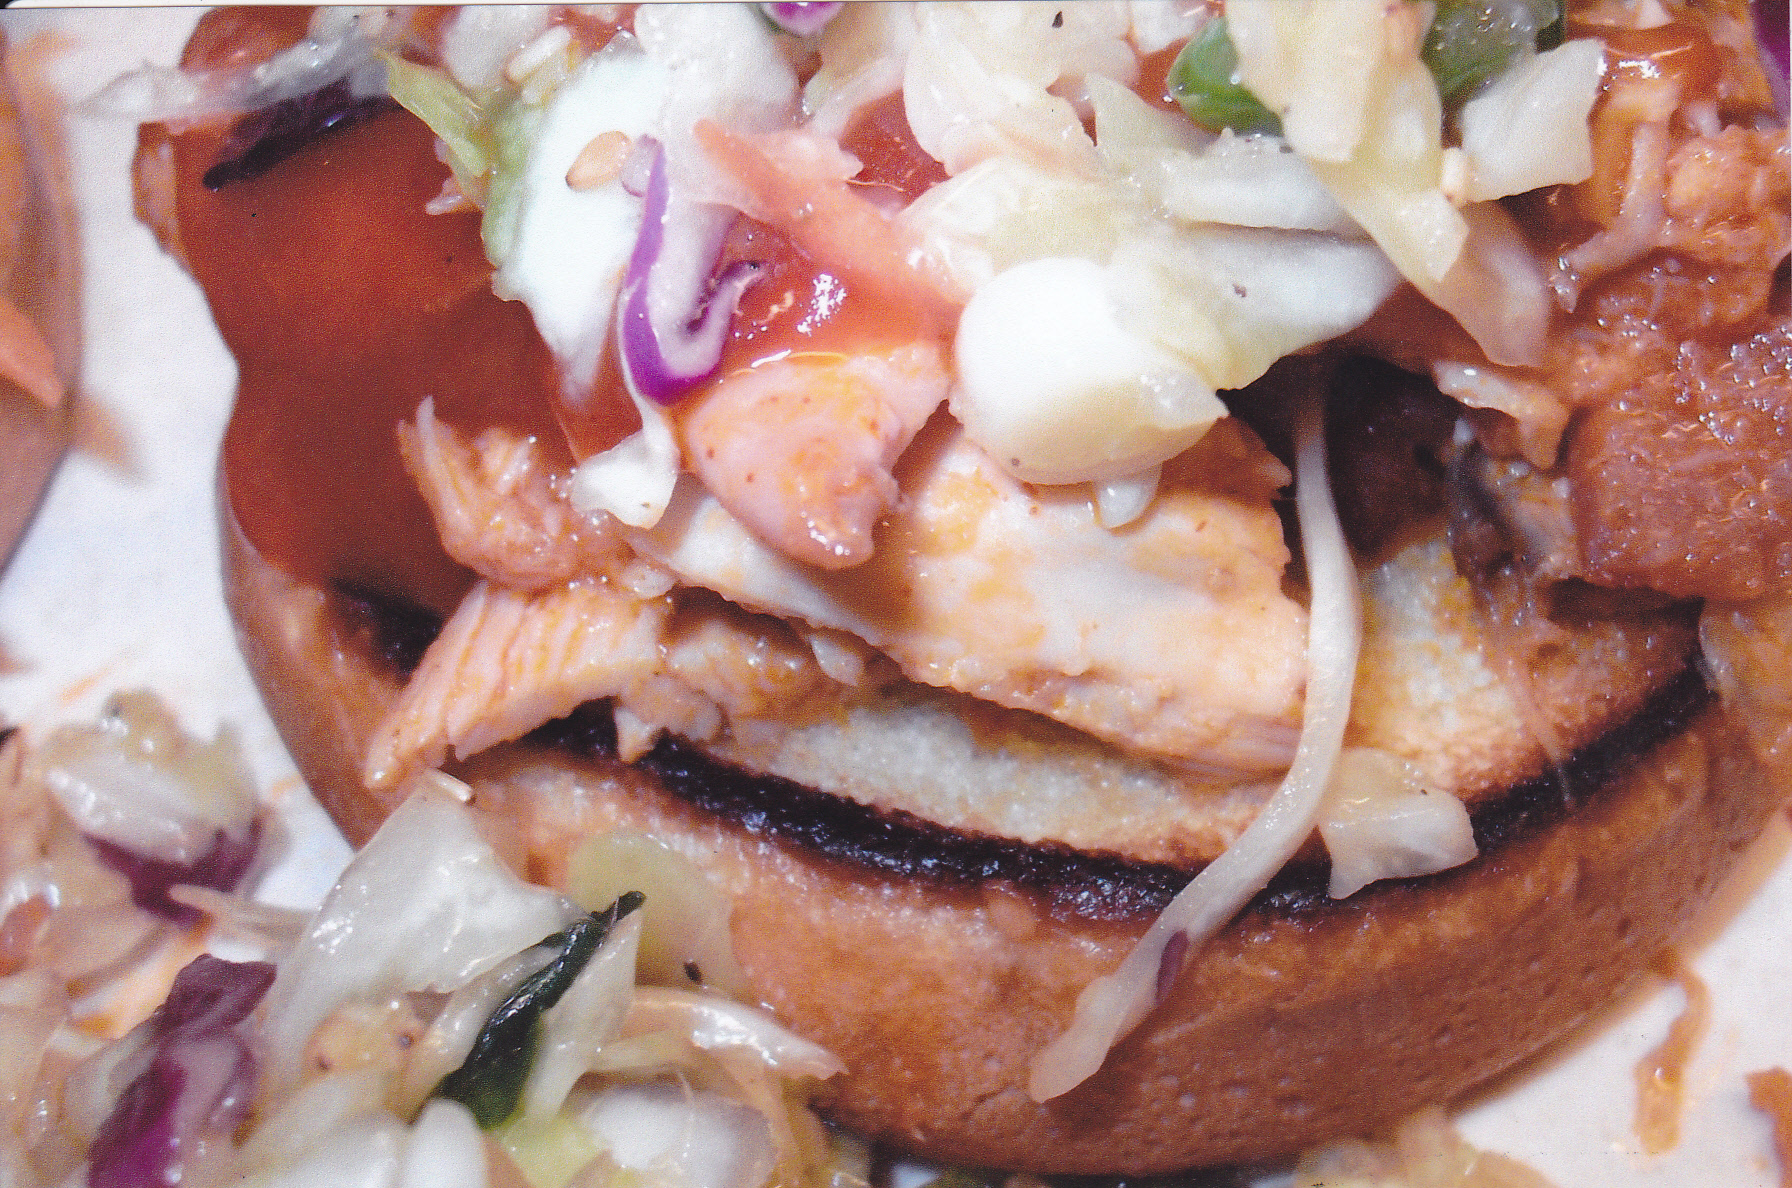
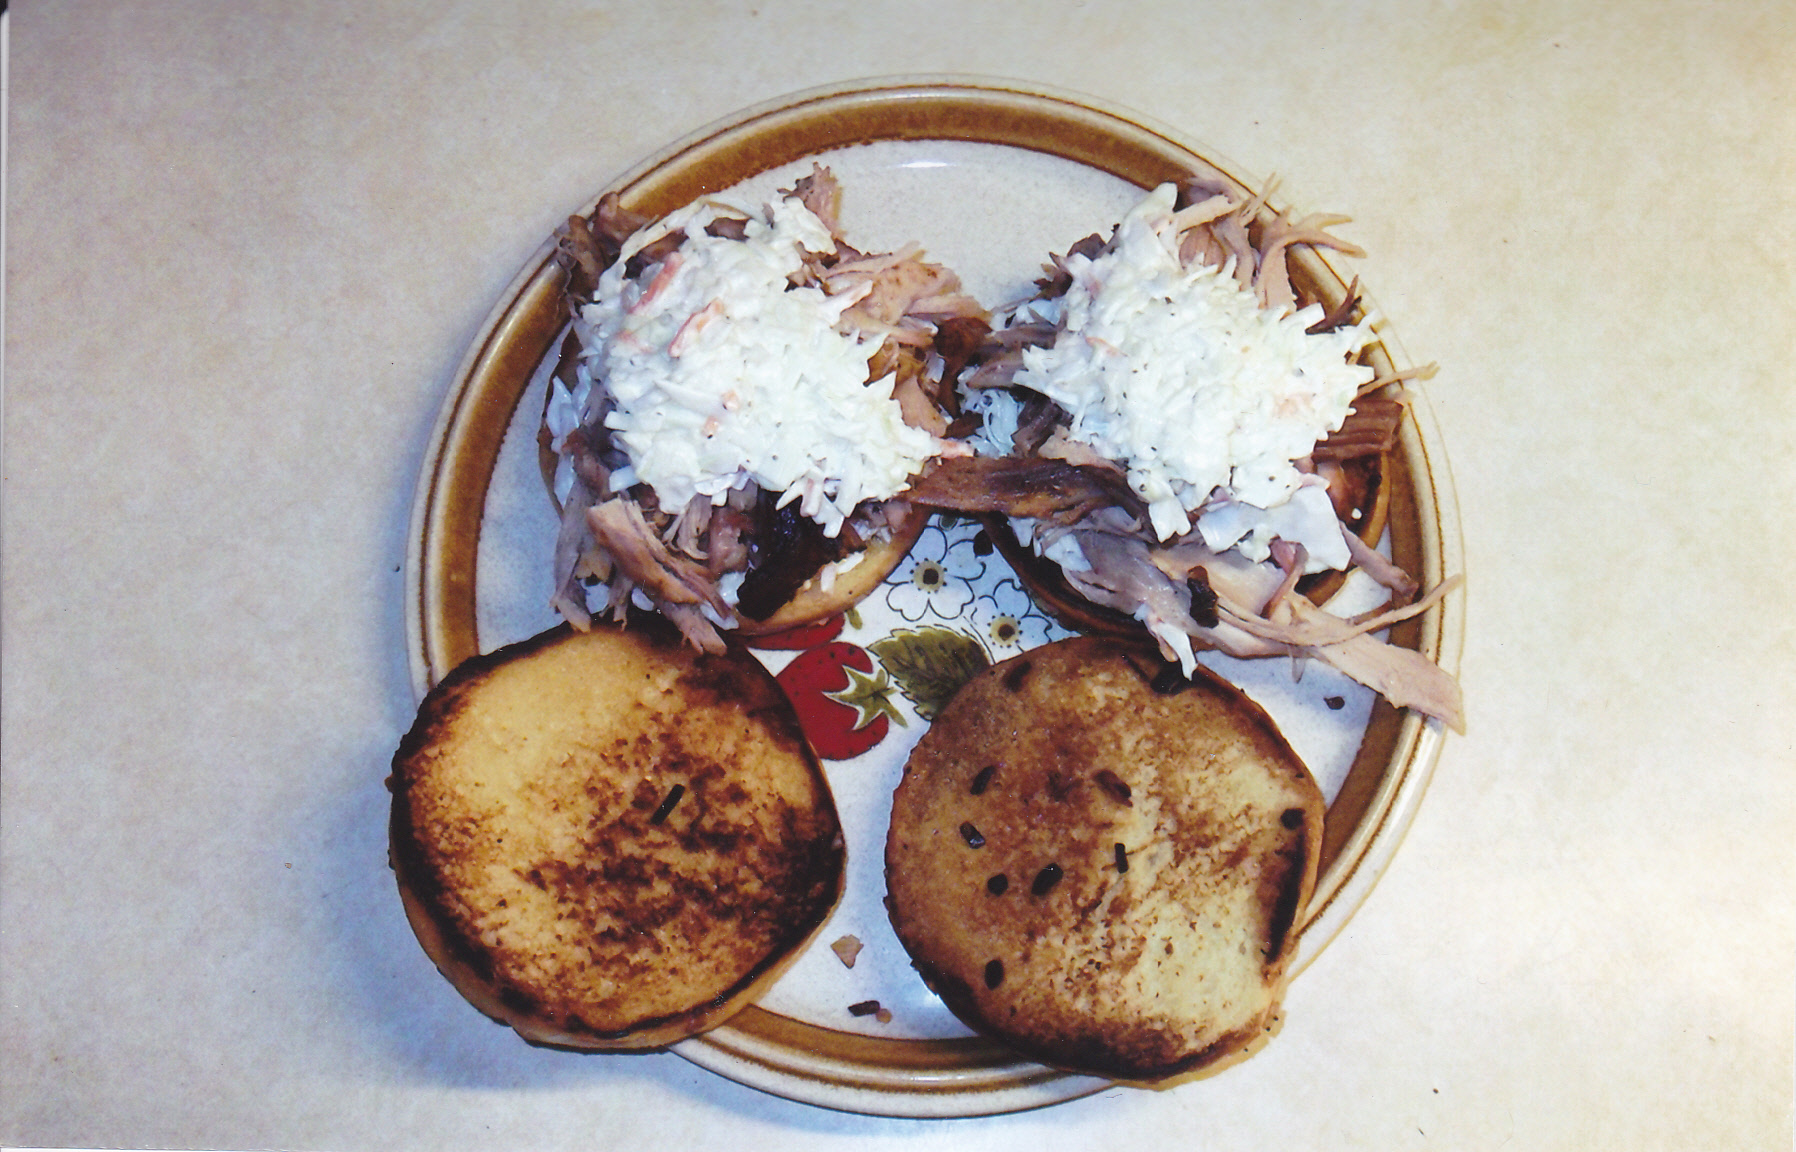
REINHARDS PULLED CHICKEN
I’m sure most folks have had pulled pork [I will post my version also], and perhapst some have had pulled chicken. I like to tweek mine some that’s different from what you see on the web. I use my own rub that I posted on this page, my own sauce [Butcher sauce in this case] and of course the ingredient that is loved by everyone–BACON!!!! Here is what I did:
2 whole fryers
Rino’s Rub [or your favorite rub]
1 pound bacon
Butcher Sauce [or your favorite BBQ sauce]
Buns
Asian Slaw or your favorite cole slaw
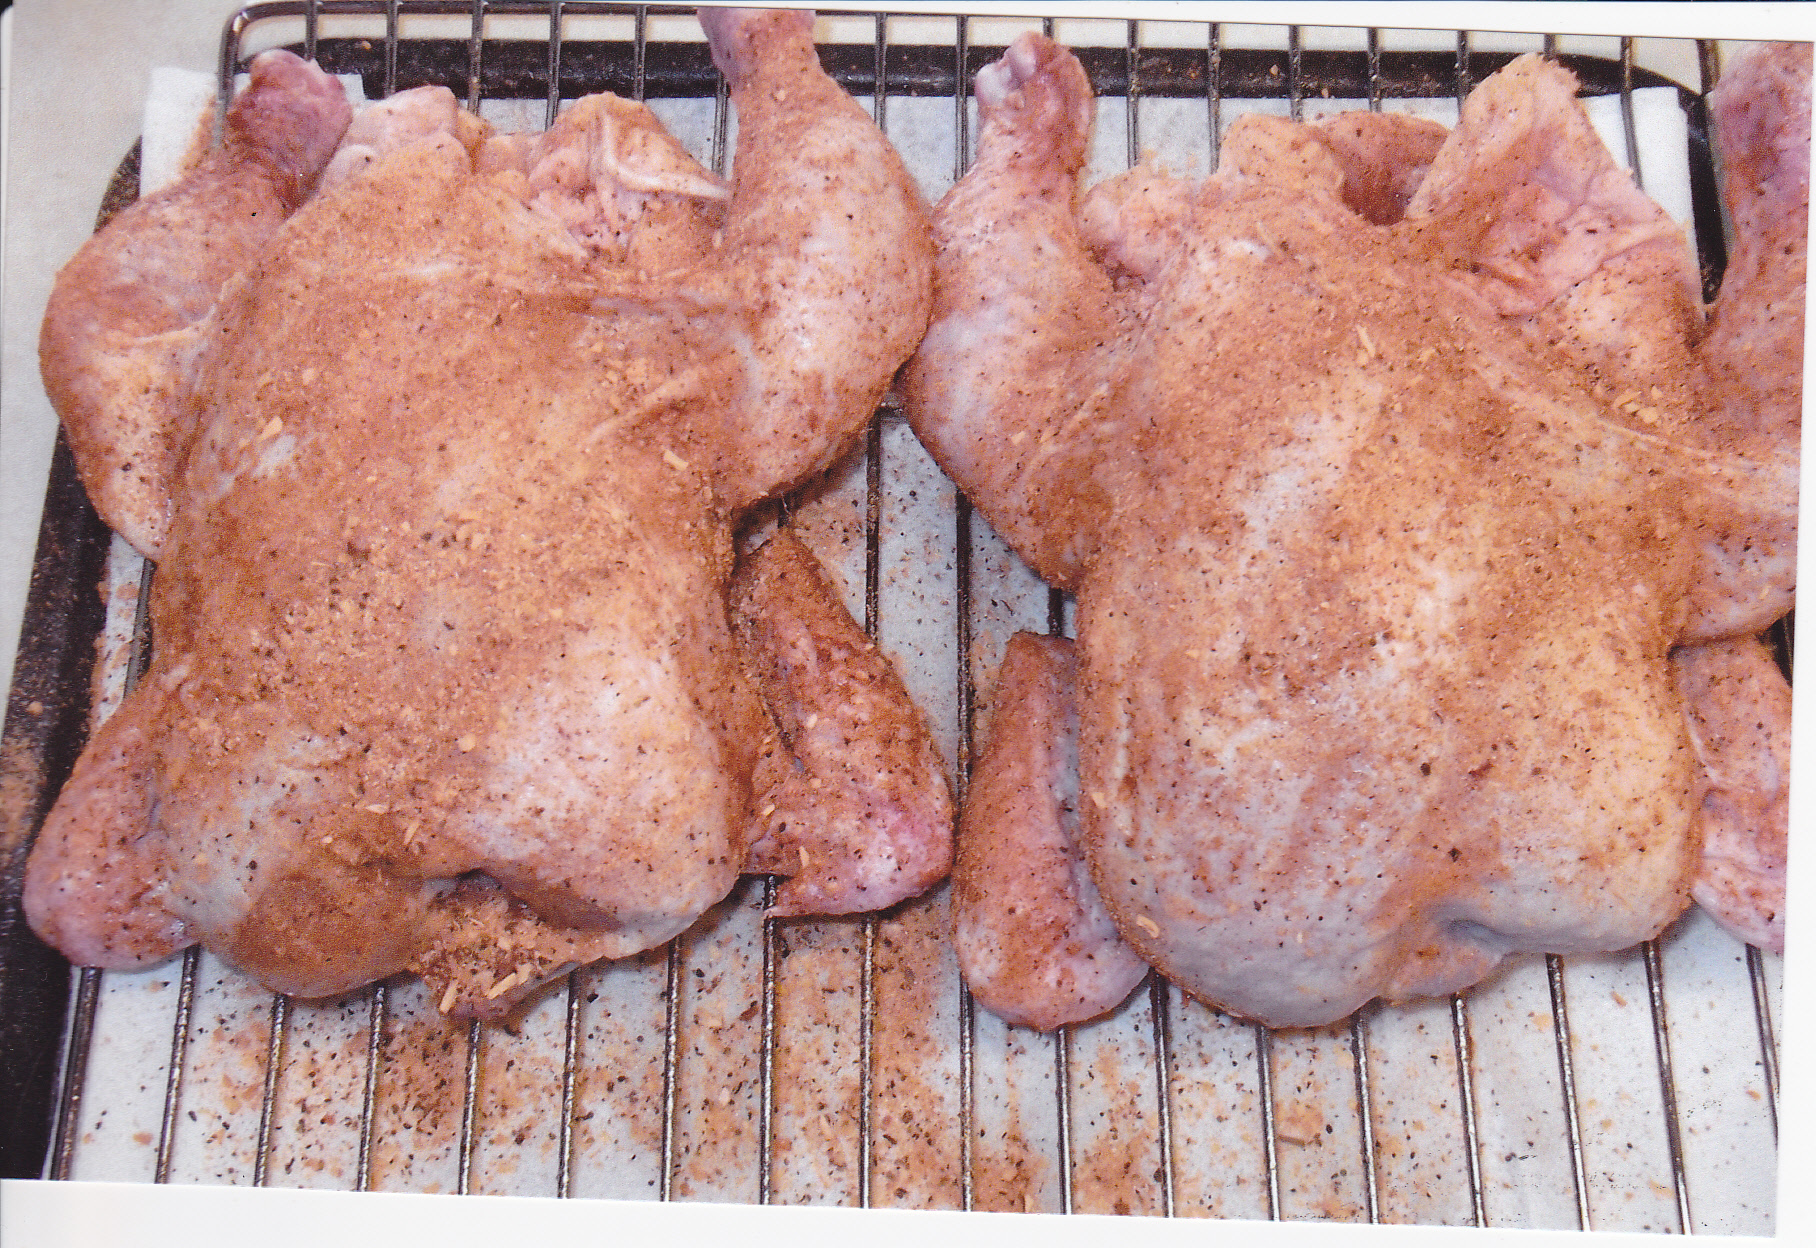
I took both fryers and seasoned them well. Then I tucked the wings under the chickens and wrapped some bacon over the breasts and hind quarters. Tied some cotton butcher string in the front and rear areas of the chickens. I do this to save room on the smoker rack and because it looks nice LOL. I set the temp in the smoker to 275 deg. This is as hot as the smoker gets. I keep the chickens in the smoker until the internal temp is 180 deg. I did use a couple of loads of cherry chips to give the birds a little love.
Once the chickens reach the internal temp of 180 deg, I pull them and set them on the kitchen counter to cool down a bit until the temp is good to pull the chicken meat. The bacon turned nice and brown and I pulled it off the birds and cut the excess fat off the slices. The meaty bacon then gets cut up small and put in the crock pot with the shredded chicken. I then pour some of my heated Butcher sauce over the meat and bacon and mix everything up good. Put the crock pot on low and let everything get heated to serve on toasted buns. I put some of the pulled chicken on the bun, then drizzle some more of my Butcher Sauces on the meat and then topped with a nice scoop of Asian Slaw. I also serve some Asian Slaw on the side. Here are some pictures of the day:
 Chickens are seasoned.
 Put some bacon slices on the chickens and tied the front across the wings and once across the hind quarters with butcher string. Ready for the smoker [also put some seasoning on top of the bacon].
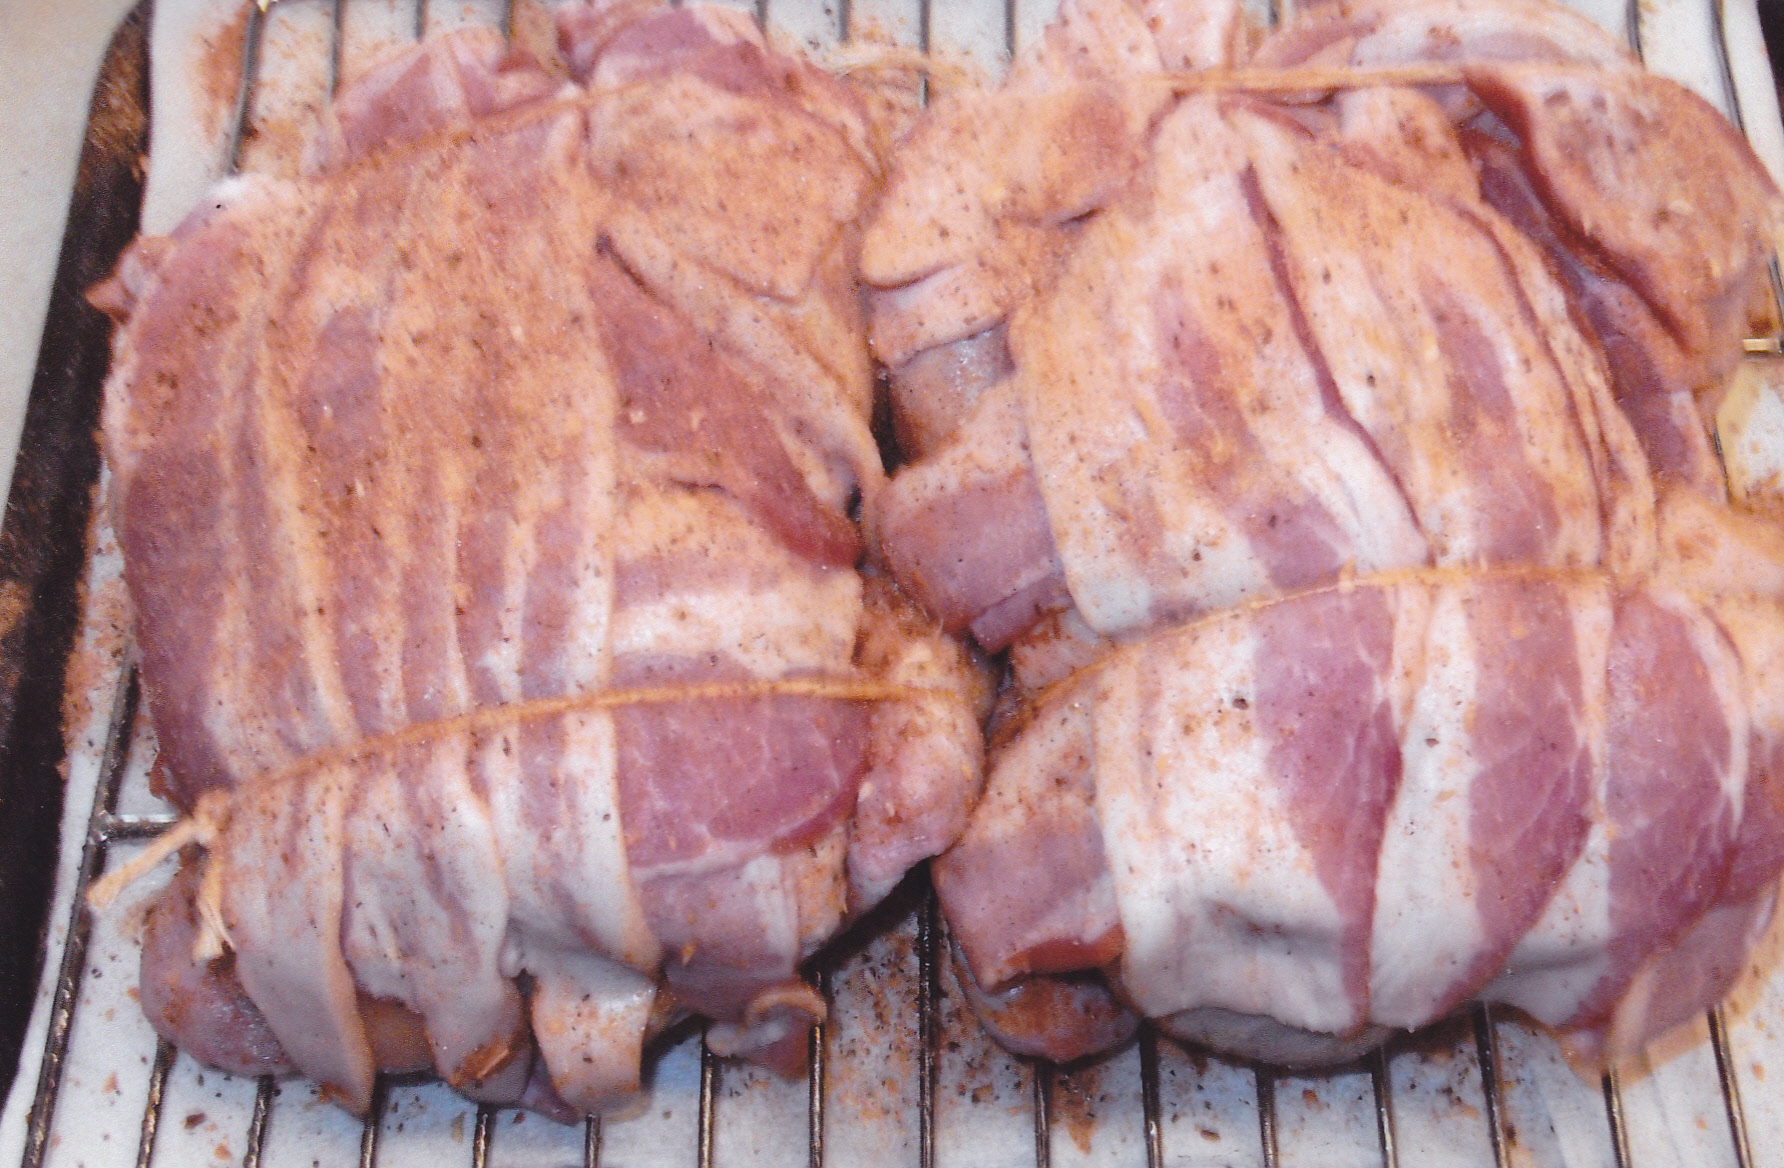
 In the smoker they go!!

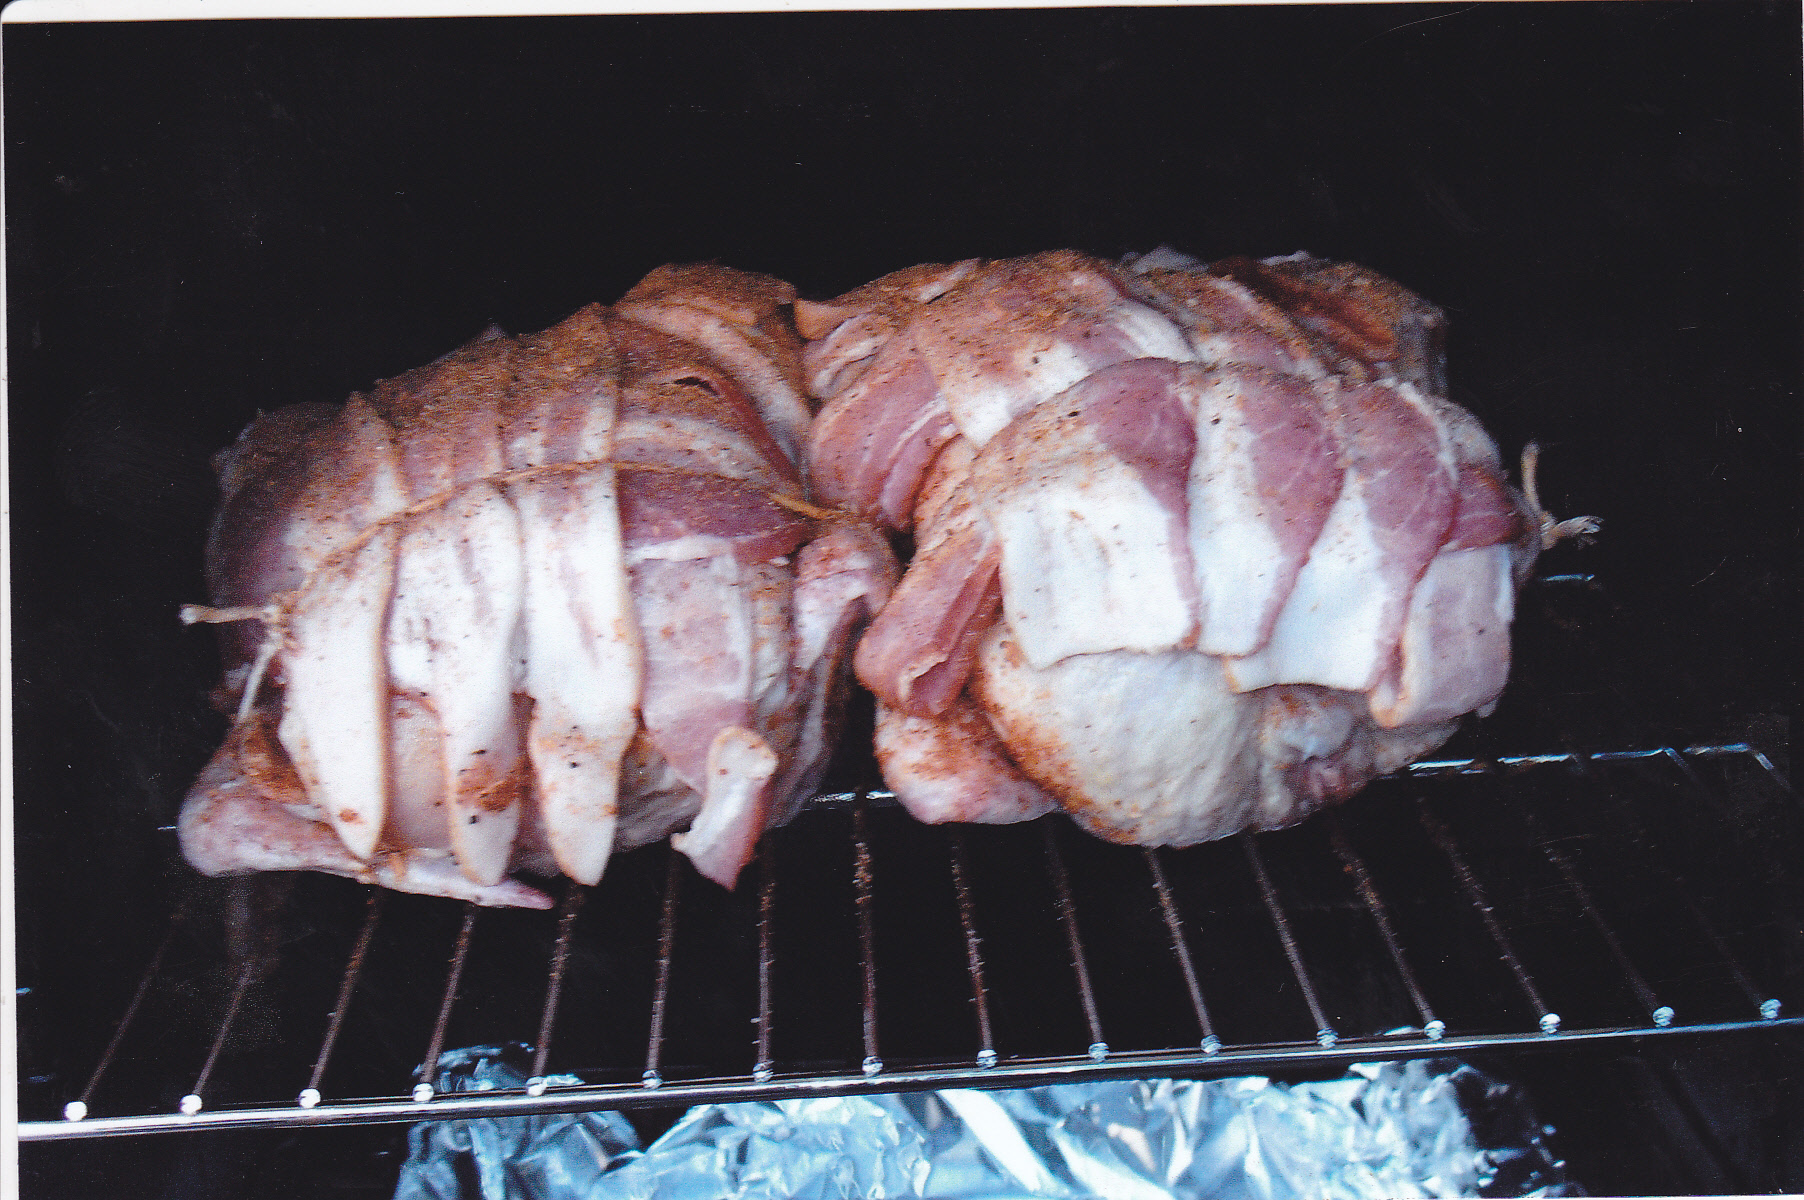
 About half way done.

 I think they are ready to pull out of the smoker.
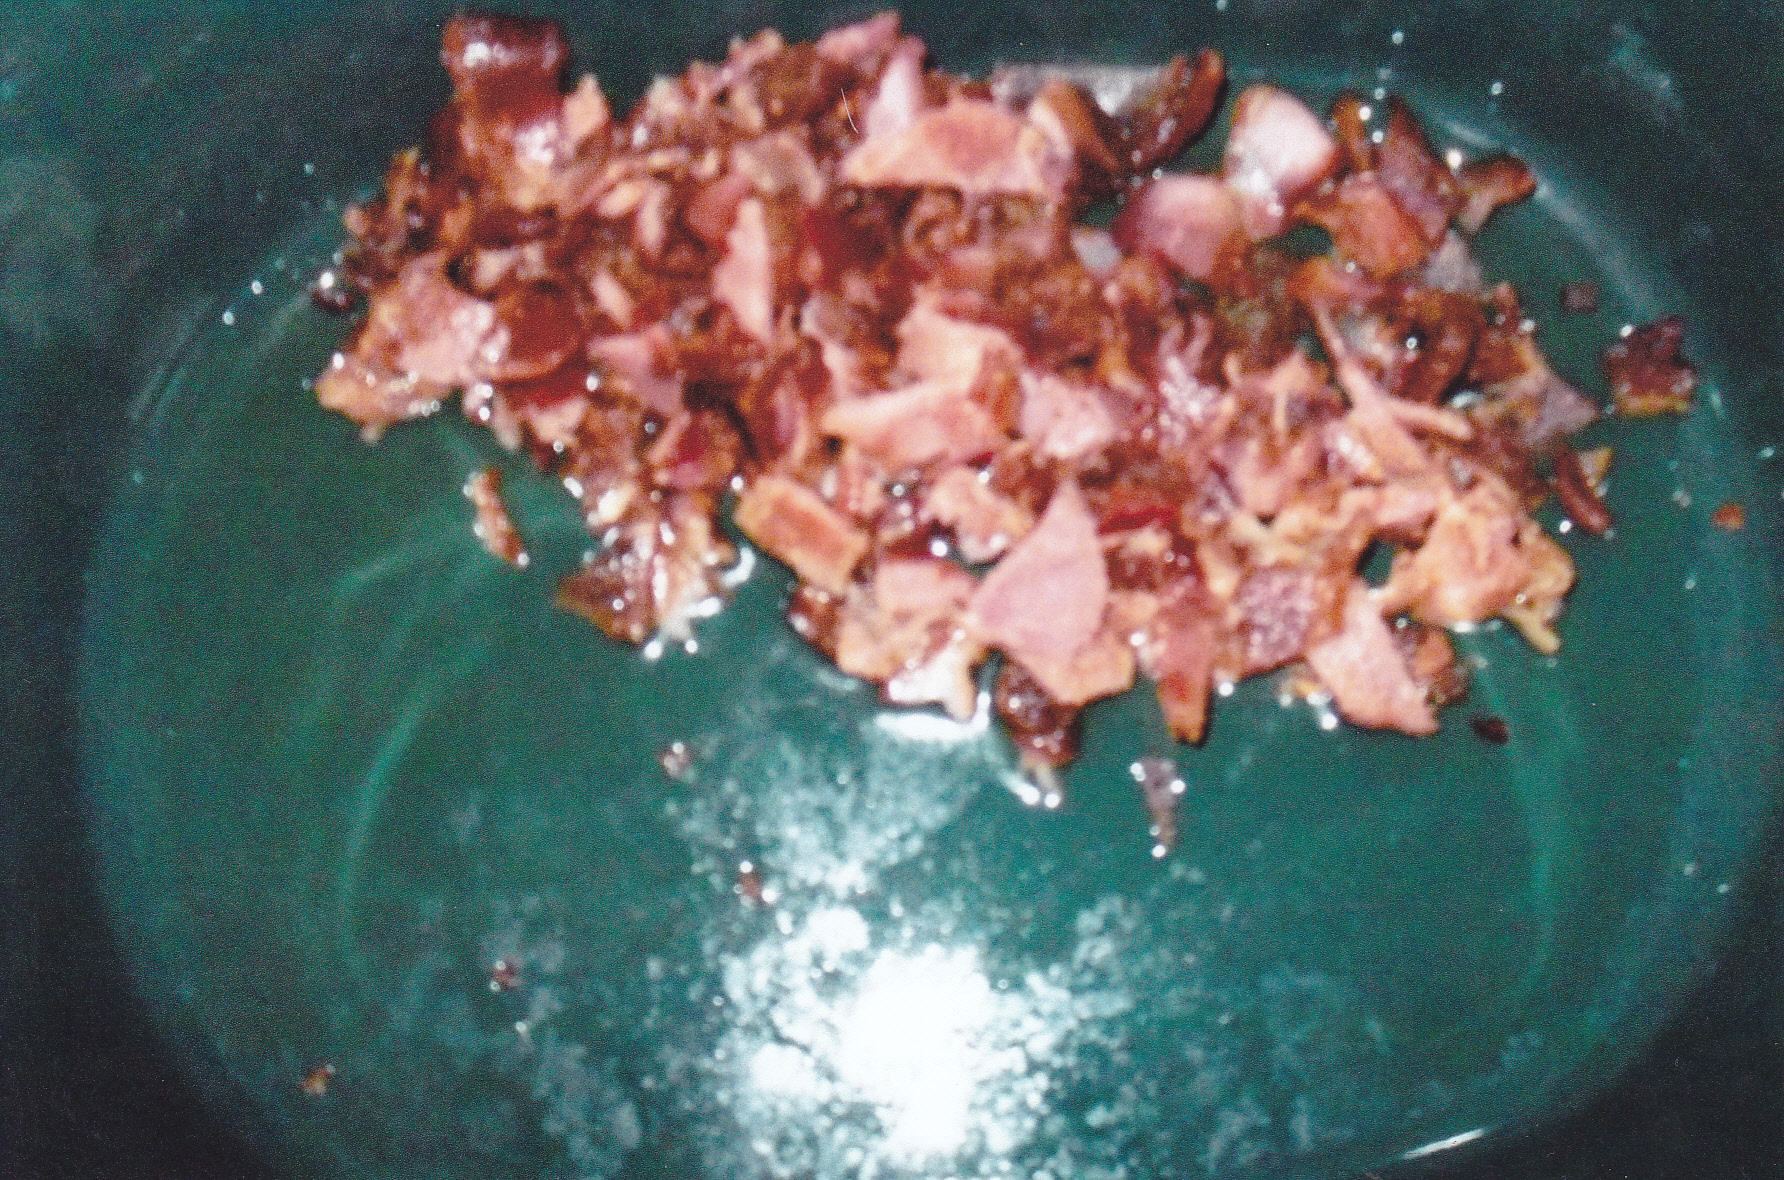 Chopped up the bacon and put it in the crock pot.
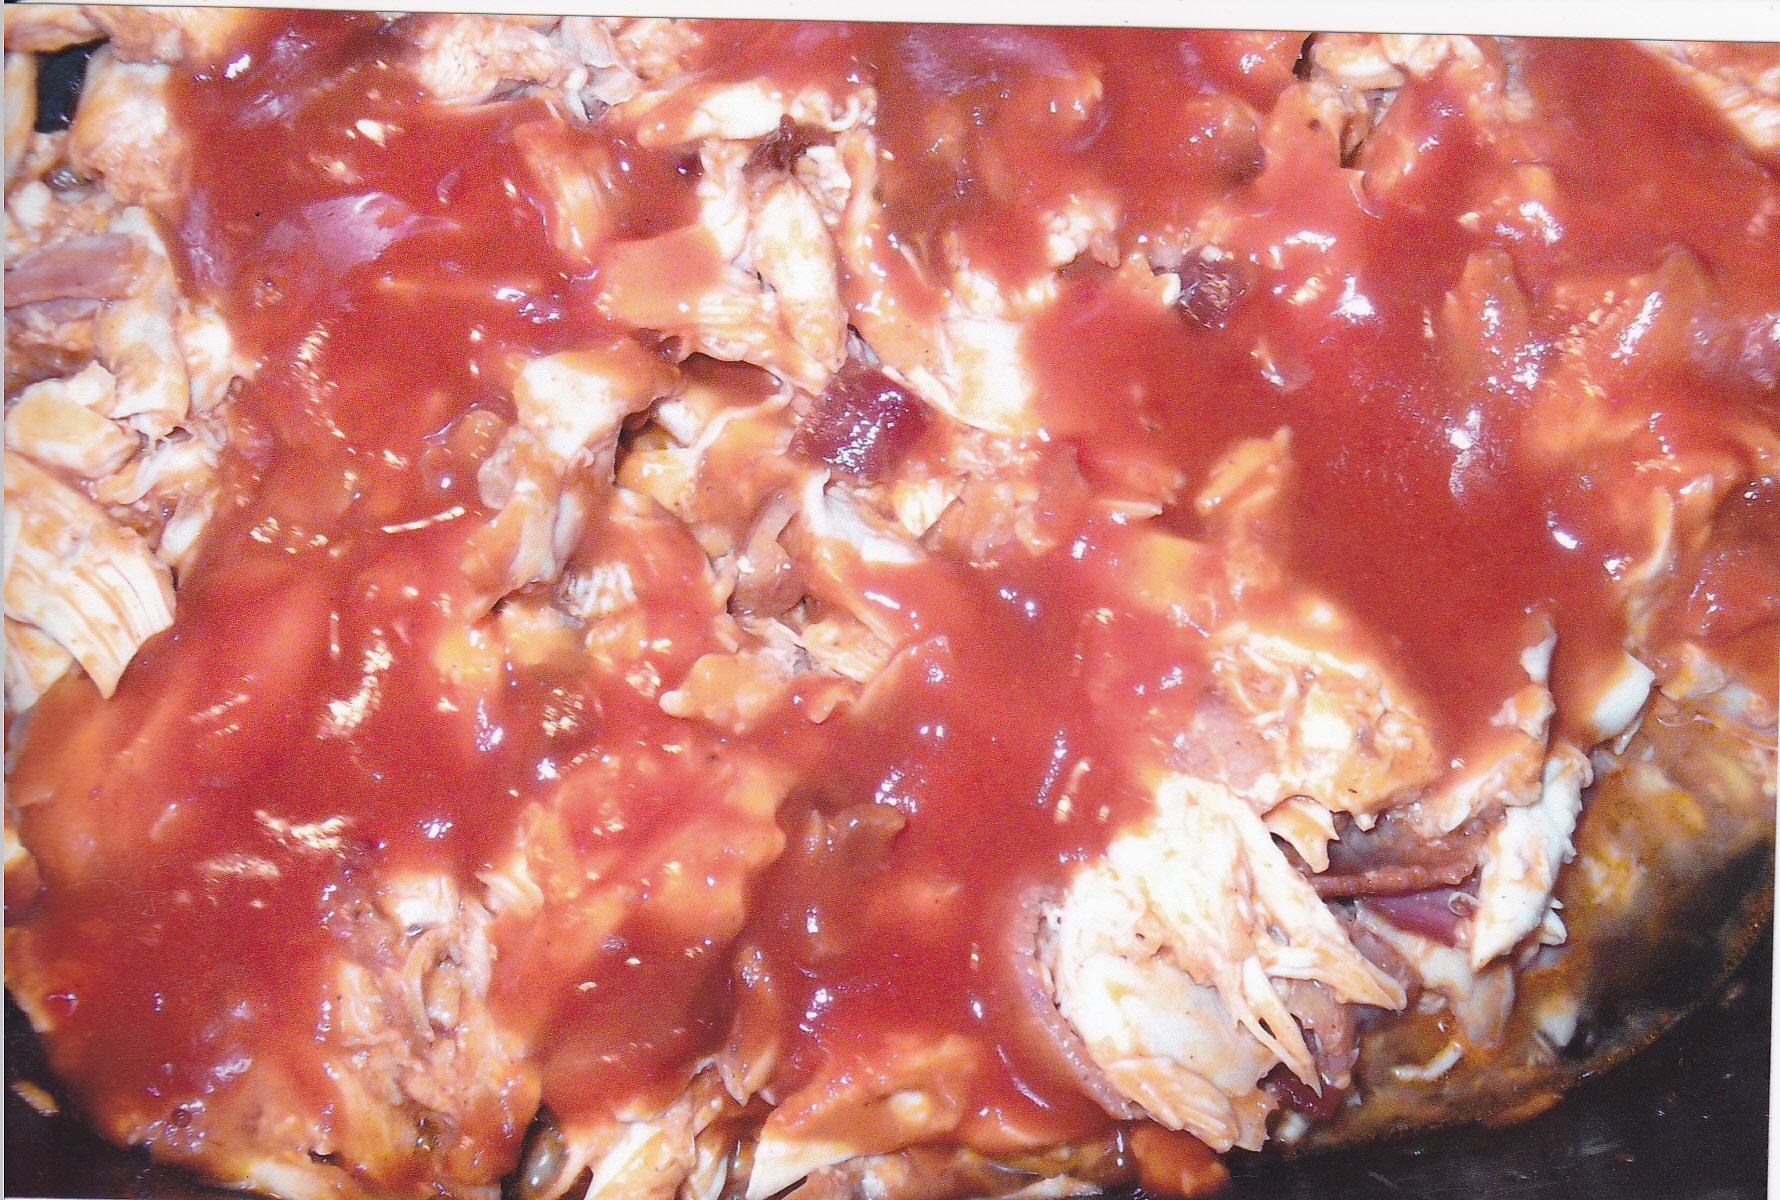 Put the shredded chicken in with the bacon and added some of my Butcher Sauce, just enough to make the meat moist. I did add some apple juice to my sauce to make it more “saucy” like a mop sauce for this.
 All mixed up and ready to serve!!
 I make extra so folks can put some of the sauce on the pulled pork extra on the bun if they like, and they usualy do.
 I like to serve my pulled pork and pulled chicken on warm toasted buns!! A little oil in the pan does the job.
 Close up view of the goodness!!
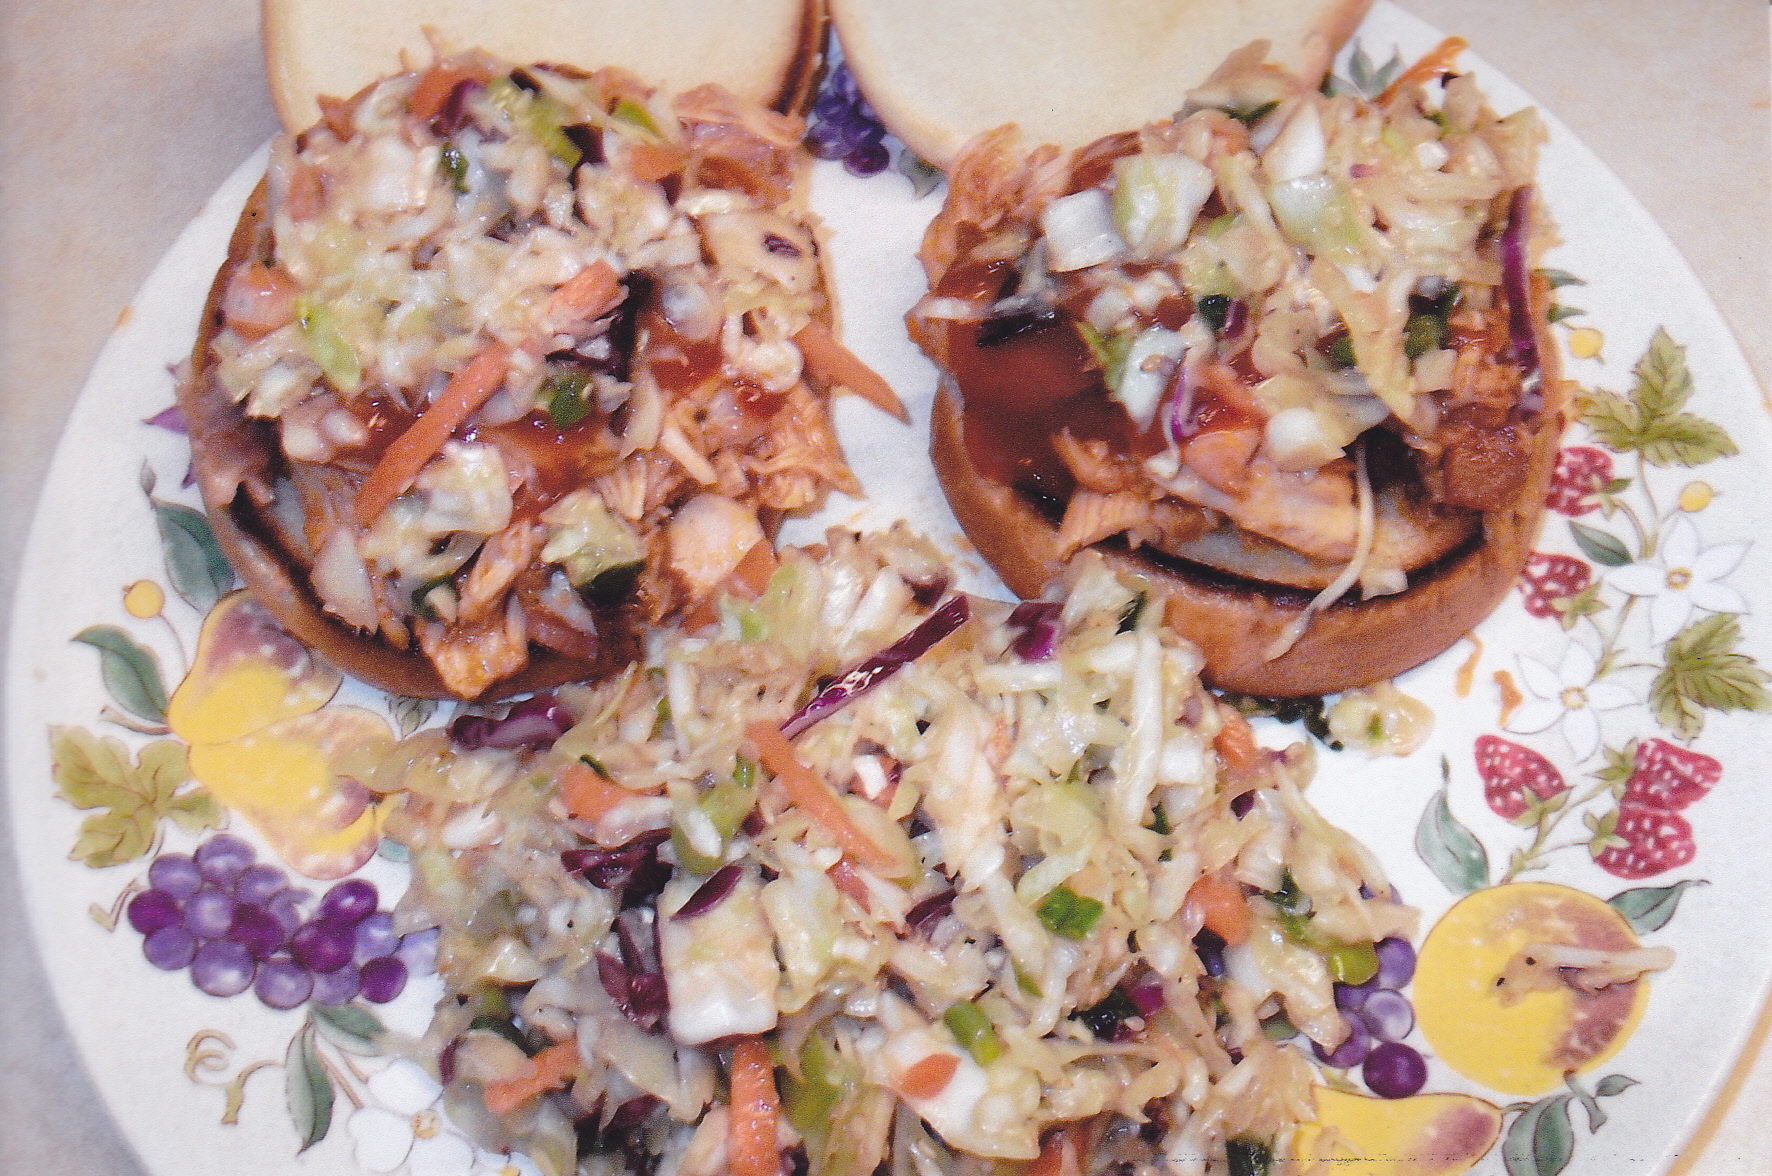 My plate!!
BUCKBOARD BACON
So what exactly is buckboard bacon? In the early years when I first started out as a meat cutter, we called this smoked boneless pork butt a Cottage Ham or Buckboard Bacon. It is a whole or a boneless pork butt cut in half and cured and smoked to become a ham or if you like, you can slice it and fry it for bacon. This cut of pork is leaner than a pork belly that is used for the bacon you buy at the store, and it’s realy not found in many places anymore. Buckboard bacon is something you realy have to make yourself and can be rewarding and very tasty.
Best part is, it’s not hard to make at all. You do need a smoker though to give that meat the smoky taste and rich color that will ignite your tastebuds. So let’s get started with what you will need and how to make this tasty cut of pork.
One whole pork butt [external fat trimmed] I buy the bone-in butt and take the bone out. Boneless butts at the store tend to be too small for my liking.
Butcher string–you need this to tie the butt together after boning out the butt.
Hickory chips–for smoking
Brine for curing–I use Pop’s Brine for this
POP’S BRINE;
1 gal. cold water
3/4 cup plain non-iodized salt
1/2 cup white sugar
1/2 cup brown sugar
3 T molasses
1 T cure #1
Mix everything up well till all is dissolved. Once the brine is made take a meat injector and inject some of the brine in the pork butt that you have now boned and tied back together. This helps get the brine and the cure distributed well inside the meat. Then put the pork butt in a plastic container with the brine. The pork butt must be submerged under the brine. I sometimes take a gallon plastic zip-lock bag and fill it half with water to use as a weight to keep the butt submerged.
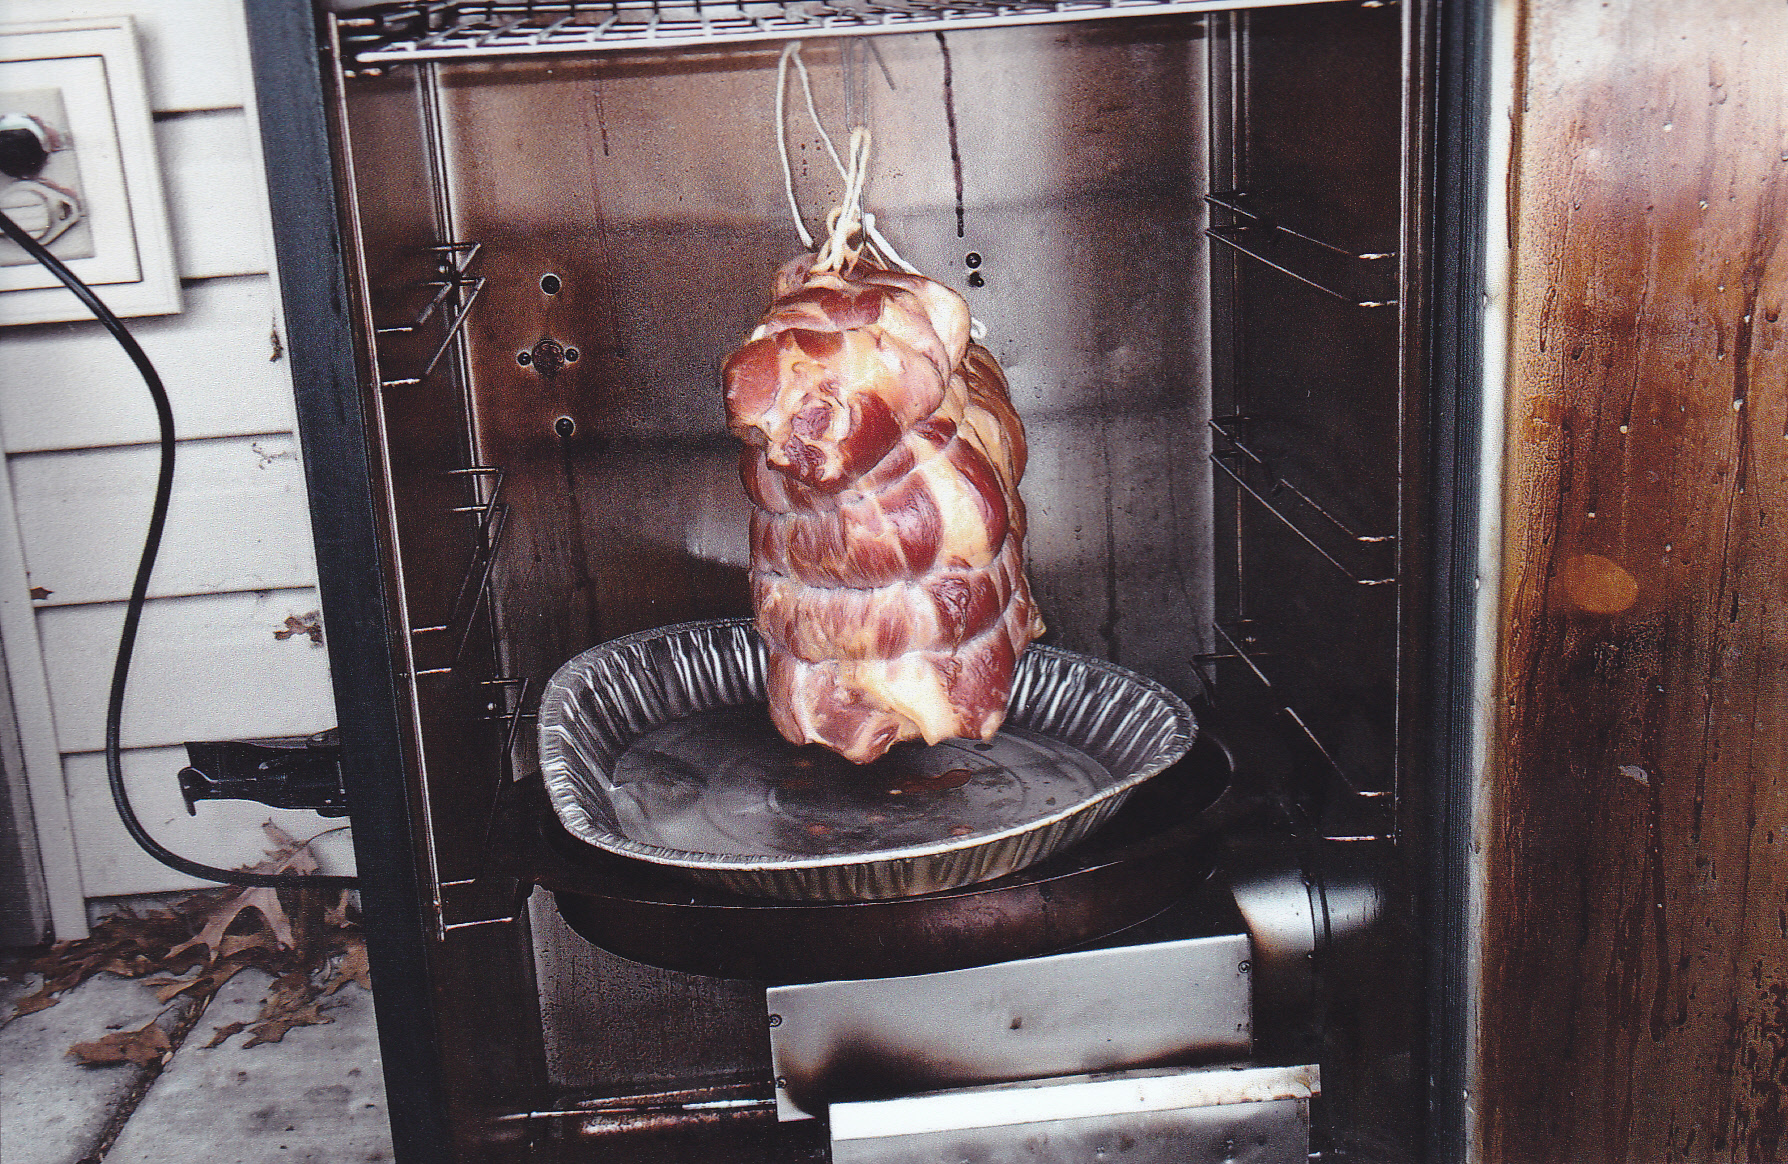
Now put the container with the butt in the fridge for about 12 days. Two or three times during this curing time I take the container out and give the brine a stir. Once the brine time is done, take the butt out of the brine and rinse the butt off with cold water and pat dry. I let the butt sit on the counter for an hour to further dry and get close to room temp. While the butt is on the counter, I go outside and start the smoker and set the temp at 140 for the first hour with the vent open. This helps the butt dry some more on the outside so the smoke can adhere better later in the smoking process.
After the first hour at 140 deg. I set the smoker at 190 for a couple of hours and start adding hickory chips to the smoking tray. I keep adding smoke until I get the color I want. After a couple of hours at 190 I turn the smoker up to 225 and leave it there until I get the internal temp to 150 deg. Once the butt reaches that internal I take it out and bring it in the kitchen and cover it with foil and let it cool down. Do not cut into the ham at this point. You want to keep the moisture inside while cooling. I know it’s tempting at this point to take a sample but it’s not a good idea to cut into it until completely cooled down. Once it get’s cooled down I put the ham into the fridge wrapped in foil and do not slice it for bacon until the next day. Here are some pic’s of the process:
Here I take the bone out of the pork butt.
Now the bone is out and some of the external fat is trimmed off. The excess fat from the butt I freeze and use later for sausage.
Tying the pork butt back up. Notice the loop on the end of the butcher string on the right that I will use to hang in the smoker.
The brine is ready and all mixed up, ready for the pork butt.
Here you see the tied butt with a little slice taken out of it. I take this little slice for a test fry to see if it’s too salty. It wasn’t so I put it in the smoker. If it was, I would of soaked the butt in cold water for about 2 hours. With this brine it wasn’t needed and that is what makes this brine so good. You can also see the red color from the cure.

Here is the butt hanging in the smoker with a drip pan underneath.
Getting some color about half way through.
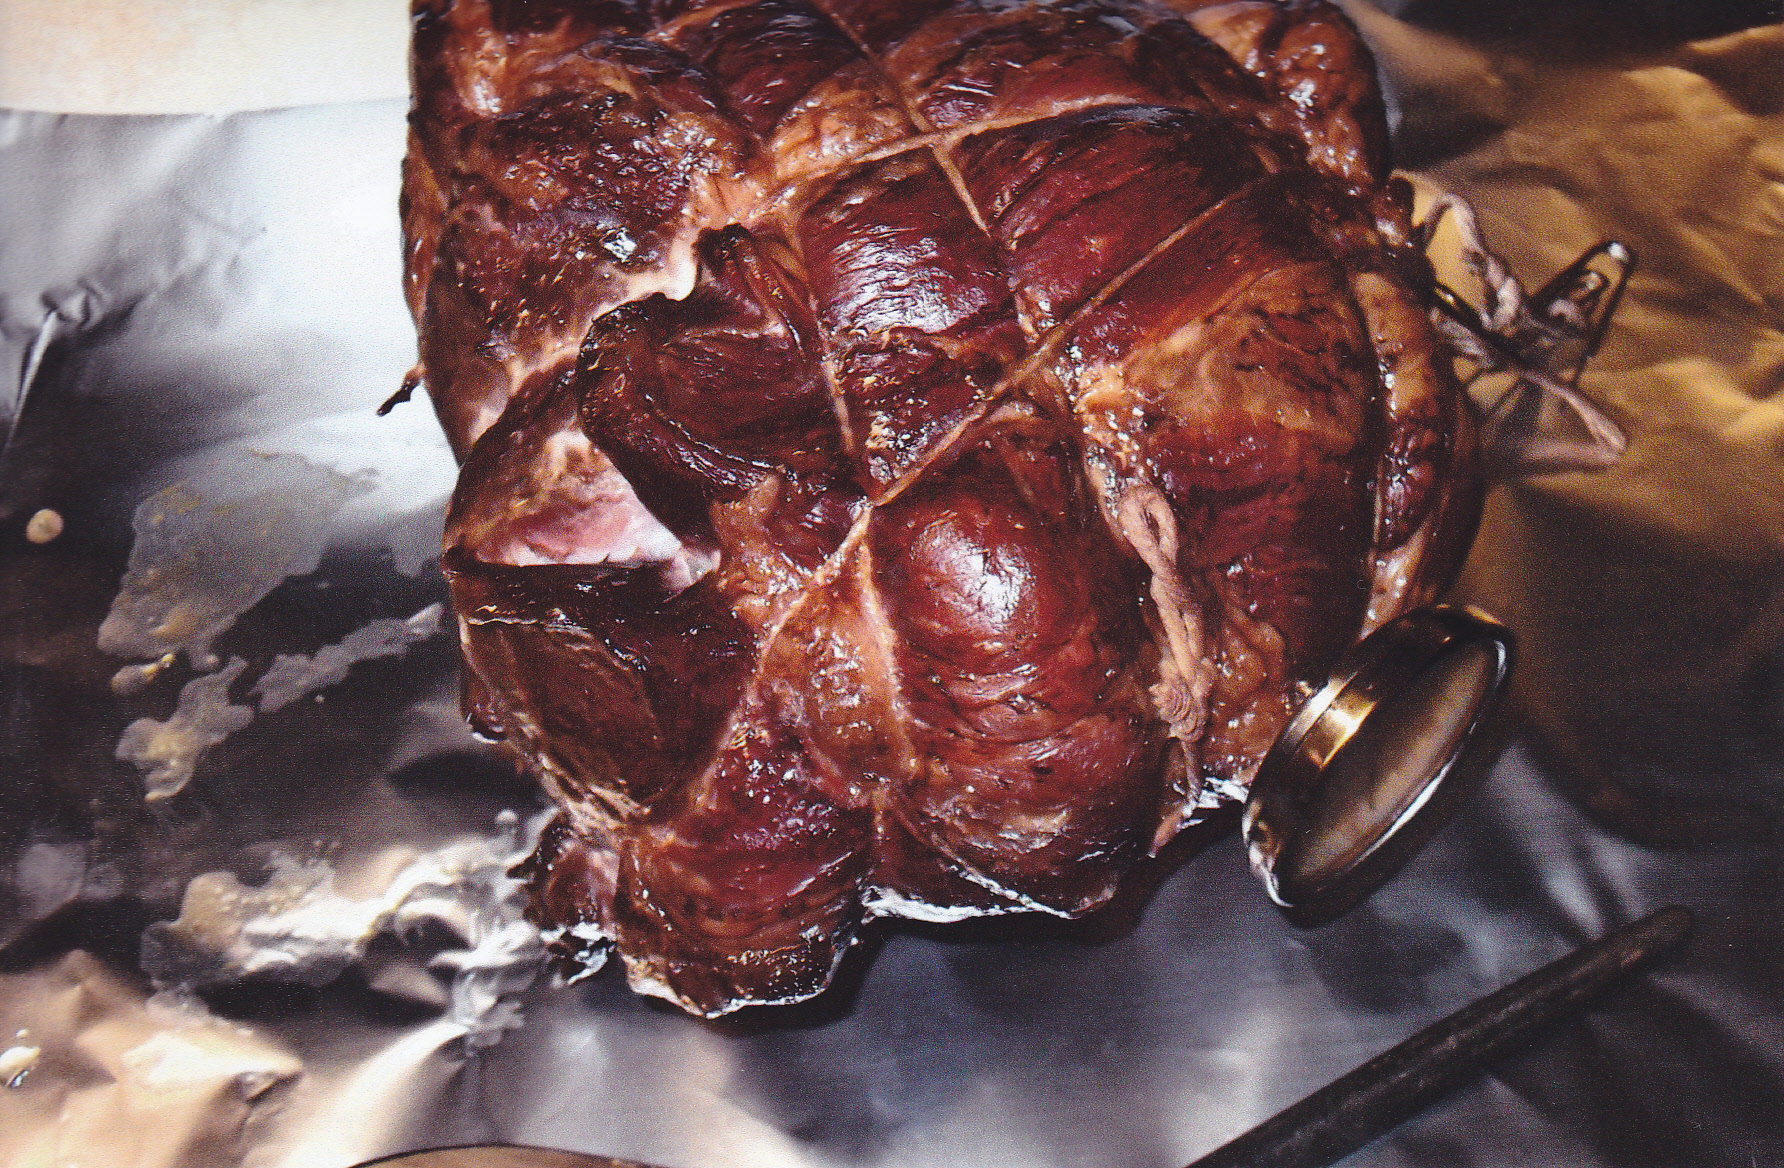
Well, it looks just great to me and ready to pull from the smoker. Smells great and the internal temp has reached 150 deg.
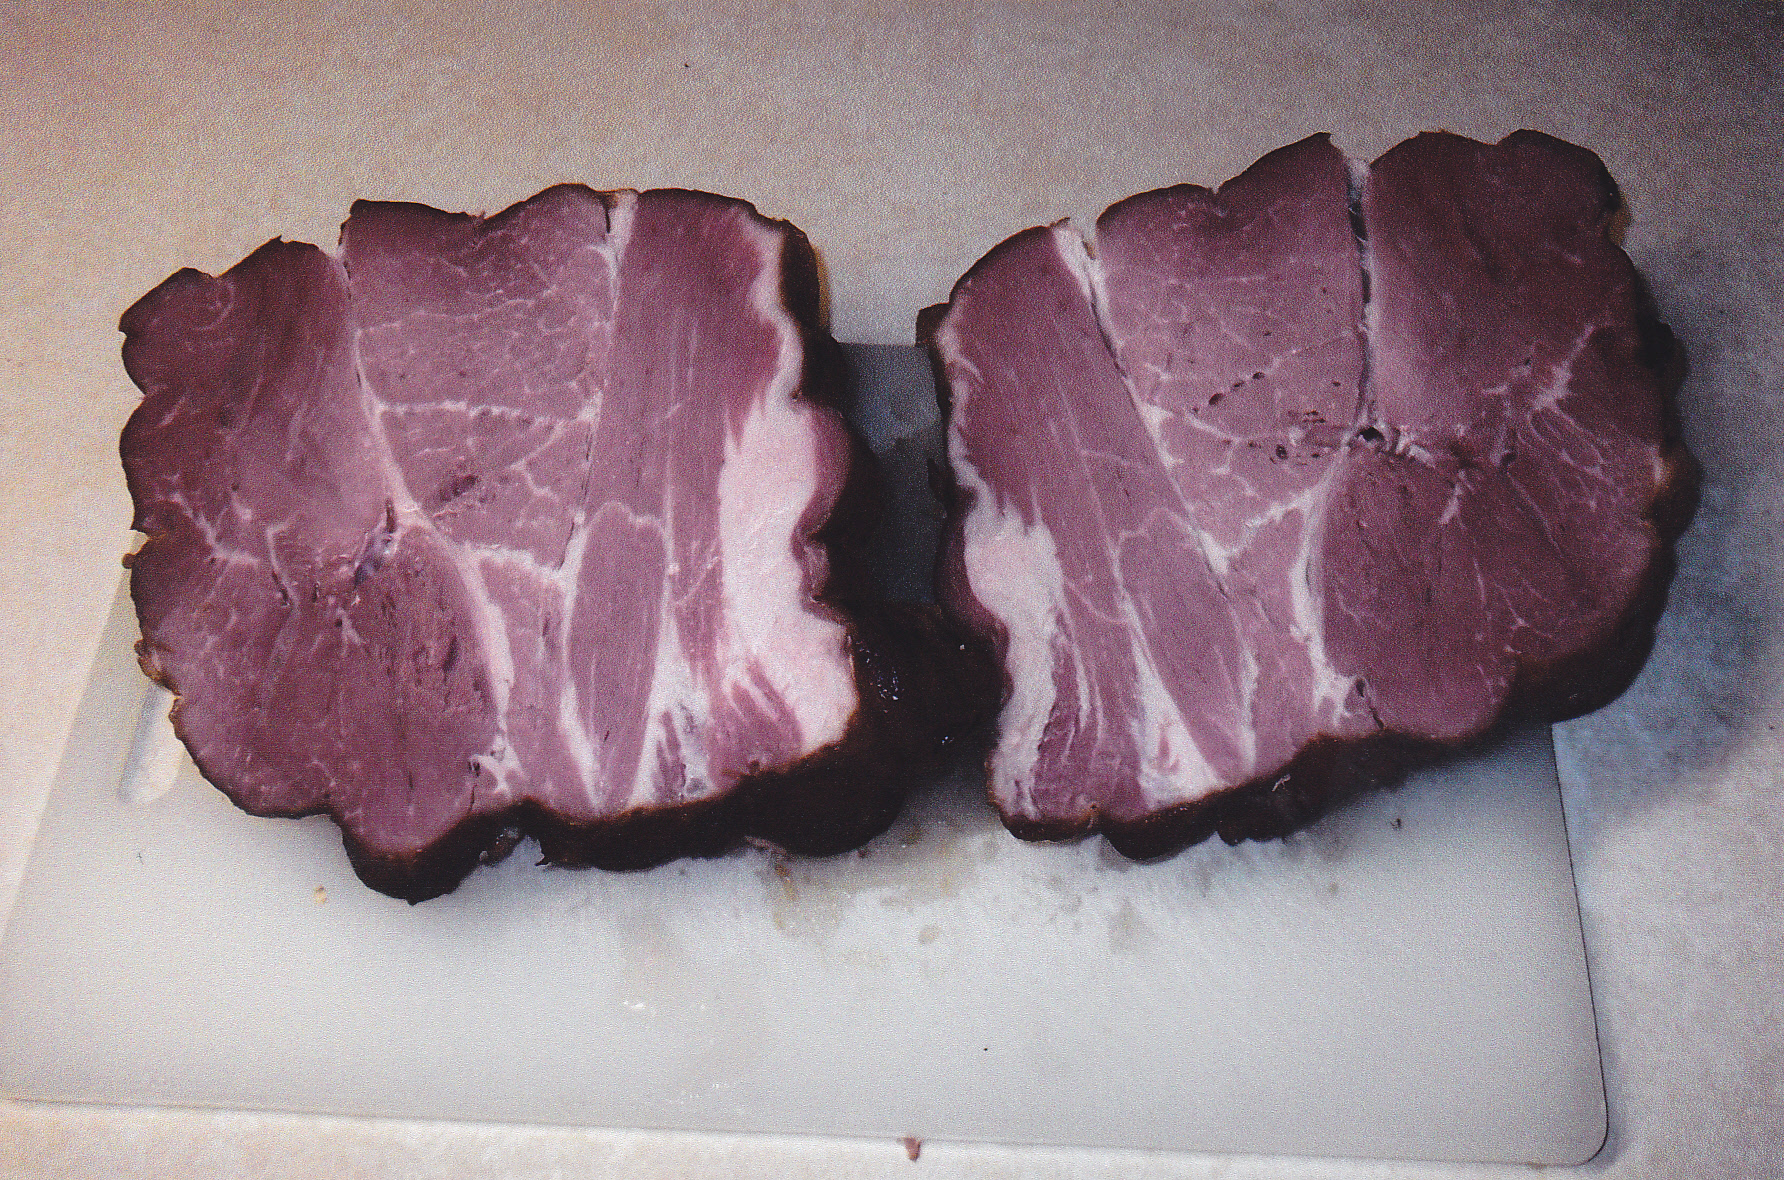
Here I cut the ham in half after the night in the fridge and it’s ready for slicing.


Some pic’s of the slices.
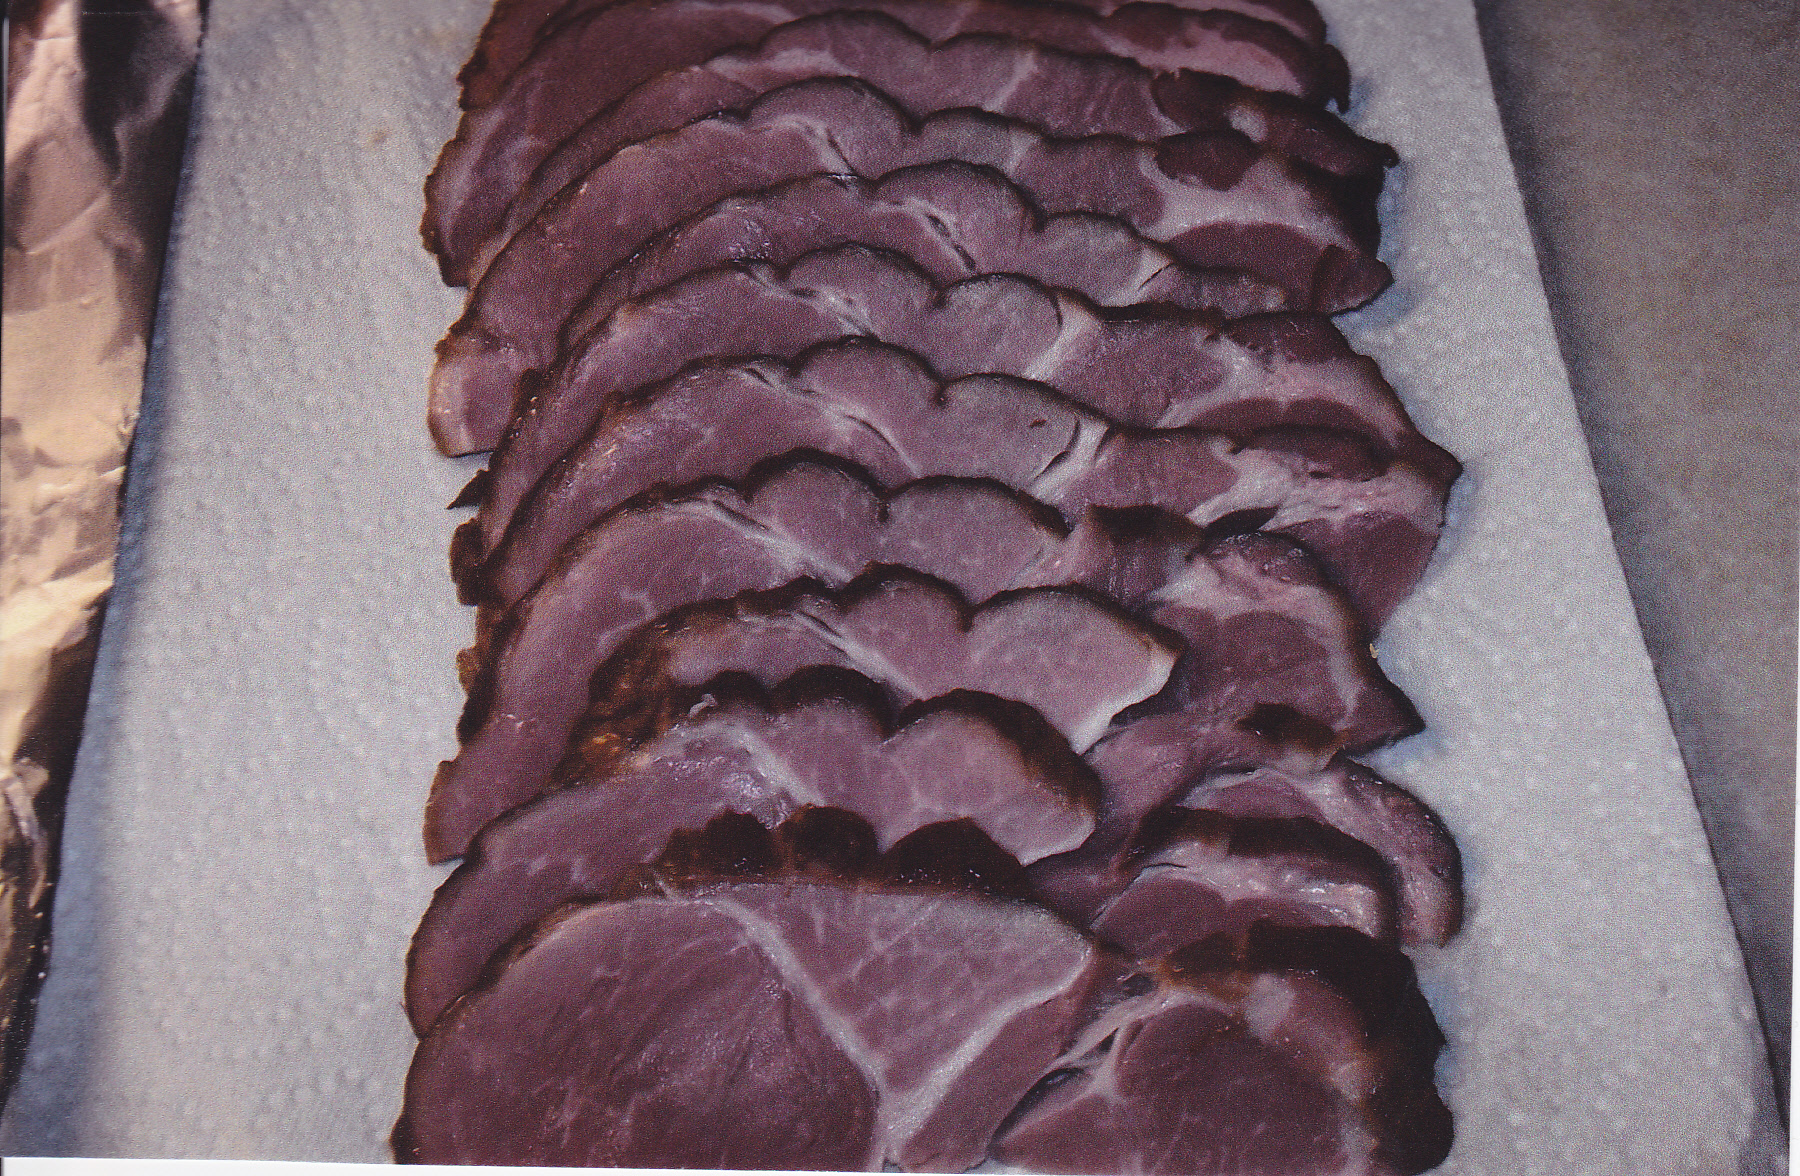
More pic’s of the slices ready for vac packs for freezing. There are some end cuts that I cut into cubes for other dishes like beans and German Gumbo [which is on the recipe page].

Here are some slices of the buckboard bacon fried in some butter. SoooooooGoooood!!!!
RIBS FOR THE PARTY
I was asked to make some ribs for my neighbors for a graduation party. So he gave me some baby back ribs and I got busy with the prep work to get the job done. This was the most ribs I have ever done at one time so it presented a challenge to me. I explained earlier about the 2-2-1 method for baby backs. I was going to go that route, however controlling the temp at 225 was not going to be easy with the weather we had that weekend and with charcoal as my heat source. The temps were cooler than expected so to maintain the temp I had to be on the watch with two Char-Grillers [barrel type smoker/grills with a side fire box] going at the same time.
I even had to use my oven that day because I just didn’t have room for all the ribs on the two grill/smokers. It was a long day but I learned a lot that day and I’m glad I had the opportunity to prepare the meal. He wanted me to make my own sauce which he has tried before. So I did half with my Butcher Sauce and the other half with my Reinhard Caught a Buzz Sauce. I also made the Asian Slaw for the party and the neighbors supplied the rest of the food needed for the party. Everyone had a good time and here are some pics of the ribs:

Two Char-Griller barrel type grill/smokers, my Masterbuilt electric smoker in the center. The sign on the garage was given to me by my co-workers when I retired. They said someday I may win an award because they knew I love to play with smokers and grills. Well that day is yet to come. Realy not interested in entering contests, but I have been tempted at some of the local contests. I went to a few and they looked like a lot of fun. Some great folks there with good food.
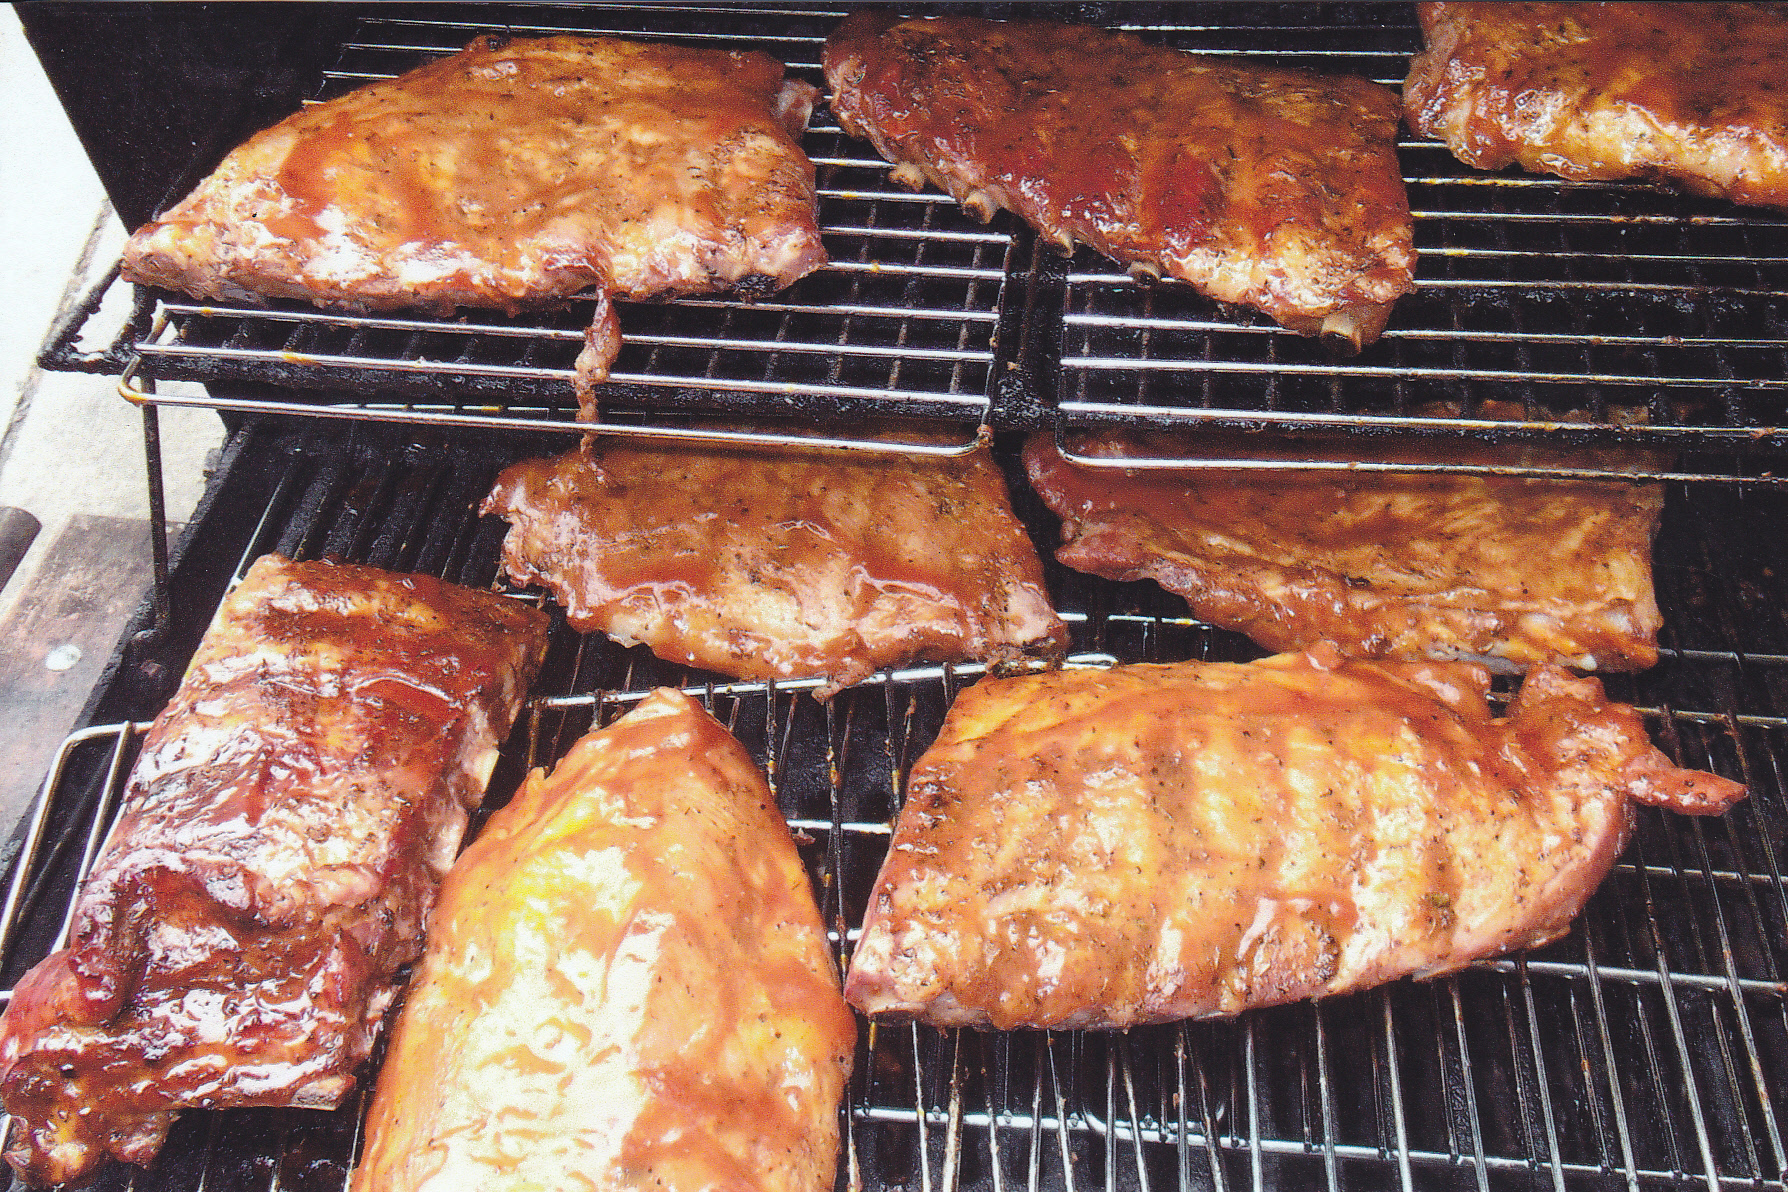
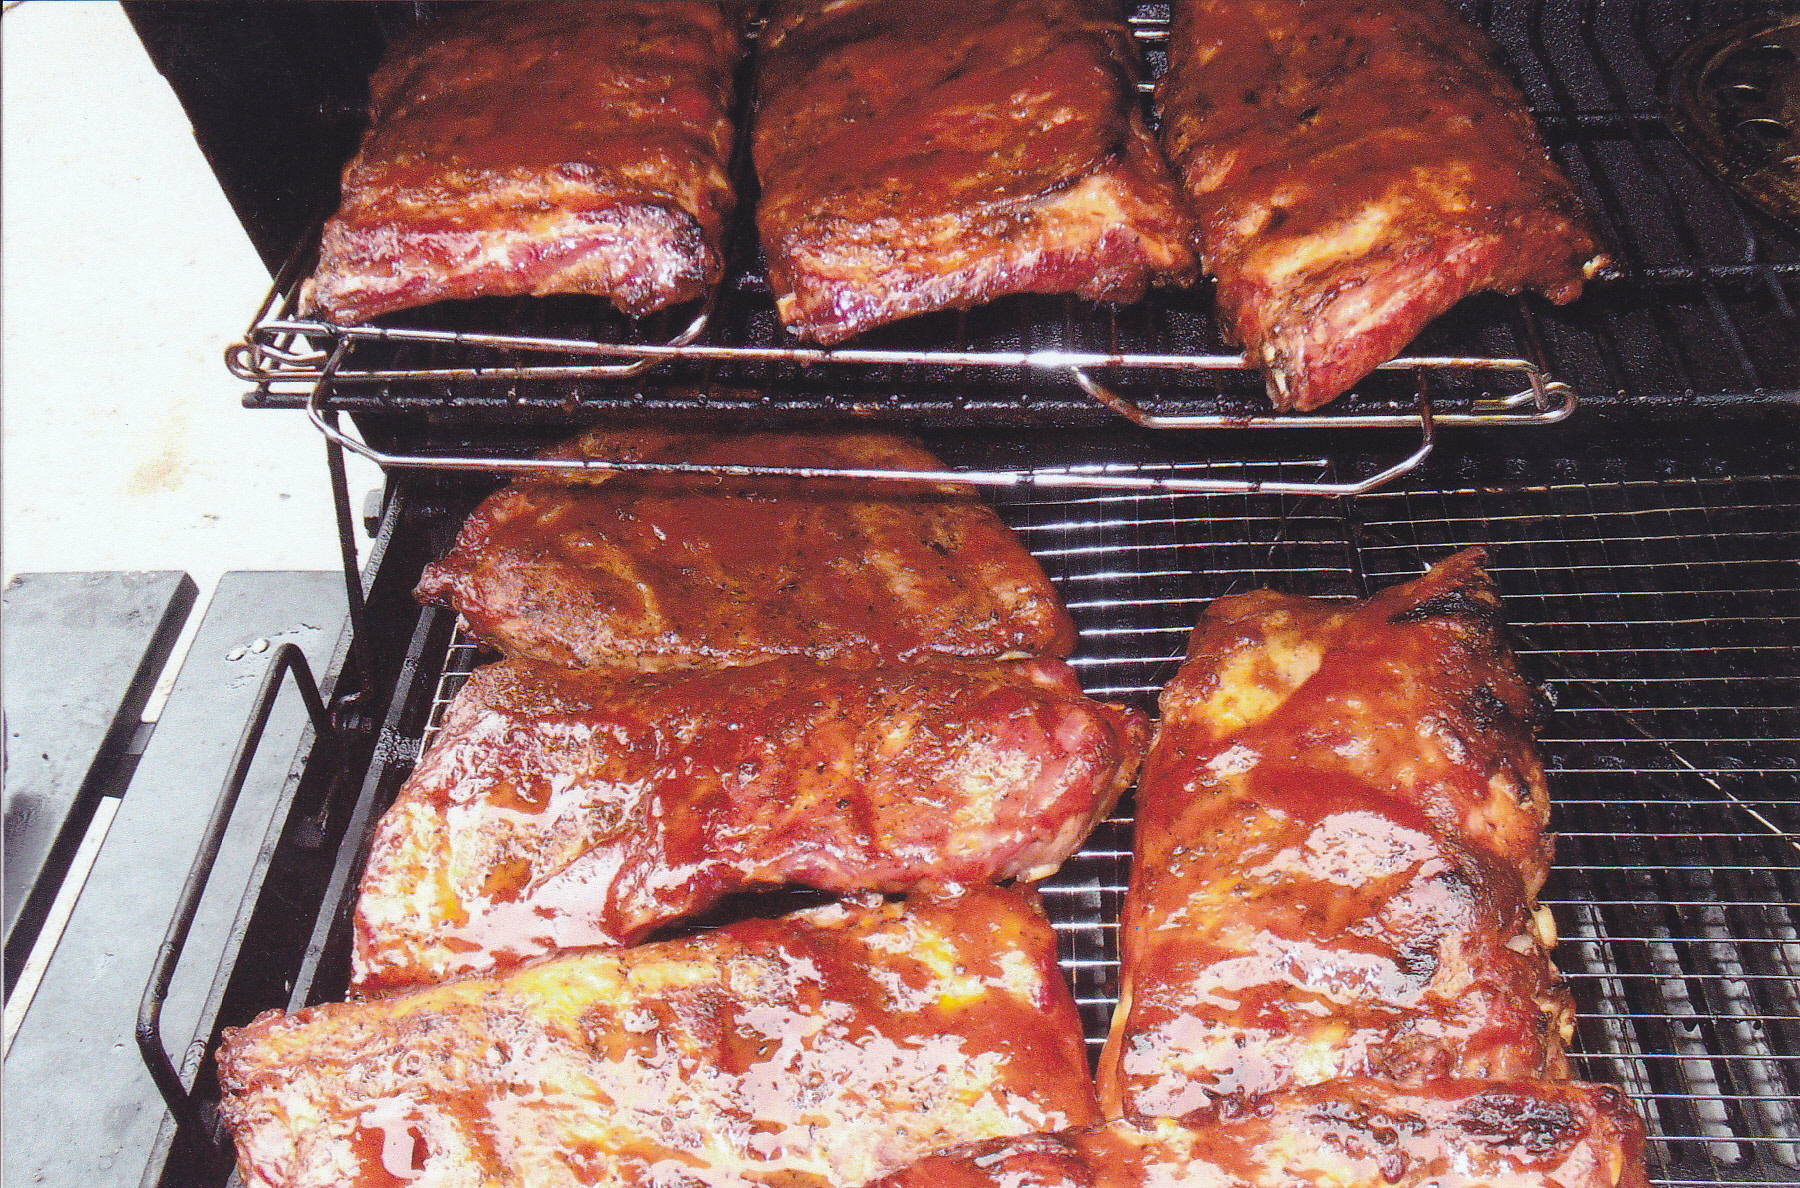


Lot’s of ribs!!! Had to have a few cold one’s this day, but it turned out great!!
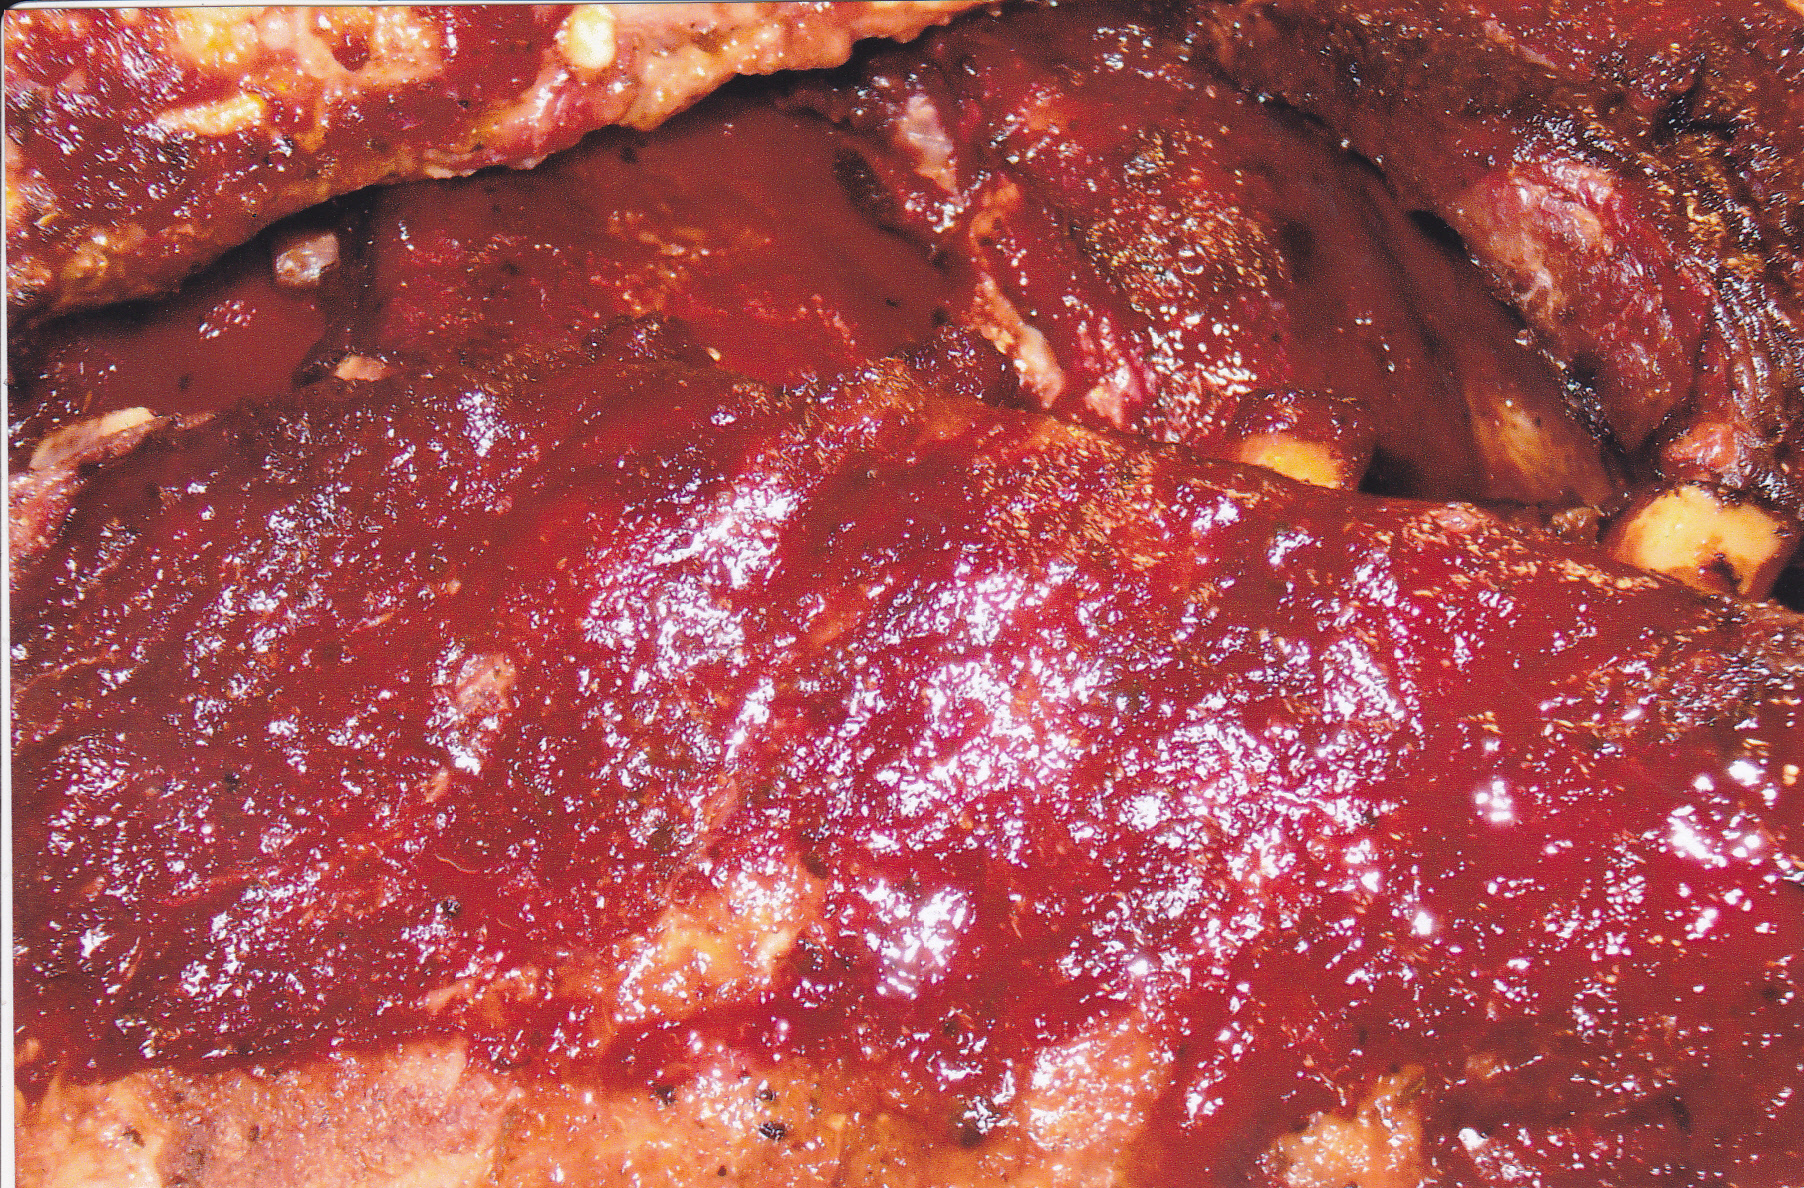
My neighbors dad is in his 80’s and he told me he wanted his well caramelized. So that took extra mopping and done to a point that I had the dark edges [pig candy] but without fall off the bone texture. I made these two pieces extra for him to take home.
This is how I like my ribs!! Dont care for the fall off the bone much. I like it so you can pull it off the bone with tender bites. Tender moist and with a nice smoke ring.
PULLED PORK !!!!!
I think it’s safe to say that everyone love’s pulled pork. At least I don’t know of anyone that turn’s it down. You can prepare it in the oven, in a crock pot, on the grill, and in my opinion the best way, in the Smoker!!. It needs to be done low and slow. By that I mean on a low temp like 250 and by slow I mean it takes time. Something you don’t want to hurry by any means.
Best cut of pork for this is a bone-in pork butt. When done, this tasty cut of pork can be shredded and given some sauce to please your family and friends. You can use your favorite BBQ sauce or try my recipe I posted earlier on this page–Reinhard Caught A Buzz Sauce. Let’s start from the beginning:
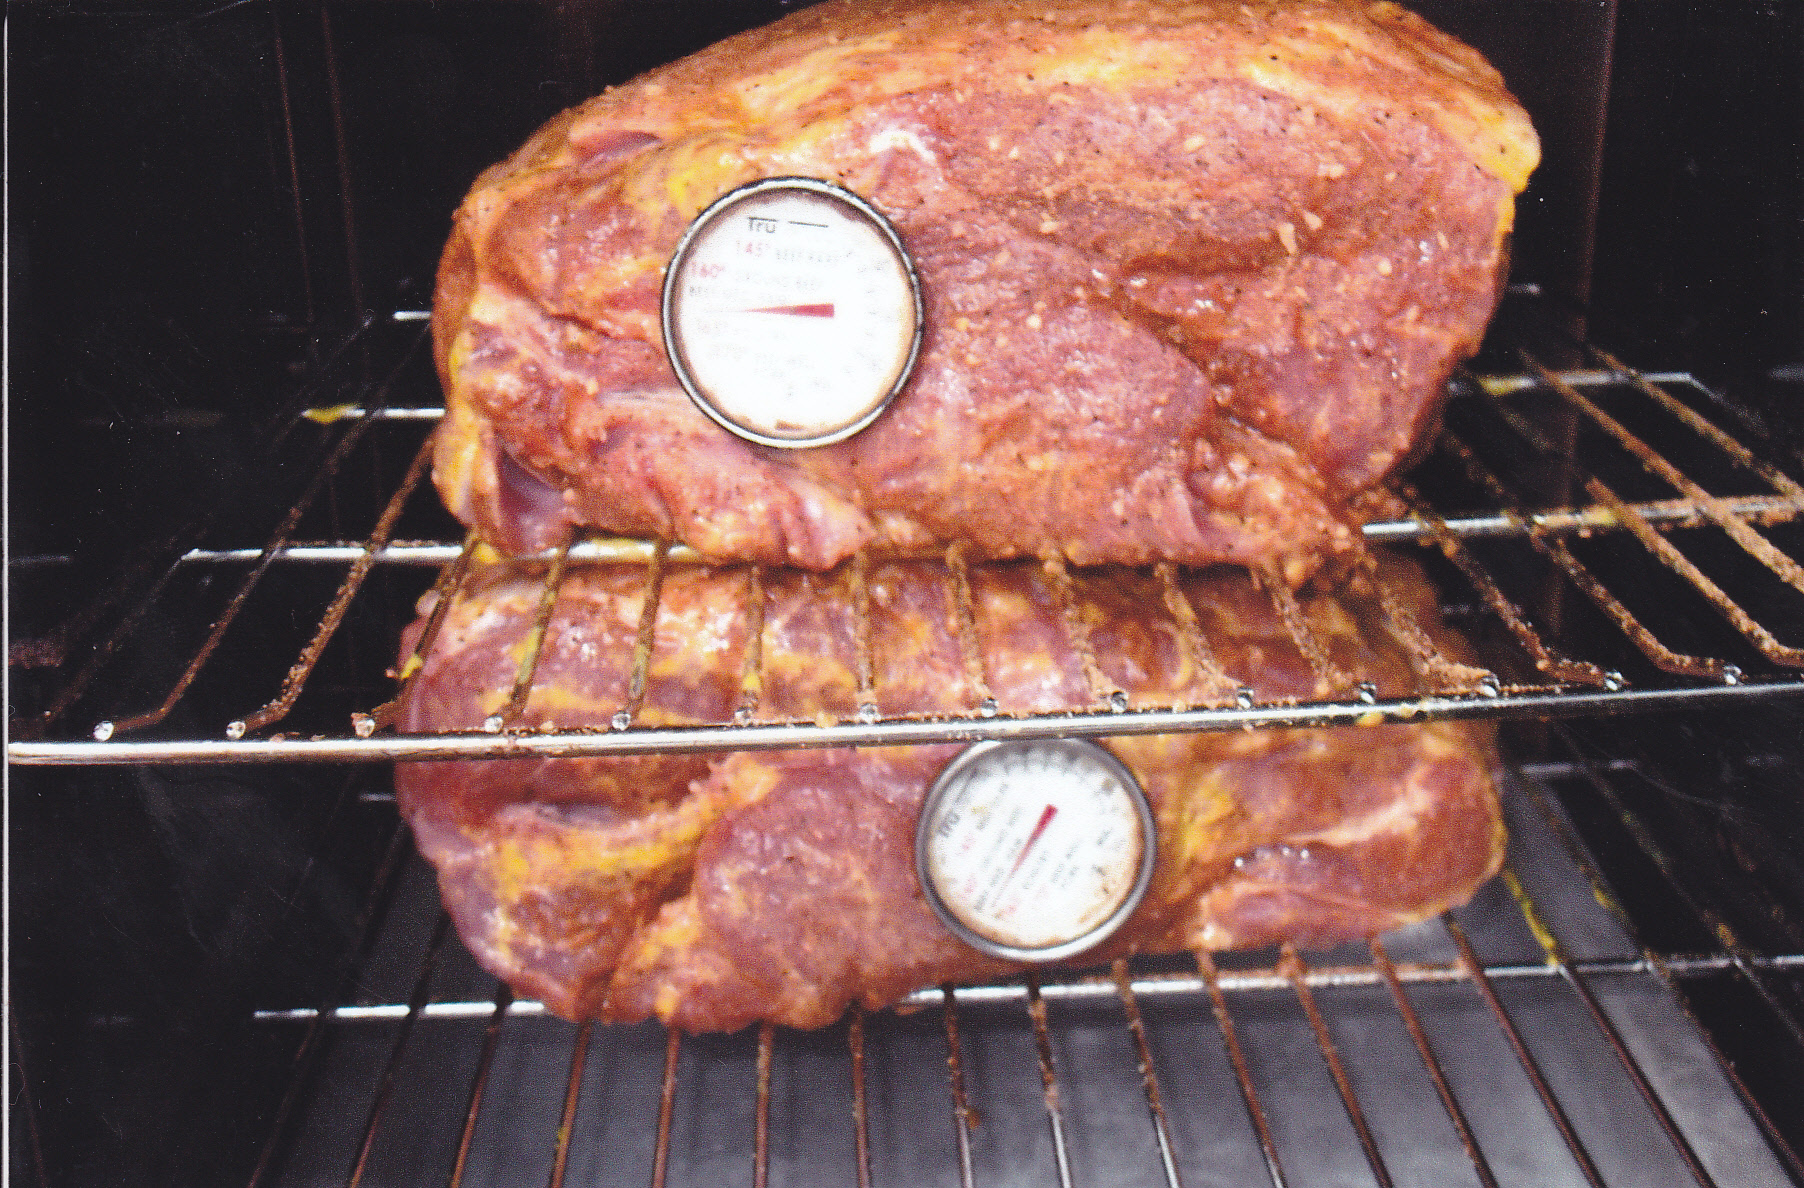
Take the whole pork butt and trim some of the excess fat off. The pork butt itself is about 30% fat without the bark so when done slowly and at a low temp it will stay moist. Take the butt and smear some regular yellow mustard all over it. This acts as a glue, and helps keep the rub [seasonings] on the meat. Apply your favorite rub or you can use one of my recipe’s for rubs that I posted earlier. Set your smoker to 250 and put the butt on the smoker rack with a drip pan underneath. Place a meat thermometer in the thickest part of the pork butt without touching the bone.
There will be a “stall” in the temp when the internal temp reaches around 160 or so. It will seem that the temp stopped rising in the meat but it’s just the collagen breaking down within the meat. Soon the internal temp will start to rise again and it will be ready to take out of the smoker when the internal temp is 200-205. At that point take the butt out of the smoker and wrap it in foil and let it rest until it’s cool enough to use your fingers to pull the meat apart. Do not cut into the meat after you take it out of the smoker. You will lose moisture if you do. Wait until the meat cools down before shredding. I use hickory chips for pulled pork. When done you will get great color and at times some darker exterior to the butt. This is “pork candy” and should be shredded and put in with the rest of the meat. I love to snack on the pork candy.
After you shred the meat you can put some of the sauce in with the meat. Just enough to make it nice and moist. You don’t want to put too much sauce in with the meat for the sauce will overpower the meats great flavor. Always make enough sauce so you have extra at hand to top the meat after you put it on the bun for those who wish to have extra. A good cole slaw is also great to top the meat with. If you have any questions just ask in the comment section provided. Here are some pictures of some pulled pork I have done–
This day I made up plenty of my Reinhard Caught A Buzz Sauce and a couple containers of my rub. I use this for pulled pork, ribs, and chicken.

These two butts are rubbed with mustard and will be seasoned with my rub also. The mustard holds the rub on.
The butt’s are almost to the “stall” point. Long way to go. Adding hickory chips as time goes.
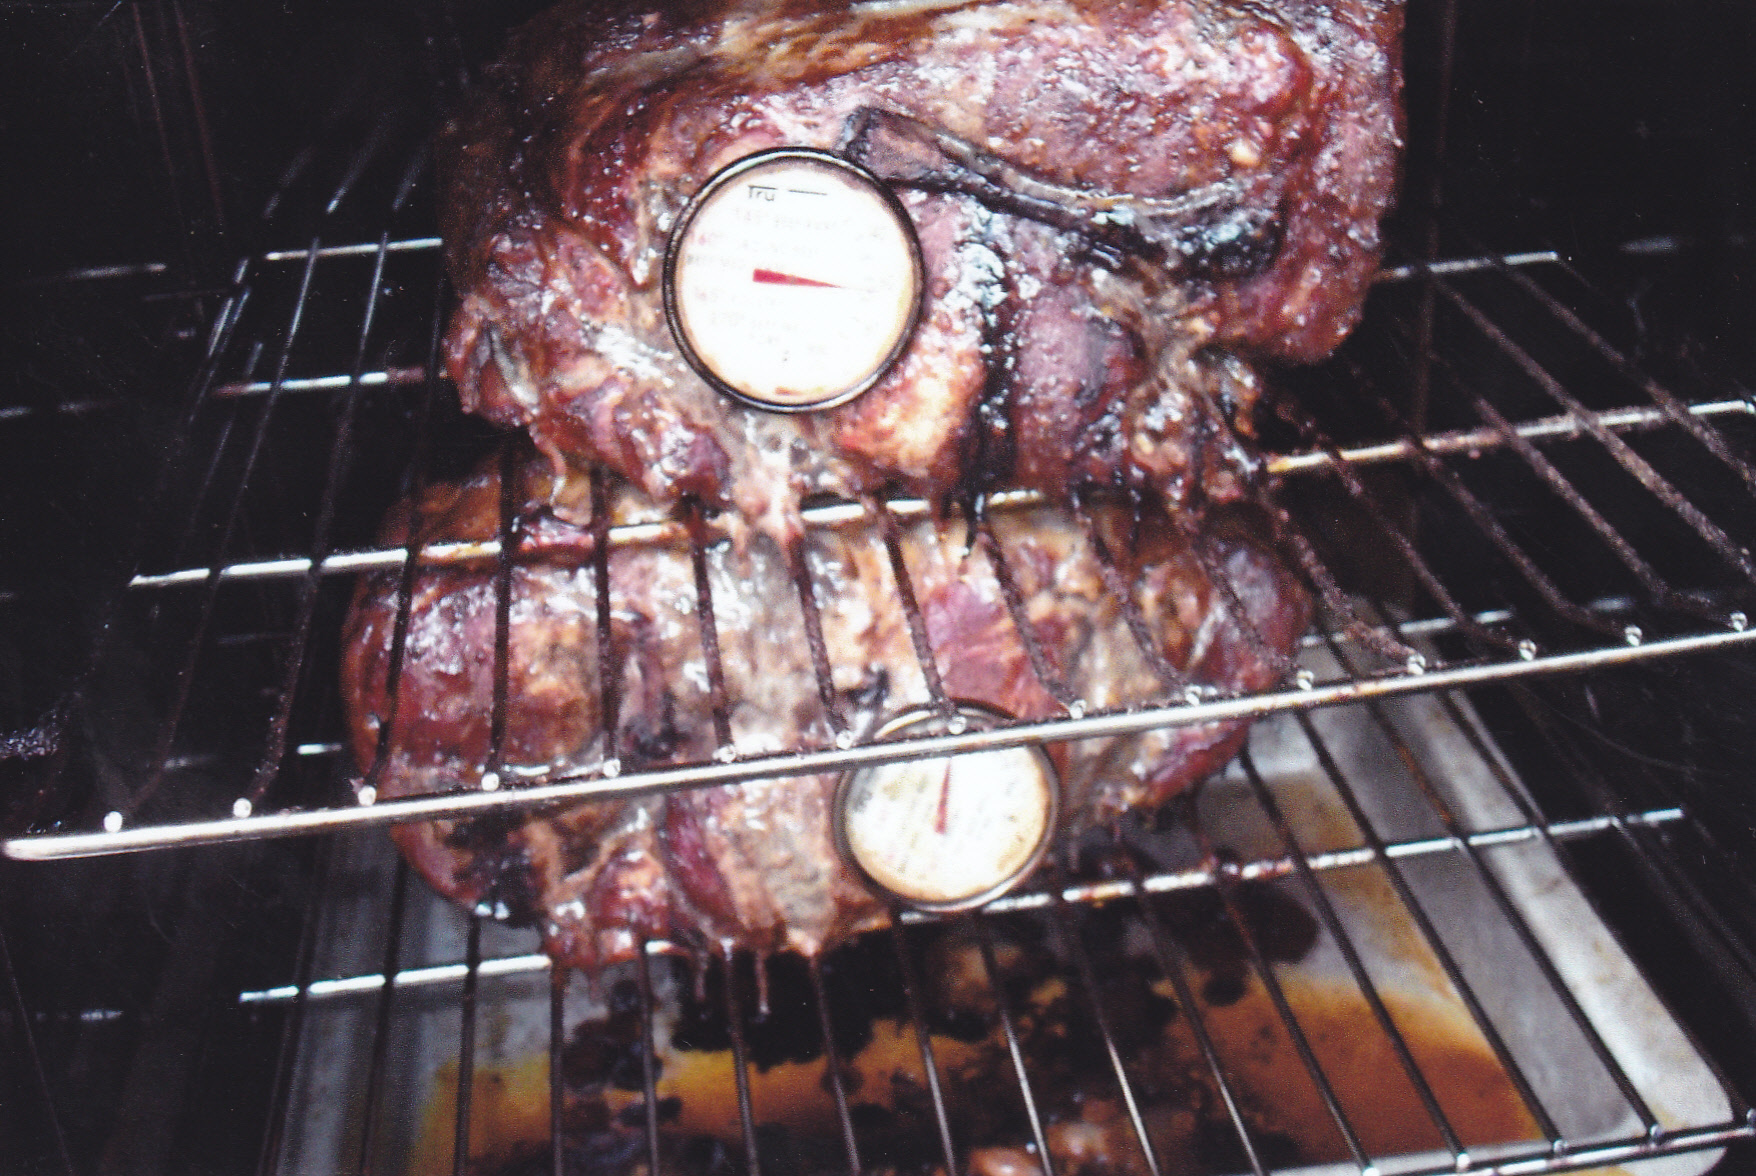
The meat is looking great and it reached the internal temp of 205 and ready to take out for the rest period.
You can see the bone is very loose and can be pulled out with no effort. A good sign that the meat is where I want it to be.
Here is one of the butt’s ready to foil and rest.
Starting the shredding process.
I don’t shred my pork too fine. I like it tender and a texture that let’s you know your eating meat. At this point I add some of my sauce. Just enough to give it flavor from the sauce but not to drown the meat to the point of tasting just sauce. I put the meat in a crock pot to re-heat the pork with the sauce. If more moisture is needed in the crock pot, I add a small amount of apple juice. Always make extra sauce to put on the bun for those that want it. I put the meat on the bun, squirt a little sauce on top of the meat and top it off with a good spoon of Asian slaw [or your favorite cole slaw].
Couple of toasted buns ready to eat!!!!
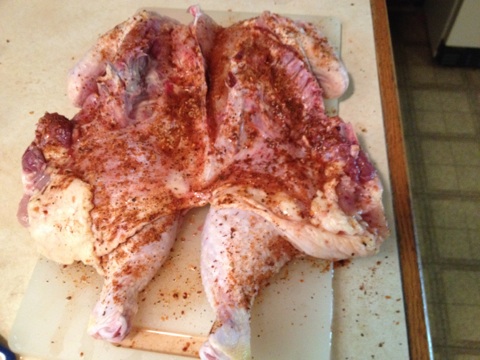
SPATCHING A WHOLE CHICKEN
Spatching is the same as the term “butterfly” a piece of meat, or as in this case a chicken. The difference here is that you take the backbone and neck off the chicken and then spreading the bird out [As in the picture below]. So why do this? This saves cooking time, let’s you put your seasoning evenly on every part of the chicken, including the inside of the chicken, plus let’s you put your favorite sauce all over the bird. I like doing this on the grill and in the smoker. Here are some pictures to show you how it’s done:

You can see here that I have cut along both sides of the chickens back up through the neck and am now holding it by the tail so I can pull the back out.
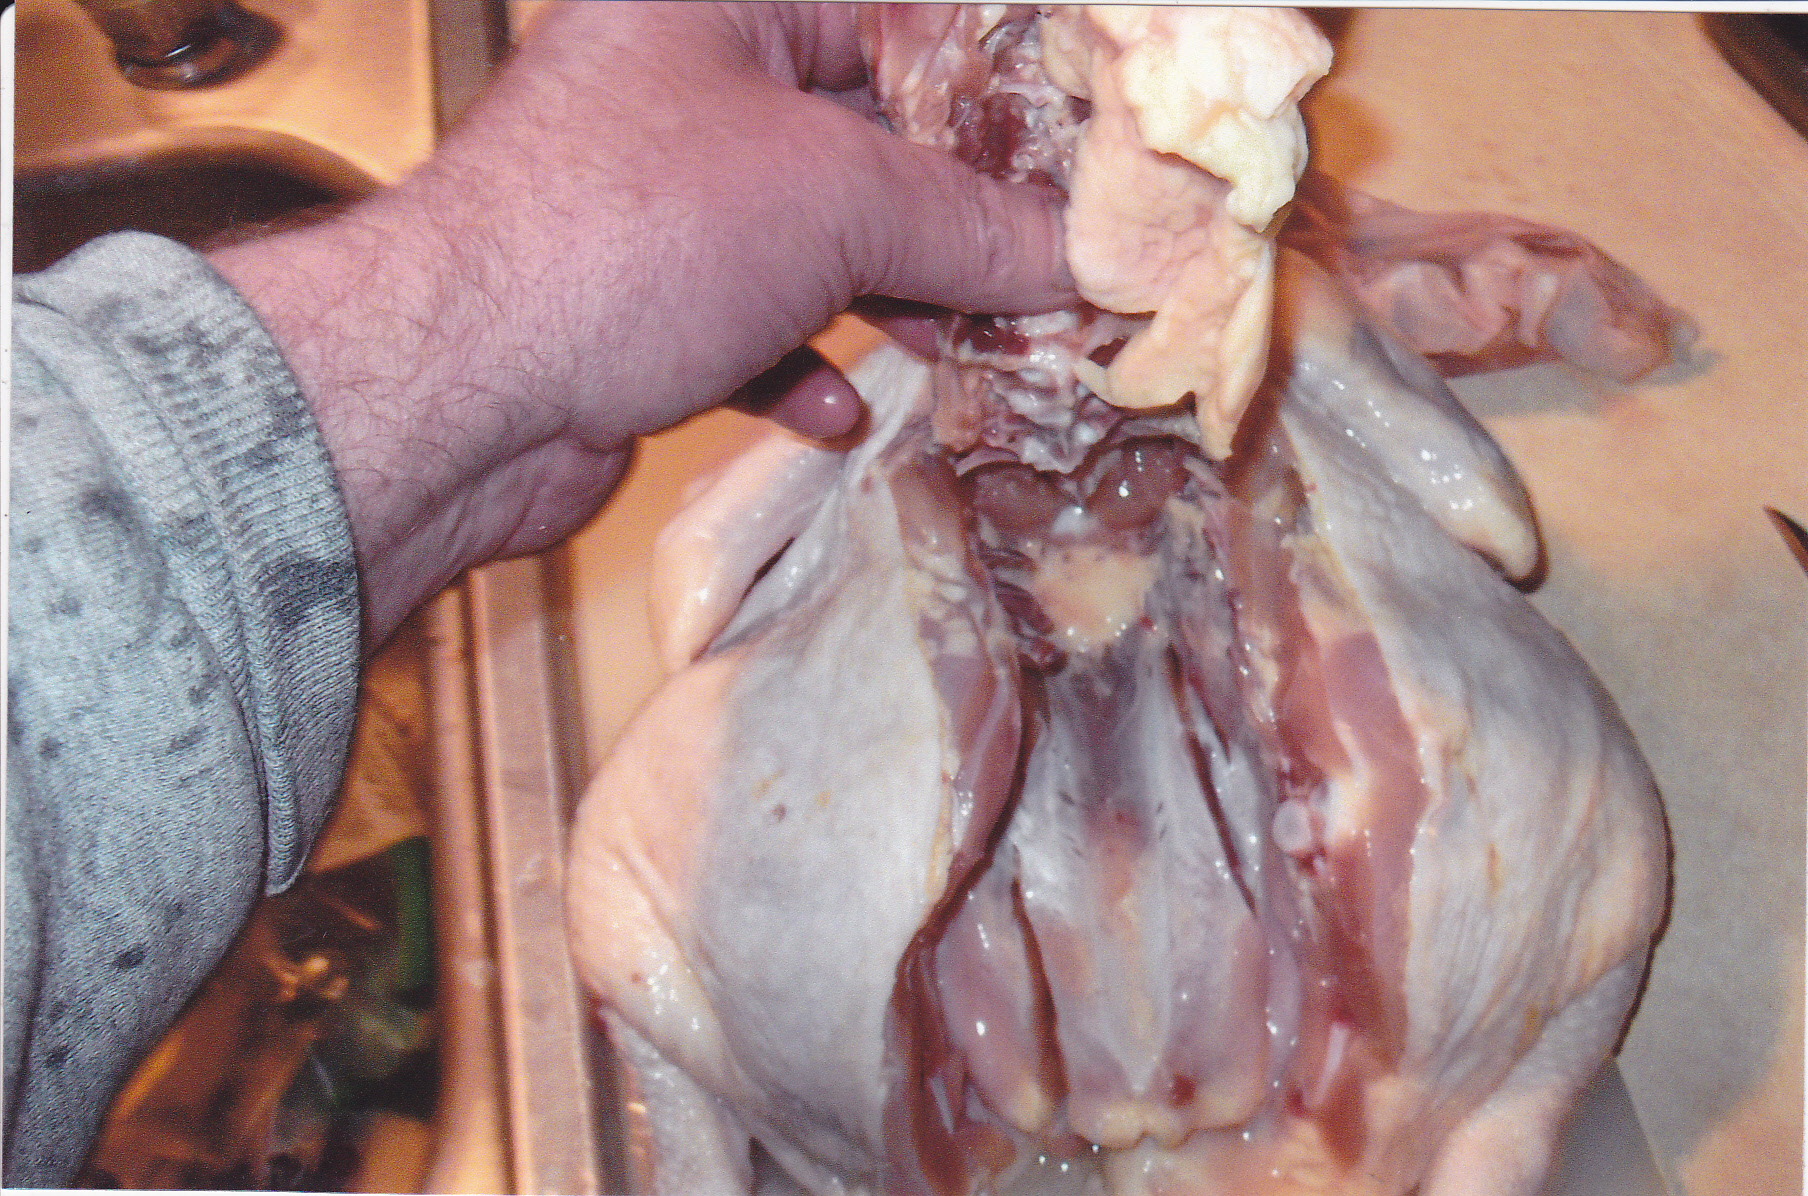
Pulling out the back with the neck.
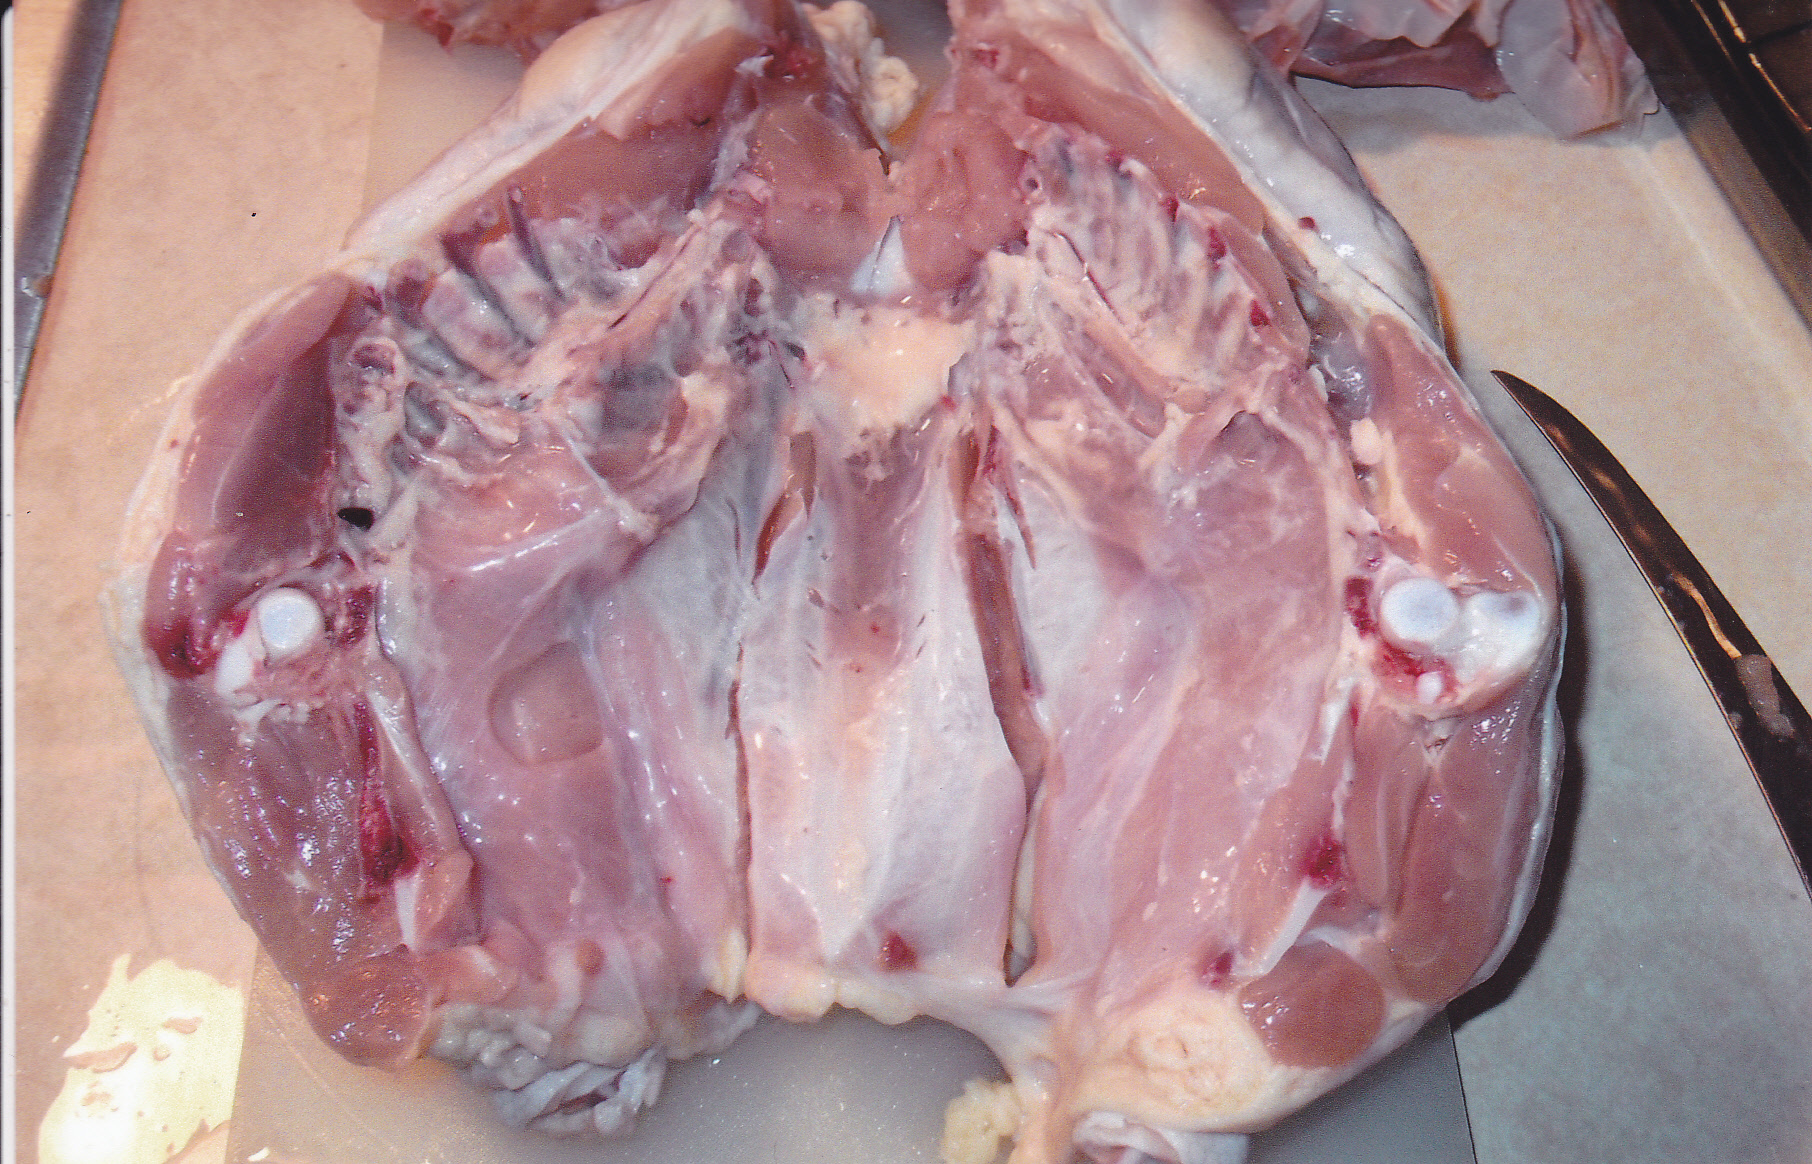
So I took the back,neck, and tail out and trimmed excess fat. here is the whole chicken breast side down ready to season.
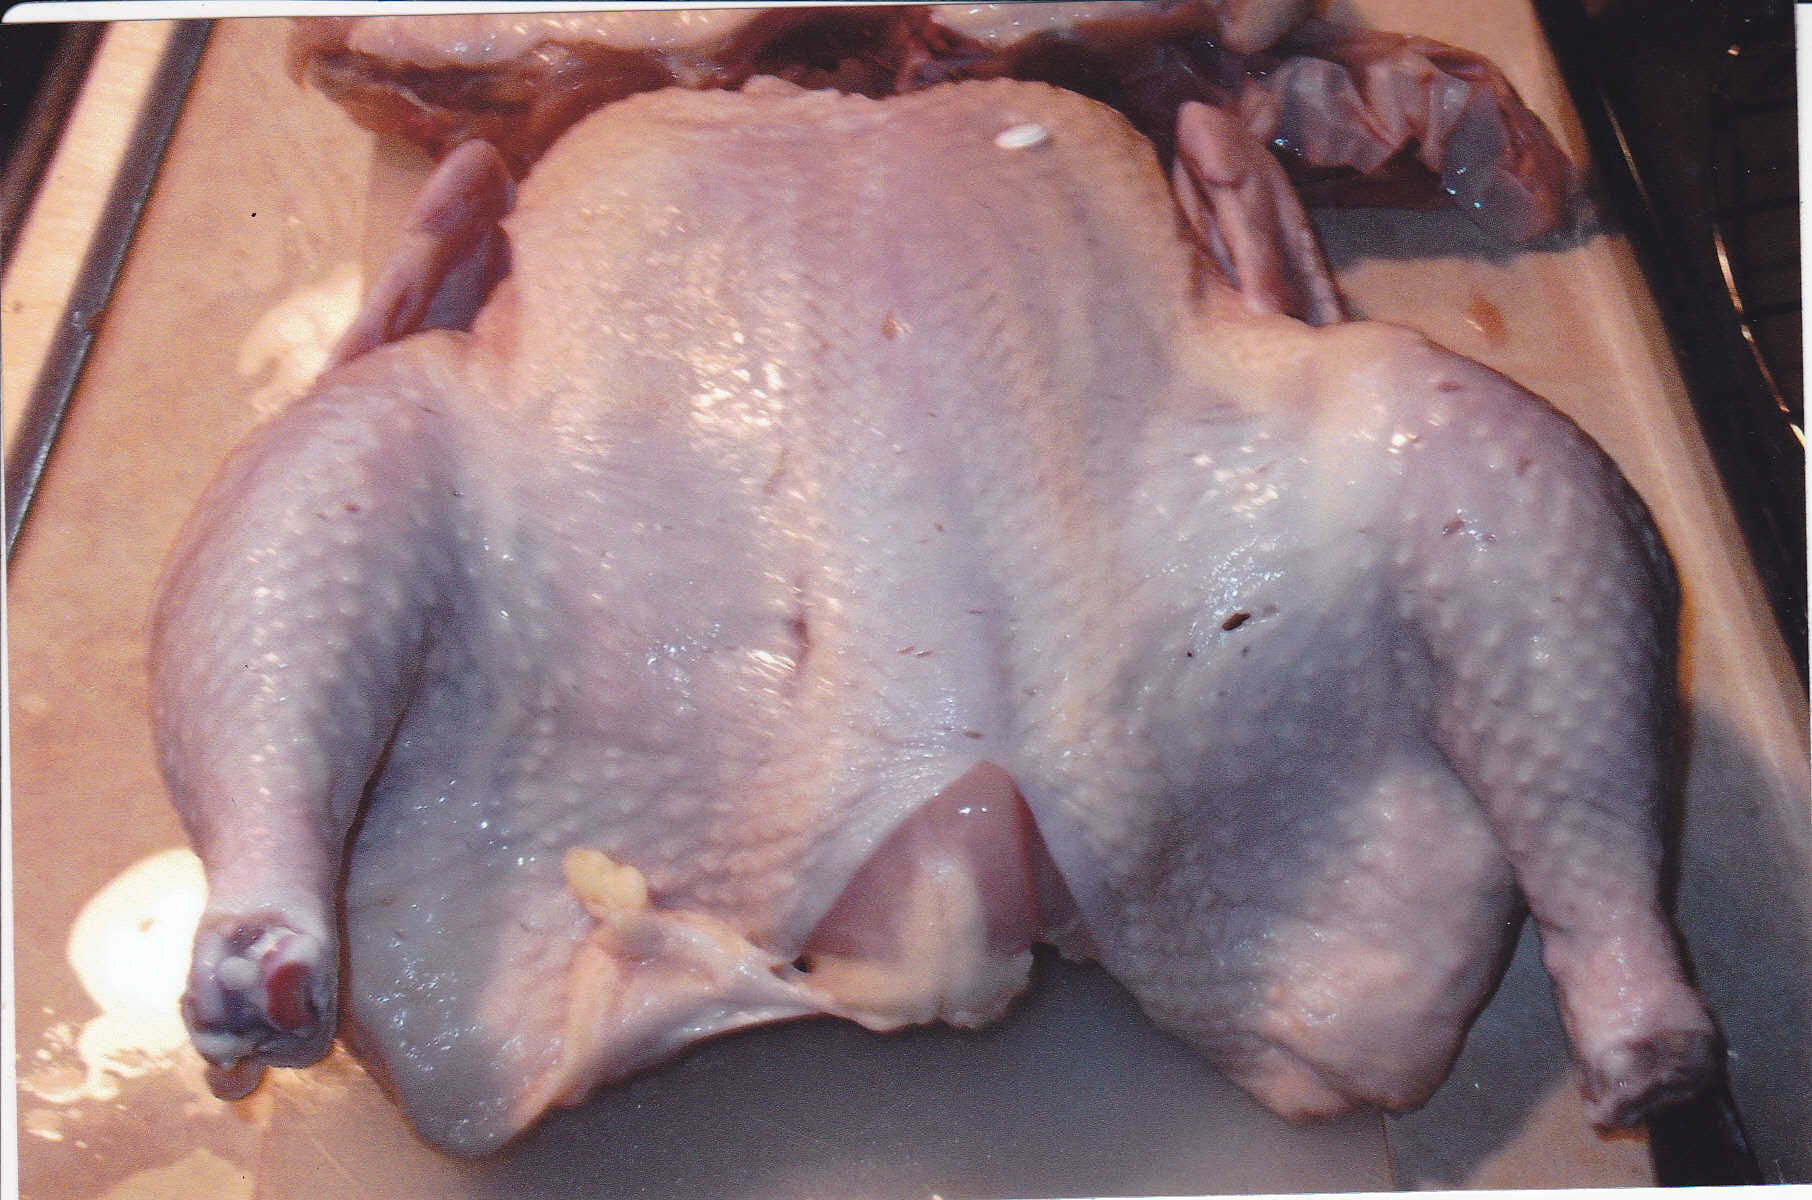
Here is the whole chicken, breast side up ready to season. One of my favorite ways to do a chicken on the grill or smoker. I save the neck,back, and tail for soup stock, so nothing goes to waste.
SPATCHED WHOLE FRYER WITH STUFFED JALAPENO PEPPERS
Using the method above in “spatching’ a chicken I made a simple meal with a 6 pound fryer, bacon wrapped jalapeno peppers, and corn on the cob. The pics will explain the process as I go through what I used doing this tasty meal.
After taking the backbone and tail section off the chicken I seasoned the area well. This is why this method works so well as far as cooking time and getting all of the chicken seasoned inside and out.
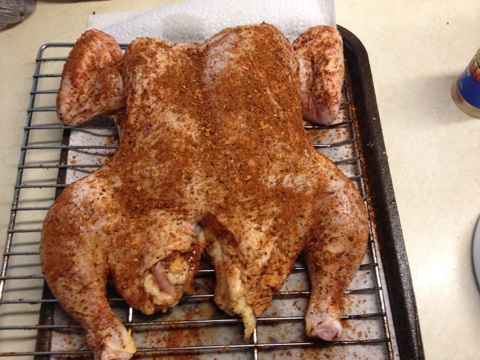
Turned the bird over and put it on my smoking grate to be seasoned with my rub as well. Ready for the smoker.
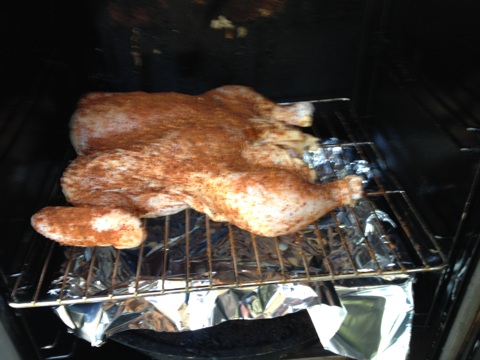
I should say that I did spray the grate with oil before putting the bird on it. Got my drip pan under the chicken, and set the smoker to 270 deg. I let the bird smoke for two hours before I put the peppers in because they don’t need to be in there as long as the chicken. Timing does vary with that, depending on the size of the chicken if your going to do both together.

I covered the peppers with bacon method in my Recipe page but I’ll go through it here for this is a simple method. I cut the peppers in half and scooped out the seeds. Then I blanched the peppers in hot water for a few minutes so they tender up just a bit. After they cool a little, I put a good amount of cream cheese in each half and wrap each half with a slice of bacon. You can also season them by sprinkling some of your favorite rub on them as well.
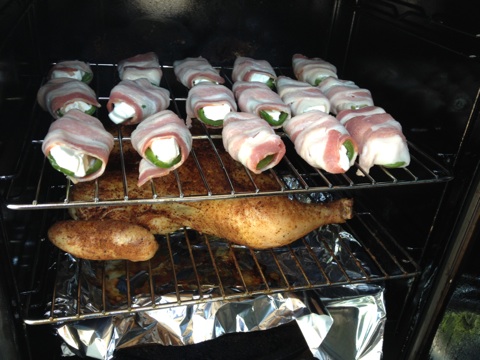
I put the stuffed peppers right over the bird so the bacon drippings give some love to that bird. Kind of self basting itself with the help of the bacon.
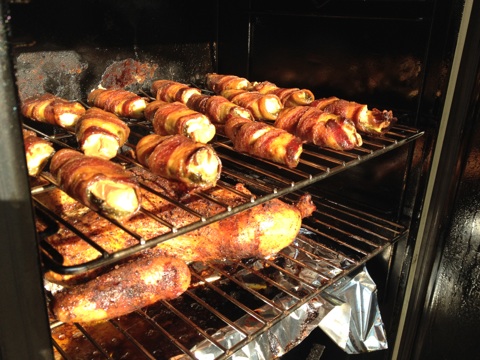
Looks like everything is done. The chicken took about 4 1/2 hours and the peppers around 2 hours.
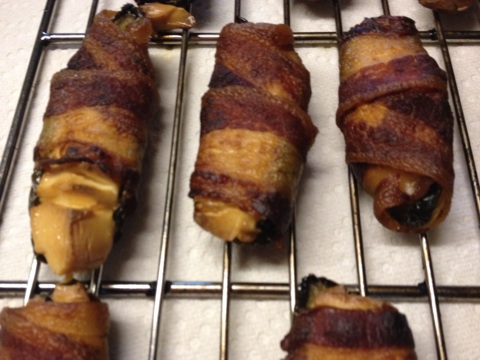
The peppers were very tasty with that bacon being nice and crisp.
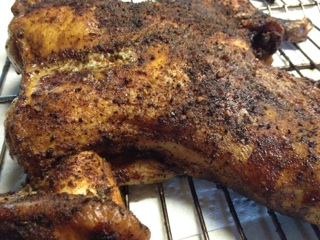
And the big bird was tender and juicy. The internal temp of the chicken was 170 when I pulled it. I used apple chips for the smoke.
SLAUGHTERHOUSE POULTRY BRINE
If you experience dry chicken after grilling, you may want to try this brine. Using a brine will give you extra flavor and ensure that your chicken is nice and juicy. This is a great brine to use for chicken. Mix all the ingredients well in the water and put your chicken in and make sure the chicken is submerged in the brine. Place a plastic zip lock bag filled half way with water on top of the chicken so the meat is covered with the liquid. Leave the chicken in the brine overnight, or at least 12 hours.
1 1/2 gal. water
1/2 cup salt [pickling or kosher]
1/2 cup brown sugar
2 tsp garlic powder
2 tsp onion powder
2 tsp cajun powder [Louisiana cajun seasoning]
2 tsp celery seeds
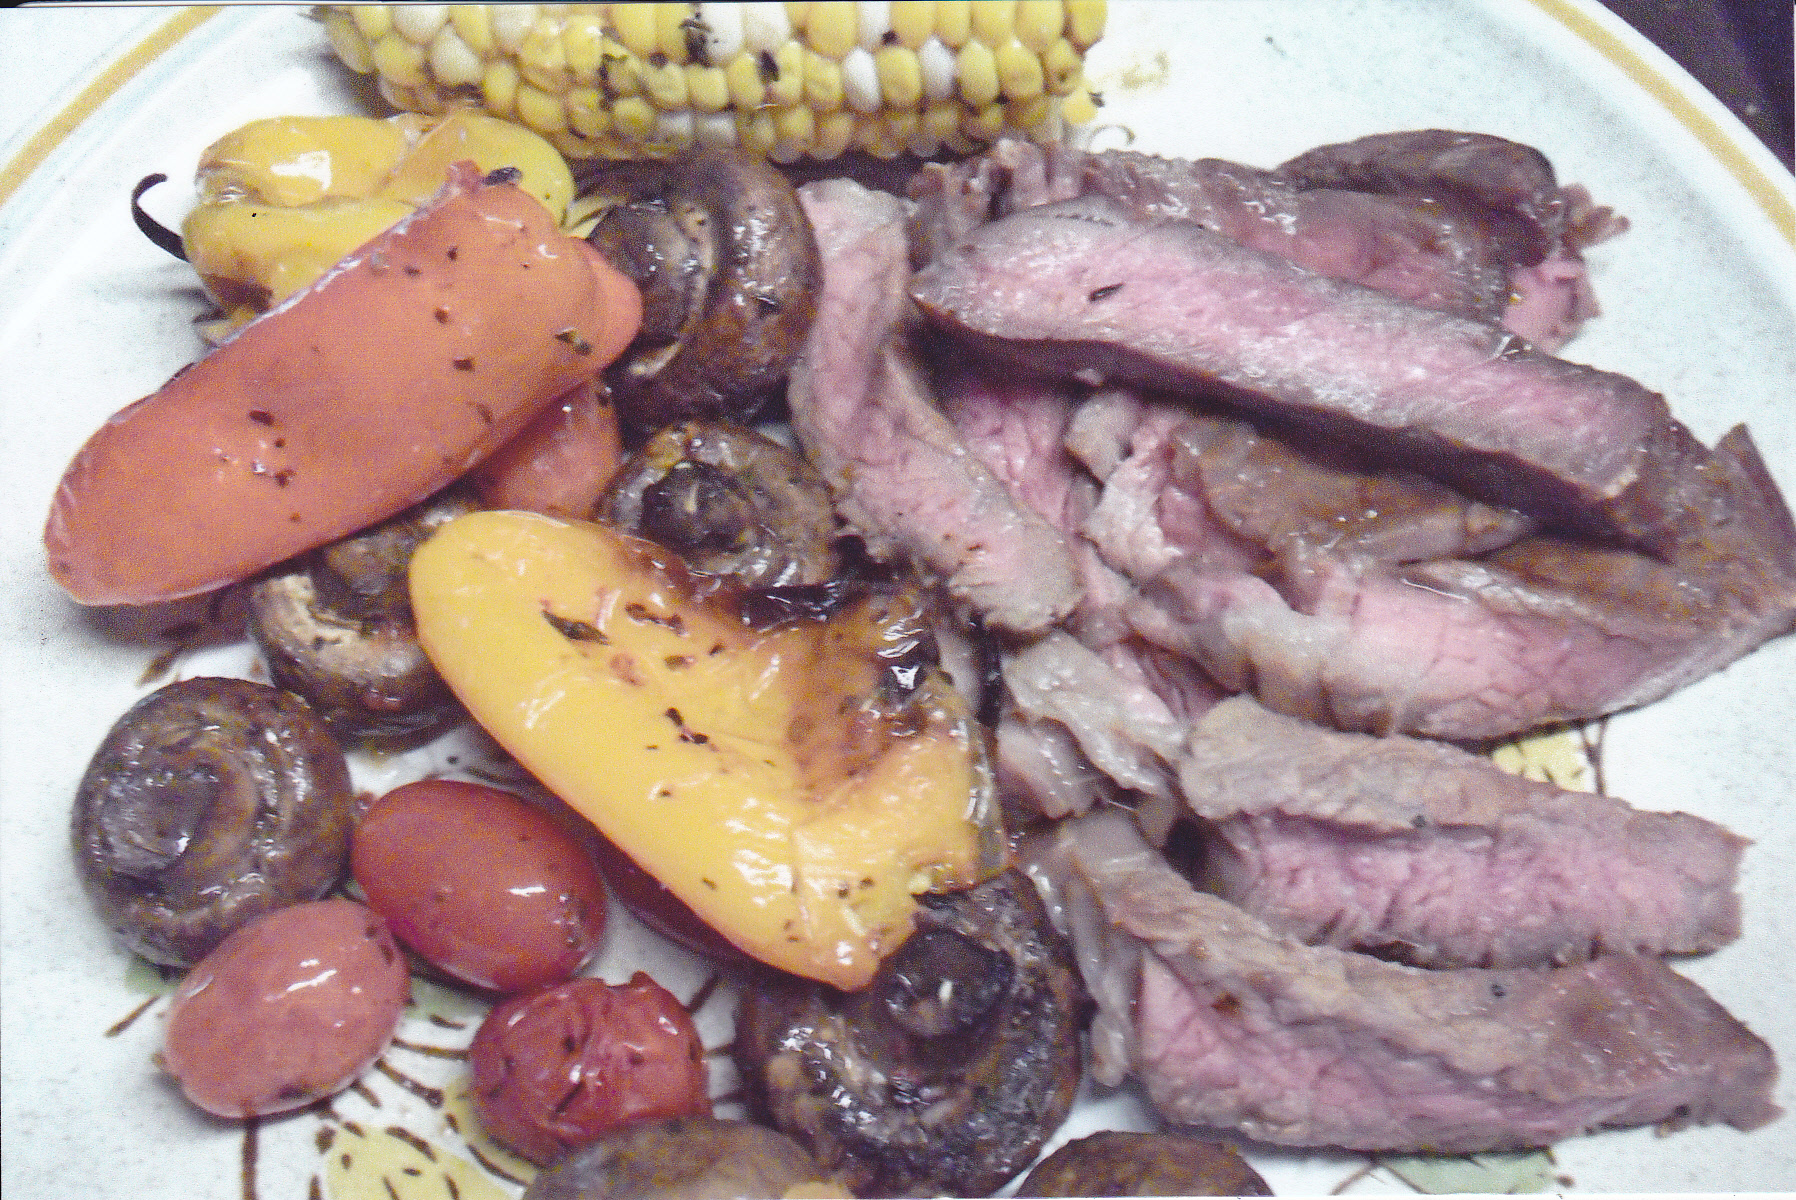
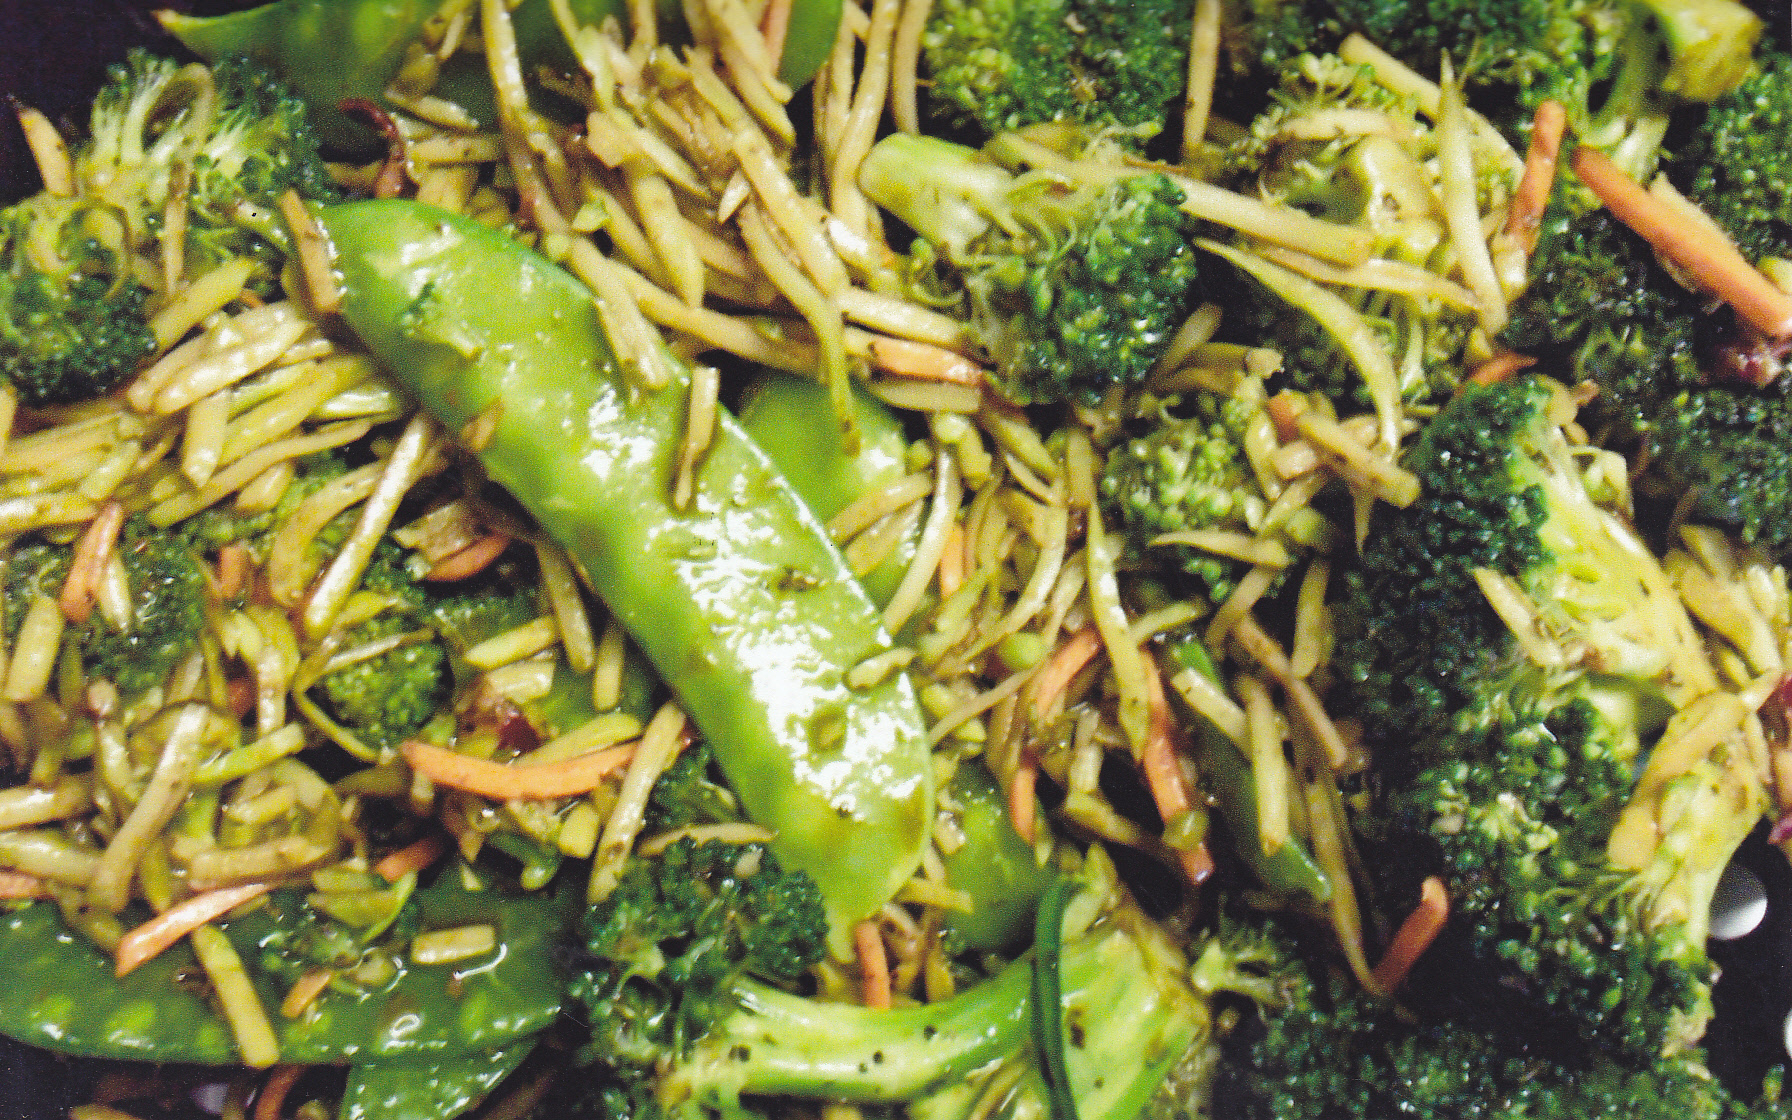
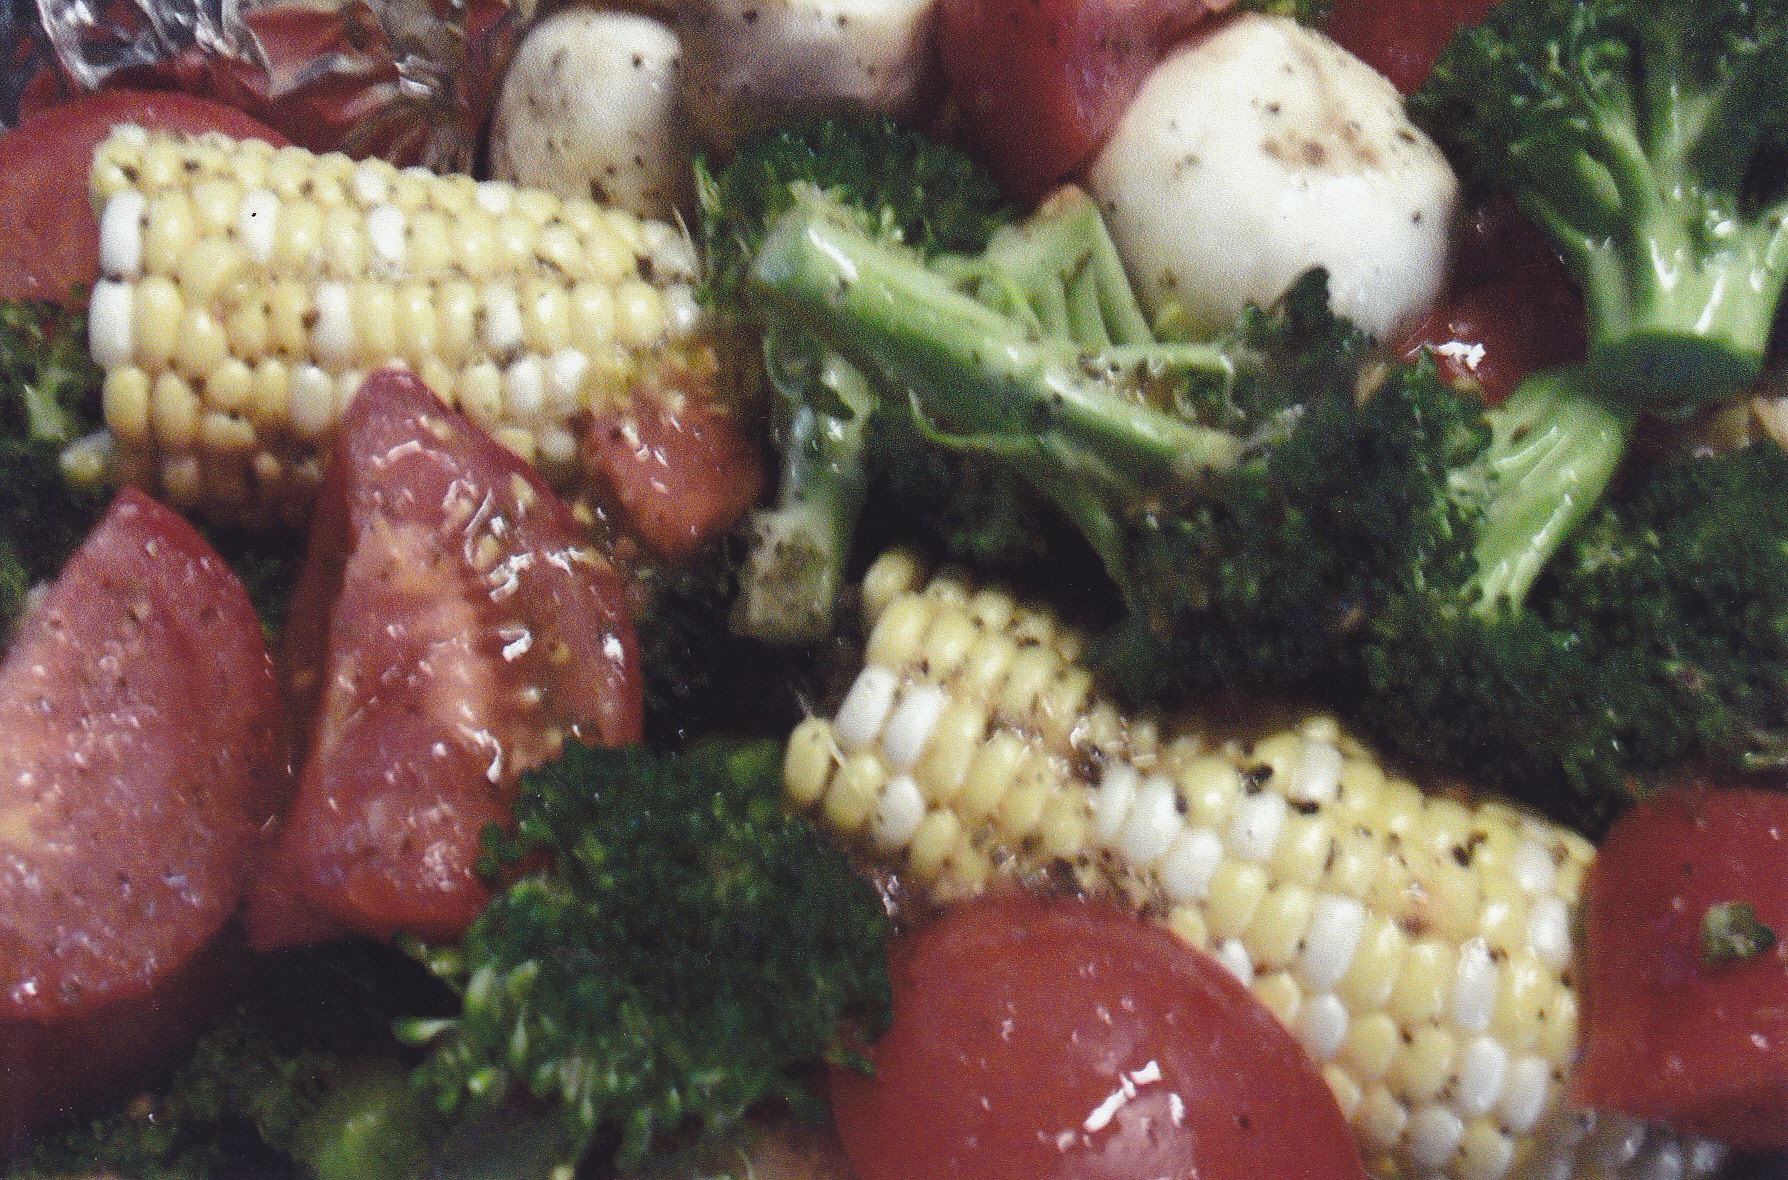
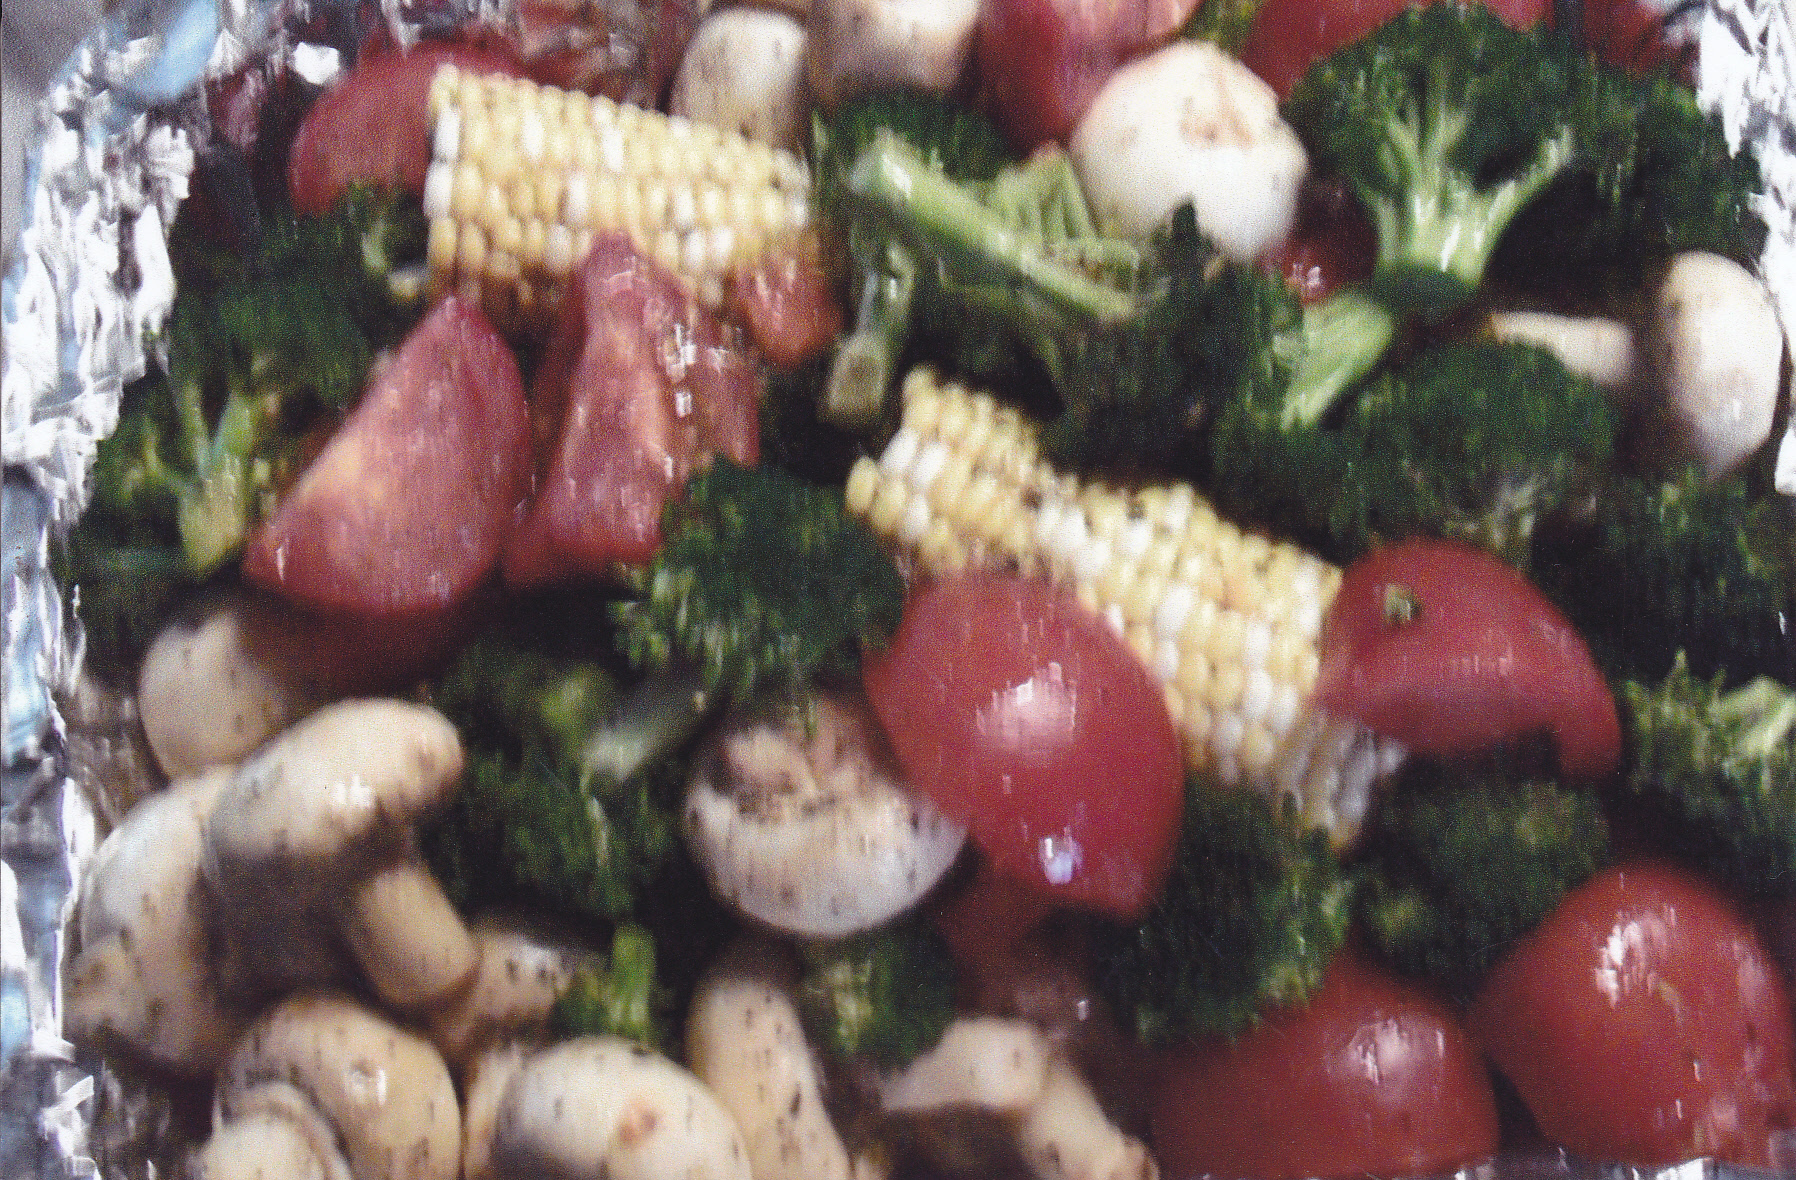
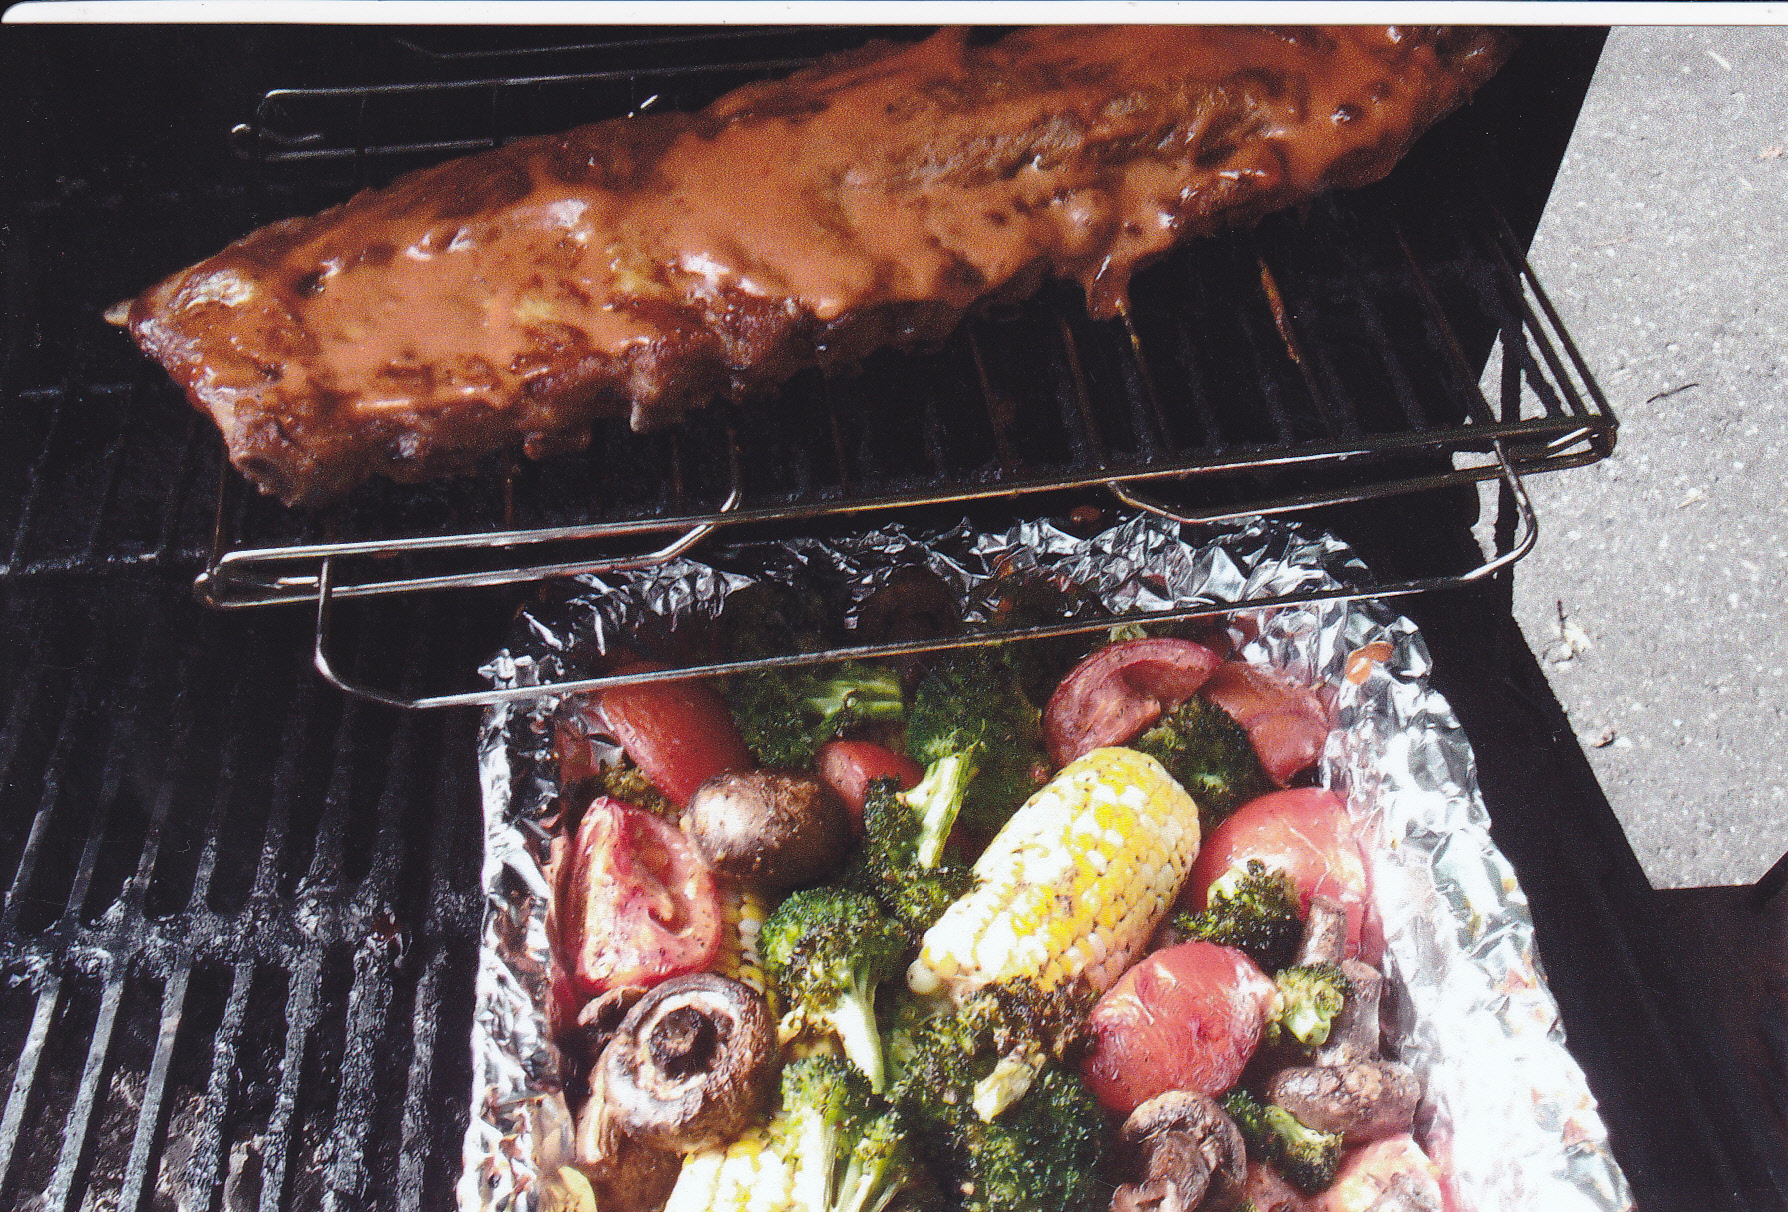
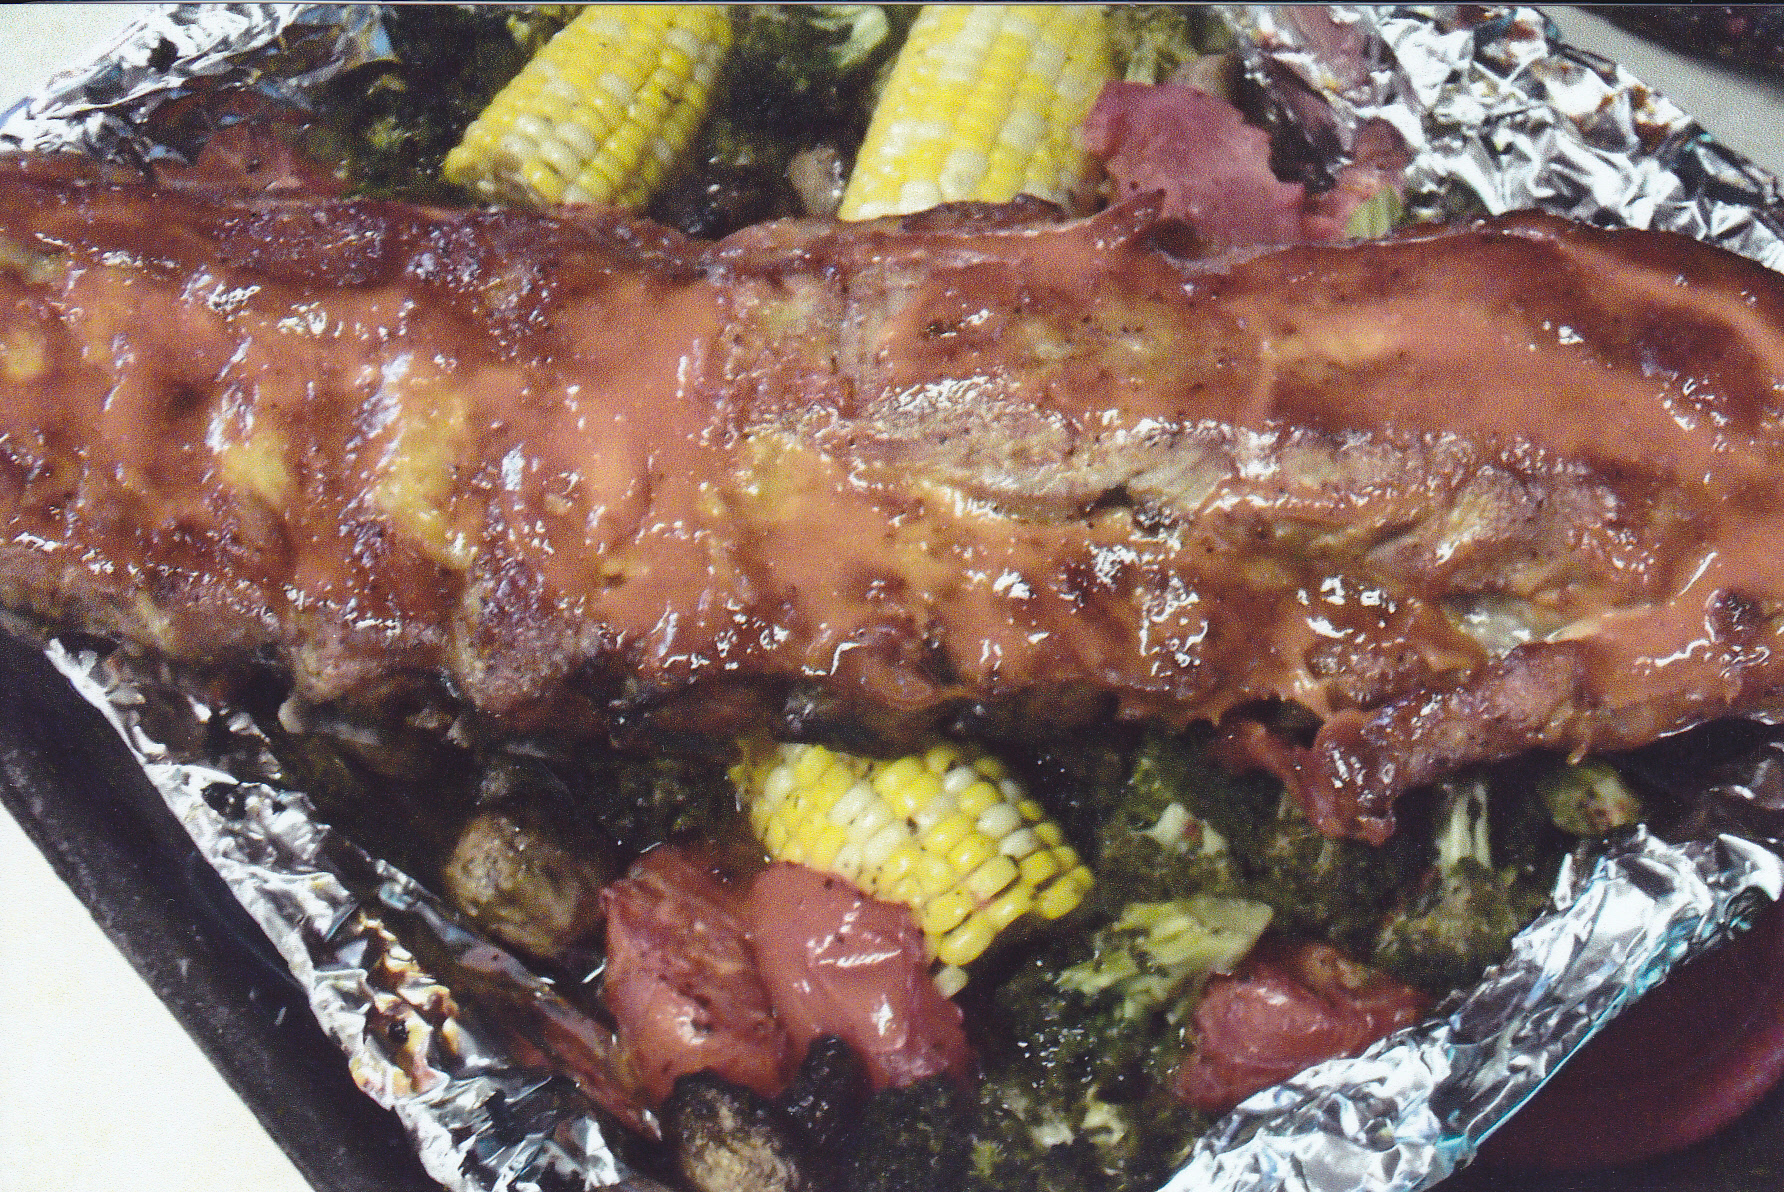
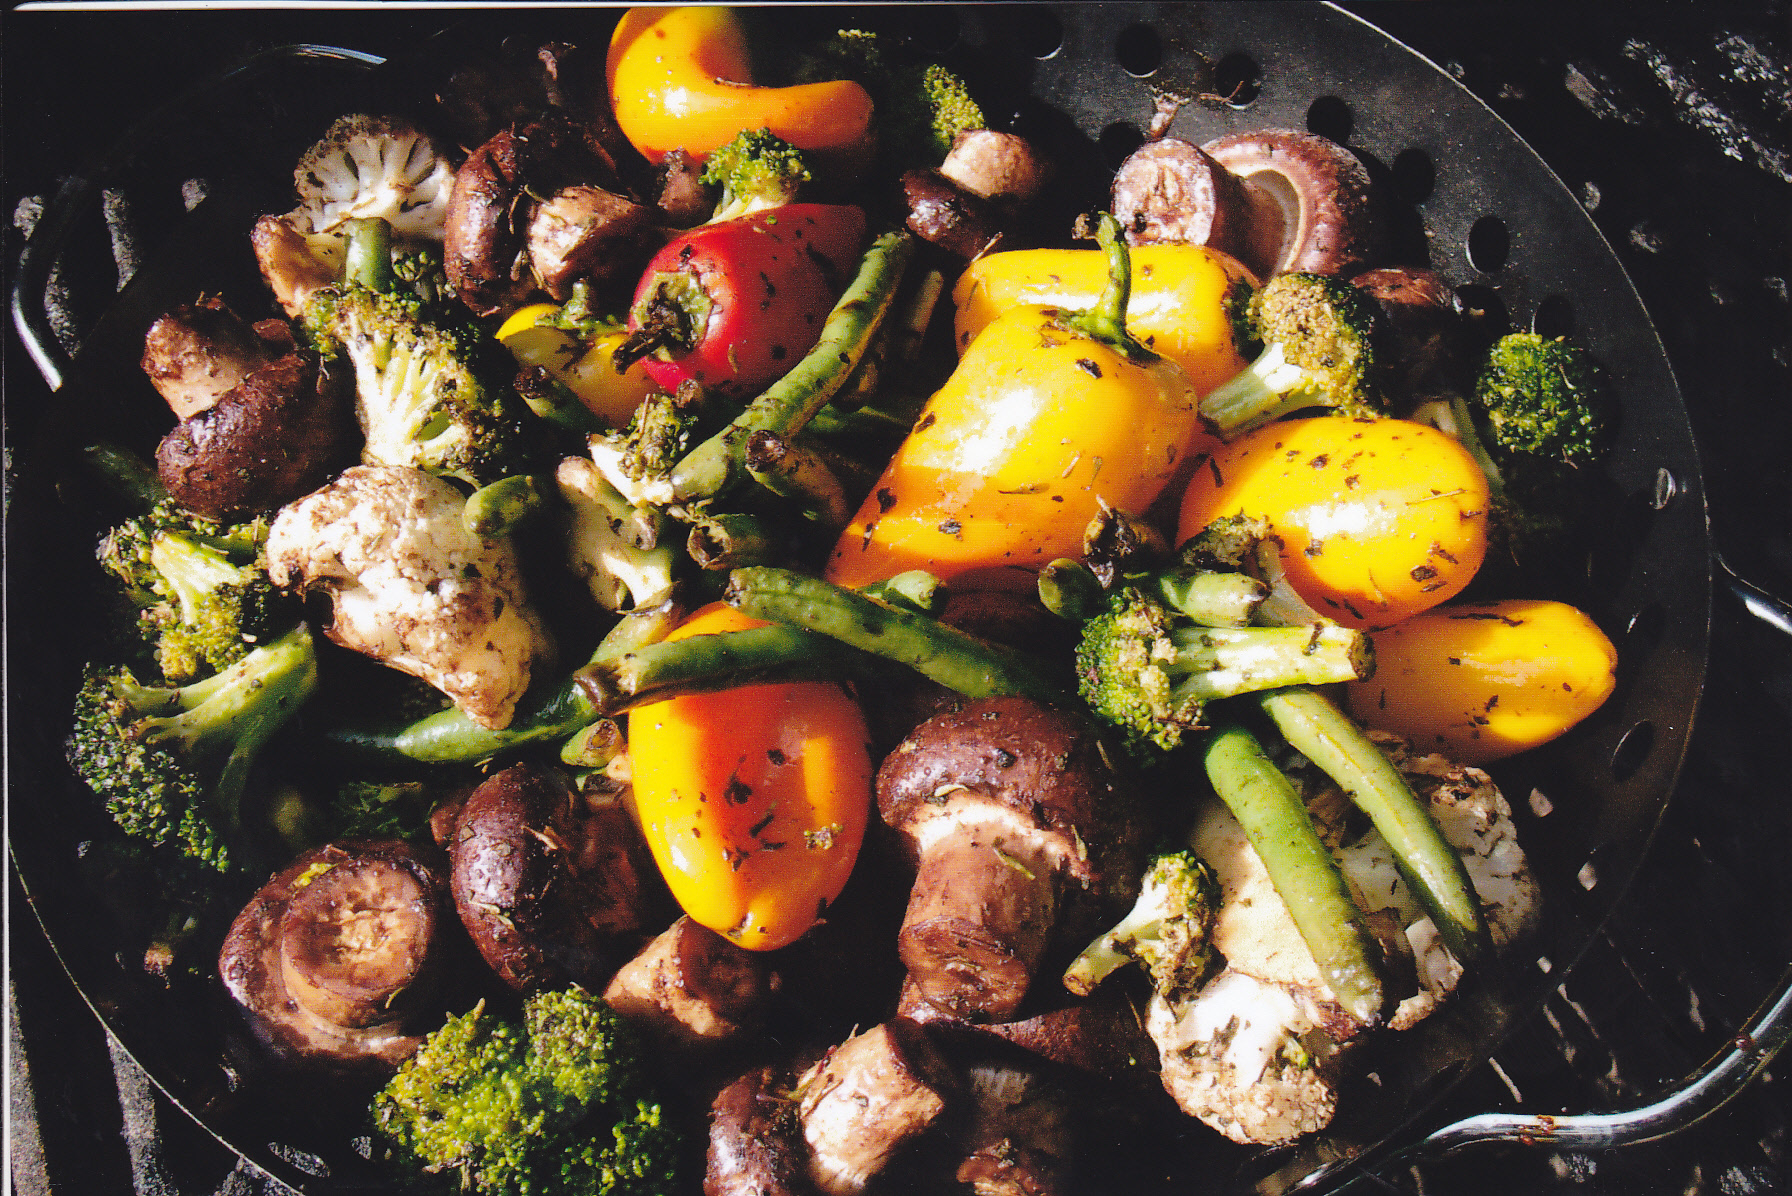
VEGGIES ON THE GRILL
Very simple to prepare. A lot depends on your personal taste. For me it’s olive oil and herbs and spices or flavored vinegar like Balsamic vinegar for example. You will see in the pictures coming up the type’s of vegies I like to eat on the grill. Corn on the cob, mine-bell peppers, green peppers, grape tomatoes, broccoli and more are some I like.
I like to grill the veggies on indirect heat while I’m grilling chicken, pork or beef at the same time. There are times I will put the meat I’m grilling on the upper rack with the veggies right under them to catch some of the drippings from the meat.
For the veggies I use a gallon size zip-lock bag to marinade the veggies in. I pour in the olive oil or balsamic vinegar in the bag [just enough so it will coat the veggies]. Then I put in some herbs like dried thyme and dried basil leaves. I will also add some kosher salt, garlic powder, and black pepper. Shake up the bag some so the herbs and spices mix in with the oil or vinegar. Then I toss the veggies in the bag, zip it up, and shake it up good. I then put the bag with the veggies in the fridge for at least two hours, so it pay’s to plan ahead.
I usually use one of those throw away metal mesh pieces for the grill or my metal perforated wok for the veggies that works well. I leave the veggies on the grill on indirect heat until the veggies are tender. Here are some pics of veggies I have done:
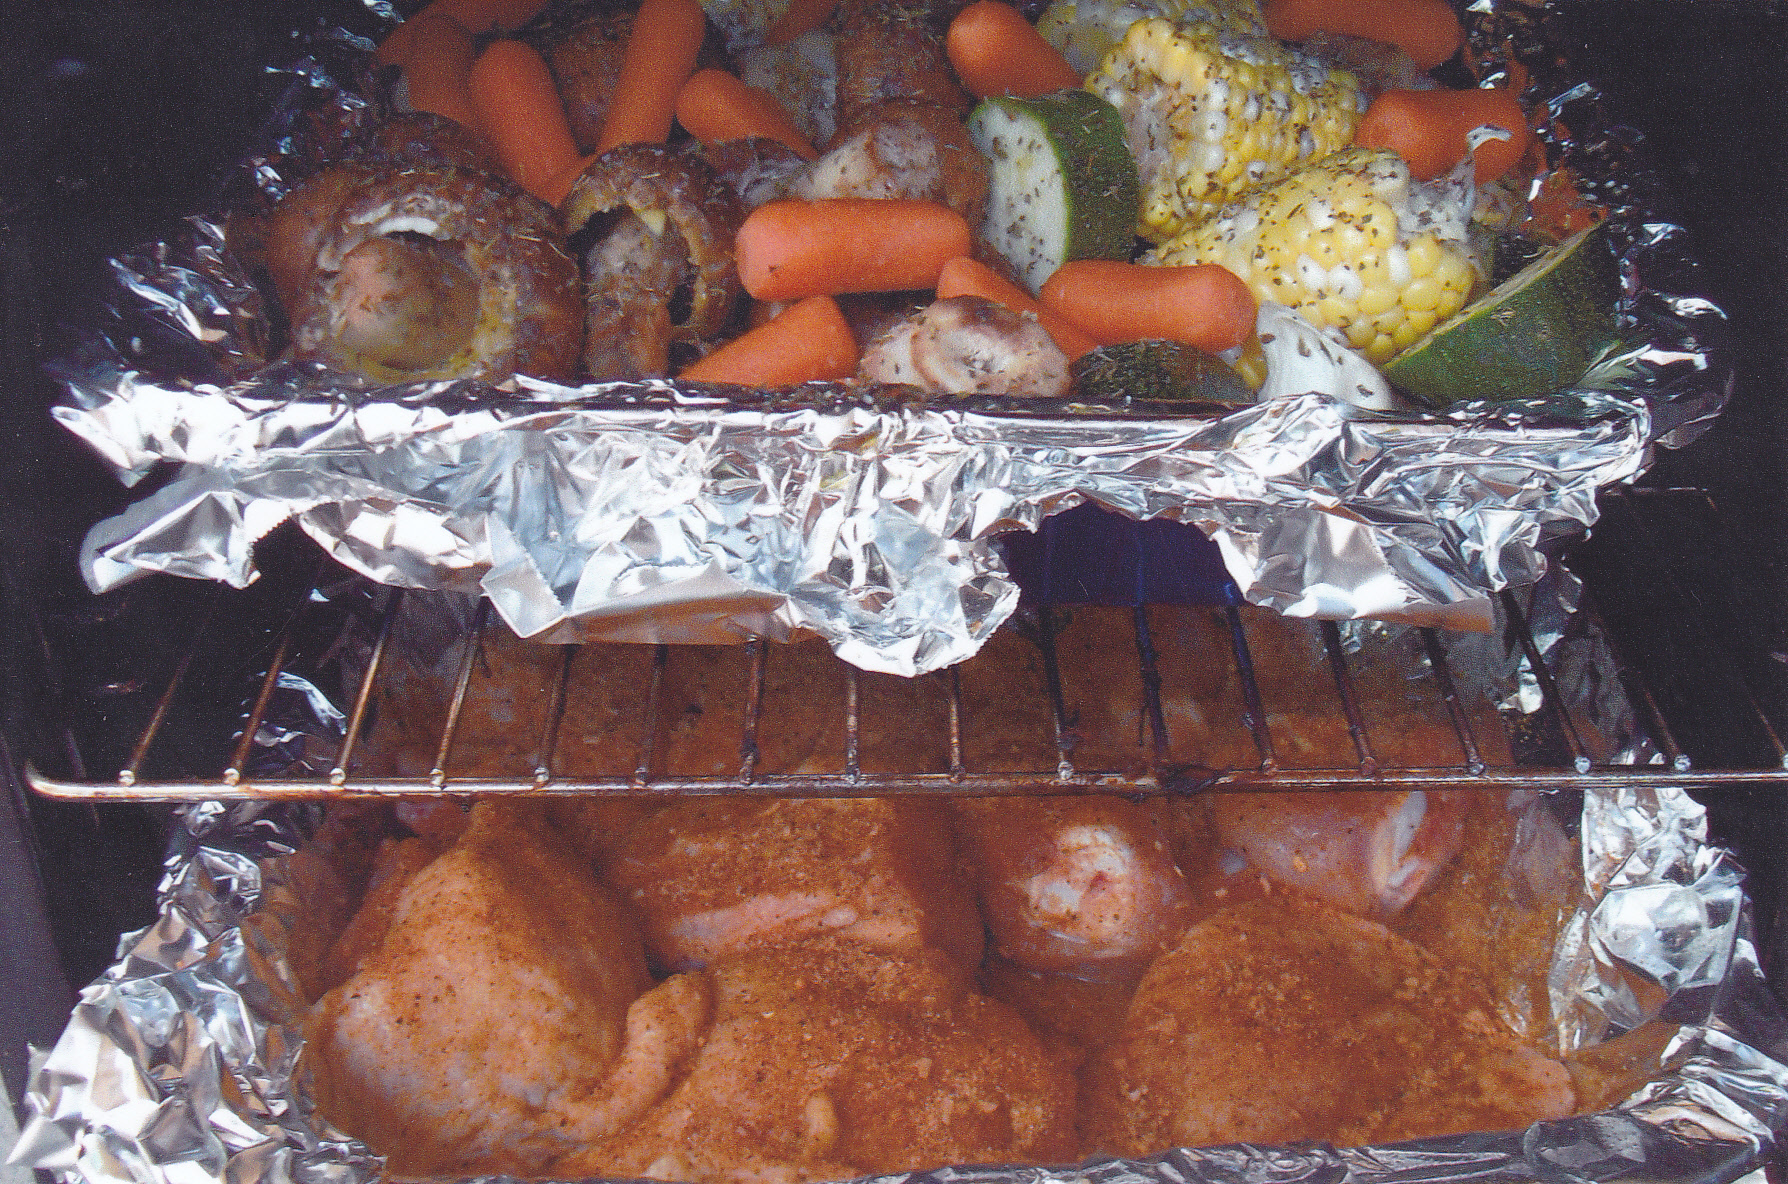
Here I have veggies on top of the chicken so their flavors drip on the chicken. Sometimes I have the chicken on top and the veggies on the bottom.

Plate of chicken and the veggies from the grill.
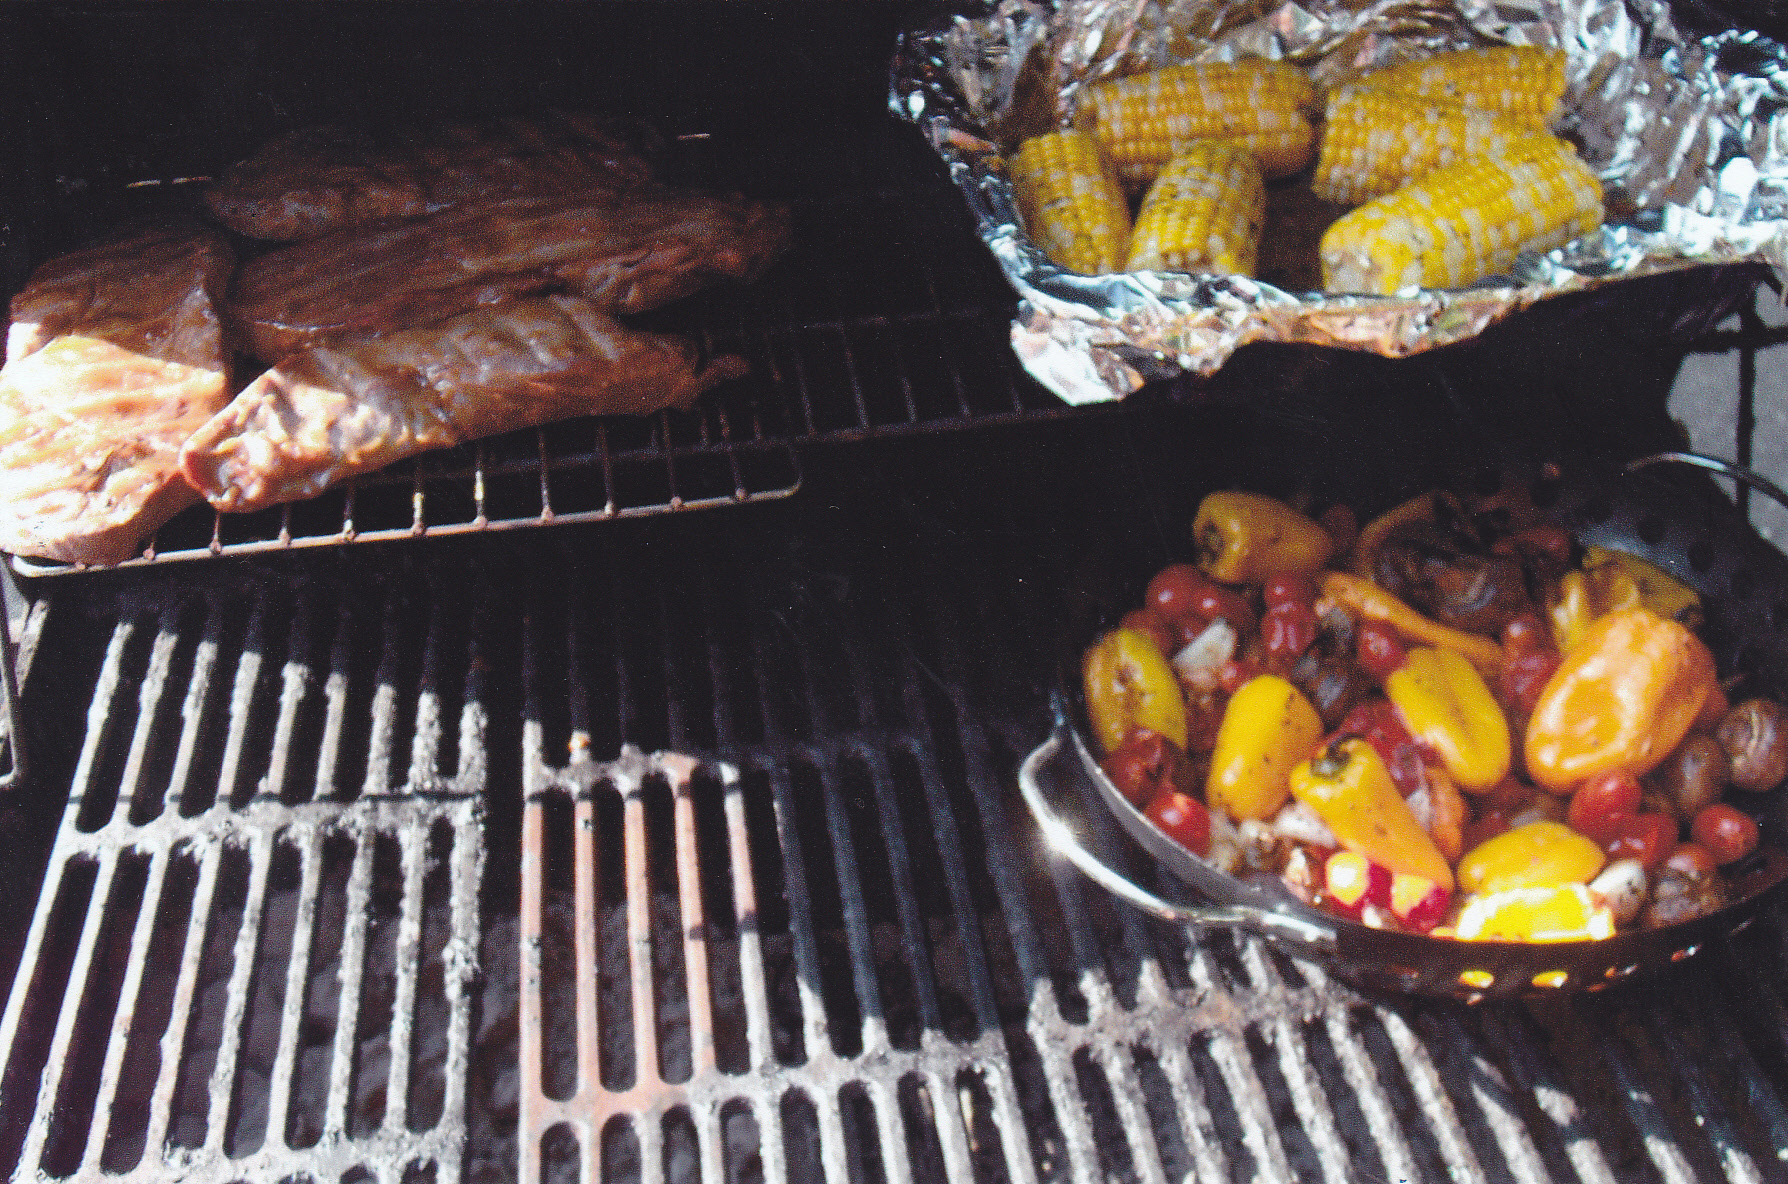
Veggies and steaks!!

Chicken leg quarters on top of veggies in the perforated grill wok.
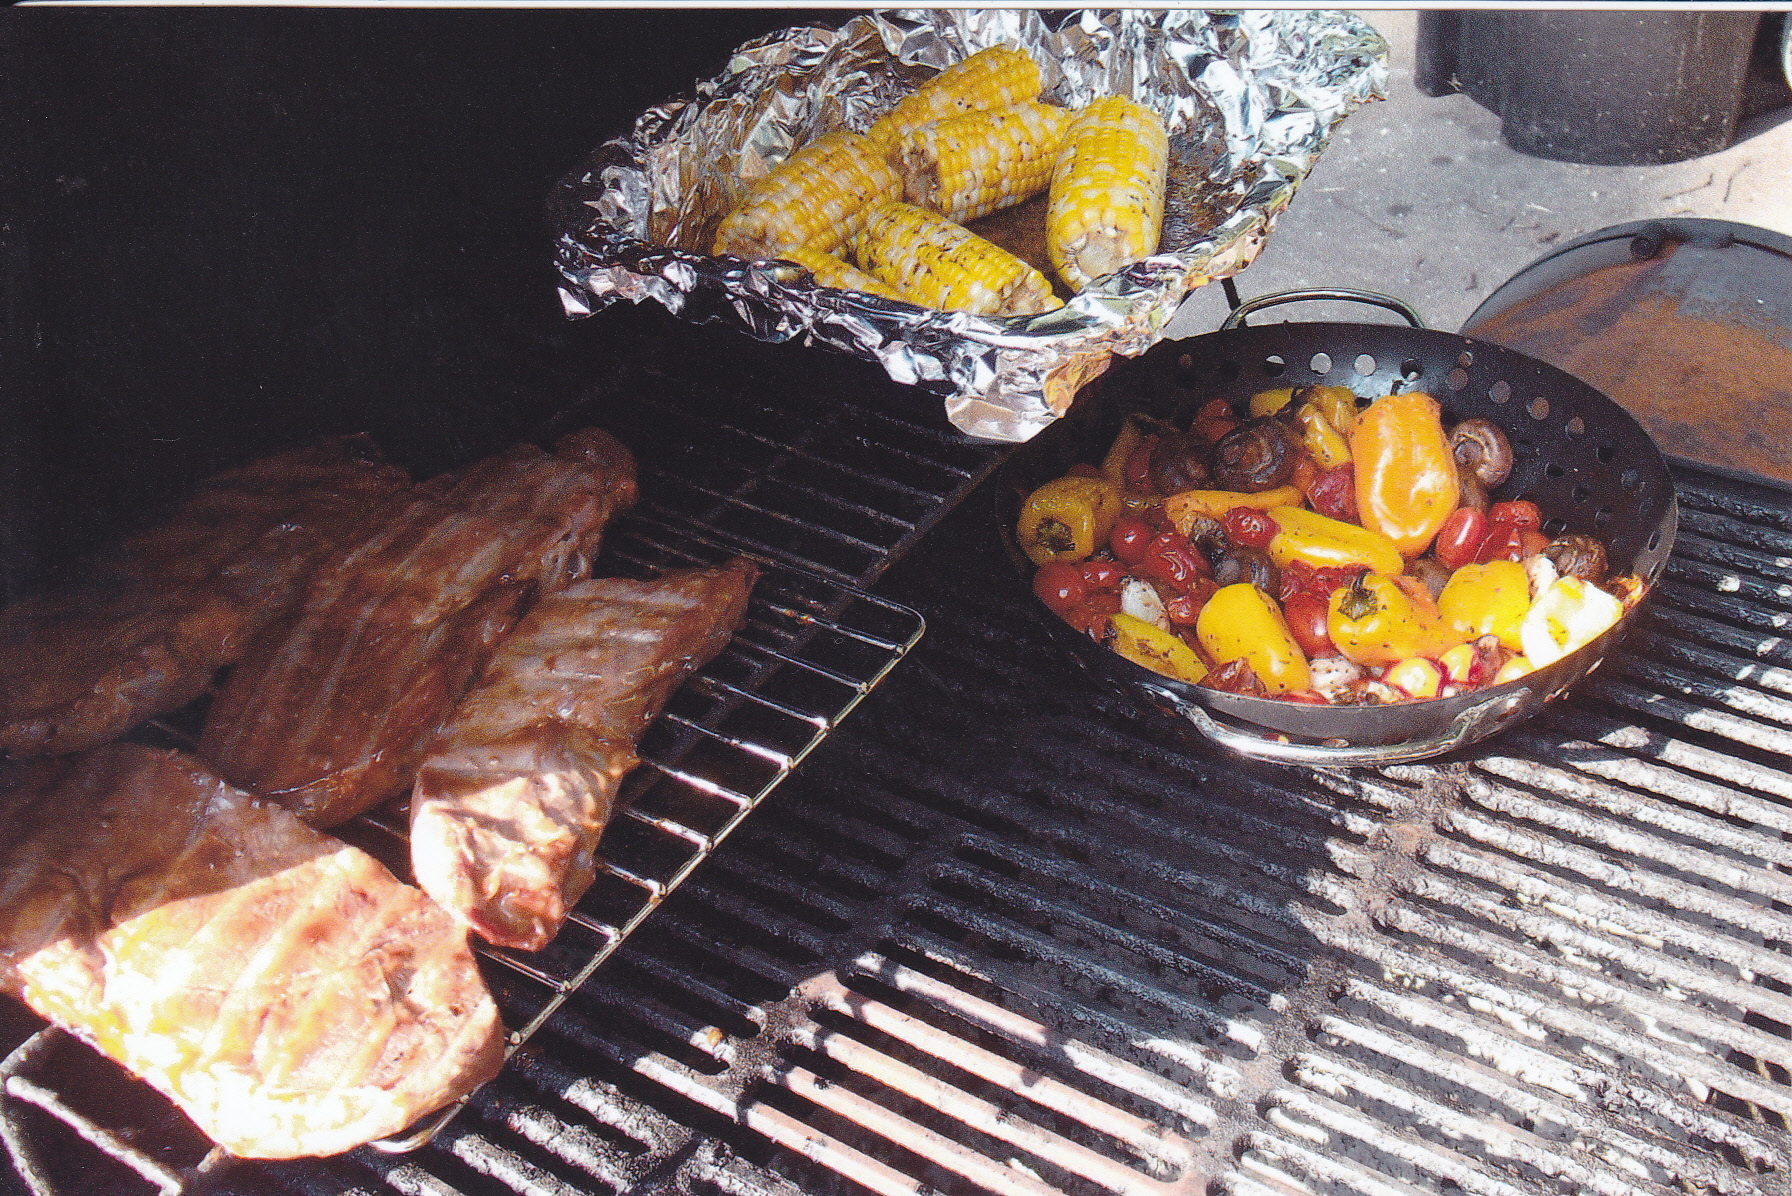
Grillin and ready to eat!!
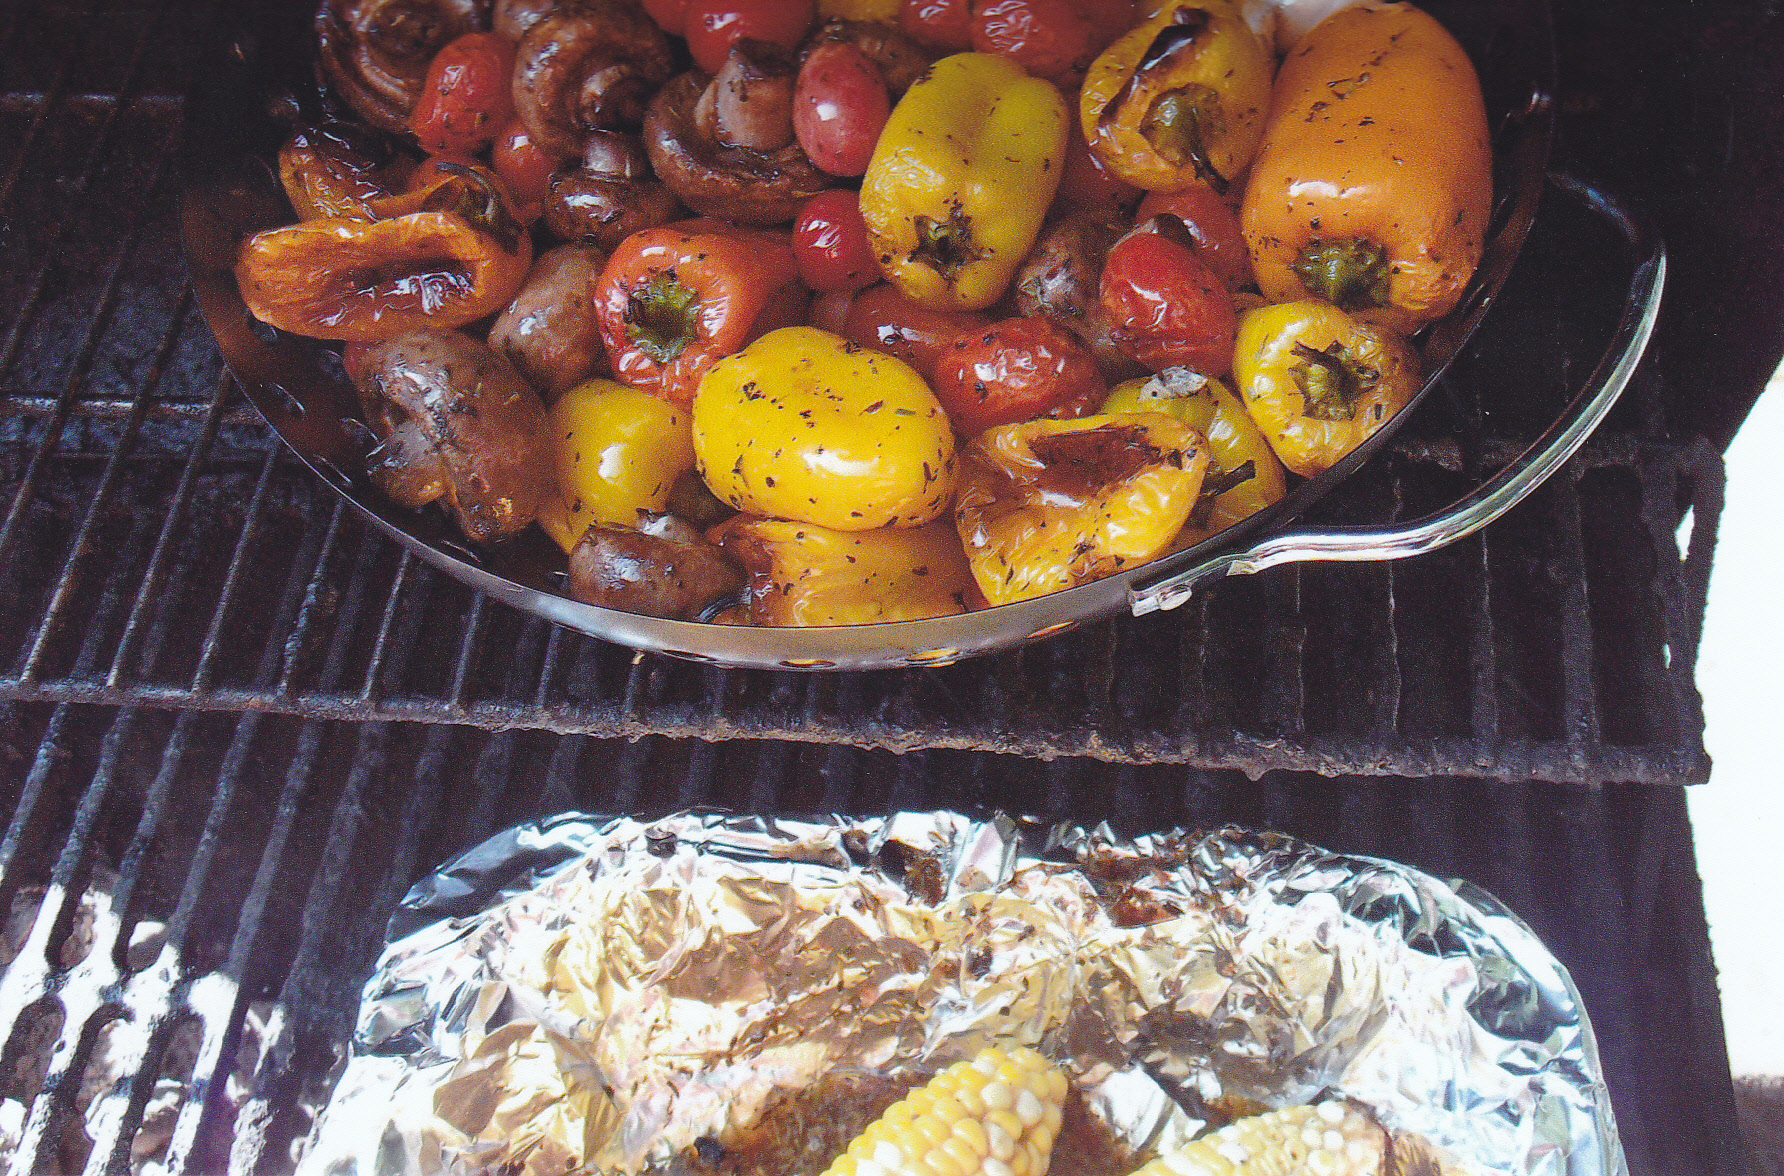
Realy like when the flavors of the veggies on top drip on meat or corn on the cob below.

Added some grape tomatoes to the mini peppers.

Veggies are so much better on the grill!!
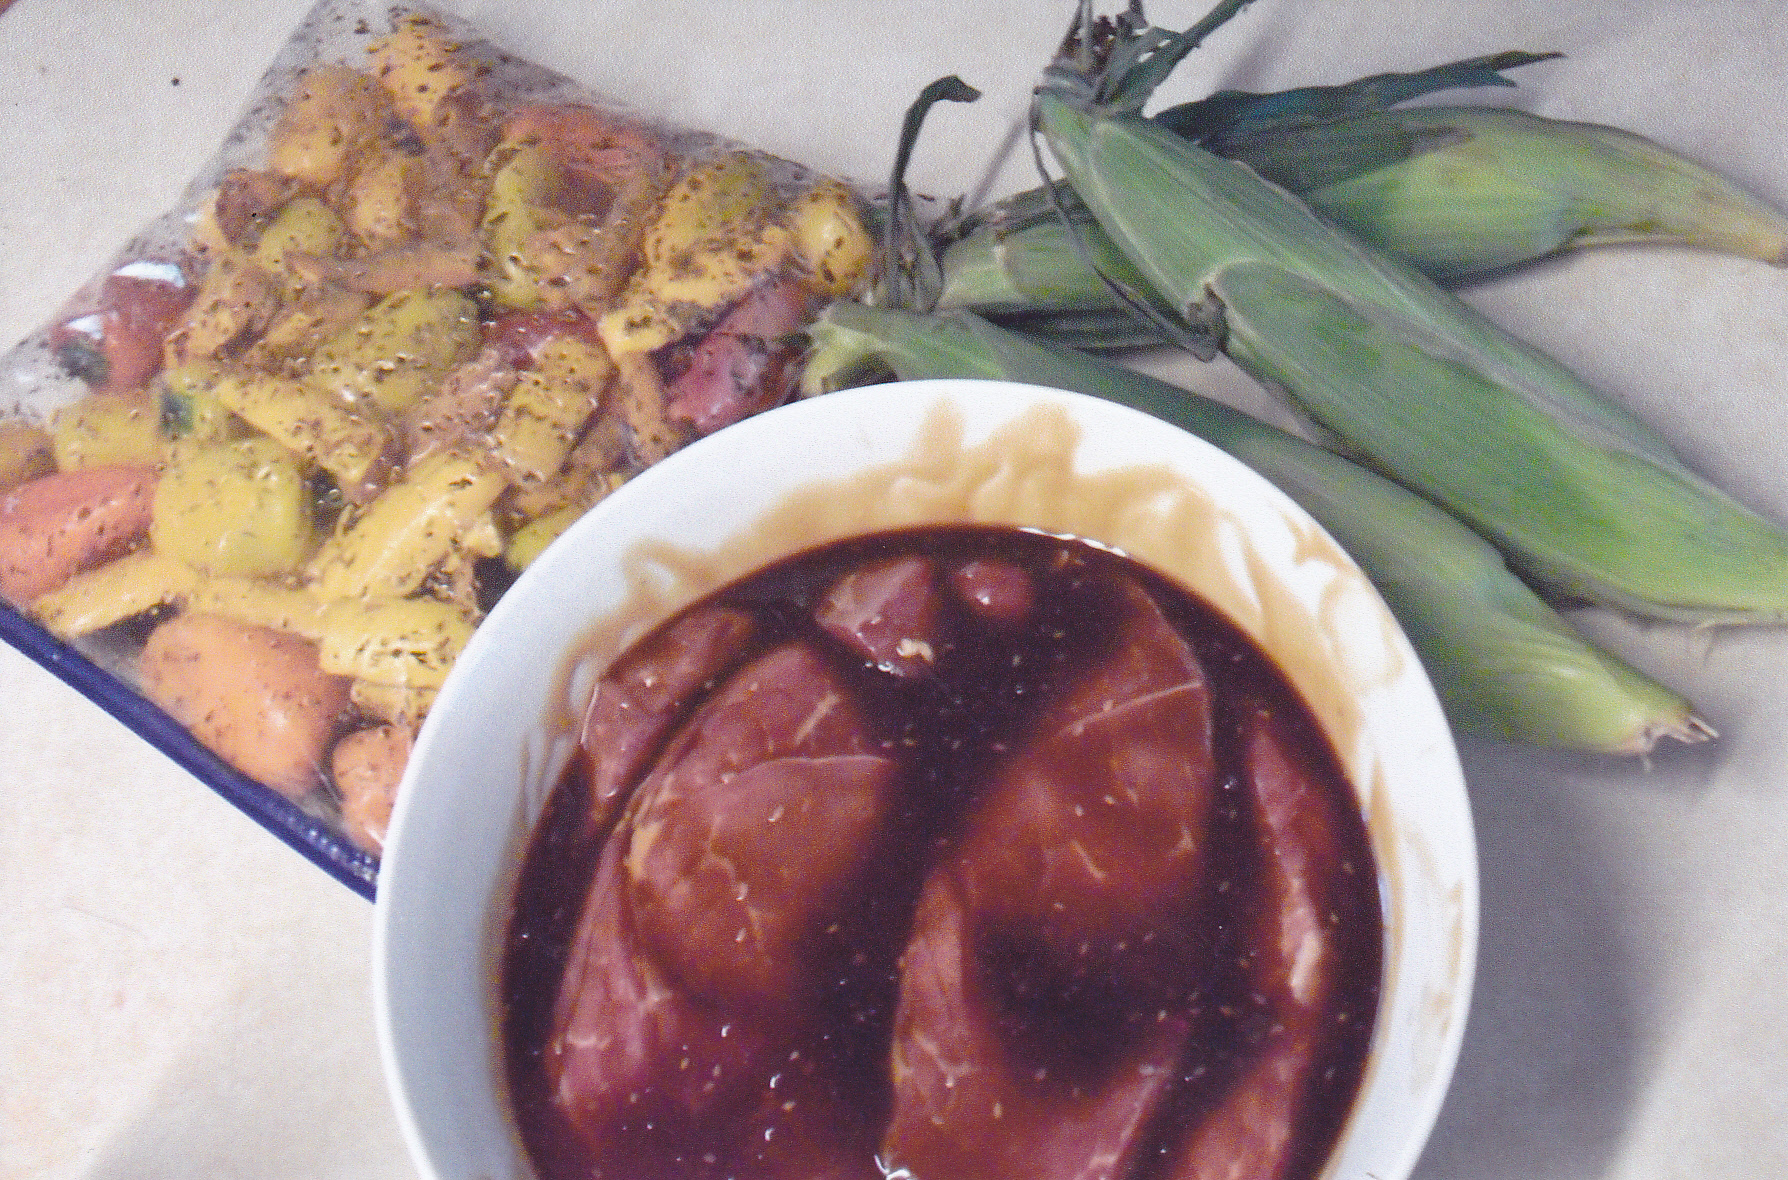
Corn on the cob, veggies and steaks ready to marinate for a spell.
More veggies for the grill along with mushrooms.
A rack of baby back ribs on top of the veggies.
Everything is ready to eat.
These are ready to bring in and for us to chow down.

Veggies with a tasty chuck eye steak. Lost a lot of weight with these meals.
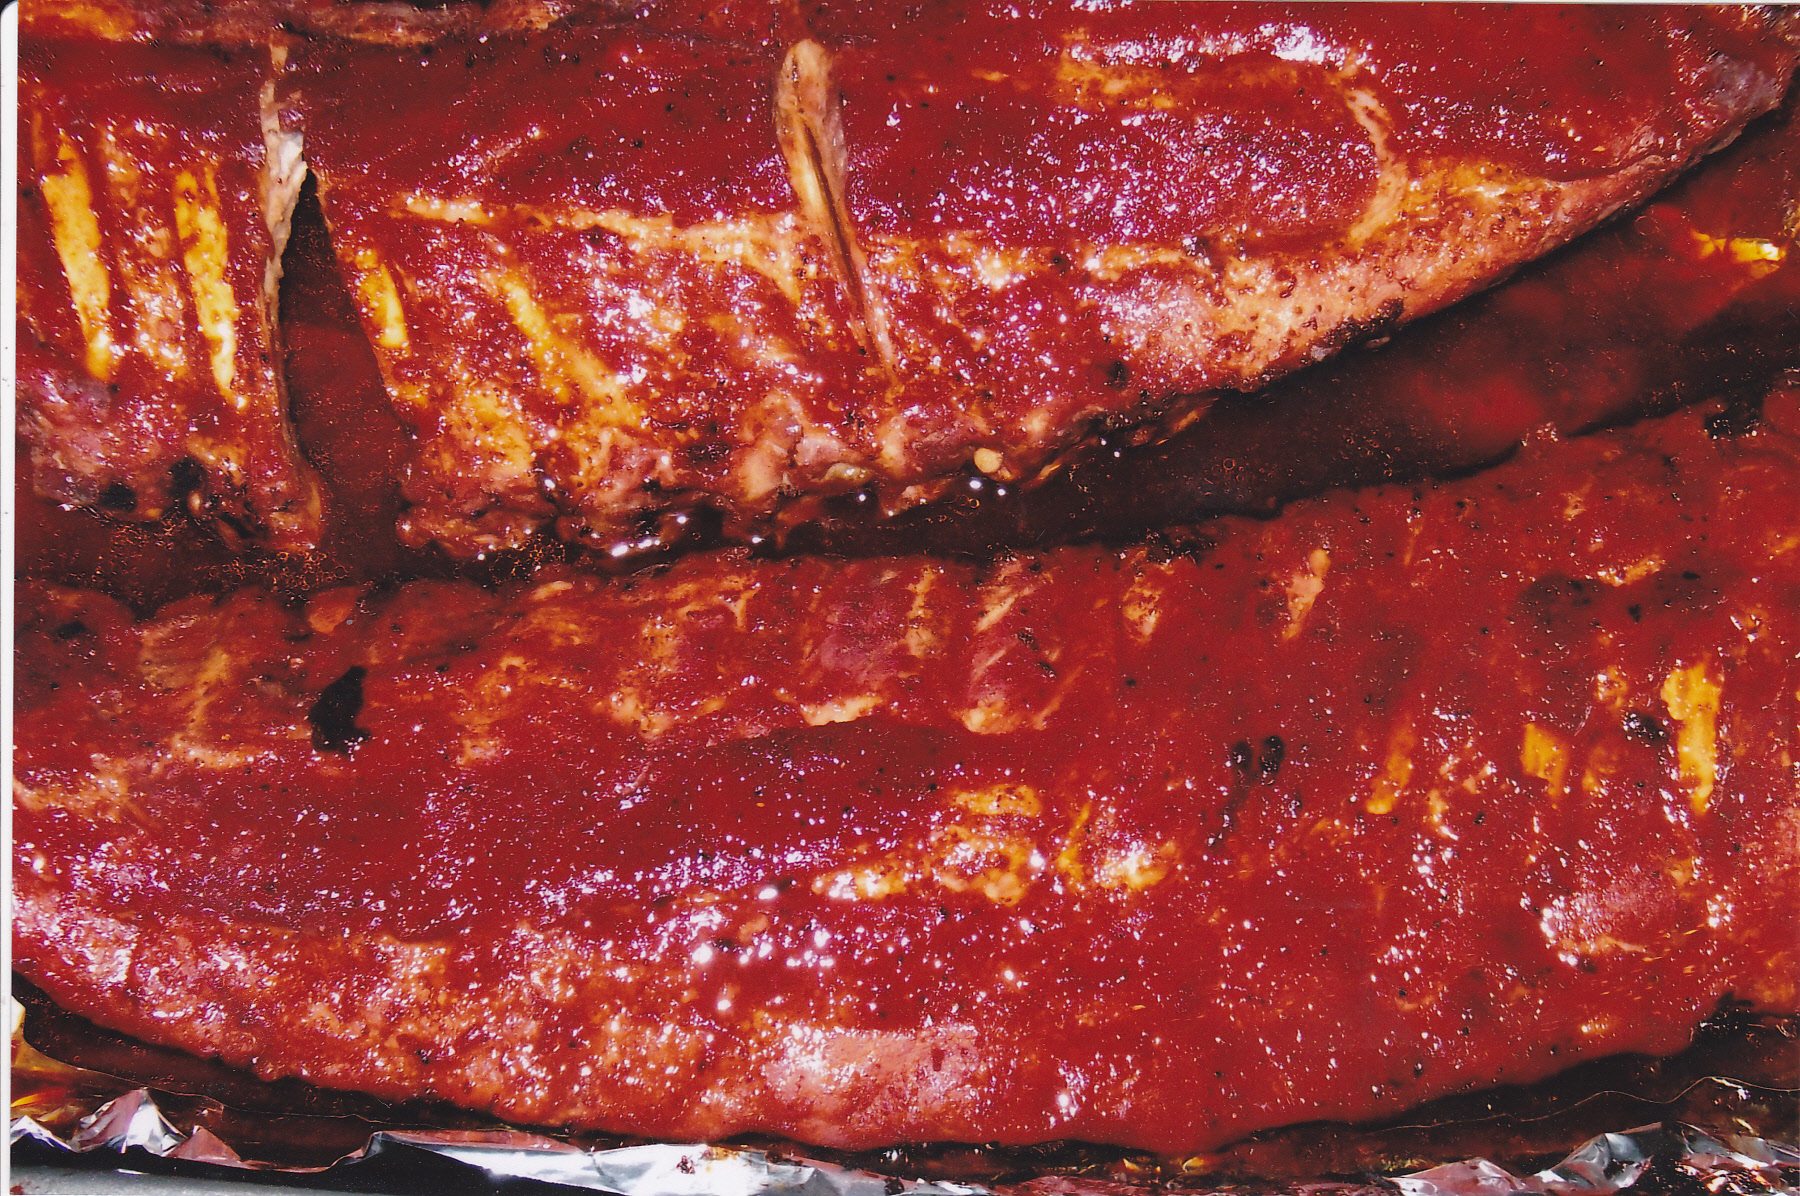
Thought I’d post some pictures of some baby back ribs I did recently. I used the 2-2-1 method as described before on this page. Used my rib rub and my Butchers Sauce for a mop. The temp in the smoker was 225 the entire time with one hour of smoke using oak and maple chips. I was in a spring clean-up mode so I didn’t get the step by step pics as normal. But I did get the end results.


Love to make my quick cucumber kimchi and add it to rice and ribs. The ribs were great. I got the oak and maple chips from a butcher I know who does woodwork and offered them to me anytime I want. He’s got some sausage coming his way for sure.
FRESH POLISH SAUSAGE ON THE GRILL
I think most of us have done brats on the grill with this method, but not many have done fresh polish. This tasty sausage is great done in the popular “simmered in beer and onions” method and then finished off on the grill. I posted my recipe for making fresh polish in my Home Made Sausage page. Fresh brats, Italian, or fresh polish, all turn out great with this method.

Put the polish in a pan with enough beer to cover the links. I normally add yellow onions all chopped up to the beer but I just made these polish and wanted to grill some up right away. Didn’t have the yellow onions but i did have some green onions and that worked out as well. Normally in a batch like this I chop up about 2 yellow onions. I also add about one tablespoon of dice garlic at times as well.
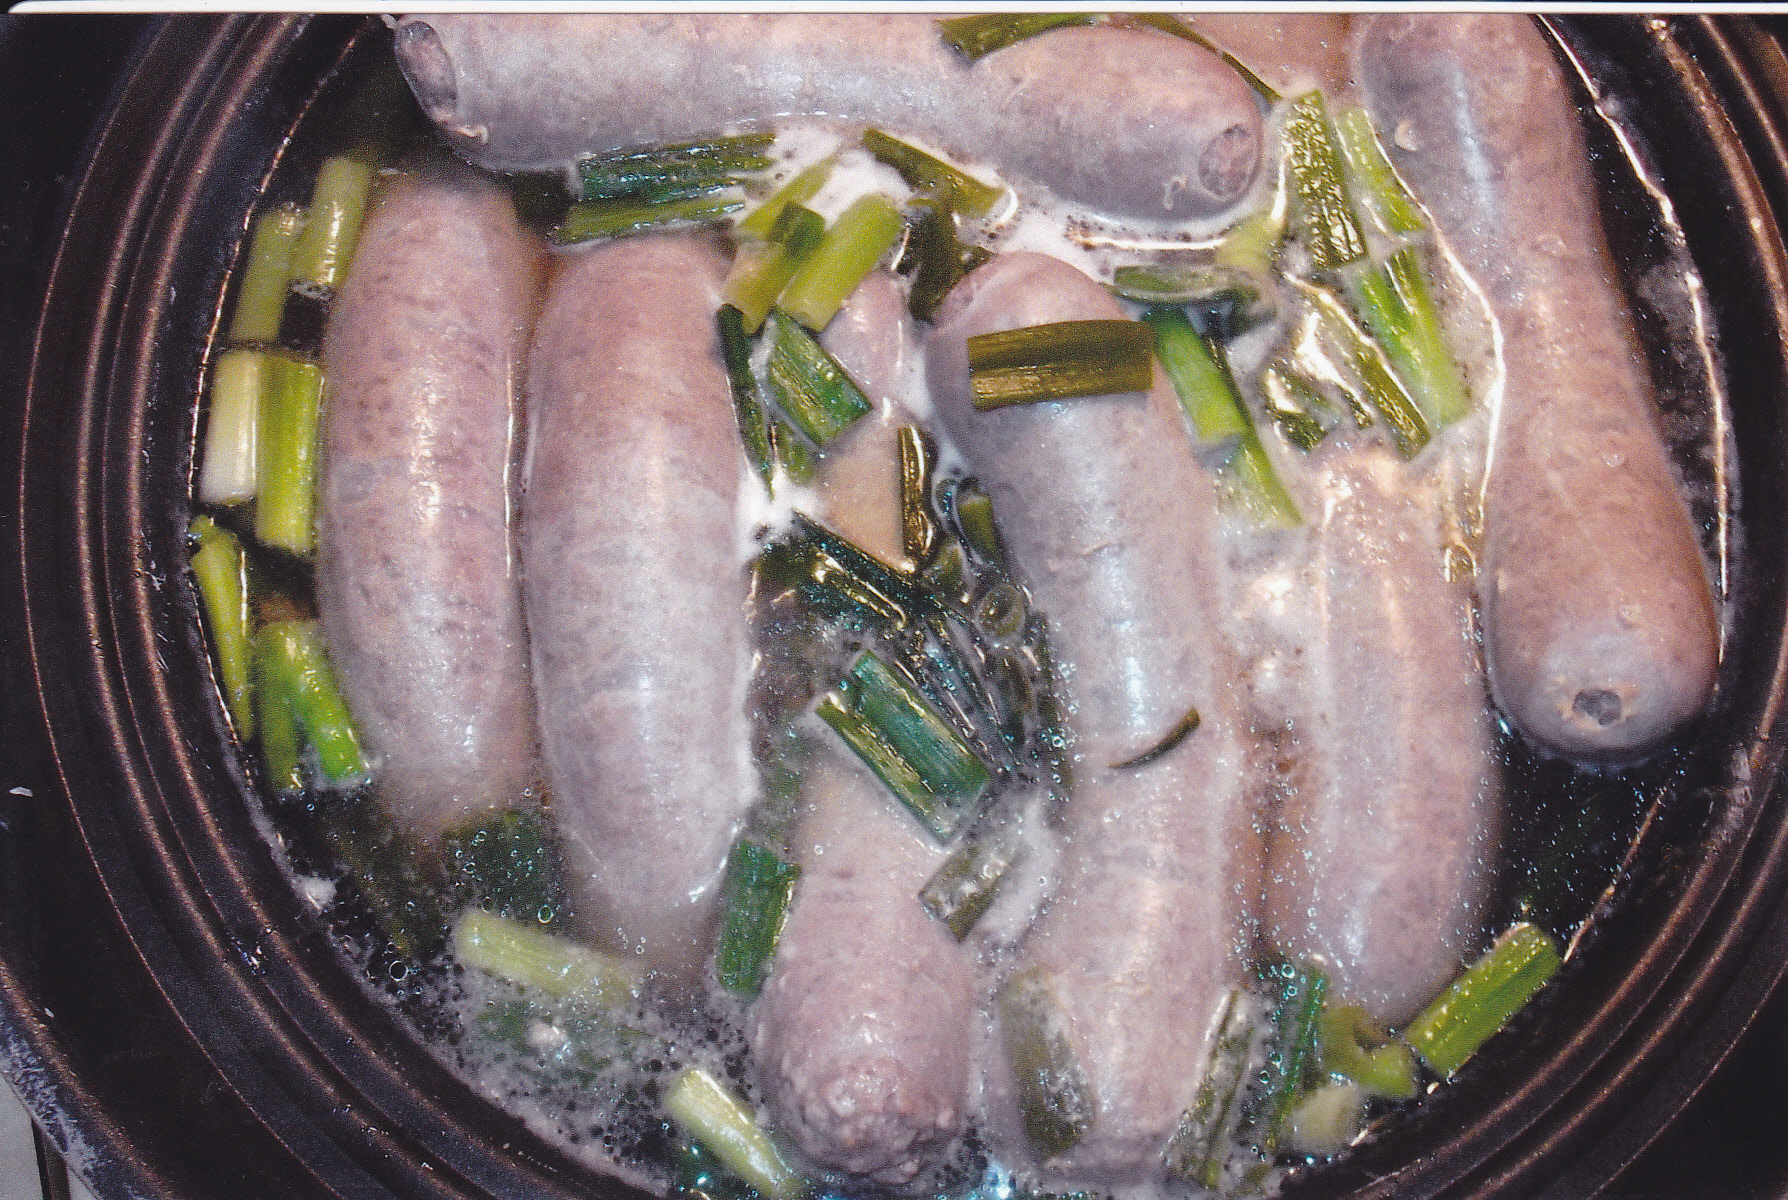
After simmering for about 10 minutes or so, the fresh polish start to get that light color indicating they are ready to put on the grill.
After putting them on the grill, it’s not long before those beautiful grill marks appear!!!!! I usually have them on the grill for 10 minutes or so turning them at times.
Polish on a bun served with my Asian Slaw.
How About Some Stuffed Burgers
Stuffed burgers are often referred to as “Juicy Lucy’s” . I have stuffed mine with cooked mushrooms, onions, jalapeno peppers, onions and more. This time it’s just cheese inside and out. They are real easy to make. A burger press is a good thing to have for these, as you can make thinner patty’s with them and the patty’s end up more uniform. The burger patty needs a little depression in the center. I have a new gadget that does that for me now but if you don’t have this then use a milk glass for example and make a depression with that. Fill the center with your favorite filling and put the other patty on top and then seal the edges with your fingers and you are ready to go. Here are my double cheese burgers I grilled using shredded cheddar cheese:
Here I’m making a depression in the patty.
Nice big scoop of cheddar cheese in the center.
Put the other patty on top and sealed up the edges so they are ready to go on the grill. I always spray the grate with Pam so the meat doesn’t stick.
You can see some of the cheese trying to ooze out of the patties. I ended up putting a couple of slices of pepper jack cheese on top of each patty.
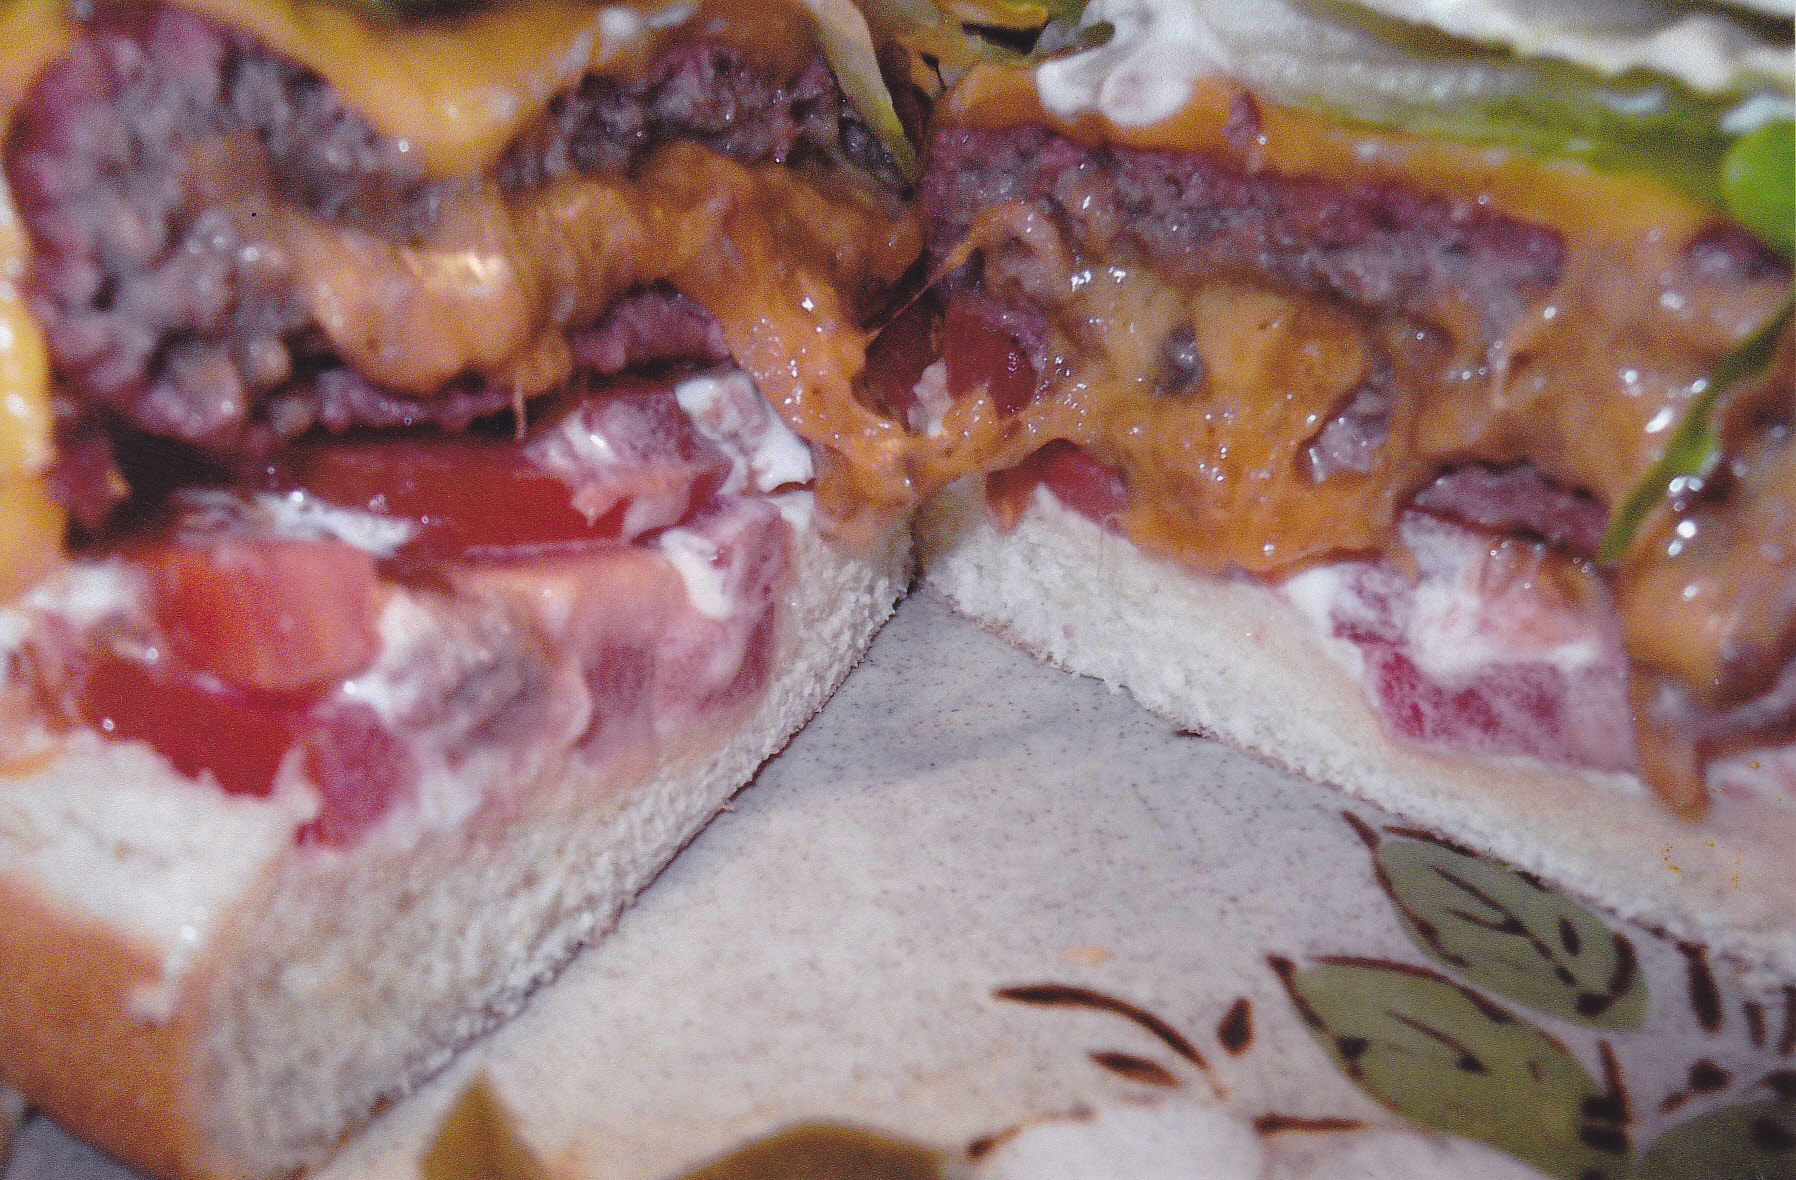
Here is the burger ready and waiting to be eaten!! Mayo, ketchup, tomatoes, pepper jack cheese slices, and lettuce for toppings.
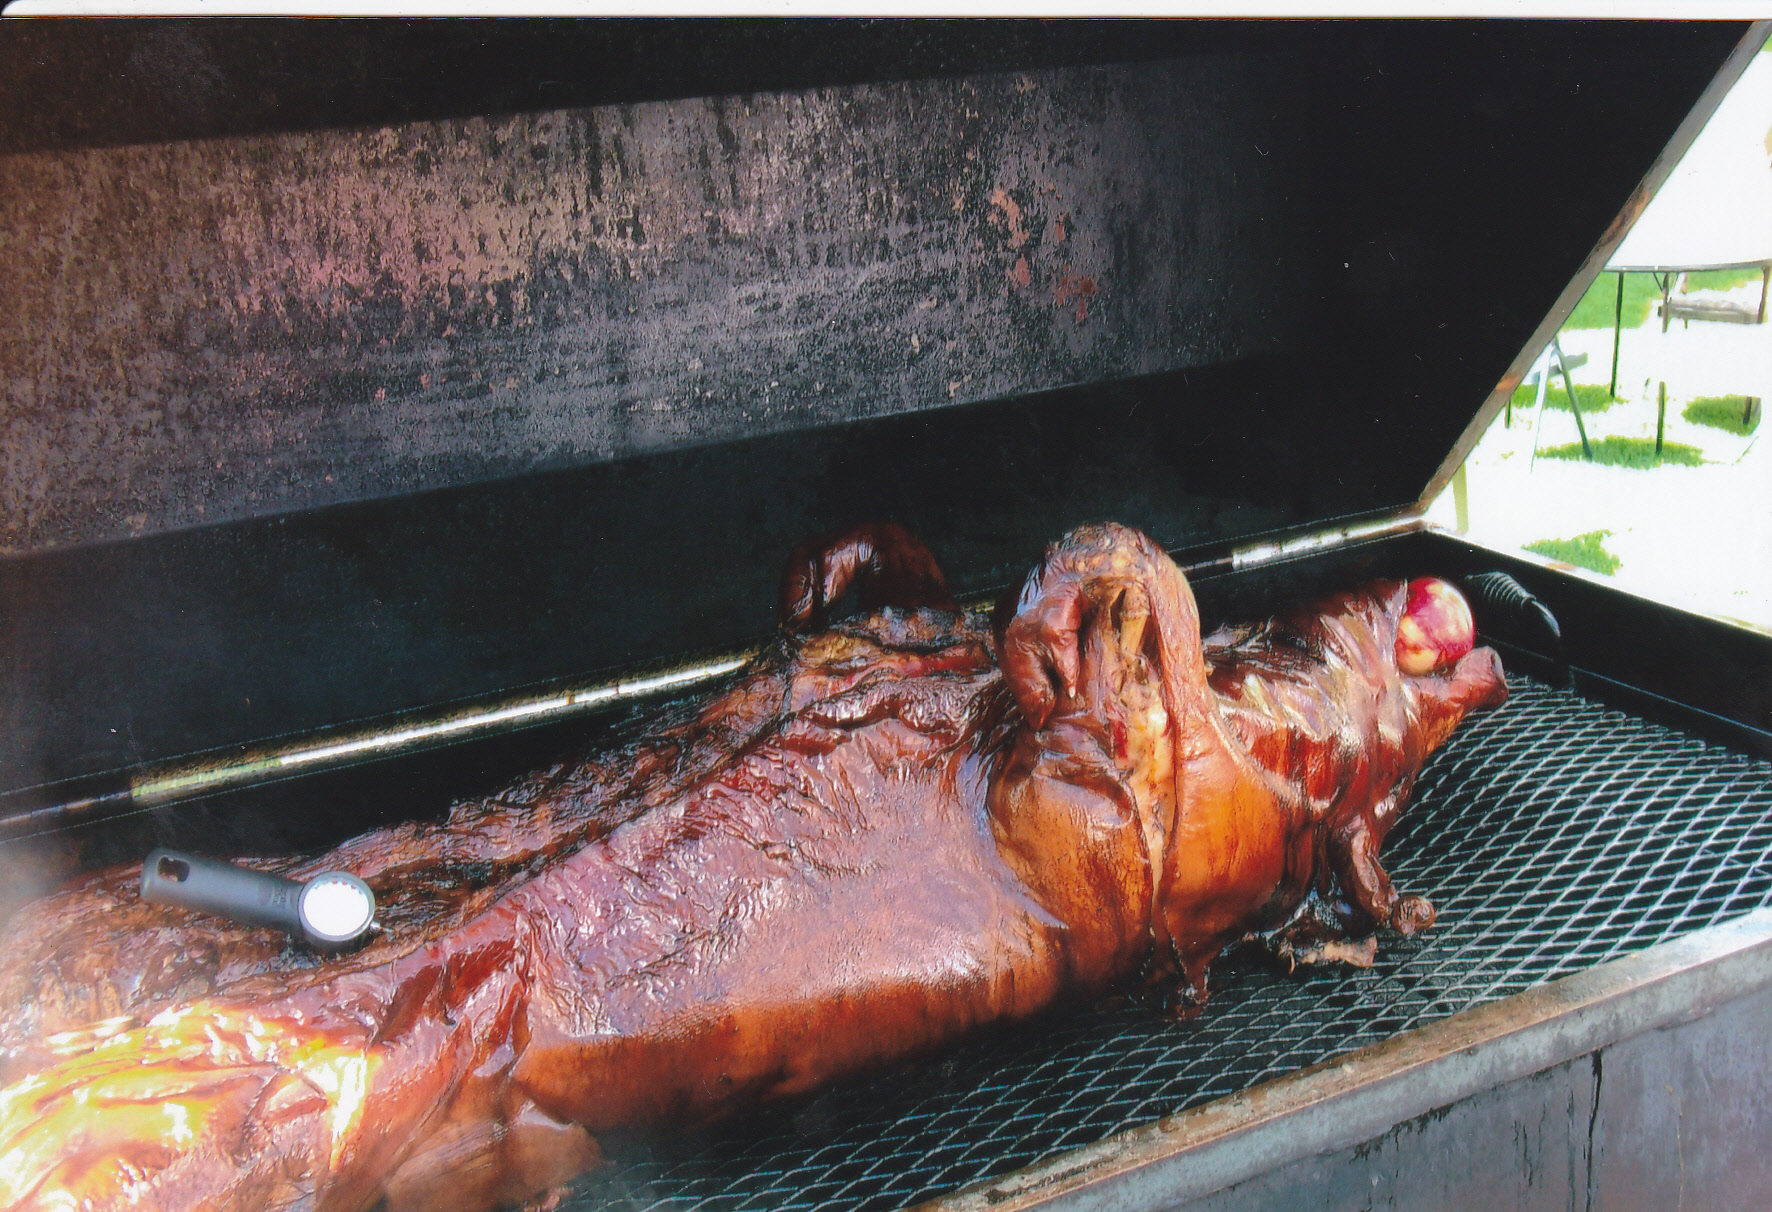
WHOLE PIG ROAST
We did a whole pig roast some time ago and look forward to doing it again. We found a great place to get a hog in St. Paul. The place was owned by Hmong folks and they gave us a good price and good service. We picked the hog out and it was dispatched quickly so the meat was as fresh as could be. Went and rented a propane pig roaster and we were all set.
Put the hog on the roaster belly down and set the roaster to a temp of 225. Stuck a honeycrisp apple in the hogs mouth and our prep work began. We knew it was going to take a long time so we injected the hog with beef broth and butter mix and closed the lid. We let the roaster go all night long and into the next day until the internal temp was around 200 degrees. The shoulder takes the longest to reach internal temp with the hams a close second. So we put meat thermometers in the hams and shoulders.
I kept injecting the hog through the whole process and sprayed apple juice on the outside periodically at times. Once the meat was ready we started the job of pulling the pork for sandwiches for the crowd. I cut off the spareribs and baby backs and let them cool, wrapping them for the freezer for a later meal. There was plenty of meat to pull. I made up some of my Reinhard Caught A Buzz sauce and cole slaw for the buns and everyone dug in and the meal was on. It took about 14 hours to get the hog where we wanted it and the meat was awesome. So it’s important to inject the meat, to keep it extra moist. The shoulder keeps it’s own moisture real well but we injected them anyway. It’s the hams and loins that need the injection for the most part. Here are some pictures of the day.—–

My son-in-law had to grab that honeycrisp from the hog.

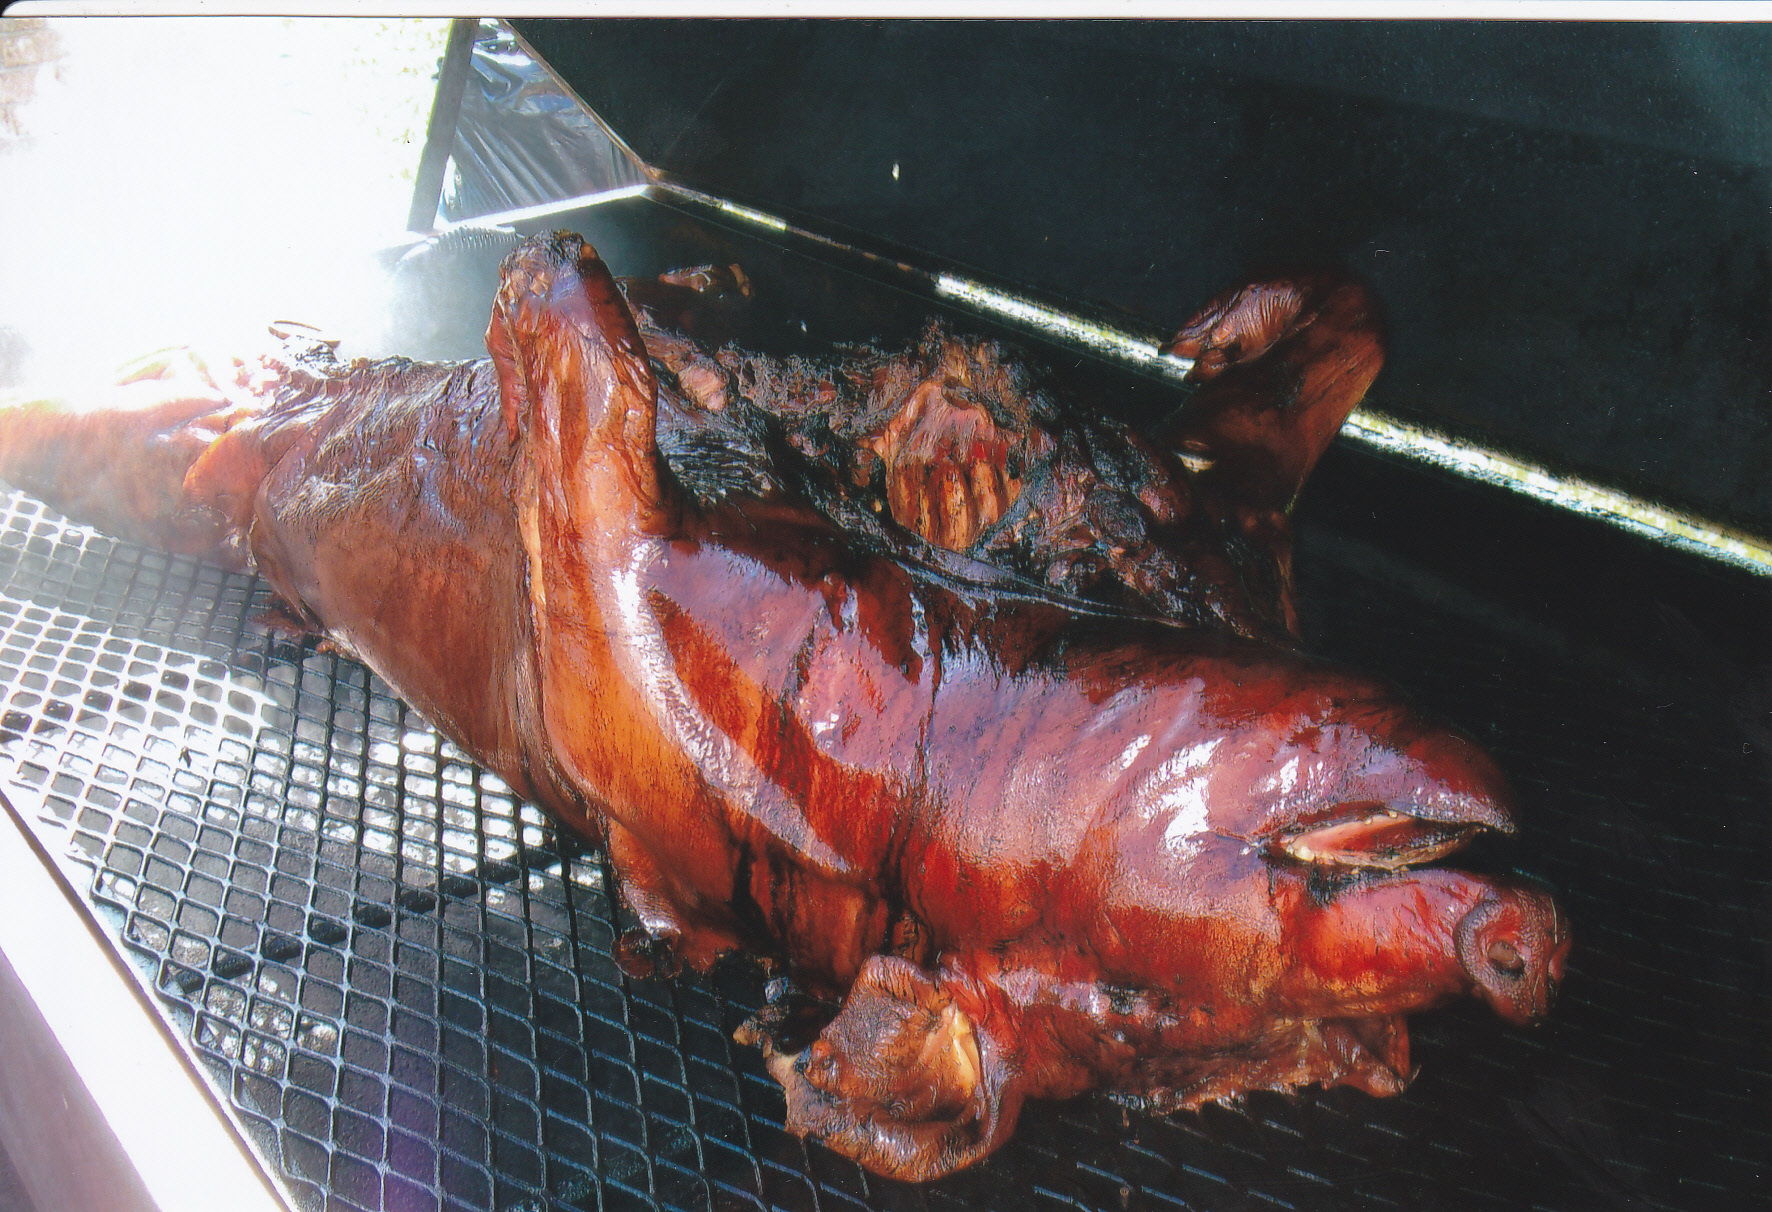
The hog was ready to cut up after it reached the internal of around 200 deg. A beautiful golden brown color and the smell was amazing.
While the hog was still smoking away we got things ready for cutting and the pulling of the pork.

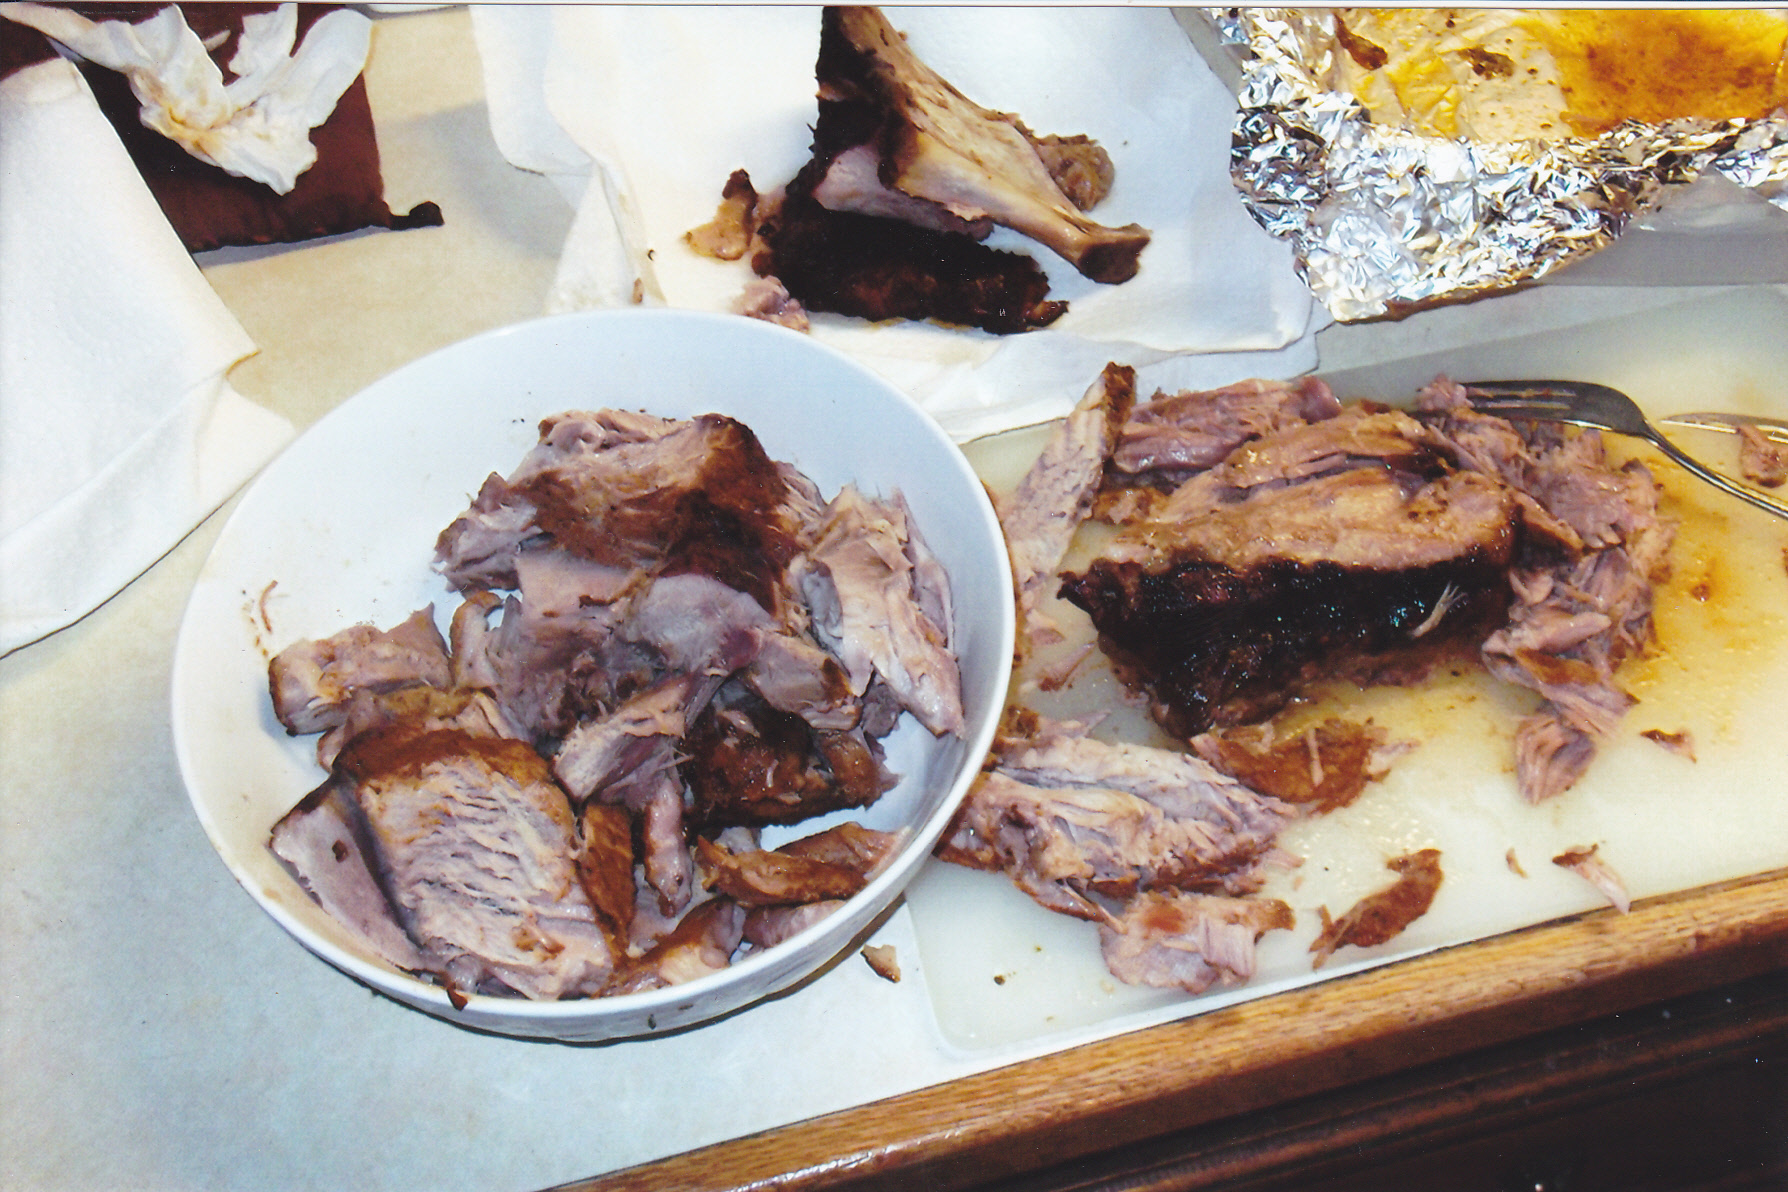
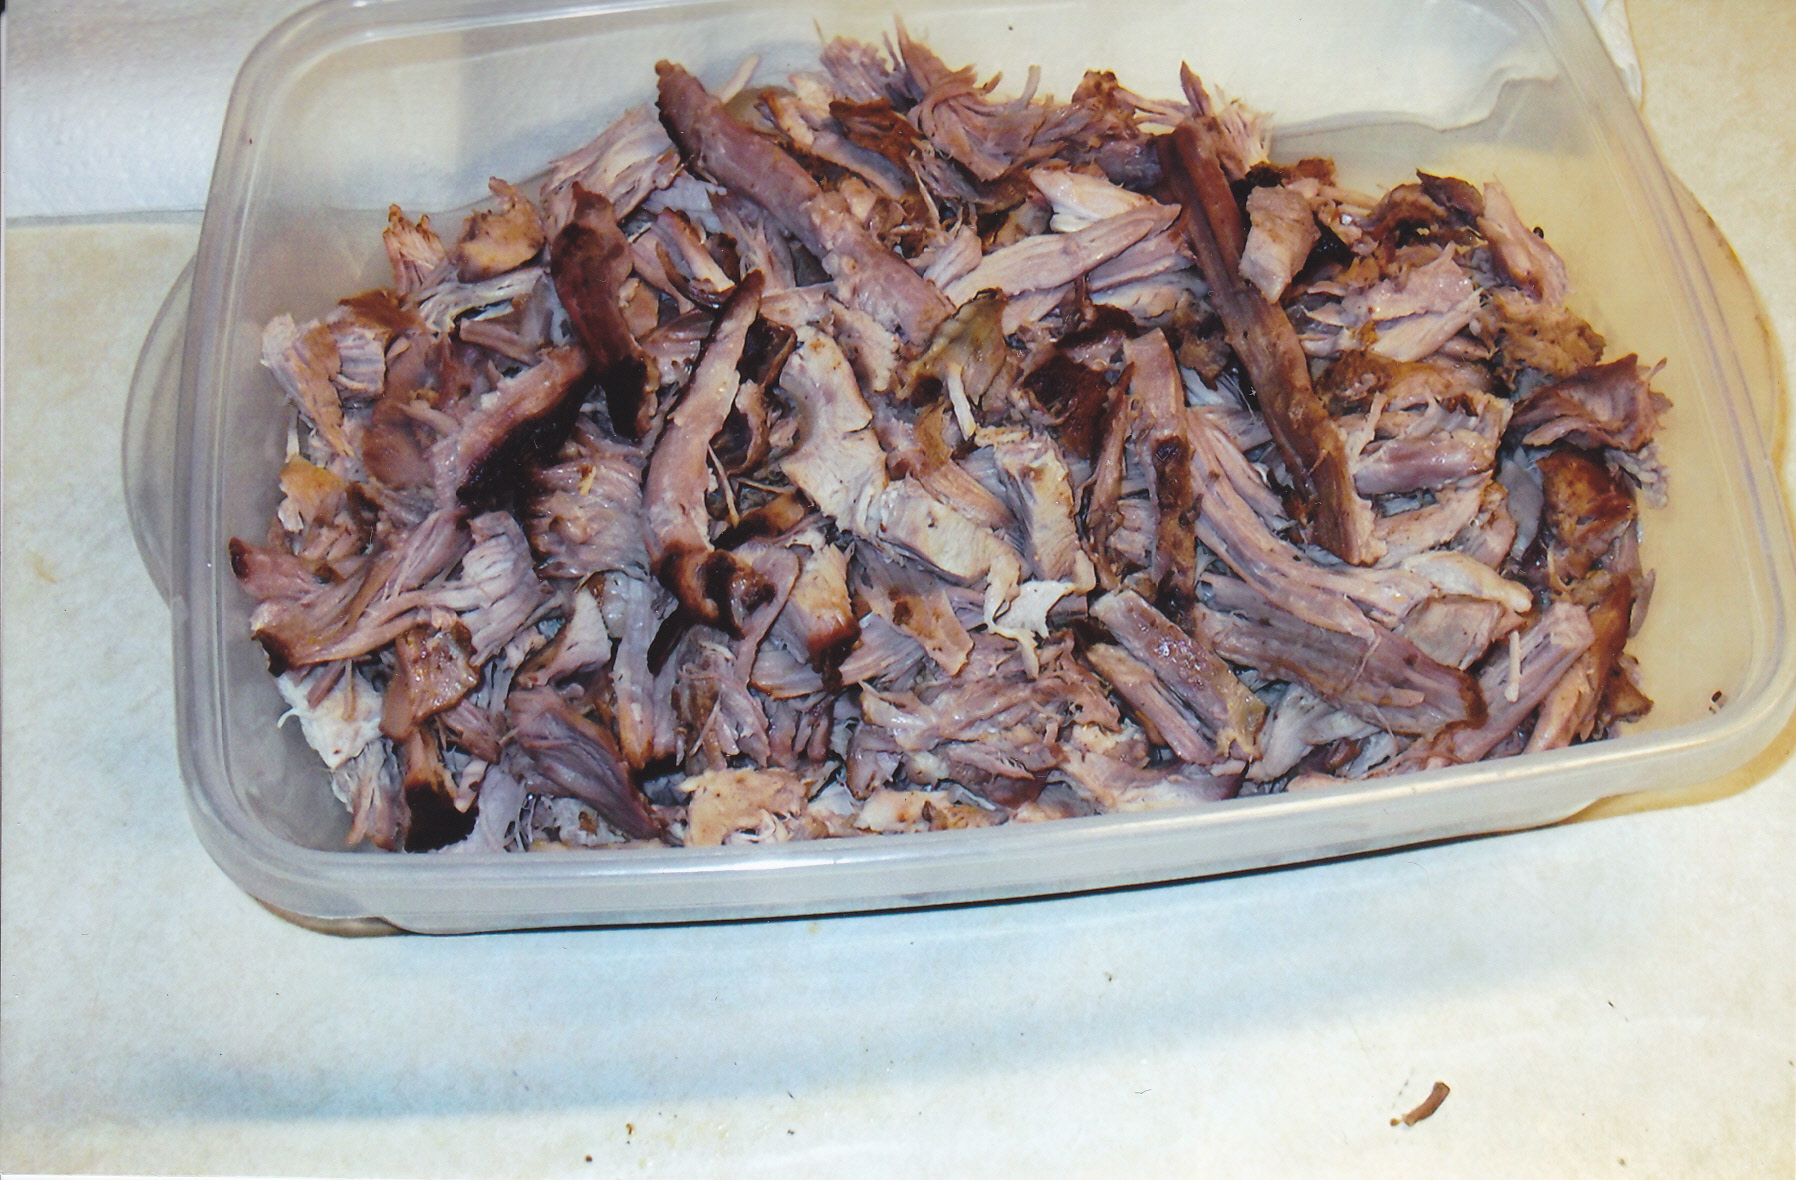
Starting the pulling process with taking the hams and shoulder first. The spareribs and baby backs were wrapped for the freezer for a later meal or two.
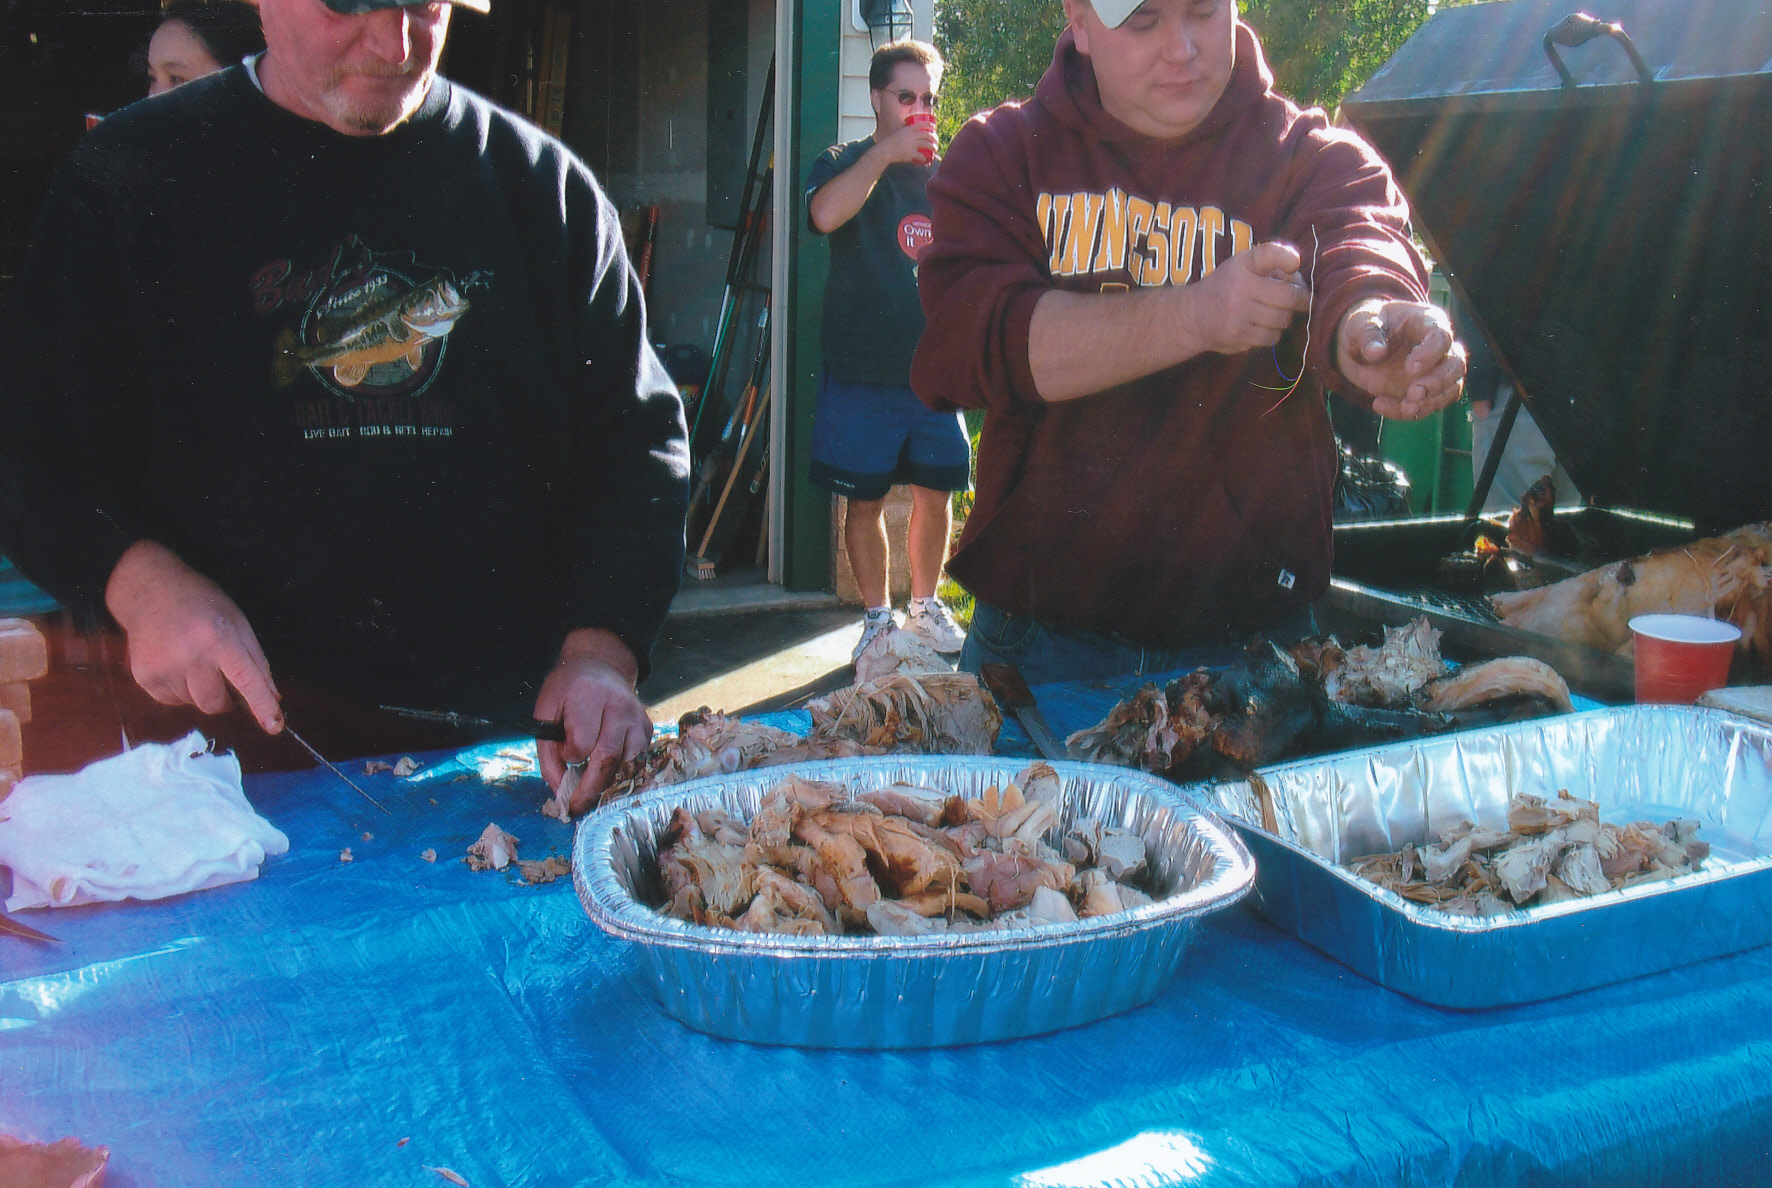
We were pulling the meat and folks were serving themselves at the same time. A great time was had with very little left-overs for doggy bags.
THE MIGHTY BEEF BRISKET
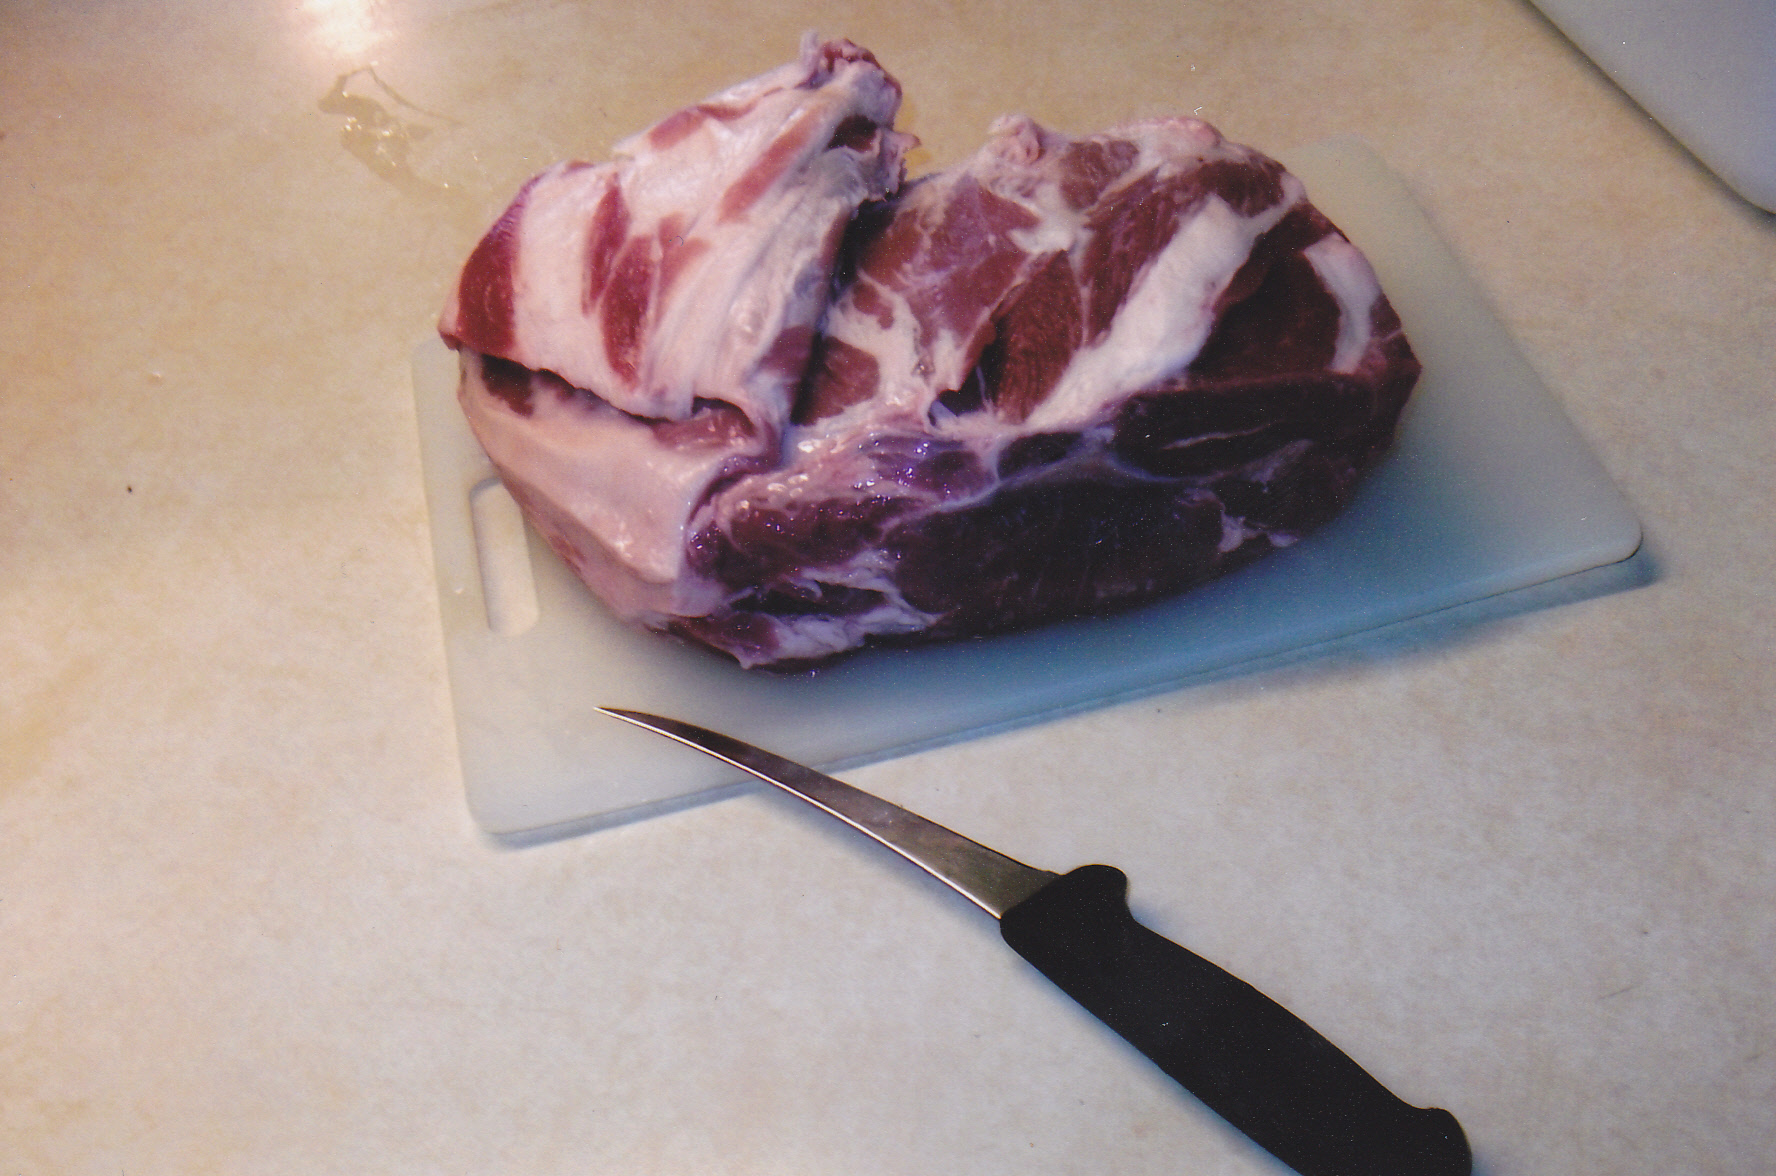
The beef brisket is one of 9 primal cuts of beef. This is also one of the toughest parts of meat being that it has a good amount of connective tissue. This is not a beef cut that you do if you don’t have the time. It’s a long process with low temps. Briskets can be cooked in a crock-pot, in the oven, or the more popular way–the SMOKER!!! There are so many great way’s to prepare a brisket. Let’s start with choosing one by grade of beef. There are three basic USDA grades of beef. USDA Prime, Choice, and Select. You will also probably see three different prices for them as well, with Prime the most expensive and Select the cheapest. For me, I try to stick with USDA Choice. Briskets tend to be fatty at times with the “point” end being the part with the most fat content and the flat end being the leanest. Still a good layer of fat is on the back side.
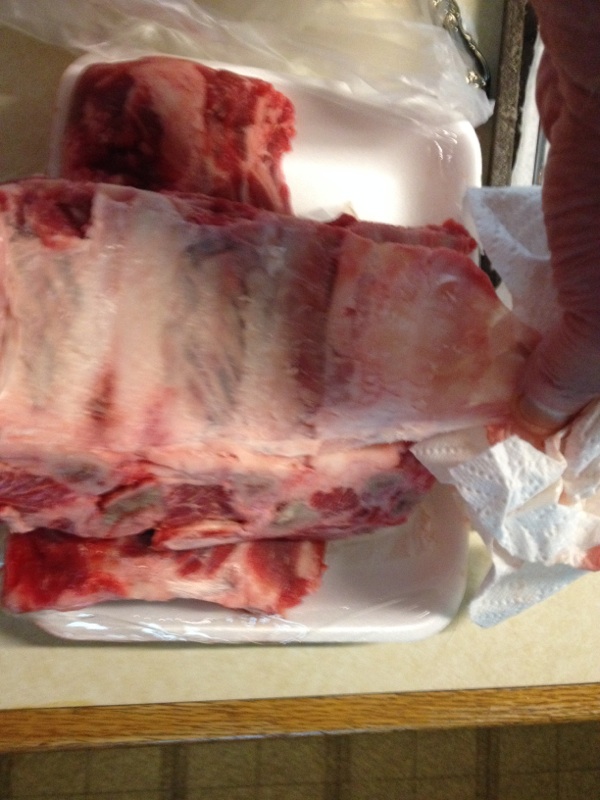
Briskets are sold for the most part in stores in the meat cases with the flat end of the briskets. Very seldom do you see the points sold fresh in the counter. When the brisket is “corned” [sold as corned beef] you do see both the points and flats sold. Buying just the fresh flat, brings you a higher price per pound. I have bought flats up to 4 to 5 pounds. However here I will talk about doing the whole brisket, or often called the packer brisket. They can run from 10 to 16 pounds on average.
I look for a couple of things in picking out a whole brisket. Fat content is number one. They are packaged in cryovac plastic for the most part in the meat counters. So you can eye-ball them of course and see the fat cap on the back of the brisket and the seam of fat on the point end. I will lift one up and grab it in the middle. If the ends droop some, I’m in with that one. If I pick one up and it’s pretty ridged, well that tells me it’s got way to much fat beyond just what I can see. I know i’ts hard sometimes to tell if it has that flexibility or “droop” on the ends in those vac packs but you can get a good idea.
If the brisket has too much fat, it’s OK to trim some off. I dont need more than a 1/4 inch of fat on t he outside. There is a wedge of fat in the point end that could use some trimming as well. I just cut enough out of that wedge to leave about a 1/4 inch surrounding the meat. Let’s start with some pictures of the brisket I smoked this Easter for my family.
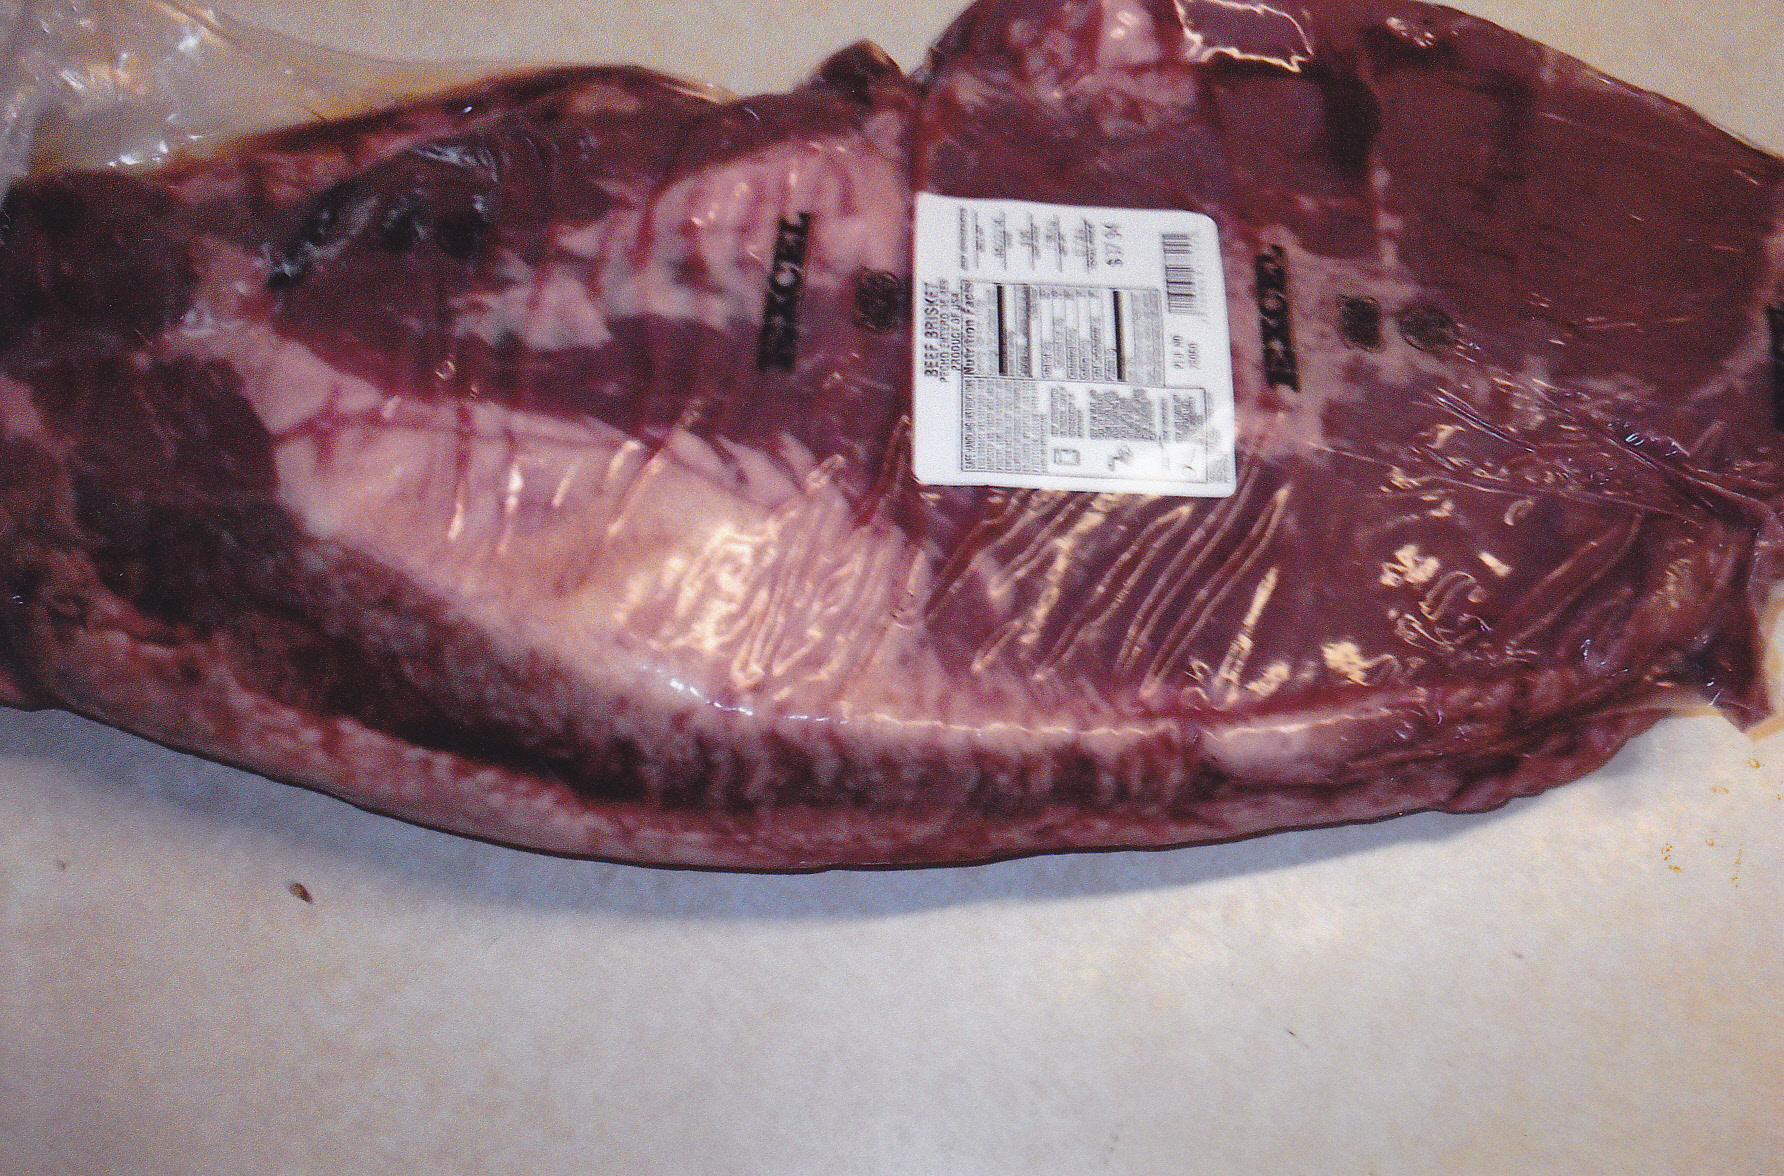
Here is the whole packer brisket I bought. It weighed a little over 12 pounds.
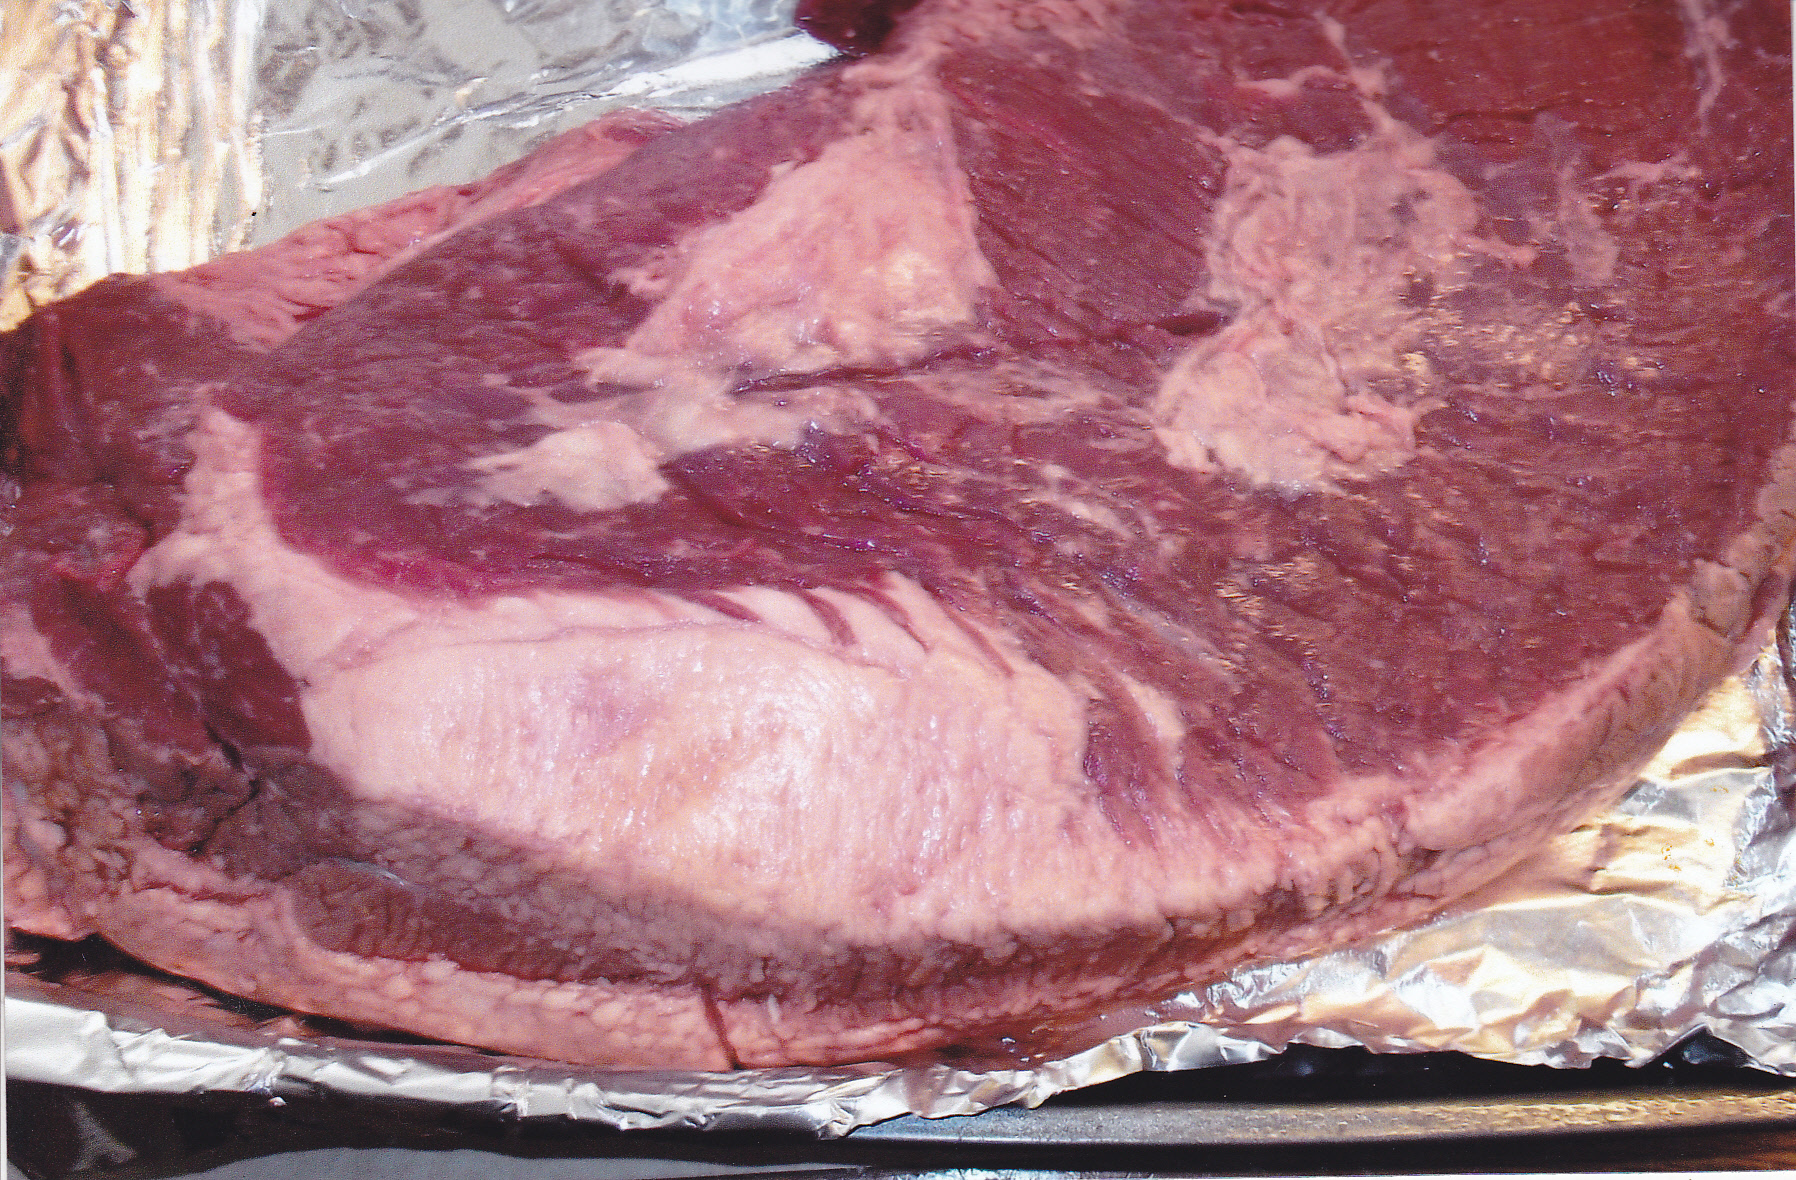
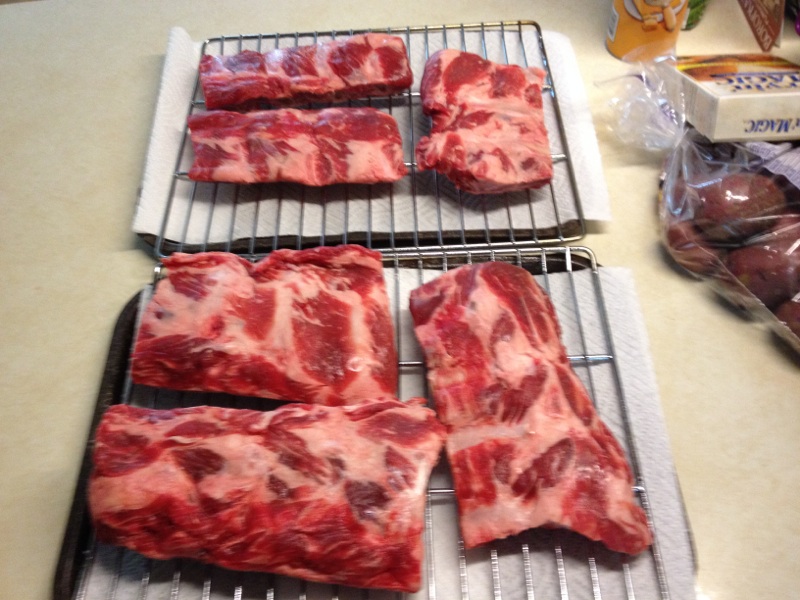
Here is the brisket showing the point end. You can see the large “wedge” of fat, as I call it. Just cut enough of the fat off to leave about a 1/4 inch covering the meat. I leave about 1/4 inch of fat on the back as well. After trimming, apply your favorite rub on the brisket.
One thing I do is prepare beef broth [Swansons low sodium is a good one] with diced garlic and butter added. I bring the beef broth to a boil and add butter and a good spoon full of diced garlic and let it simmer for about 10 minutes. Then I let it cool down some before injecting it in the brisket. This adds extra flavor and keeps the meat moist. Now is a good time to pre-heat the smoker to 230 degrees.
It’s important when the brisket is done to slice it against the grain. One way to assure that you will is to cut a small piece off the flat end so you don’t loose track of where to slice if your not familiar with the brisket. In this picture you can see the lines in the meat to show where to cut against the grain.
I had to cut the point off the brisket because the whole brisket would not fit in my smoker. There is always opinions of fat side up and fat side down. My view is it’s better fat side down. Having the brisket fat side down keeps the moisture in the brisket from leaving the meat. So what prevents the top of the brisket from drying out or loosing moisture on the outside?
BACON!!! That wonderful magic ingredient use in many BBQ’s and more. The bacon gives the brisket flavor [along with the rub] and keeps the meat now moist from top to bottom. There is an old saying that “there is no right way to BBQ, only my way”. This has worked for me, but I’m sure there are other way’s that work as well. That is why Smoking is an adventure that never stops.

So, I have the smoker at 230 degrees and the briskets have been in for awhile but the internal temp is around 140 deg at this point. I have my drip pan under the briskets with water to catch the drippings and keeping the meat moist at the same time. The vent is wide open. At this time I start adding smoke. I used apple wood chips this day. I will keep the smoke on until it’s time to put the briskets in a foil pan which will be covered.

Here we are at the stall point. This is when the collagen starts to break down. The same thing happens with pork butts. It will seem that the temp [internal] will just not rise and seem to stall. The internal temp is around 170. This is when it usually happens. Be patient, it will happen.
Close look at the brisket when ready to put in the foil pan [covered in foil] and put back in the smoker to finish off without smoke until the internal temp of 205 is reached. The internal temp was around 185. I added some beefy onion soup to the brisket pans at this point.
The briskets have reached the 205 internal and they are now ready to by again covered in foil and then I cover the pans with towels to keep them warm in the resting process. I let them rest another 3 hours like this on the kitchen counter. The whole process was around 18 hours [including the rest time].
Cooking some more of the beefy onion soup mix with some diced garlic added. I love garlic and add it to a lot of things I cook, grill, or smoke.
I trimmed all the excess fat from the briskets. You can see how tender the meat is after slicing. Here I pulled gently on a slice and it pulled apart easily.

The briskets are all sliced up. One pan with the beefy onion soup mix with garlic [used as a au jus] and the other pan with my Butcher sauce.

Closer look at the slices soaking in the beefy onion garlic au jus.
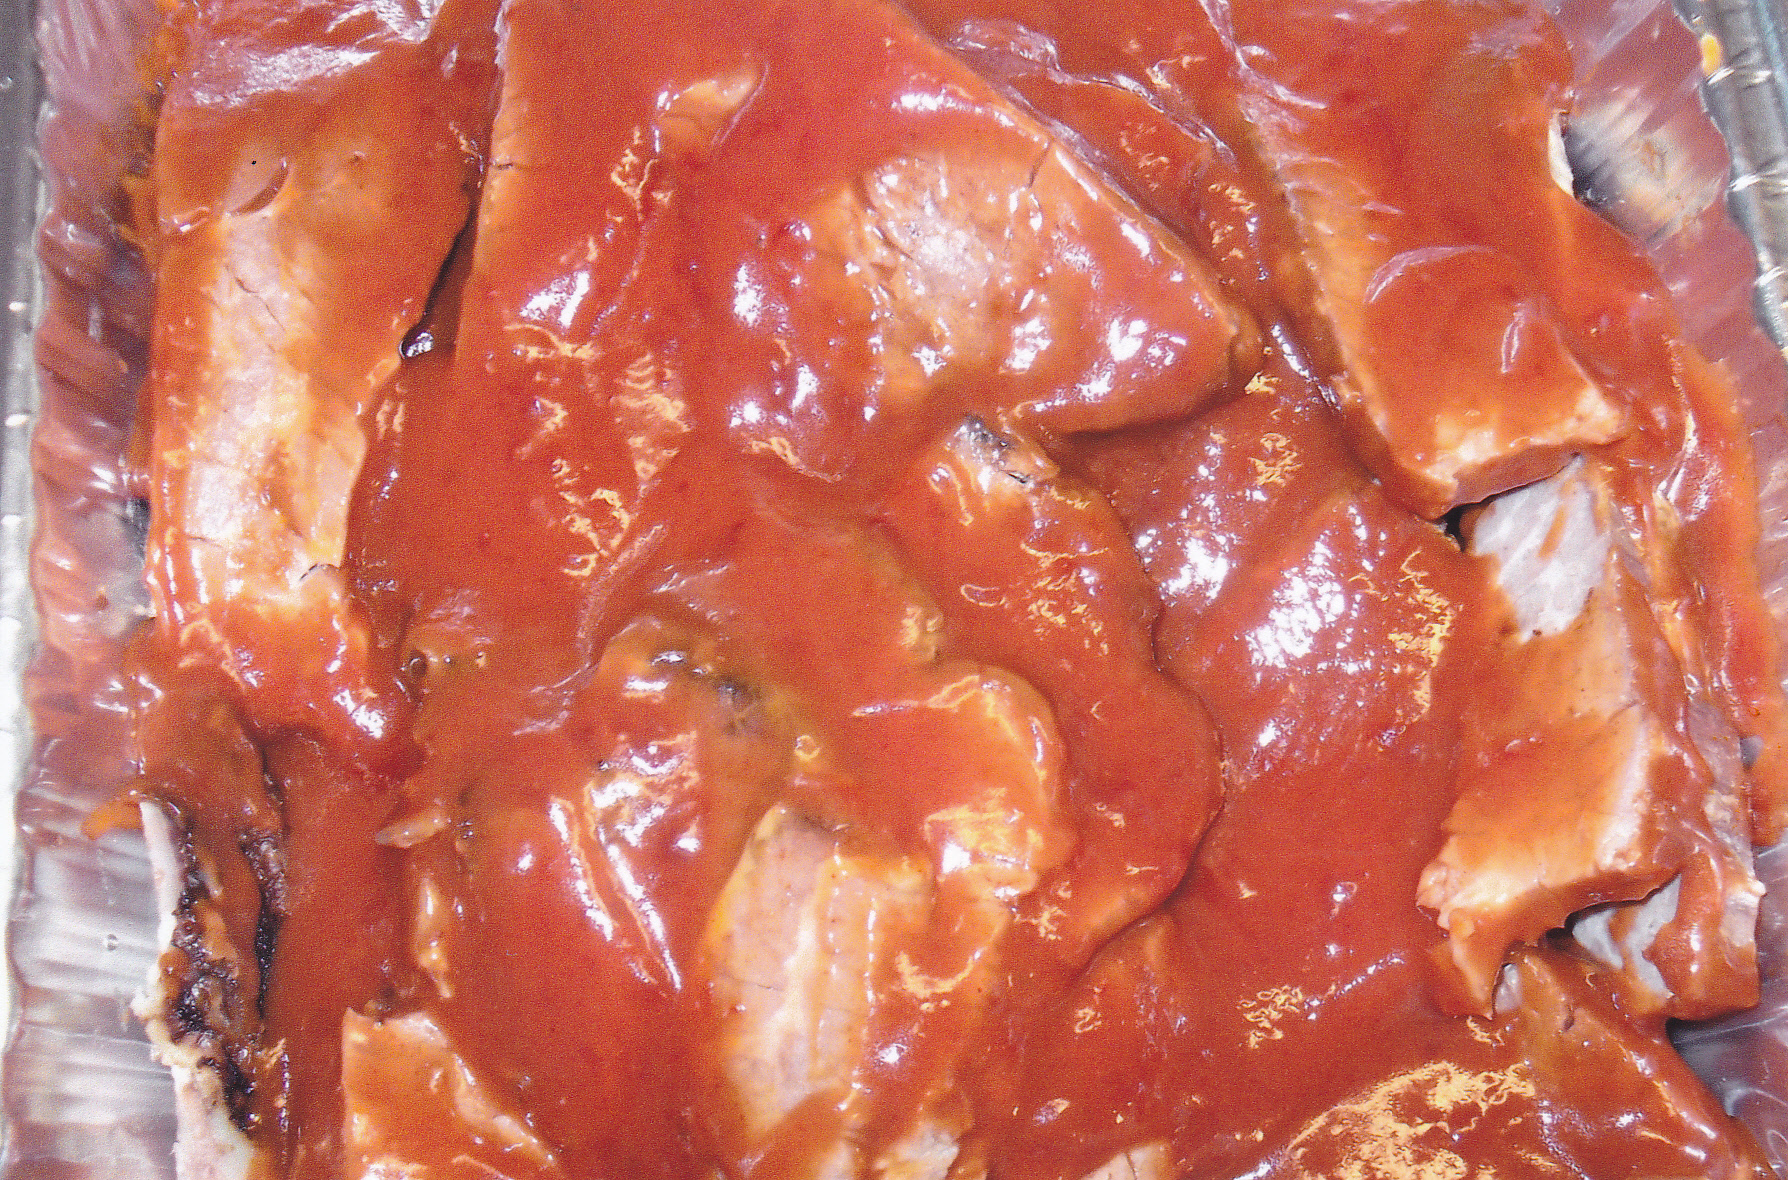
Closer look with my Butcher sauce and the sliced briskets.
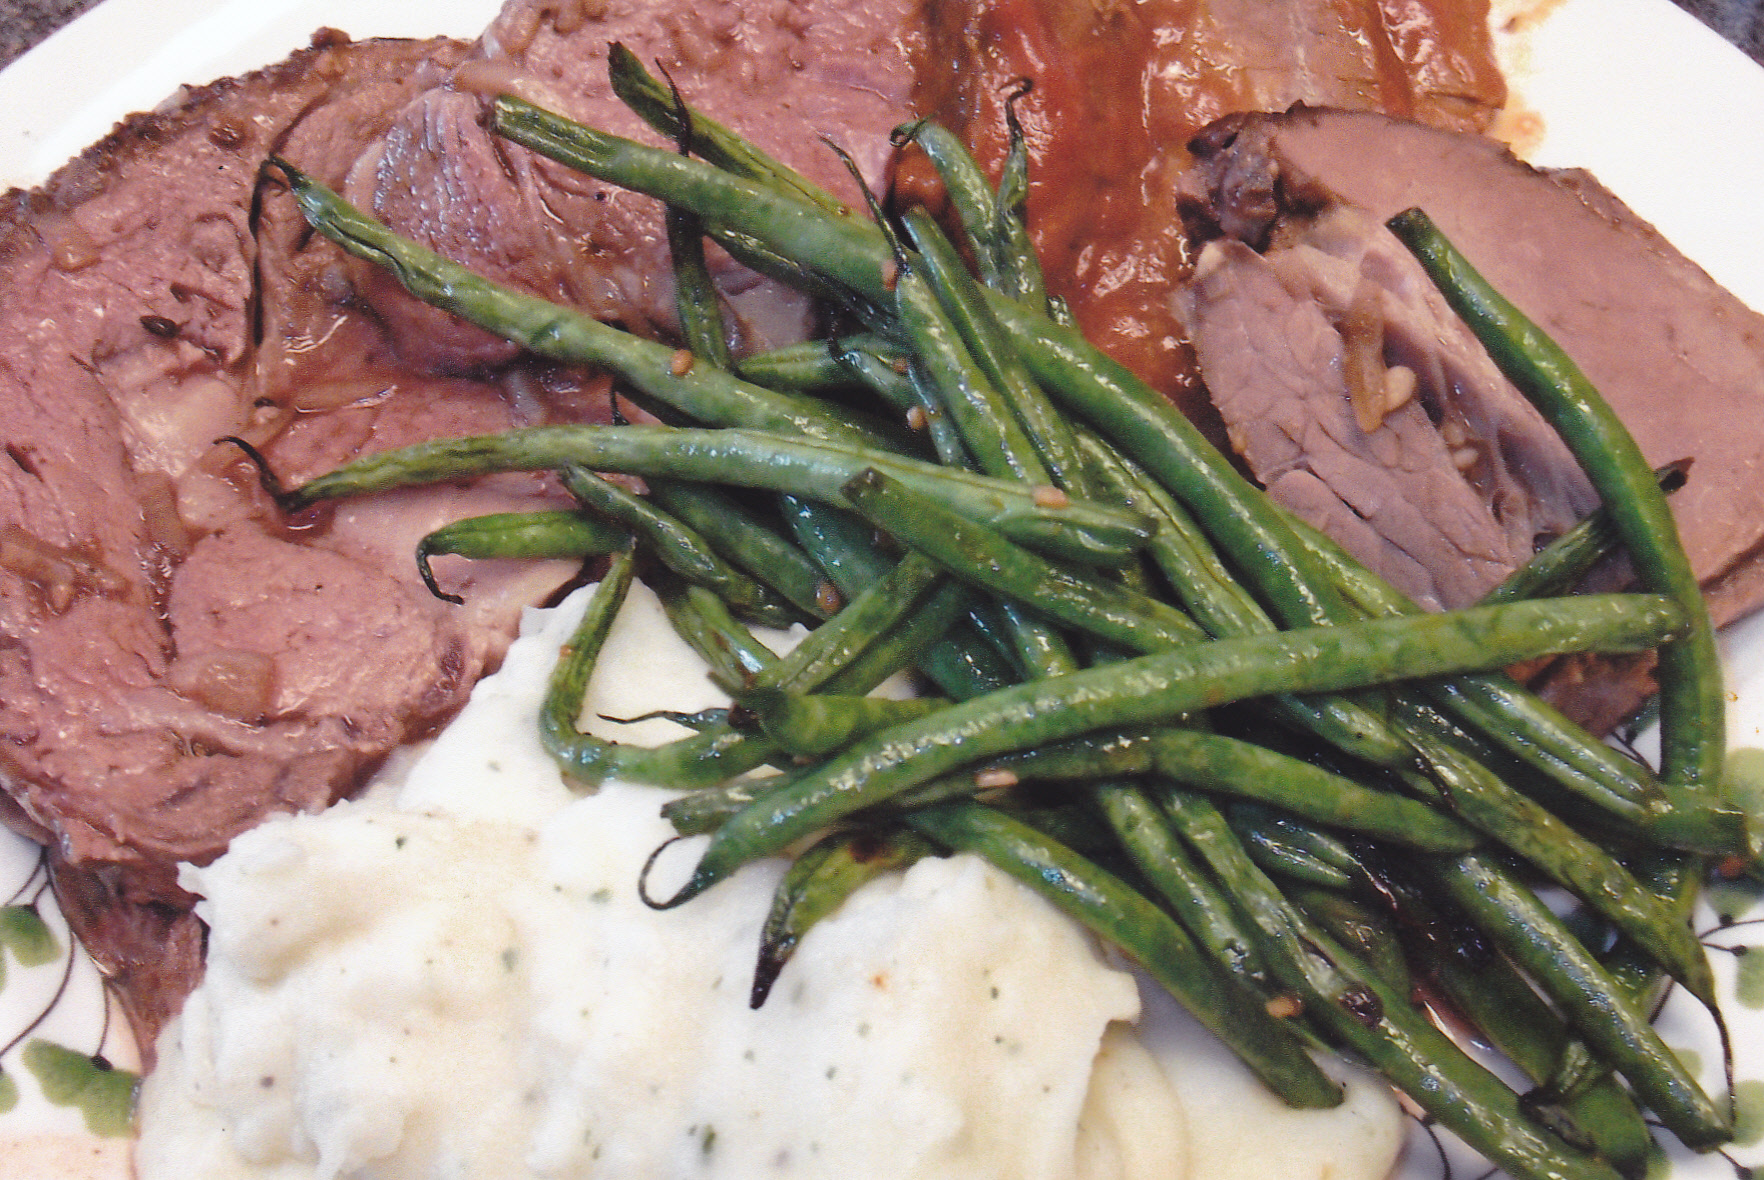
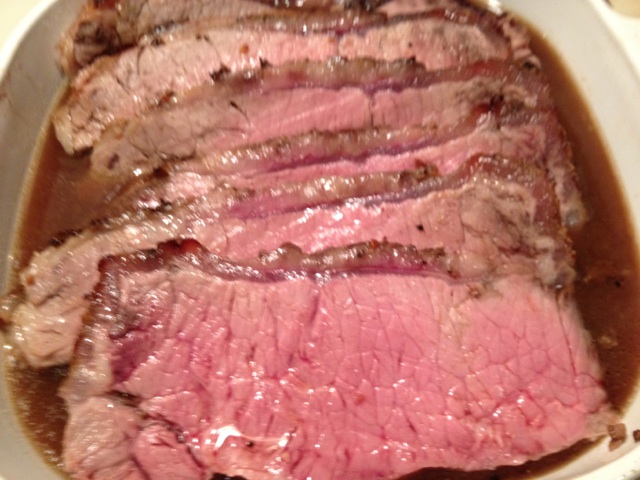
Here is my plate. I made some prime rib as well [ Prime Rib I will post next] . From the left you can see the slice of prime rib, my brisket with the Butcher sauce, slices of the brisket with the au jus, and in the center my daughter made mashed potatoes and her Asian grilled green beans [Got to get her recipe for the Asian green beans and I’ll post it].
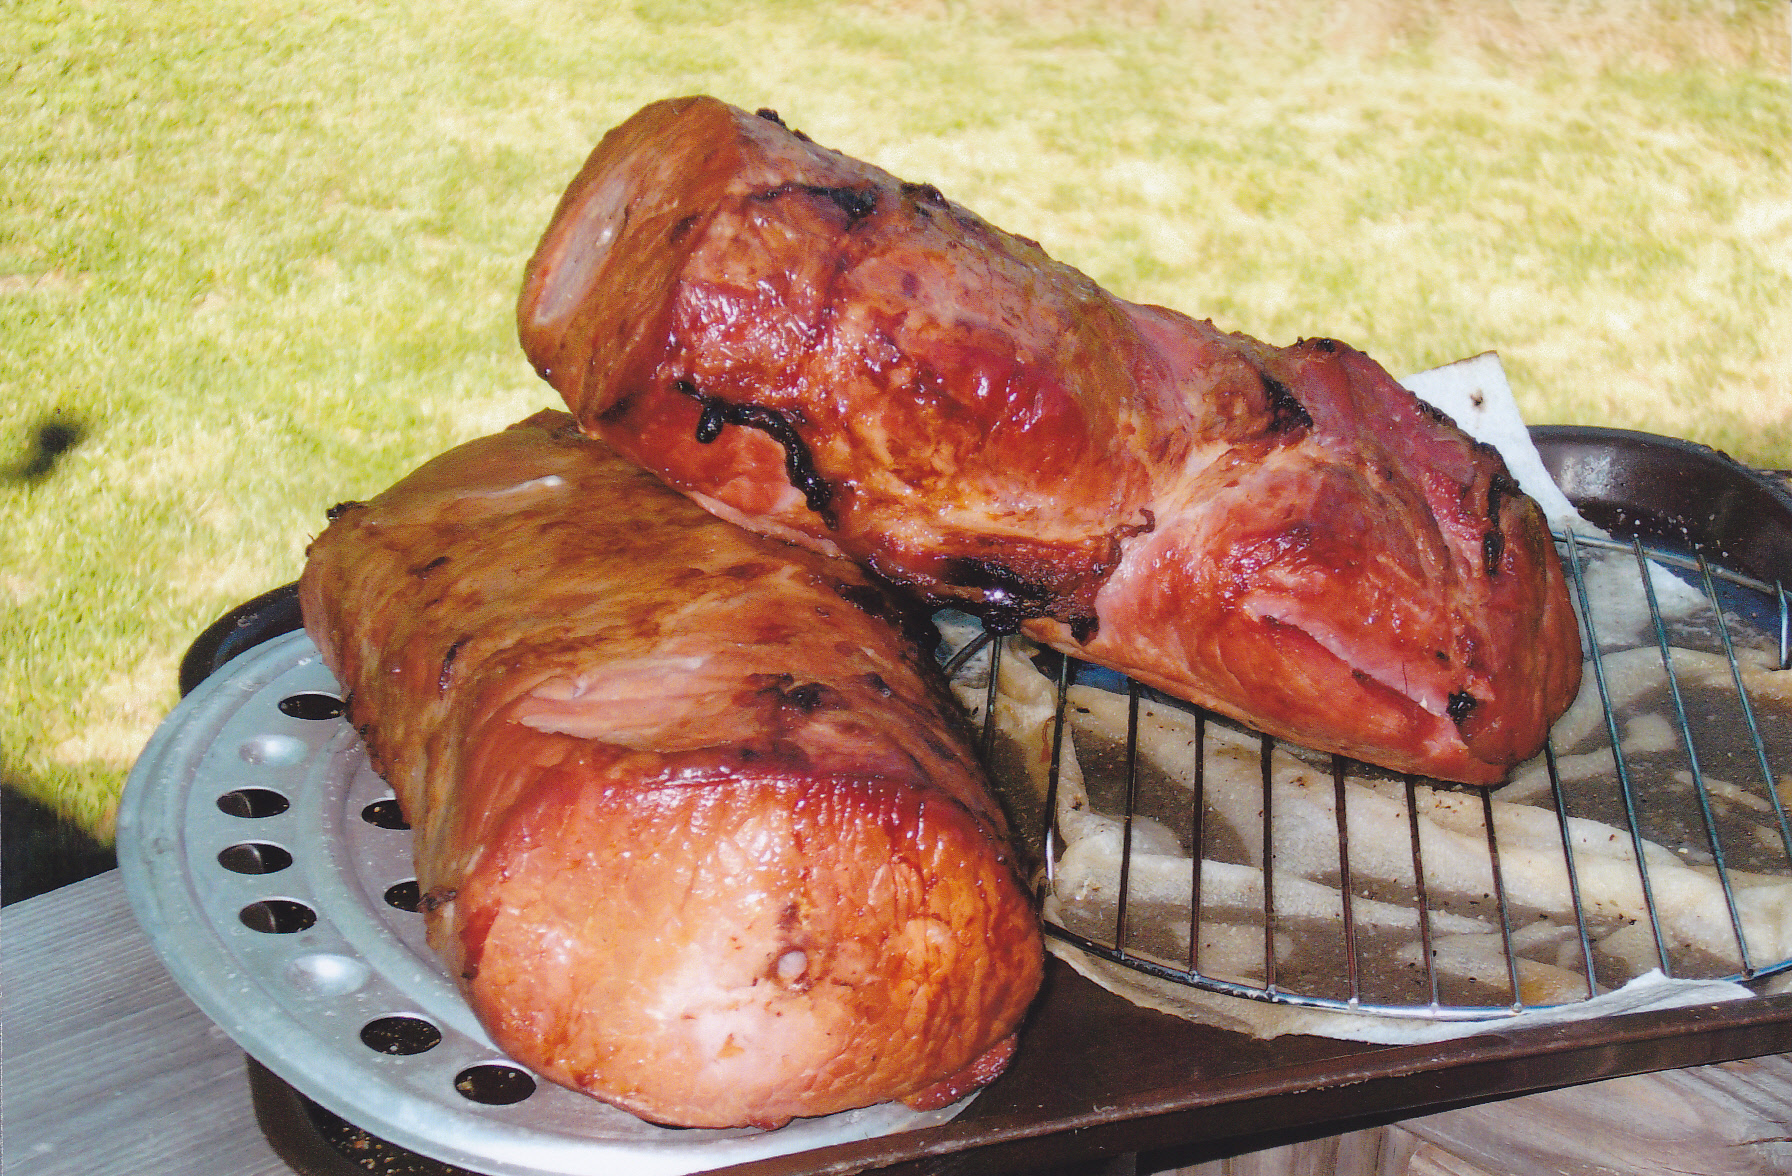
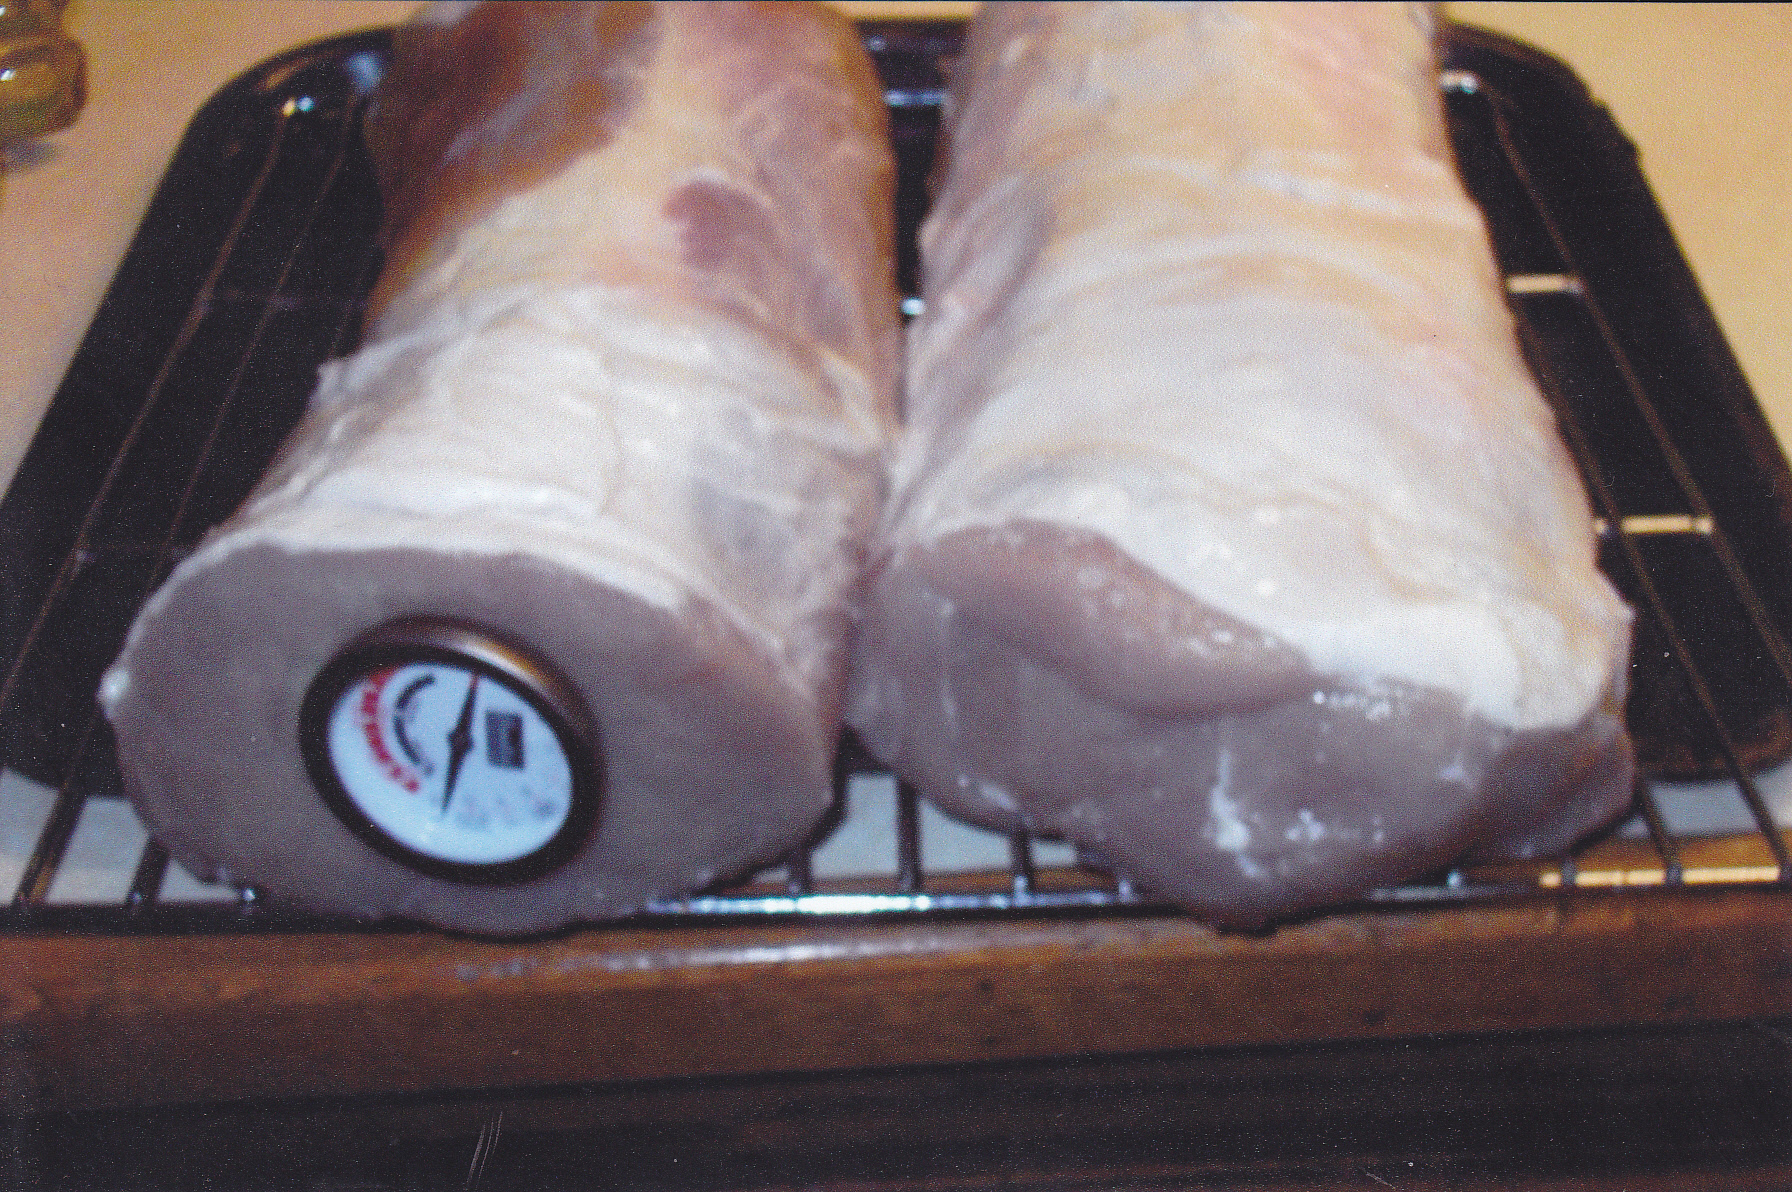
PRIME RIB ROAST
Also known as a standing rib roast or bone-in rib roast. This cut of beef is one of the tastiest cuts of beef you can buy. It’s also one of the more expensive cuts as well. The two 5 pound rib roasts I’m going to show here I bought on mark-downs after a Christmas sale. It is after sales of these fine cuts of beef, that I lurk in the meat department to see if the store ordered too many and have to mark some down. I’m aware of this because I was a meat cutter for over 35 years and during my working days, I have marked down many rib roasts.
Rib roasts are often bone’d out for boneless rib eye steaks or cut straight through for bone-in rib steaks. All of these can make for tender tasty items to prepare on your grill. As tender as these cuts can be, they can also be messed up if not done right. For this post, we will stick to the rib roast and how I have made them turn out medium rare every time.
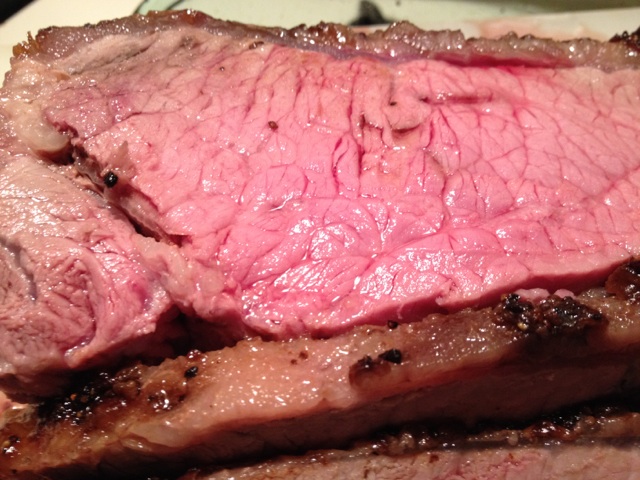
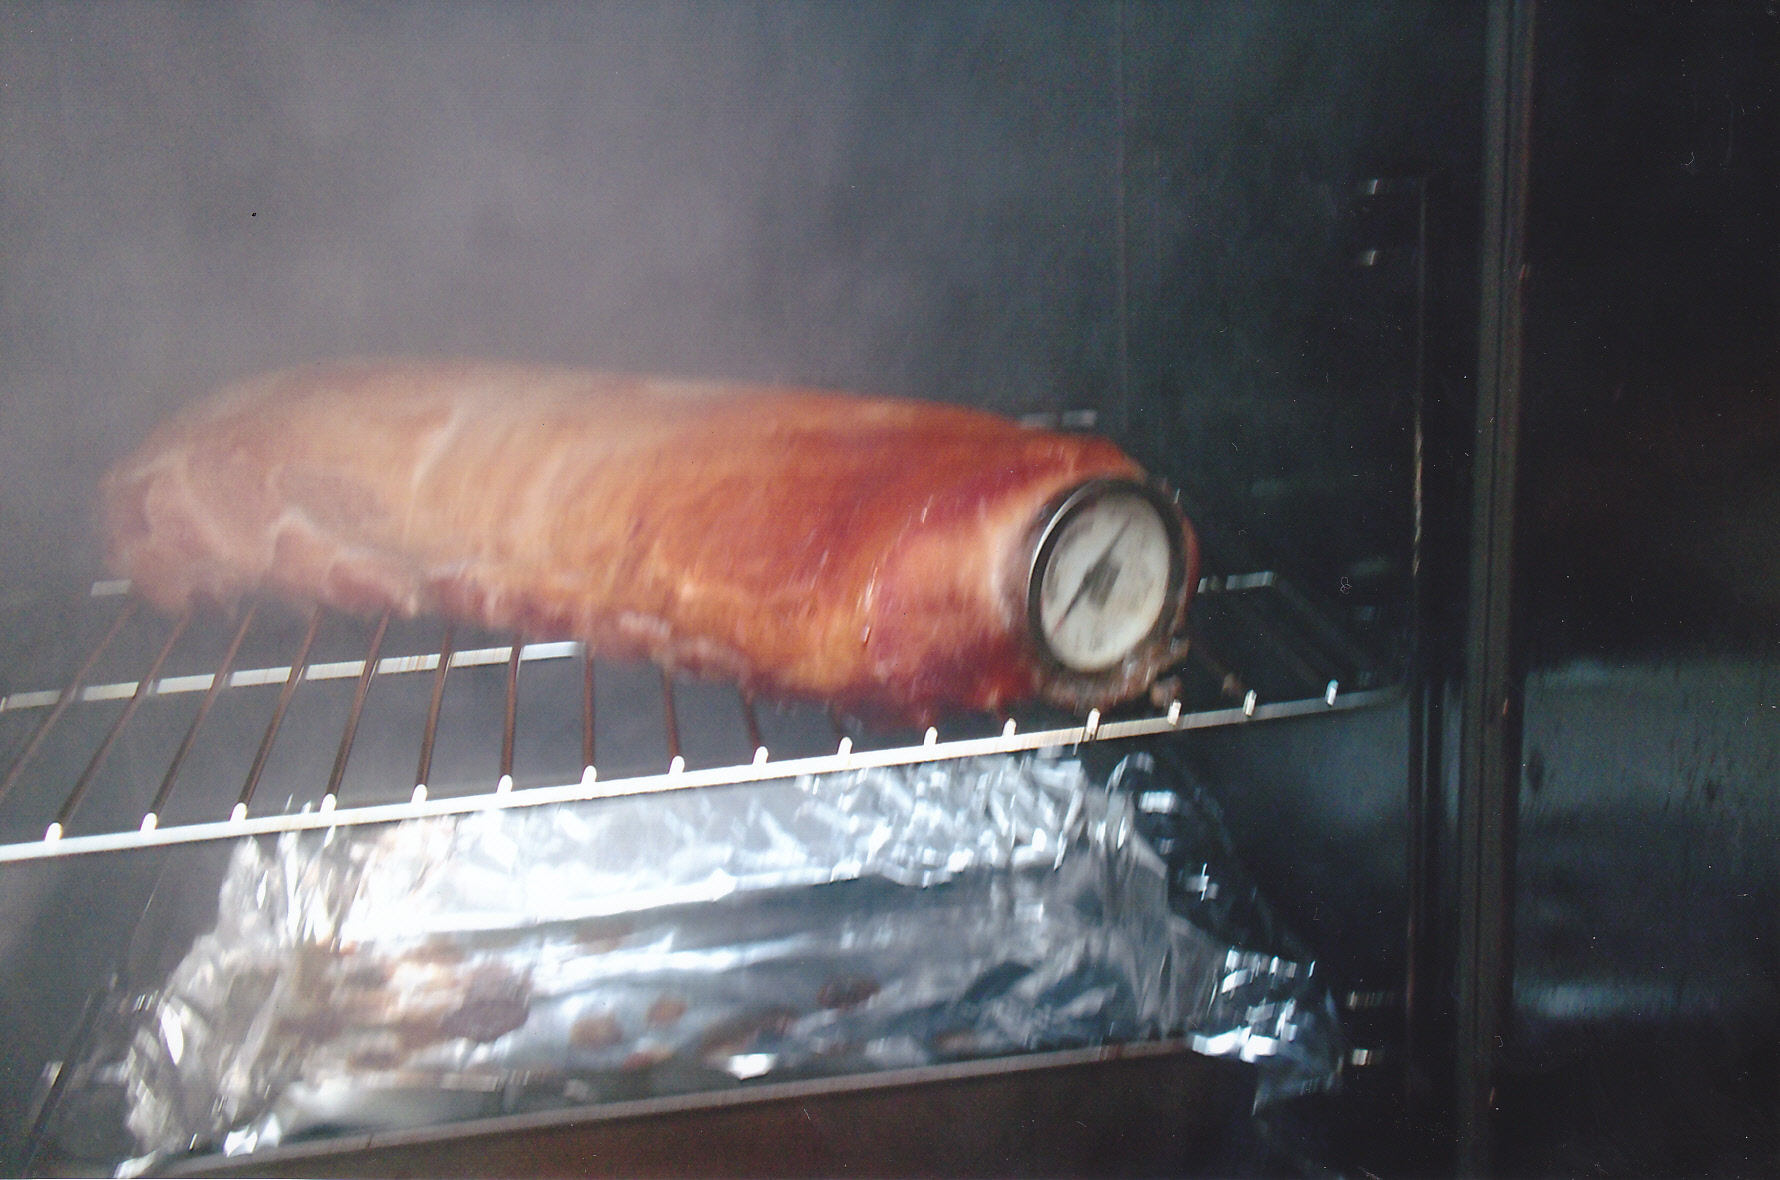
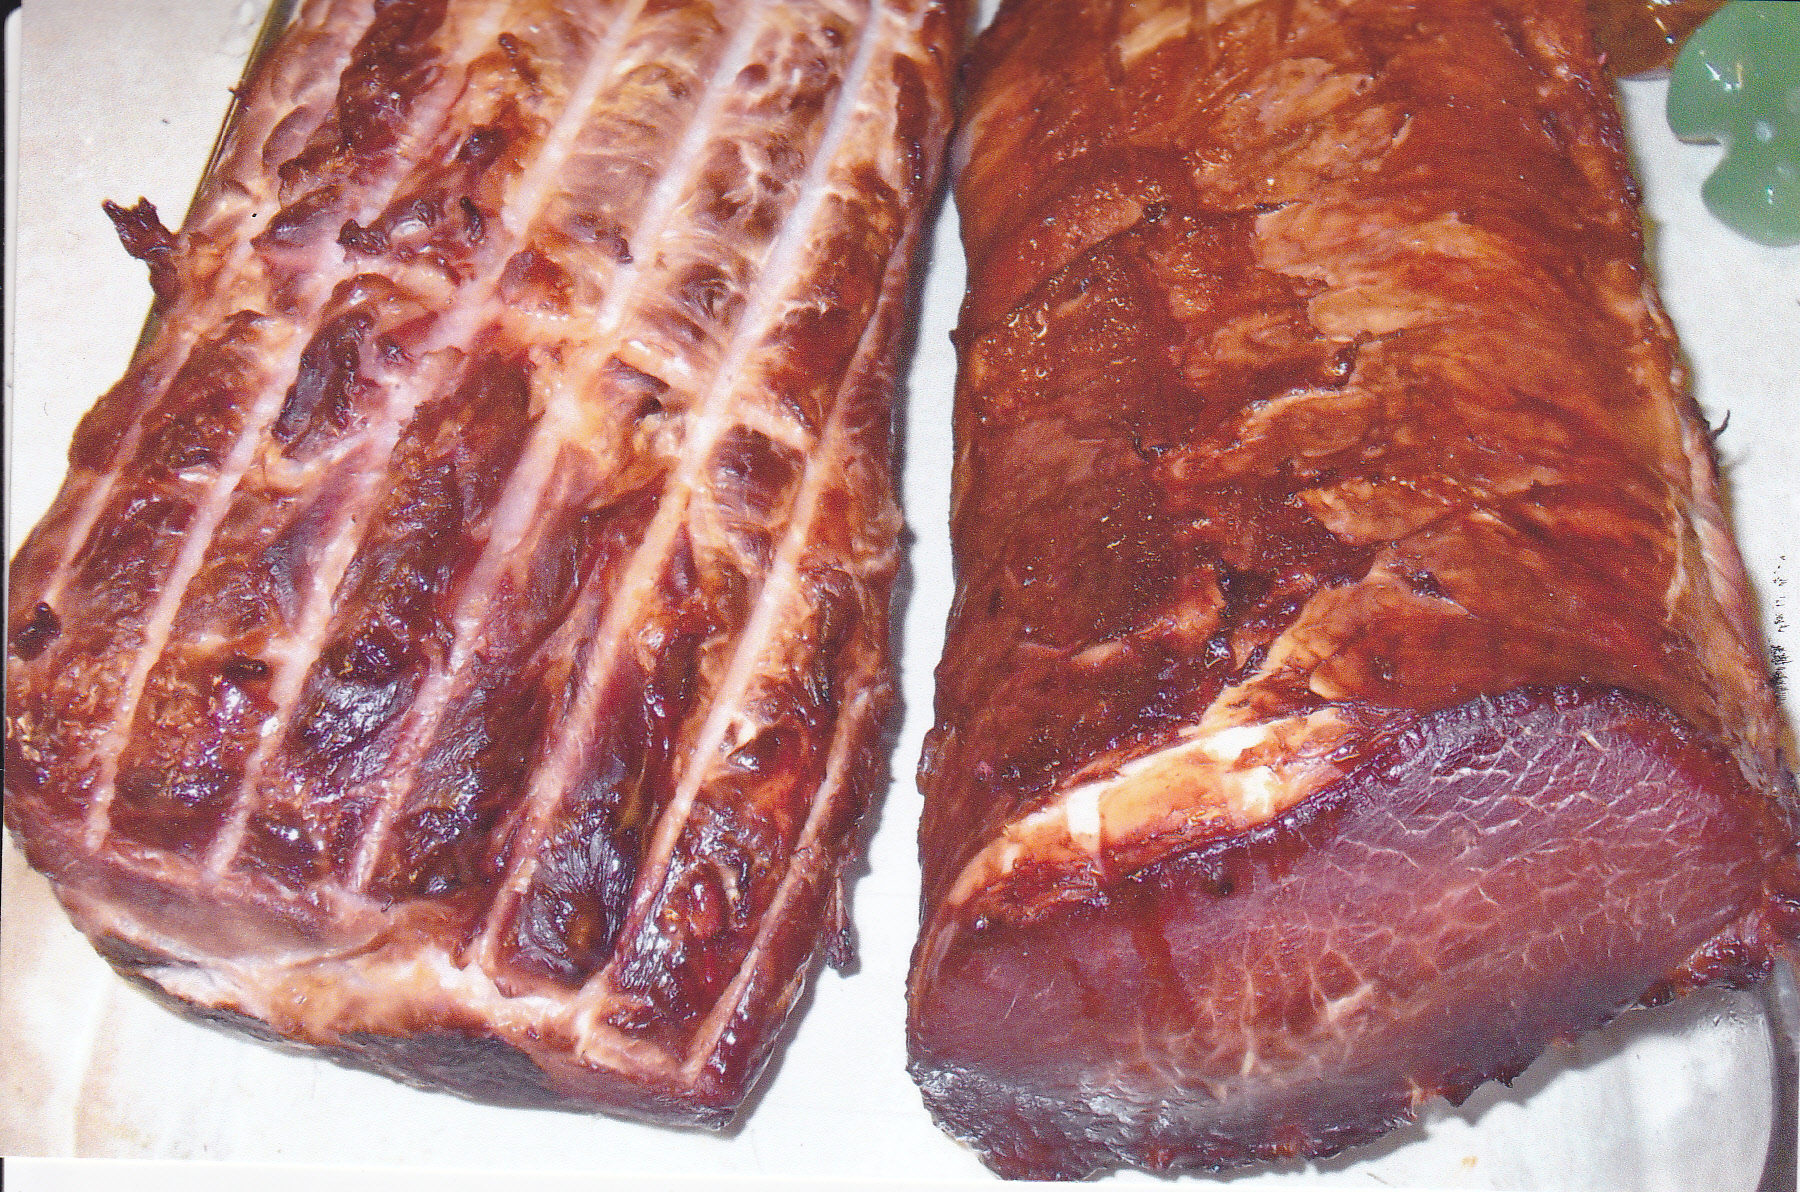
Before I got my smoker, the grill and the oven were the places the rib roast would go. The oven still play’s a major role in preparation for me. To start the process, I smear mustard all over the roast. This acts as a glue to hold the rub that I will put on right after I finished with the mustard. After the rub is put on, I insert a meat thermometer in the center of the roast. The oven will be pre-heated to 450 deg. Then I put the rib roast in the oven to “sear” the outside of the roast to hold in the juices. If you continue the roasting in the oven, just turn the oven down to 225 deg at this point, after one hour. Let the roast stay in the oven until the internal temp is 130 deg and then take the roast out. Put the roast on the kitchen counter and cover with foil for 15 minutes or so. Make your au jus at this point or have it ready to go nice and warm.
After 15 to 20 minute rest, take the beef back ribs off the roast. These can be sauced and eaten as BBQ ribs. Then slice the roast and put the slices right in the au jus to maintain the moisture of the meat and tenderness. This time around I used Lipton beefy onion soup mix for au jus. Just make the soup mix as it states on the direction of the package. This method will give you medium rare prime rib every time.
If your going to finish the rib roast off on the grill or smoker, you still have to use the oven for the first hour at 425 deg unless you have a grill that can reach that temp and then lower the heat to 225 deg until the internal temp is 130 deg. A smoker is for lower temps and really is my favorite tool to finish off my rib roast. With a smoker I also use the oven first, and then set my smokers temp to 225 and add some love from apple, oak, or cherry chips. Here are some pics from some rib roasts I have done recently—–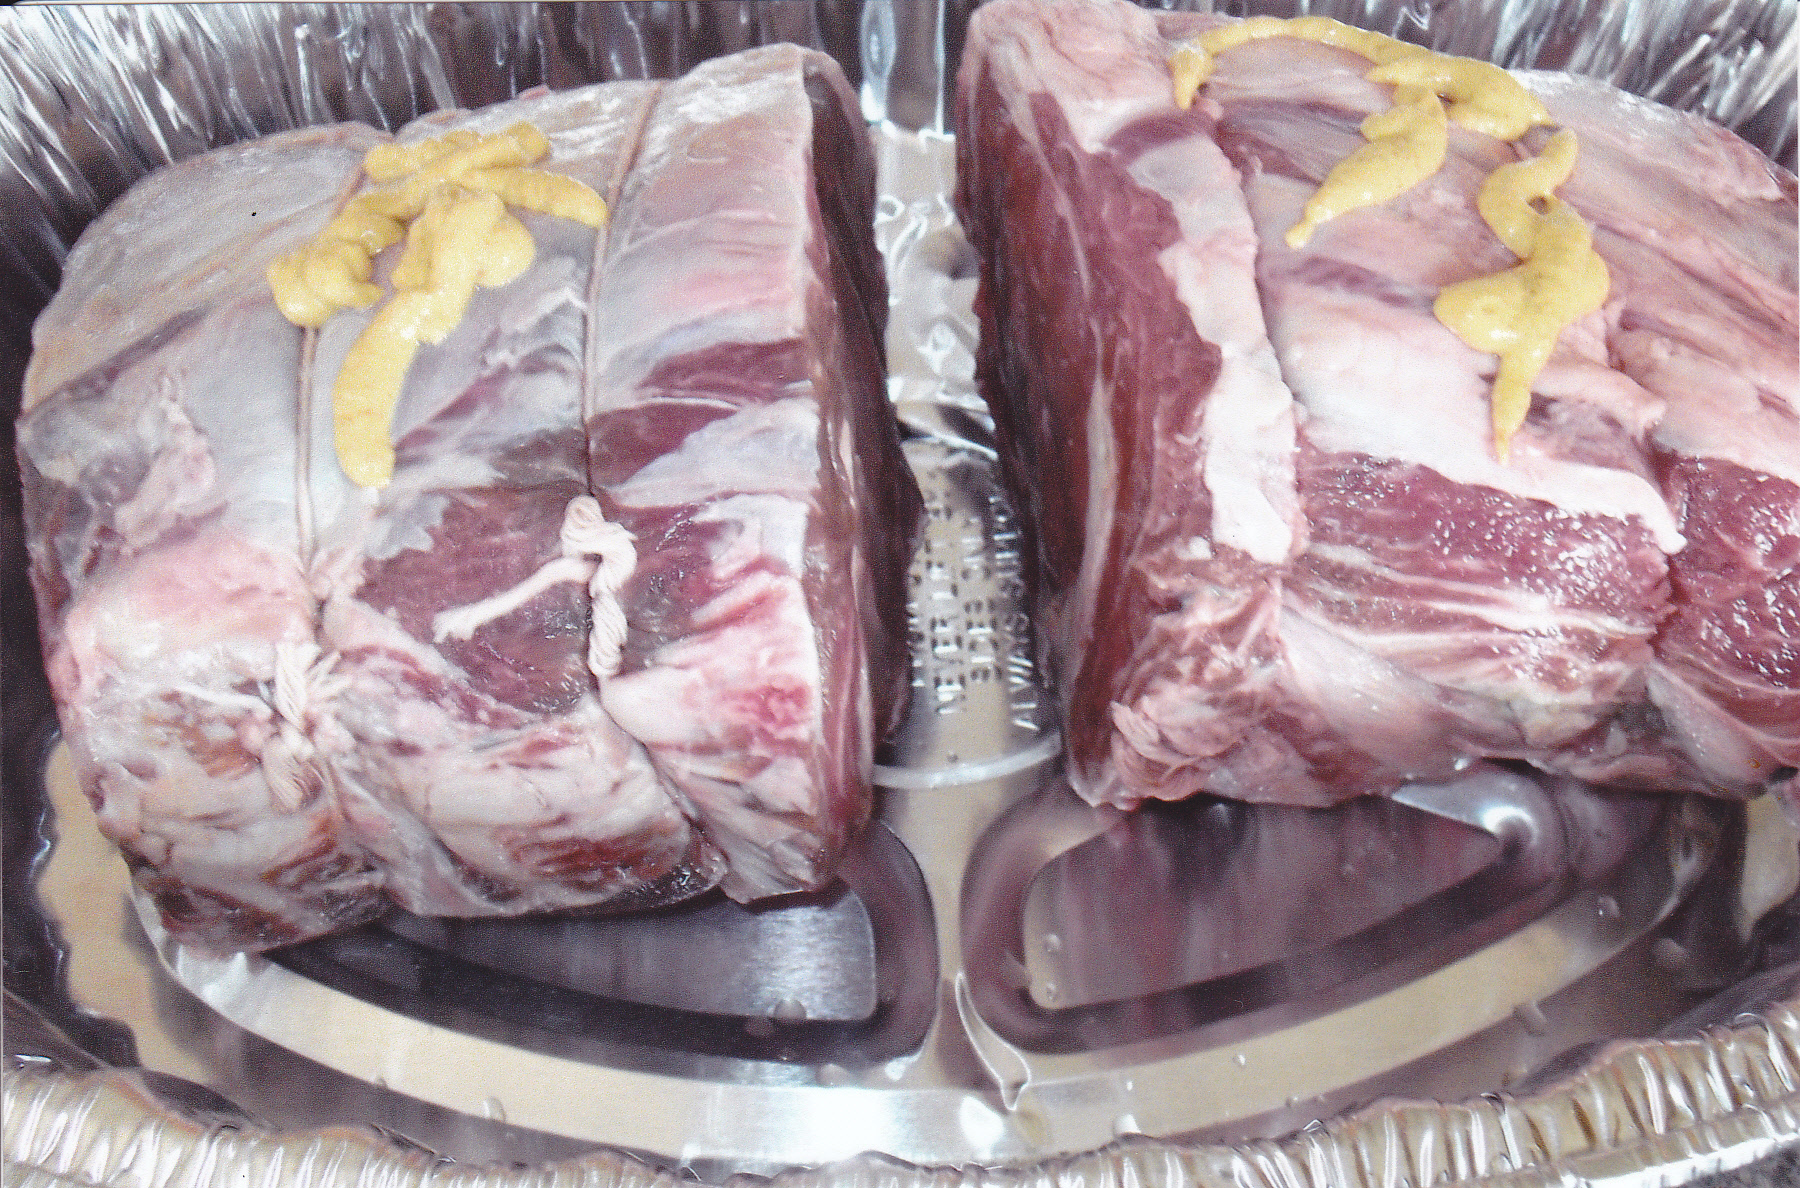
Squirted some mustard on each 5 pound rib roast and will smear that all over these two beauties. Then apply my rub [or your favorite rub] and place the roasts in the oven which is heated to 450 deg. for one hour.
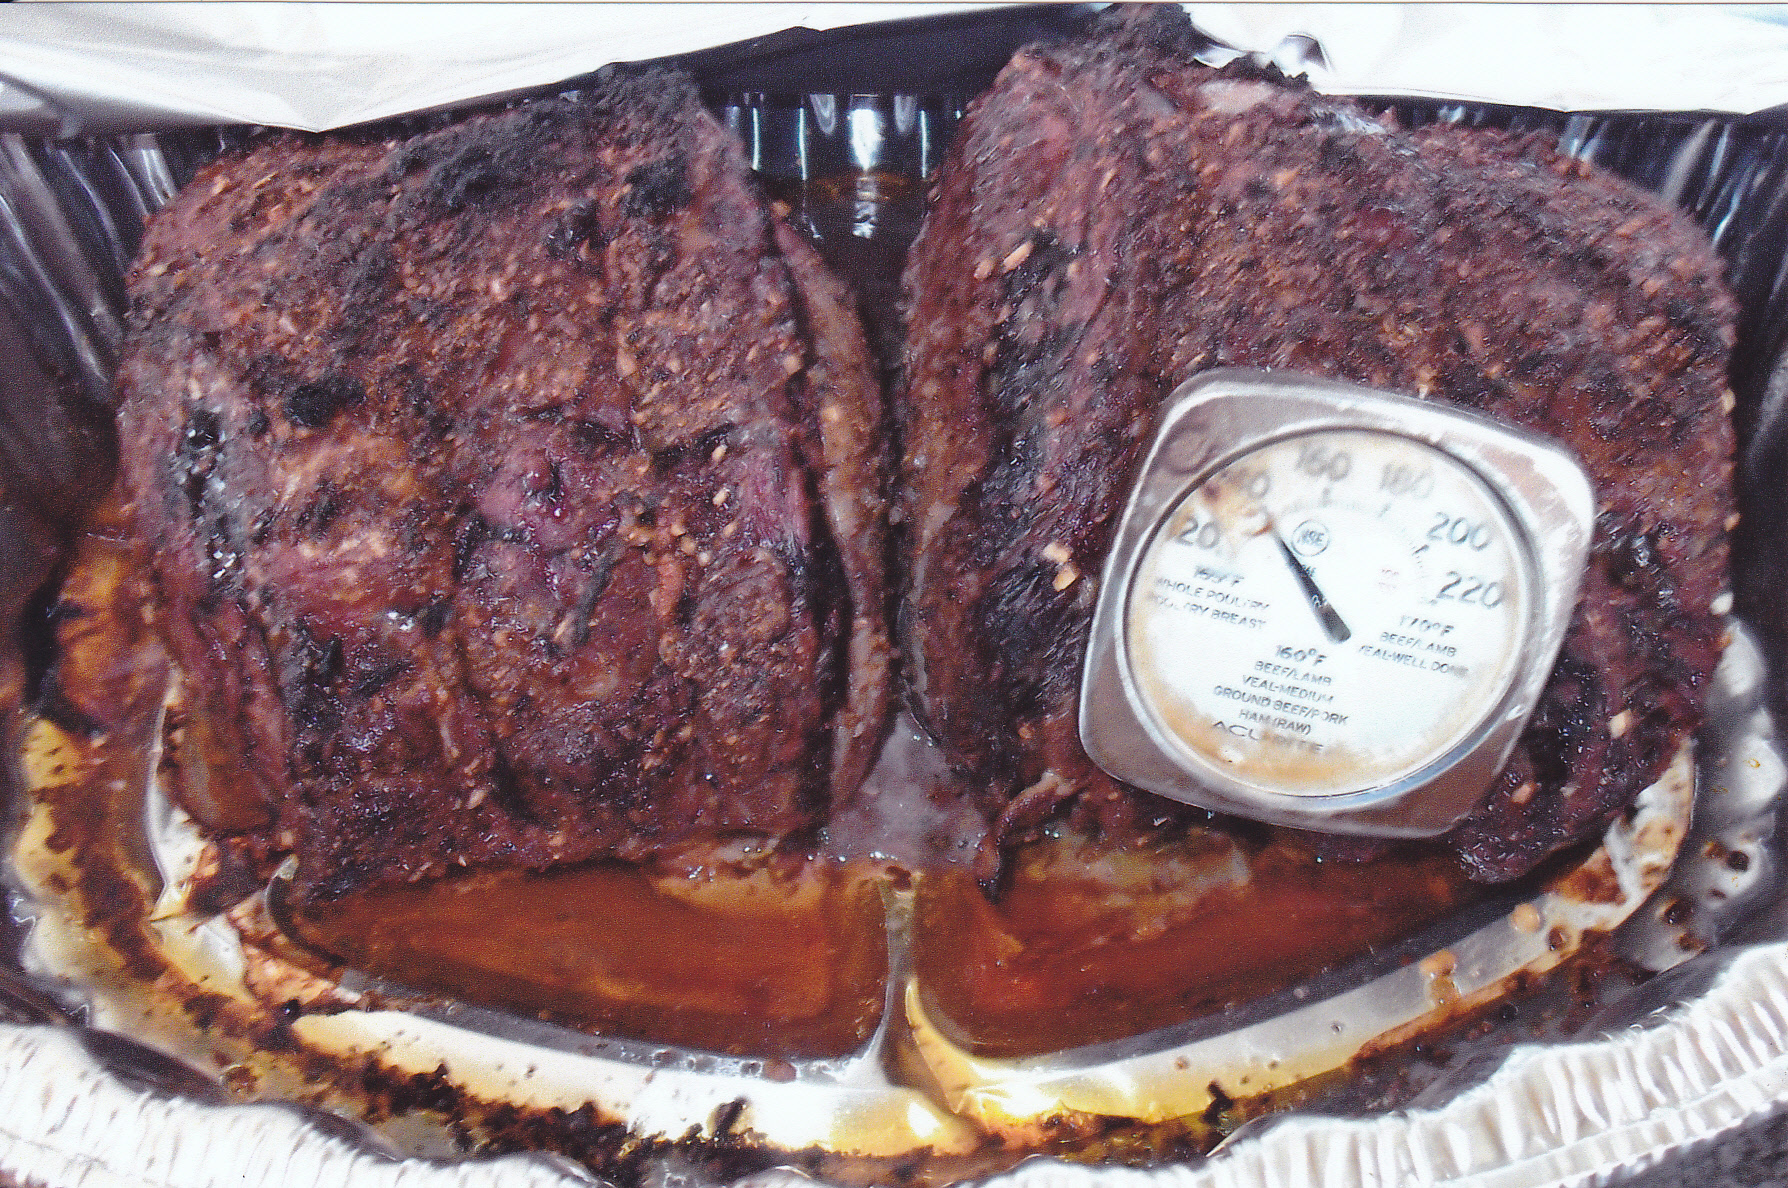
I took the roasts out of the oven after an hour and put them in the smoker that was set at 225. I added about an hour’s worth of apple chip smoke to the meat. After the roast’s internal temp reached 130 deg. I took the roasts out of the smoker and brought them inside to let them rest under foil for around 15 or 20 minutes. Remember the meat still keeps cooking for a little while so it’s importand not to let them rest too long if you want medium rare. The internal temp as you can see is 140 deg after the rest so now I’m going to slice them.
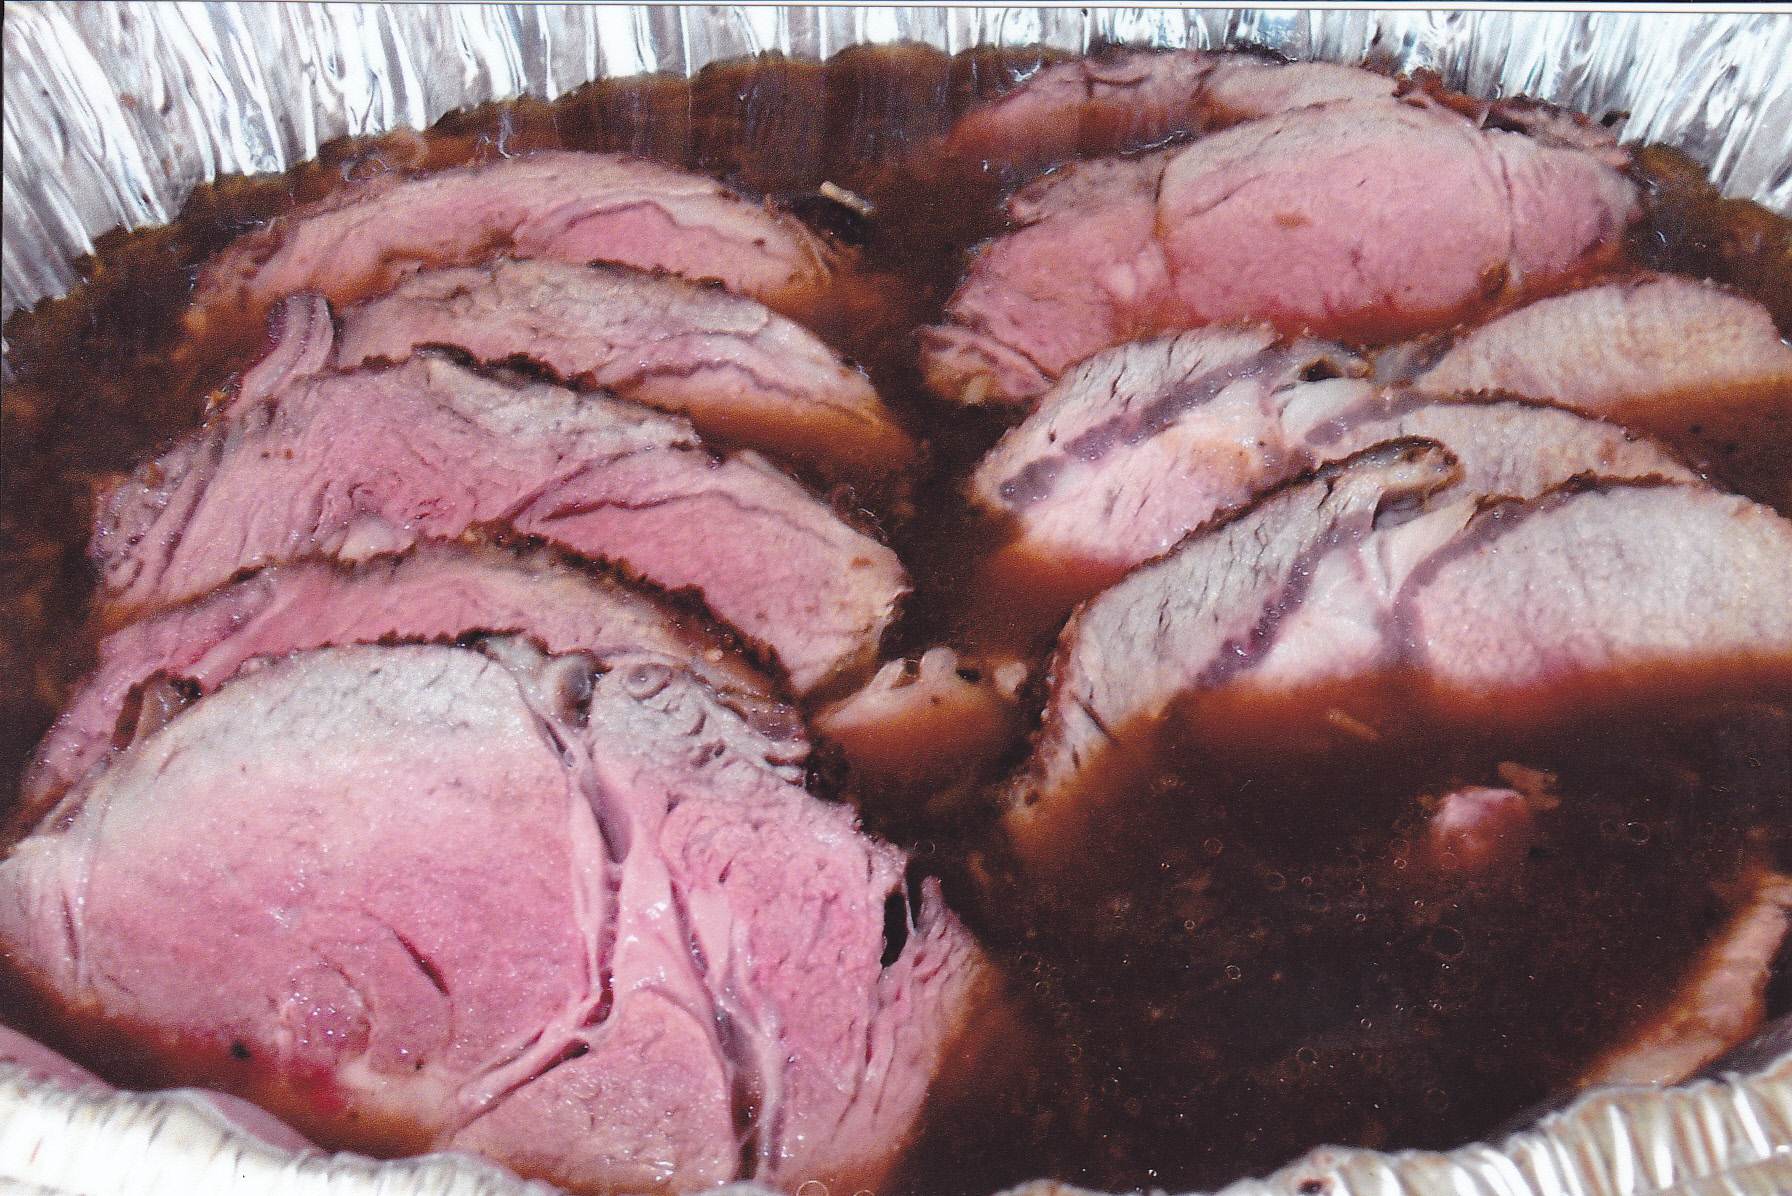

This is what I like to see after slicing. Some smoke ring around the edges and that nice color which spells excellent flavor and tenderness, as they soak up additional moisture and flavor in the au jus.
KOREAN MARINADE
I use this marinade for Chicken, Beef, and Pork. This really is a flavorful marinade that will bring your meat to the next level. Very simple to make.
1 cup of soy sauce
1/2 cup of sesame oil
6 large garlic cloves well minced
2 tsp sesame seeds
1/4 cup of chopped green onions
1/4 cup sugar
1/2 tsp white vinegar
1/2 tsp dry mustard
1/2 tsp ground pepper
I like to process all this in a blender. Keep in a glass container, well covered, in the refrigerator. Use over chicken, beef, or pork for grilling or smoking. You can use this as a marinade. Put the meat in a zip lock plastic bag and pour this over the meat and keep the meat in the fridge overnight for grilling or smoking the next day.
THAI STYLE MARINADE
Now this one, is one I just started to use alongside of the Korean marinade. Wanted one with a little heat to go with the great taste of the Korean marinade. You can use the 8 serrano peppers with the seeds or use a lesser amount or go without the seeds depending on your tastes. I started out with the 8 with the seeds and I make one batch without t he seeds for my wife. Here is what you need—
6 cloves of garlic, minced
1 T of lime zest
8 serrano peppers minced including seeds
4 small green onions, green and white parts minced
1/4 cup of cilantro sprigs
2 T of finely minced ginger root
Juice from 3 limes
1/2 cup rice wine vinegar
1/4 cup fish sauce
1 cup hoisin sauce
1/4 cup honey
2 T soy sauce
2 T vegetable oil
I do put everything in a blender for a good spin or two to mix and chop everything finer. I also save some of this sauce for basting as well in the last hour of grilling or smoking time.
COCA COLA PORK RIBS
There are some of us that love ribs with a good sauce and some that love their ribs with just a great rub. This is one of the ways the rub lovers can enjoy their ribs. This can be done in the oven, on in-direct heat from the grill, and of course my favorite way with most things, the smoker. The key here is low temperatures such as 225 to 250. This method allows the moisture from the ingredients blend into the ribs to compliment the rub. This is probably one of the easiest methods of preparing ribs also. Not much prep work and very little help during the cooking process. Here is what you need:
Sweet onions to form a bed for the ribs
Coca Cola–In this recipe I uses regular coke [not diet] Regular Cherry Coke is also great for this.
Garlic. I use diced garlic that comes in jars. In this recipe I used about 6 tsp. in each pan spread out as you will see in the pics.
2 slabs of baby back ribs-I cut each slab in half to fit the throw-away aluminum pans.
I used my rub [which I have in this page] or you can use your favorite rub.
Here are some pictures of how I made these ribs—
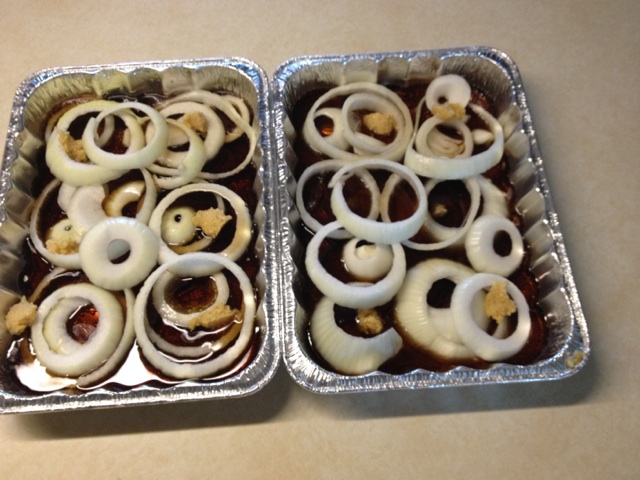
Here you can see that I cut up some onions in rings. They make for a better bed than chopping the onions all up. Added the garlic.Then I poured enough coke to fill about 1/3 of the pan.
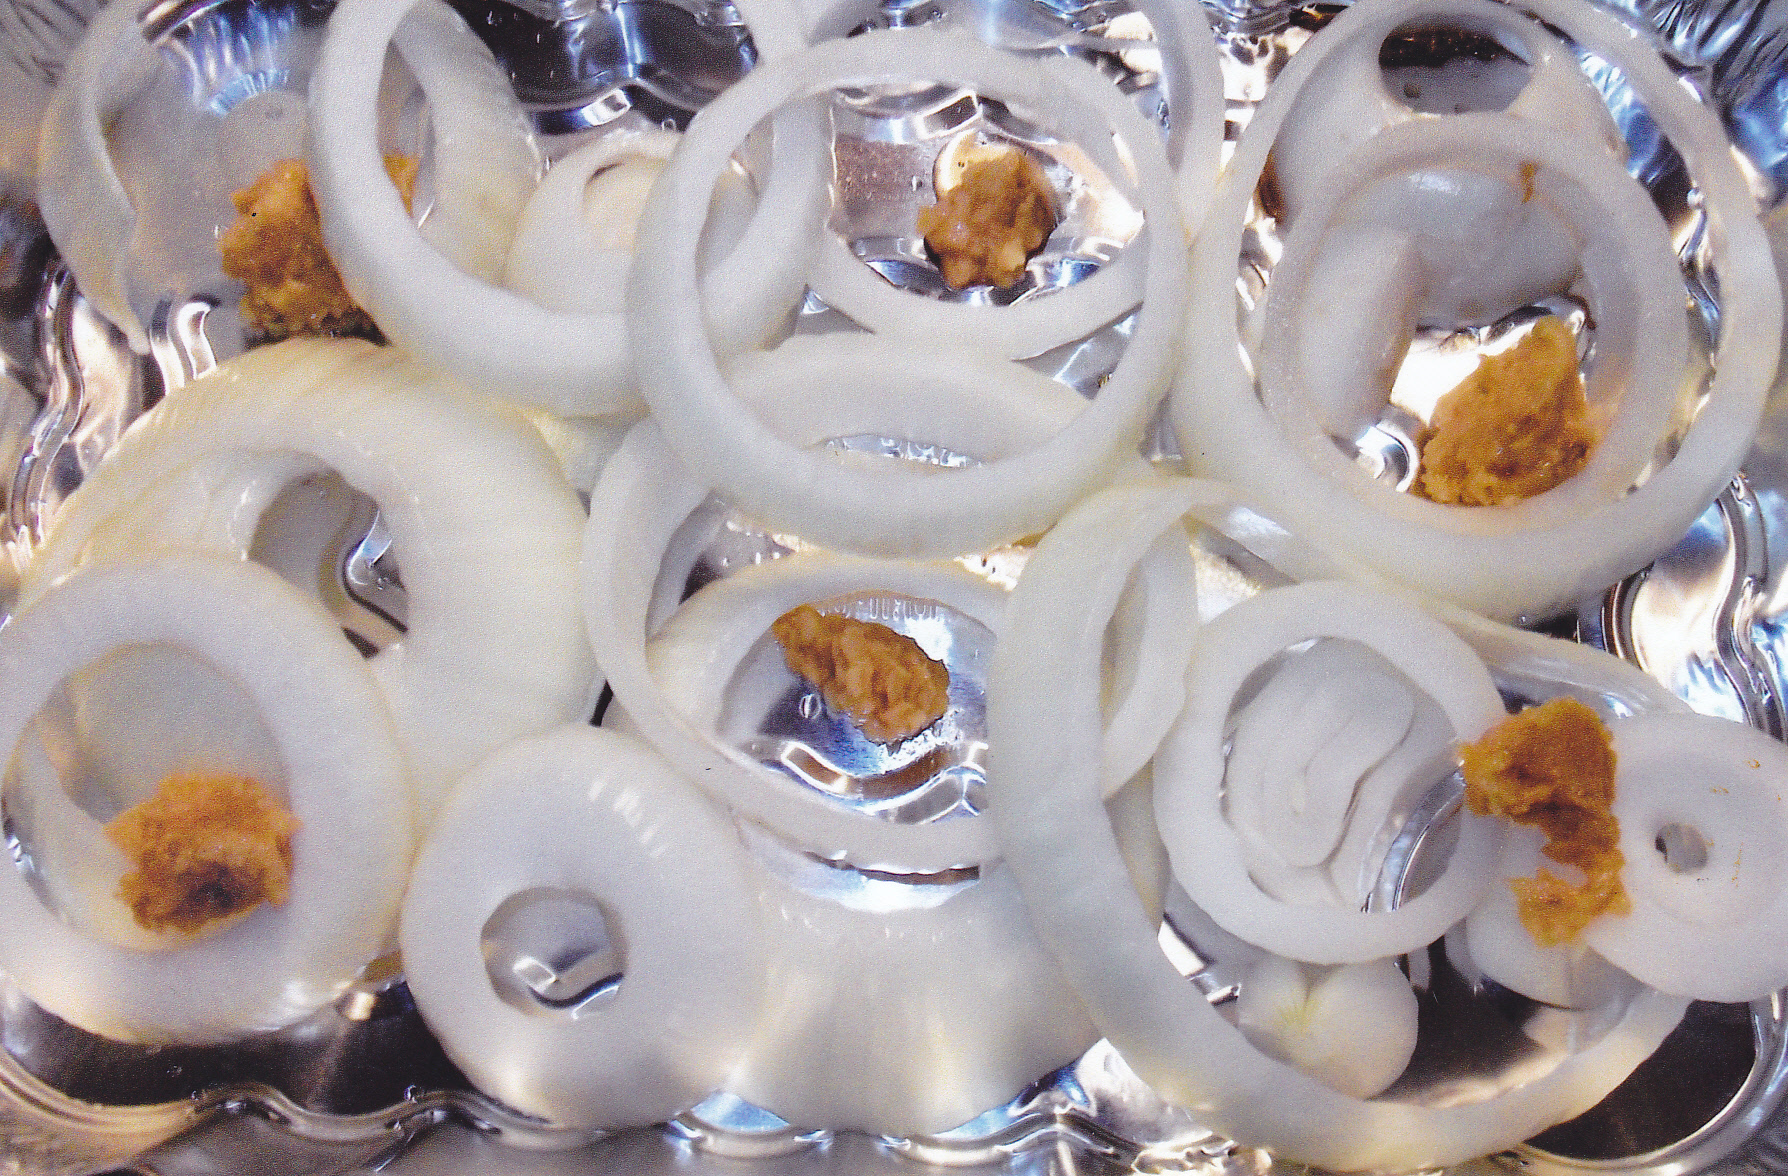
Here you can see the tsp size gobs of garlic I put in the aluminum pan. They will blend into the onions and coke for a great flavor.
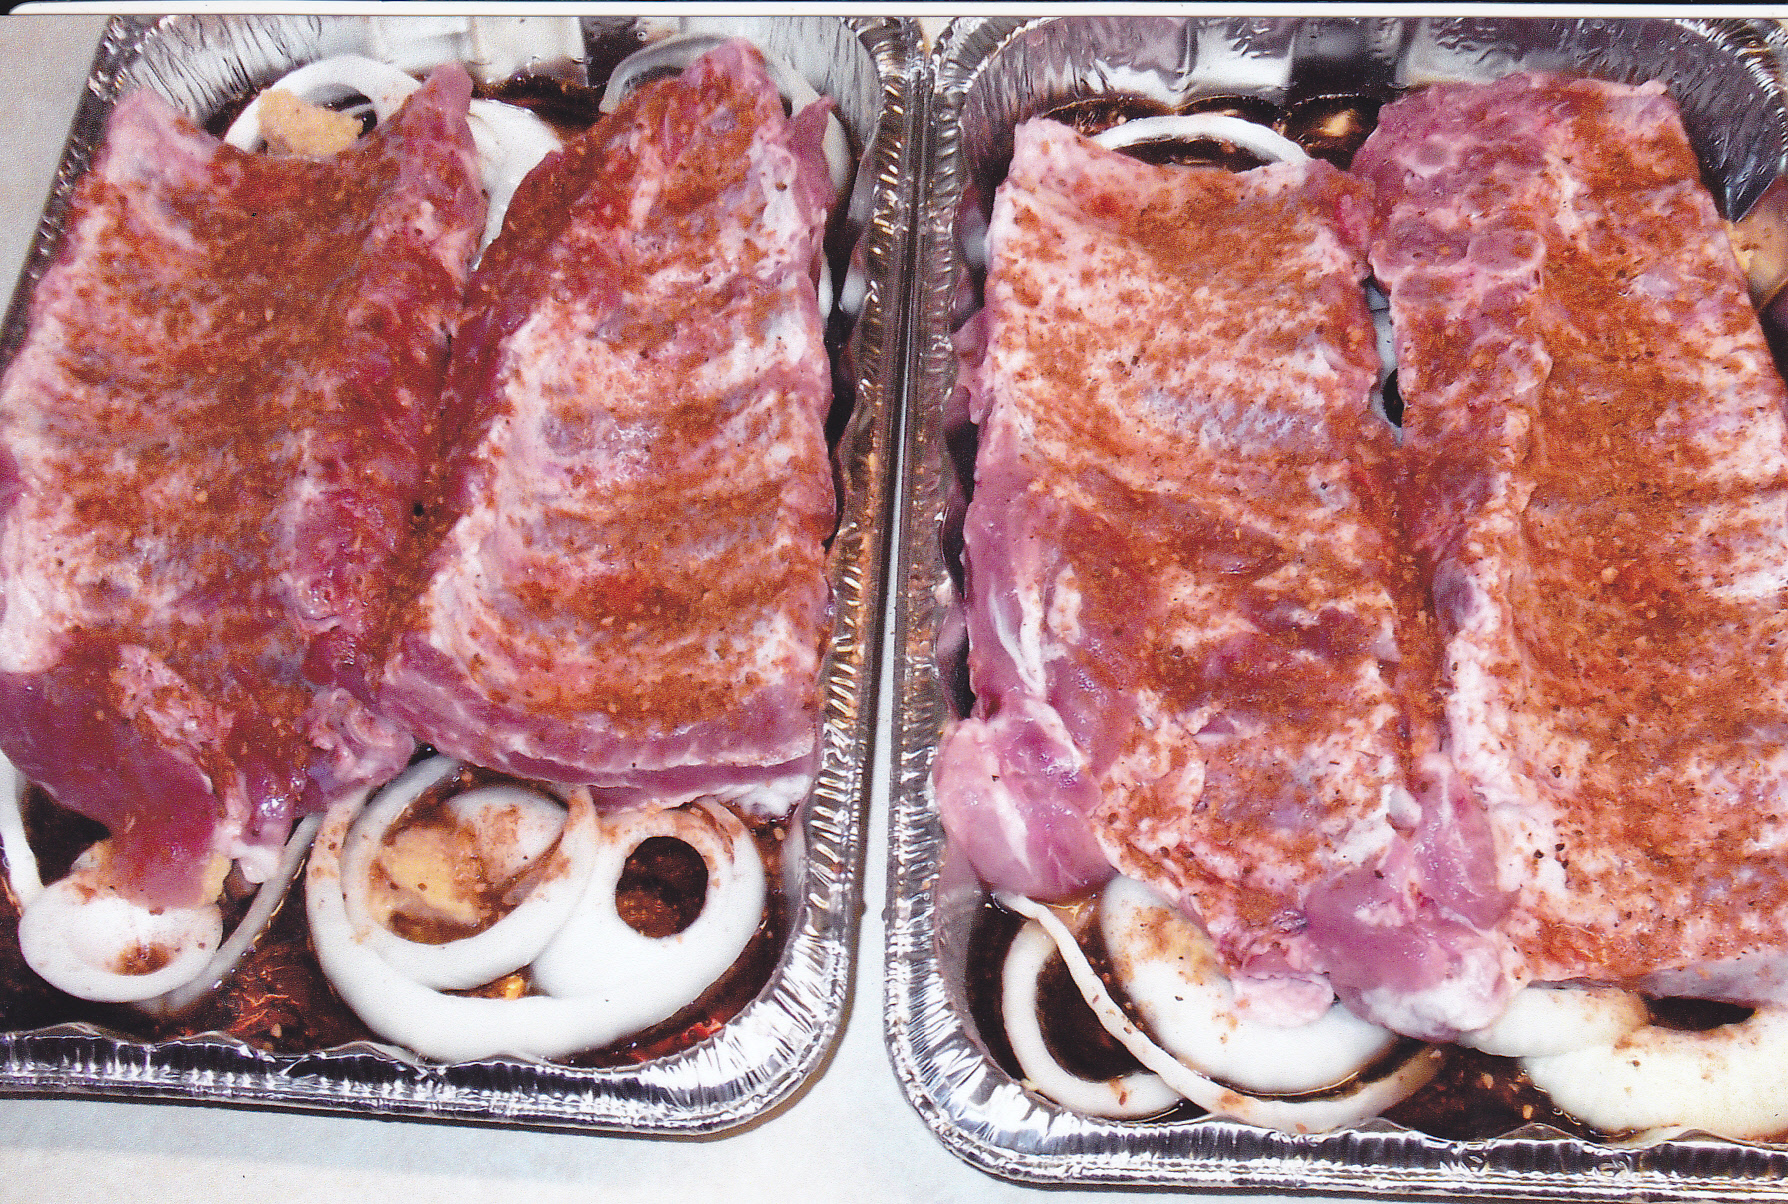
OK, so the onions, garlic, and coke are in the pan. I took each slab of back rib and cut them in half to fit in the aluminum pan. Put them rib side up and put my rub on them.
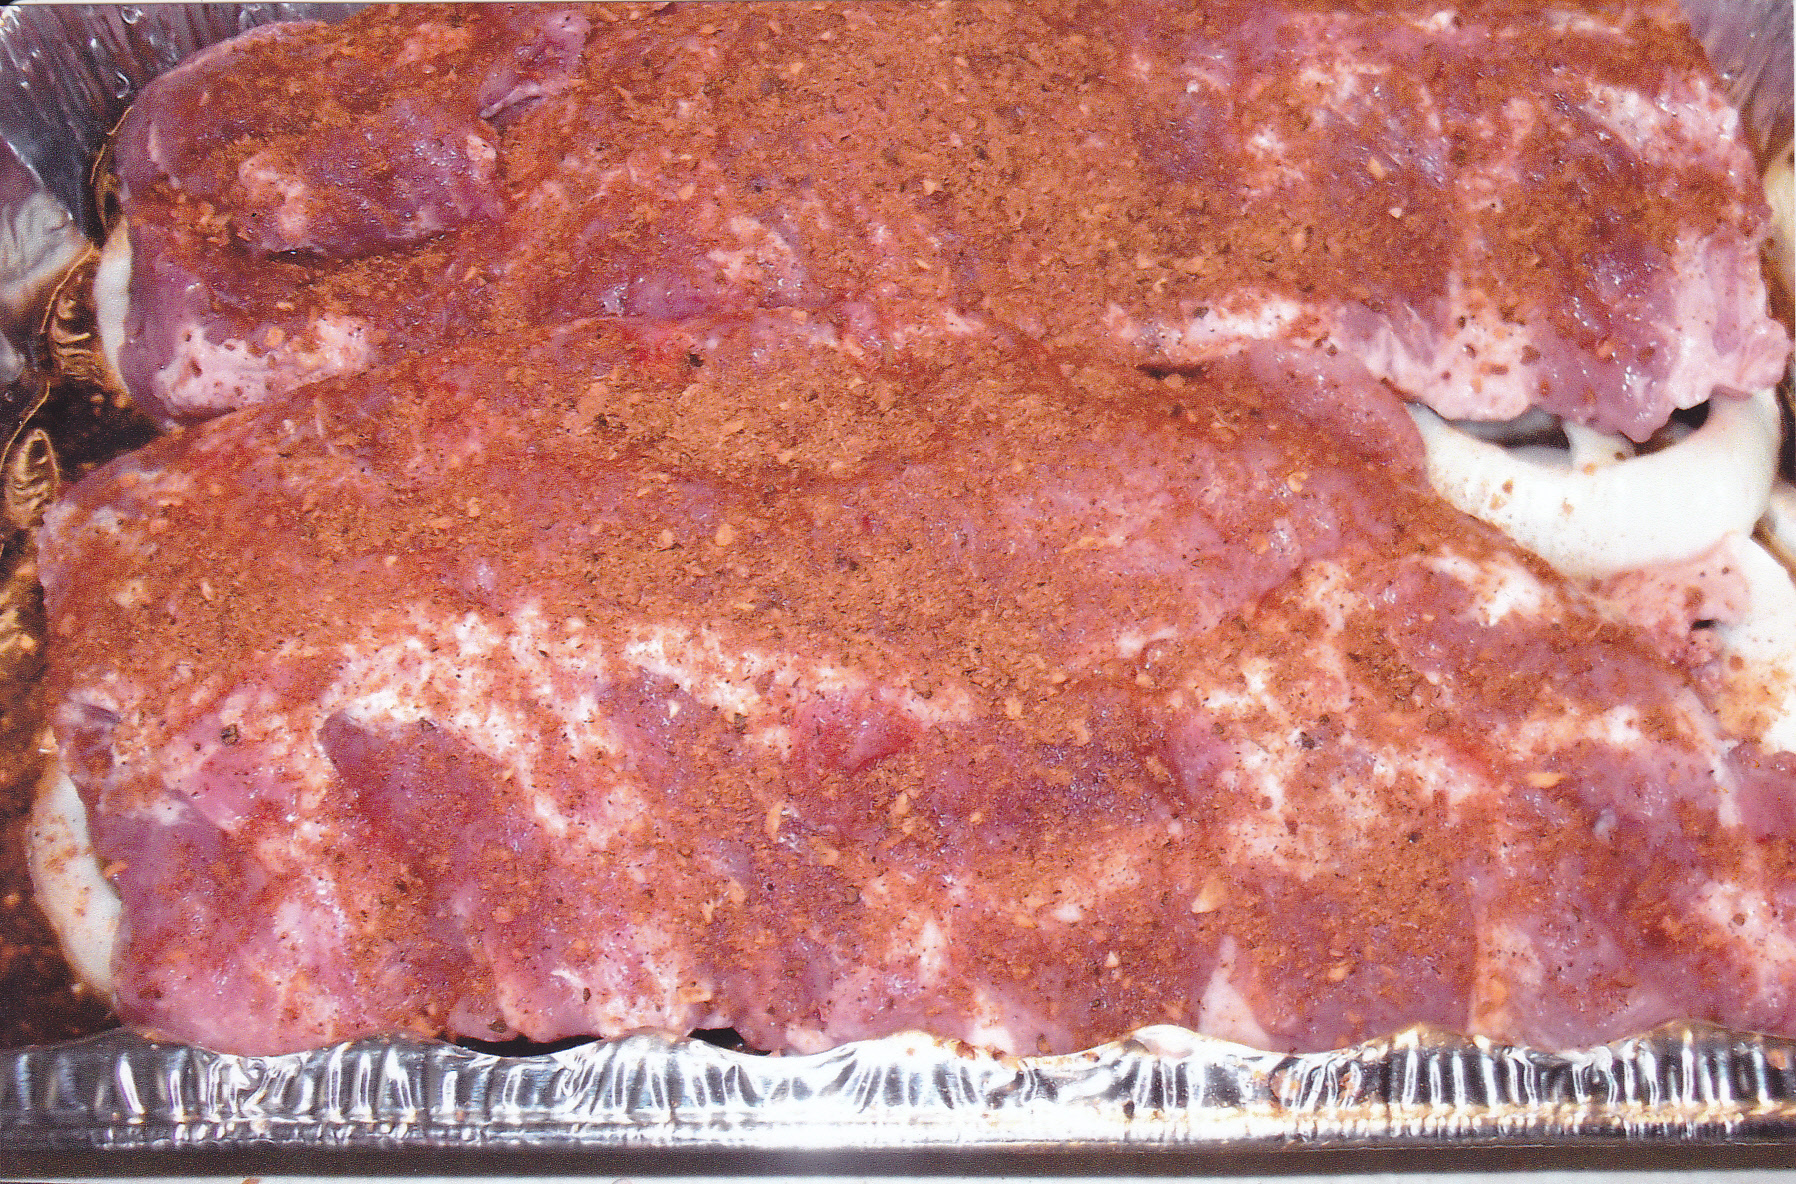
Then I turn them over to the meat side and that’s how they will stay during the entire cooking process. Sprinkle a good amount of my rub on them also.
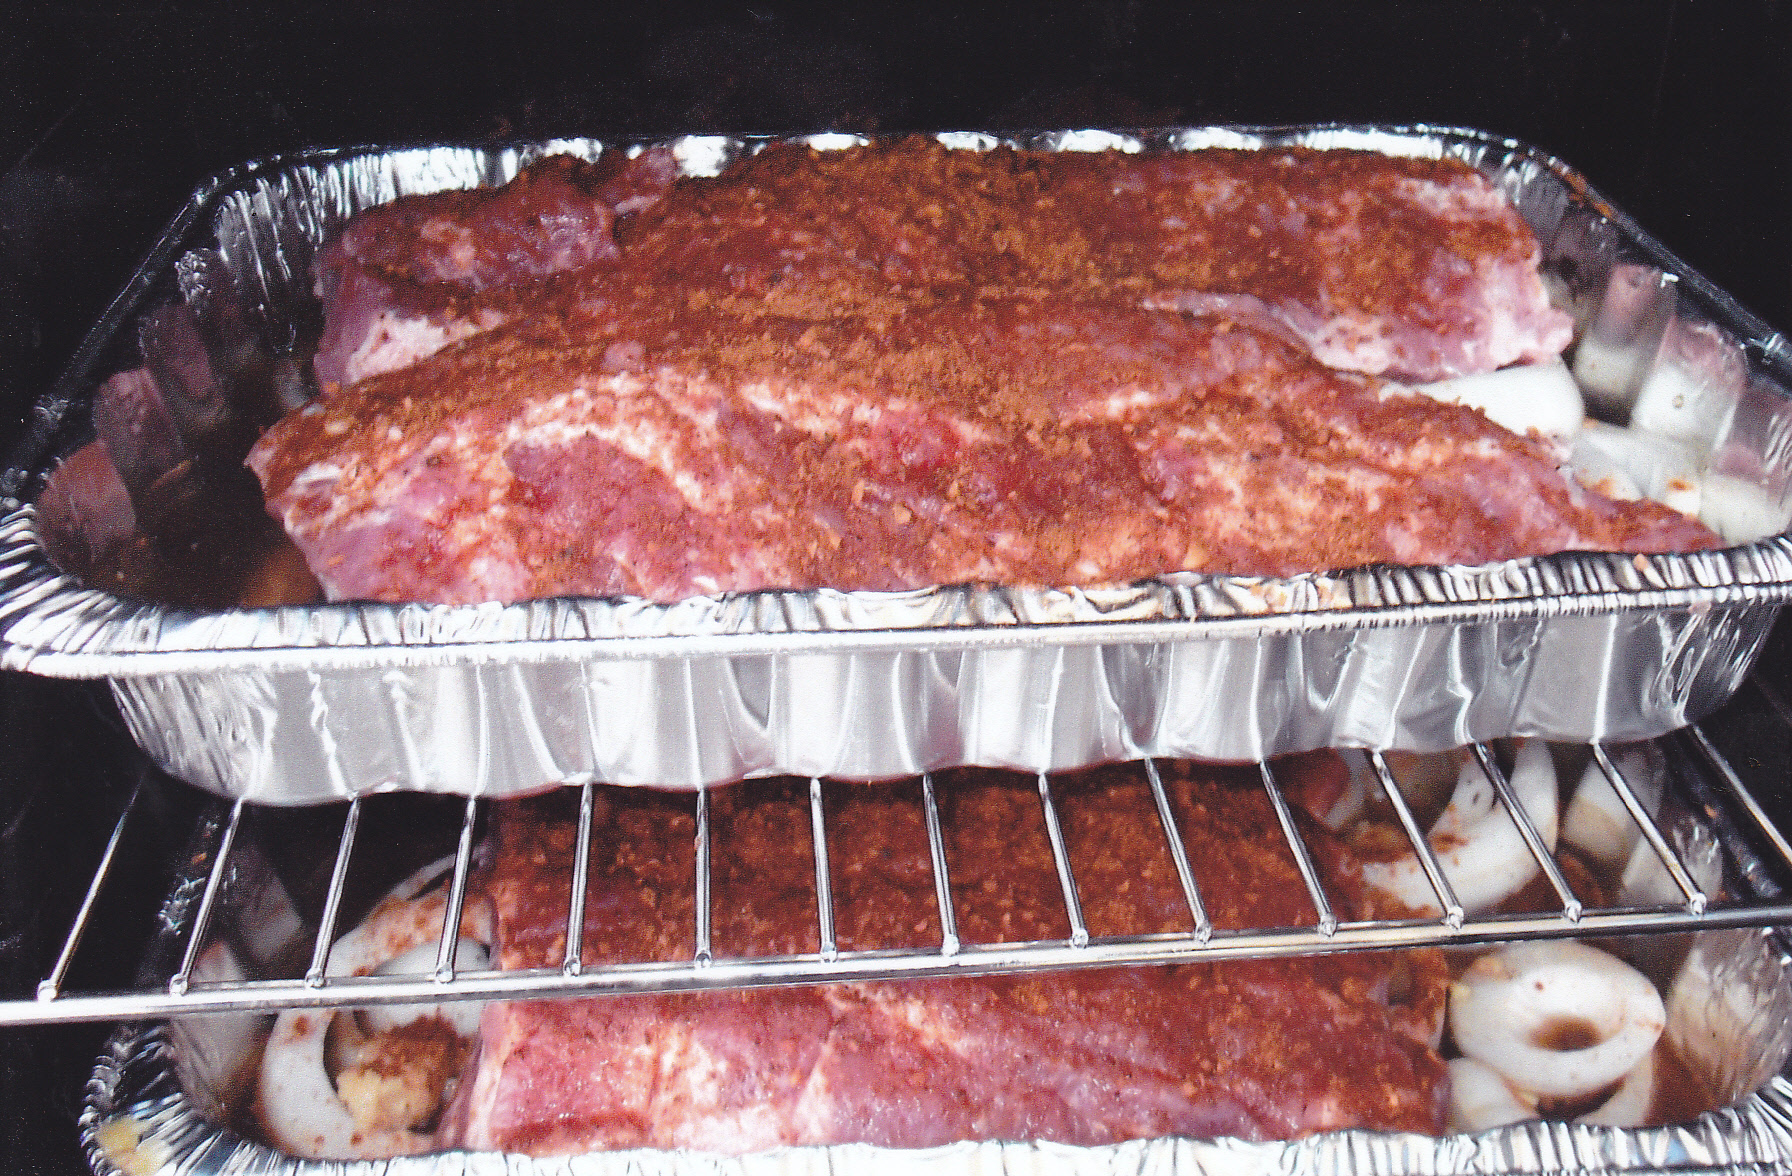
In my smoker they go!! I set the smoker at 250. I don’t use a water pan for most of my meals in the smoker but I do with this method. The ribs will have the moisture from the coke and onions on the bottom but the top needs some attention as well. This is where the water pan comes in. It adds additional moisture to the top of the meat. About half way through the cooking I use a baster to squirt the good juices from the pan all over the top of the ribs at times.
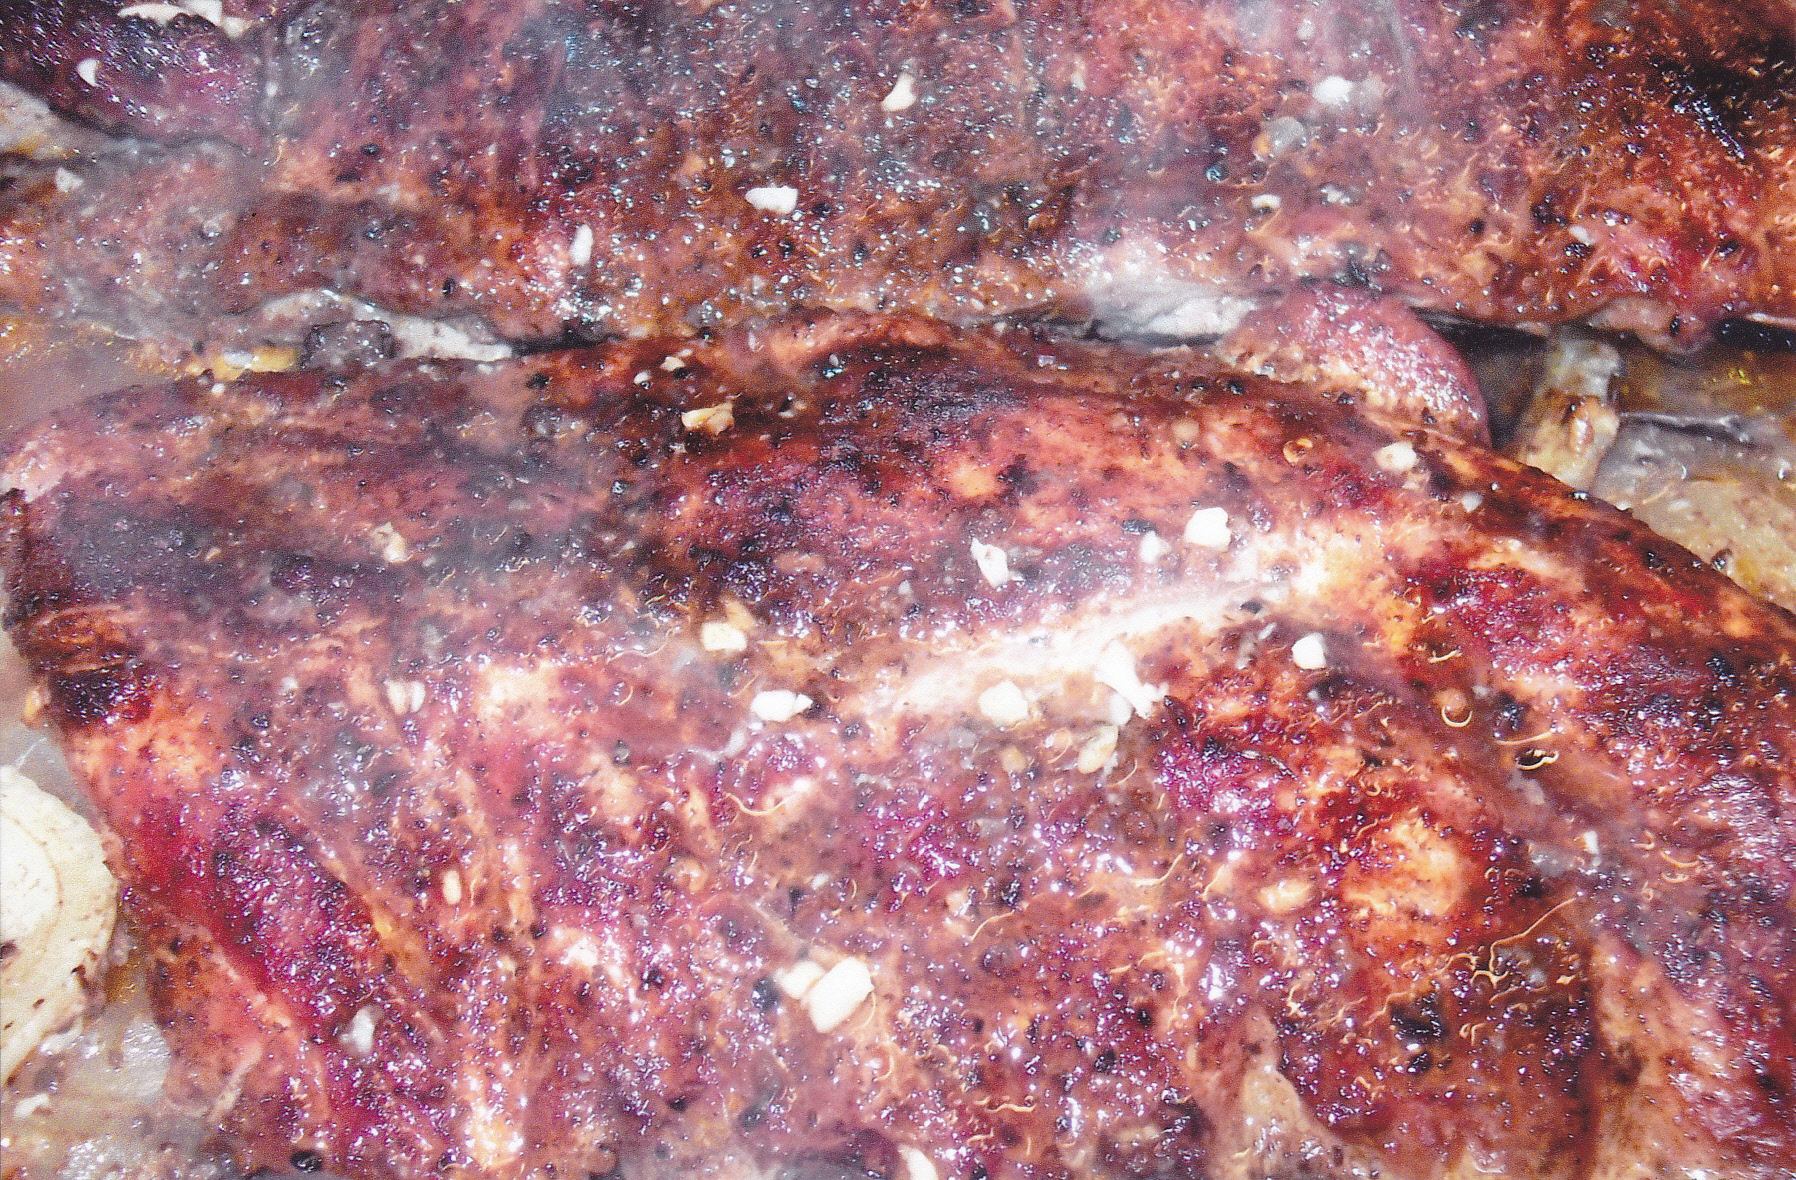
You can see some of the smoke from the cherry wood chips and bits of garlic from basting the tops of the ribs with the great juices from the onions, garlic and the coke.
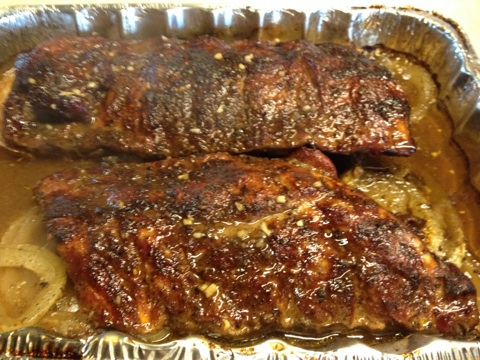
The ribs are done!!! It took about 5 hours in my smoker at 250 to get them done the way I like them. I like them super tender but not fall off the bone. So cooking times can vary depending at what temp you do these and how you like them done. Sometimes I just cut a rib out of the center of one of the ribs and check if they are ready to serve toward the end.
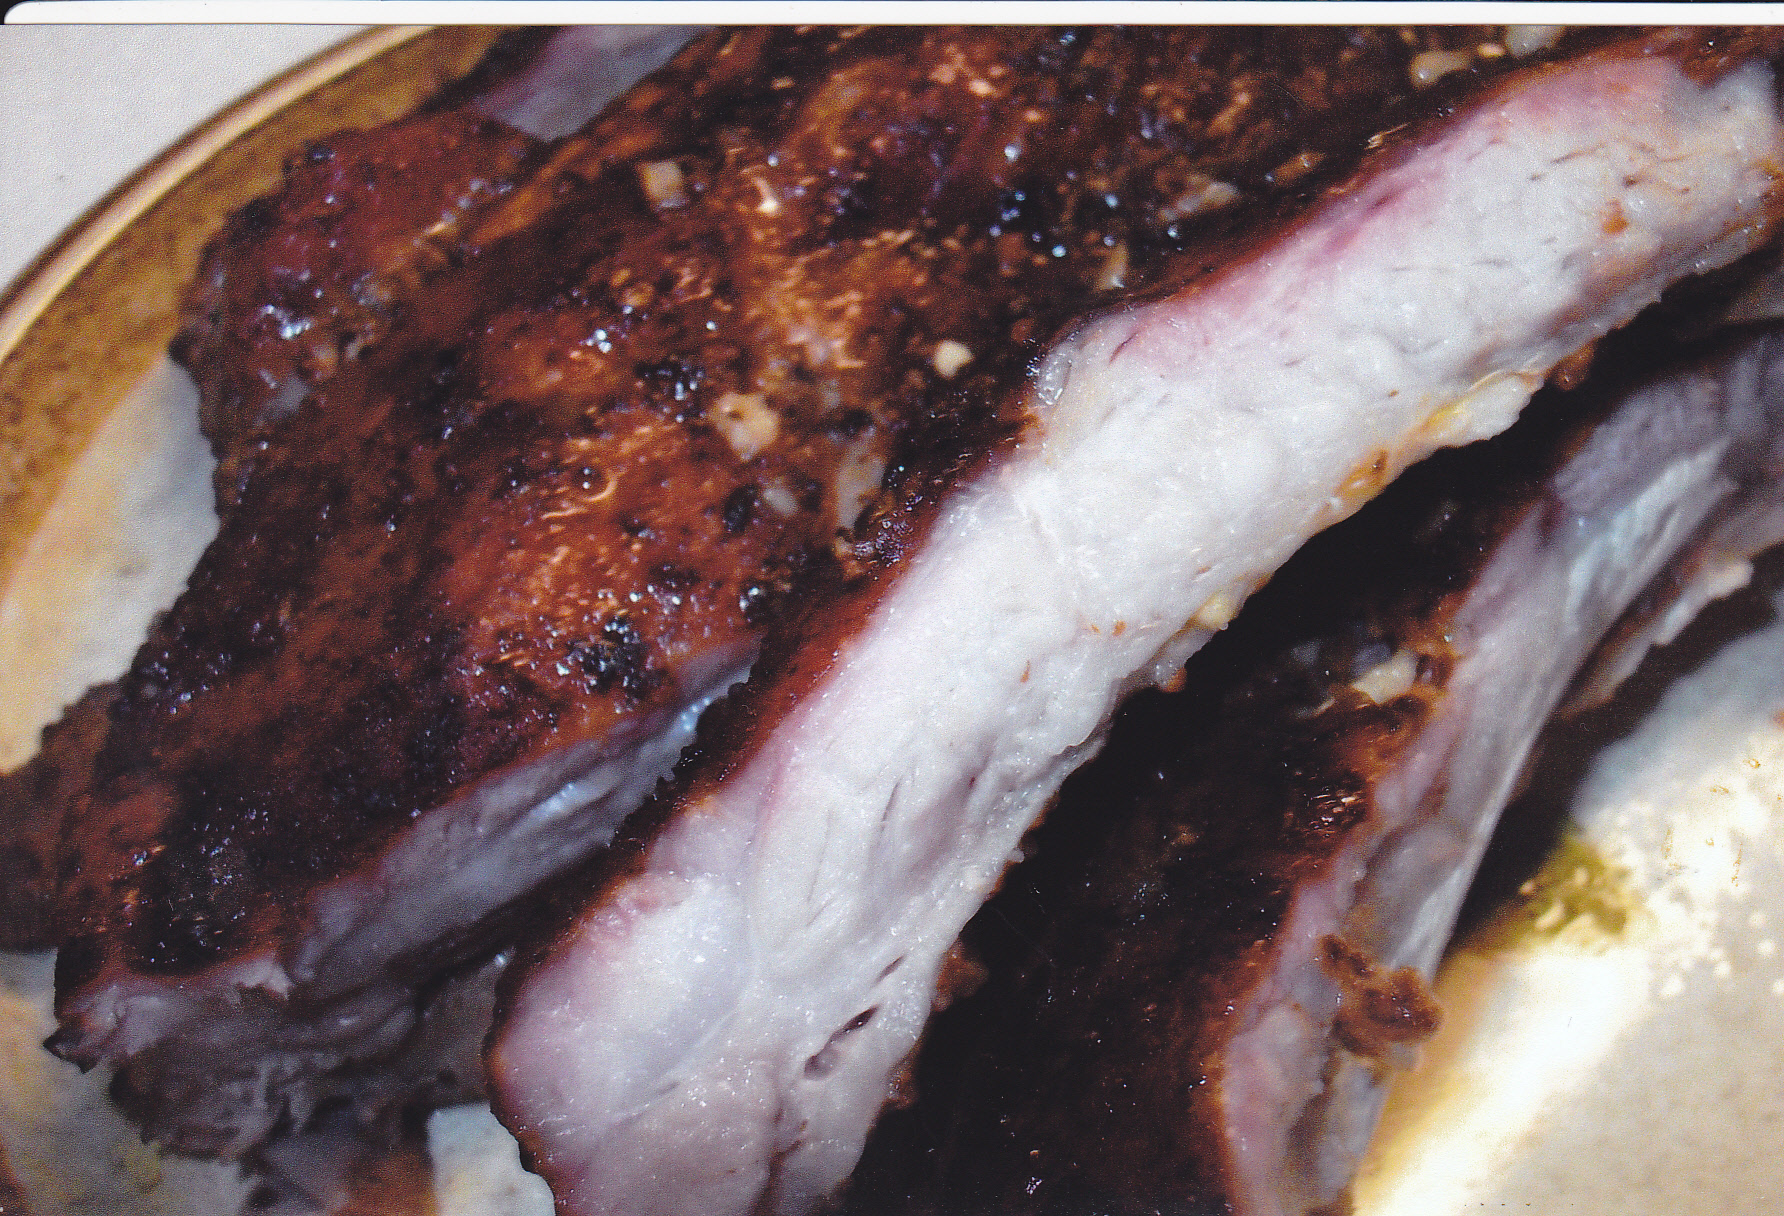
Ribs are ready to eat. Very tender and flavorful with a nice smoke ring.
SIMPLE CHICKEN WINGS ON THE GRILL
I don’t mind a little prep work to complete a meal. Been doing it most of my life. Sometimes a lot of preparation is needed and like in this case really not that much. I had two bag’s [two 3 pound bags] of frozen wings. Thawed them out and rinsed them with cold water. Put them in a large bowl with a little olive oil and mixed them up a bit to coat the wings. Then I added some of my rub and mixed that in well . Sprayed my jerky rack with olive oil and placed the wings on it. Fired up the grill with some charcoal. Used my side fire box for this. This put plenty of heat in the main chamber of my Char-Griller barrel type grill/smoker. It was 80 degrees out, and the side fire box kept the temp near 300 the whole time. No time to complain about the heat after the very cold winter we had this year.
Toward the end of the grill time, it was time to put on some of my Reinhard Caught A Buzz Sauce. Had some left over from the ribs I grilled the day before.
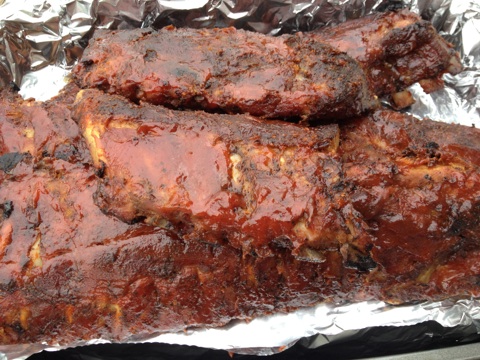
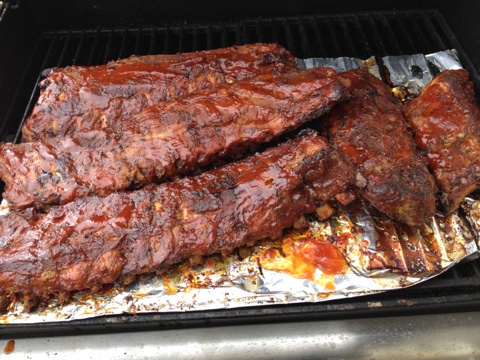
That sauce goes great with ribs, pork and chicken. So I basted the wings up well and left them on the grill another 20 minutes, basting them once more before taking them in to serve. One thing I like to do during the whole grilling time prior to putting on any sauce is to spray the ribs or wings with some apple juice to keep everything moist. Here are some pics of the wings:
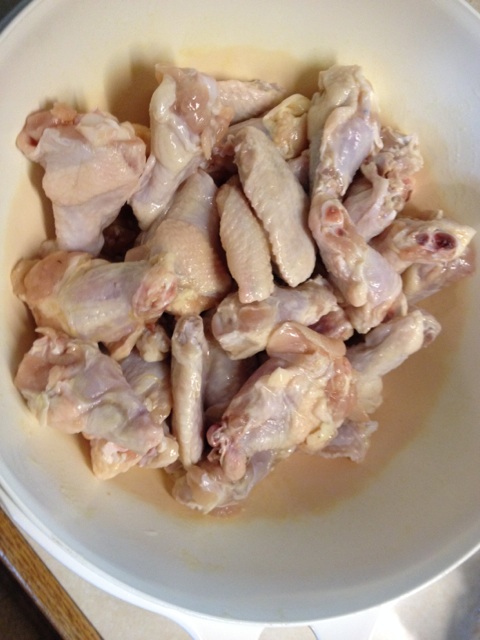
I put the cleaned wings in a large plastic bowl with some olive oil and mixed them well to coat the wings.
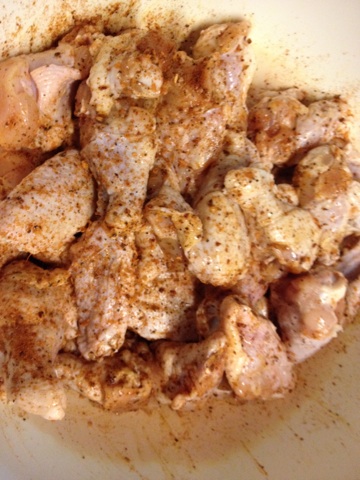
Threw in some of my rub and mixed the wings up good again.
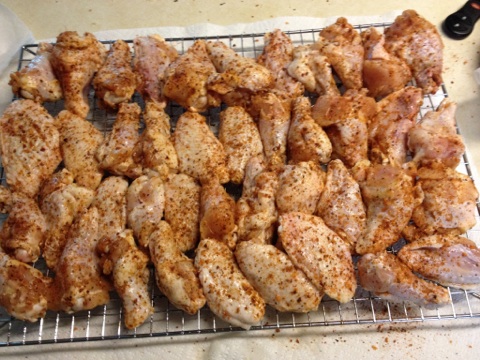
There they are on my jerky rack. The jerky rack works great for smaller items such as wings and also vegies on the grill.
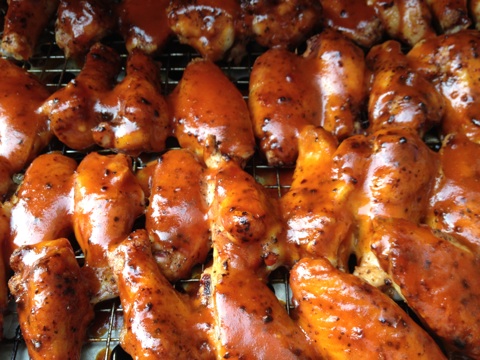
About a half an hour before the ribs are done, I put on the sauce to give them extra love with an awesome flavor.
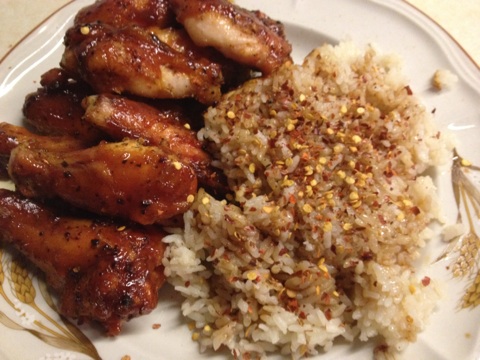
Simple but great meal, with rice and soy sauce, sesame oil, and hot pepper flakes sprinkled on top.
MEAT LOAF BURGER
I was going to make a meat loaf in my smoker,but it was such a nice day, halfway mixing the meatloaf mix I stopped and decided why not make this into a burger. Didn’t put everything I normally put in my meat loaf, but enough to make it tasty. The more you add into a burger sure can make it tasty, but the burger itself is less likely to hold its form and may fall apart on you. For example I didn’t add any ketchup because I’m going to put that on the bun. I did add an egg to this plus some bread crumbs to add as a binder and to hold some moisture. This is a simple version of a meat loaf burger and you could use your favorite ingredients if you take a whirl at this.
When I cook, I hardly ever measure stuff. Get’s to be a bad habit if your going to make your own site and expect people to get the same results. I just started this hobby of mine [my own site] not so long ago [Feb. of 2014]. I’m getting better, but with this burger I didn’t measure anything but I think I can get close. The fun part of cooking is to always try something new at times. Here is what I used.
2 1/2 lbs. of ground chuck
one large egg
about a half cup of Italian bread crumbs
one heaping tablespoon of diced garlic [from the jar]
diced up about half a 8 oz. container of mushrooms
sea salt and pepper to taste
12 slices of provolone cheese, or your favorite cheese
I put everything in a large bowl and mixed it up good. I set my hamburger press a little deeper than normal, to make a thick burger. Got the grill going and put the patties on direct heat to sear the patties a bit and then slid them to the side for in-direct heat to finish them off. When they where done I put a couple of slices of provolone cheese on each patty. When the slices of cheese melted I brought them inside to serve on my homemade buns with some mayo and ketchup. No lettuce and tomato this time around.
I made my own buns for the burgers. Just starting to get into baking, and I can say homemade buns are so much better than the store bought. Fresh out of the oven. Here are a few pics of these burgers–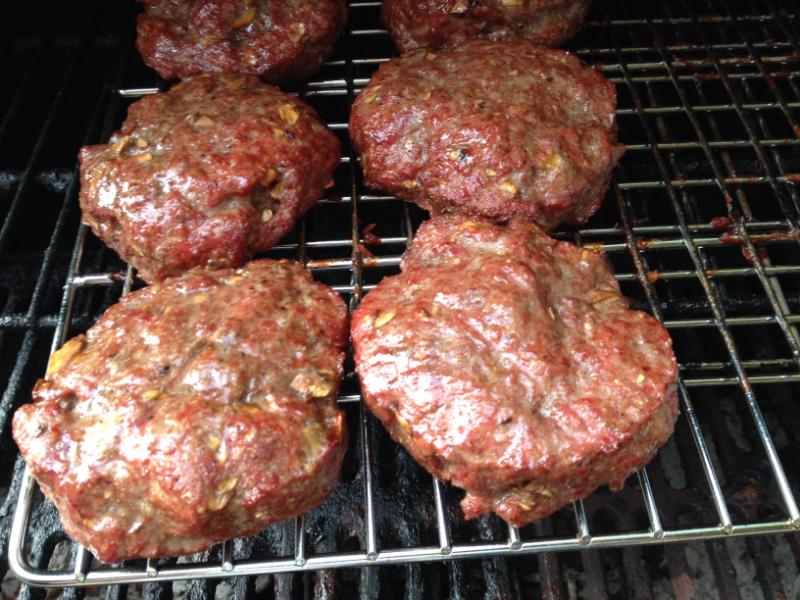
After searing the burgers over direct heat, I slid them over to in-direct heat the remainder of the cooking time.
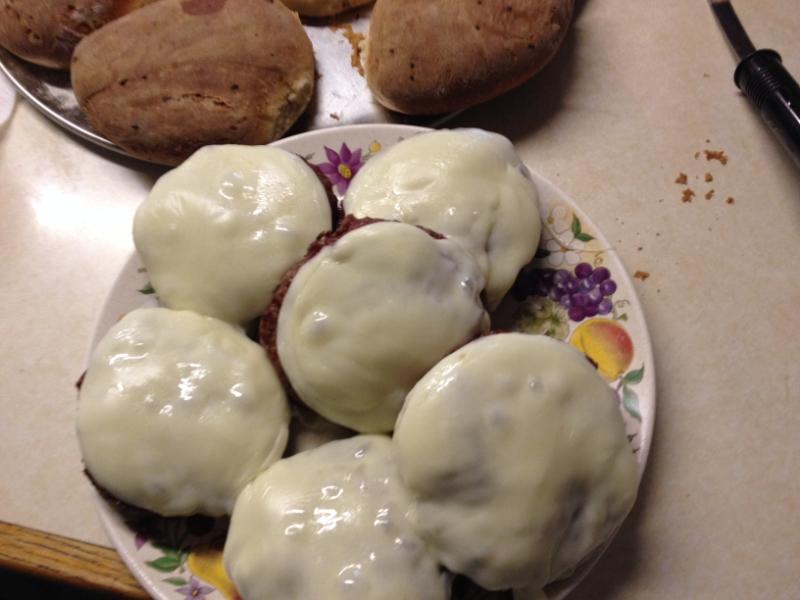
Double dose of cheese, melted and ready for the homemade buns.
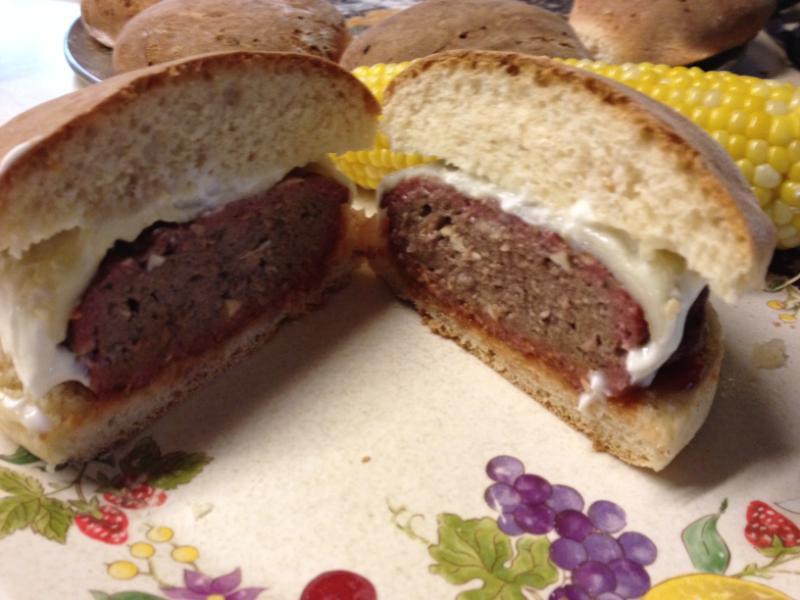
You can see the diced mushrooms inside the burger. That thick burger was a meal in itself. More to come……..

Comments on: "Smokin Hot" (16)
Sure looks good. I’m going to try this as soon as it warms up enough so my smoker works. Maybe July!!!!!
Tried your recipe and method for Tulibee’s. They turned out great!
That’s great Jim, glad you liked the brine. The rest you did and did it well. Must of got the smoker adjusted and fixed. That’s good to hear. Reinhard
[…] Smokin Hot […]
Lots of great stuff on here so far! Great job!!!
Thanks Lee!! More to do, but it’s been fun so far. Lot’s for grilling, smoking, and fishing to do this year!!! Reinhard
Reinhard,
You met me at Cub Foods a couple weeks ago to get meat for smoking. I wanted to let you know we used your site and made some great smoked ribs and decent brisket (we need some practice with the latter), as well as a bunch of other stuff.
Thanks again for your help!
Dan
Glad it worked out for you!! It’s truly a piece of meat that the terms “low and slow” give meaning to. The resting time is important also. Especially the smaller pieces of flat ends [the kind you see in most stores]. I buy the whole packer brisket when I do them. They usually take anywhere from 15 to 18 hours. Freeze left overs, if any left. Let me know if you need any help with the briskets. Reinhard
I just spent some (more) time viewing your awsome site. It’s safe to say that the content has grown leaps and bounds. Great job Reinhard!
Thanks James !!! Appreciate the kind words. I have more to do but it’s coming along. Video’s is something I want to get on here also. I have lot’s of great fishing stuff on my old VHS tapes I would like to put on here somehow as well as starting up new video’s for example. Cooking video’s and showing folks how to cut up venison ect. Reinhard
Tried your “Up North Brine” again for my Rainbows. They turned out perfect. My wife says “just right and not too salty”. Keep the great recipes coming. Jim
Thanks Jim. I’ll be using it soon to smoke my rainbows also. Getting ready to pickle some pike today also.
What kind of curing agent do you use for the buckboard bacon?
Can I use Mortons instacure?
Hi Steve!! I don’t use Mortons Tenderquick for buckboard. I use Instacure #1 which you can get on-line or even at Fleet Farm. I use one tablespoon of cure #1 per gallon of water. Pop’s Brine in the Smokin Hot page is a good one for buckboard. While Tender Quick mix is a good product it consists with the main preserving agents being salt, sugar, both sodium nitrate and sodium nitrite [curing agents that also contribute to development of color and flavor], with salt the main ingredient. I do use it for things like jerky and skip the salt in my recipe. But for my brine’s I like to use the salt I measure and use cure #1. Thanks for stopping by!! Reinhard
Reinhard- hope all is well with you. Just about ready to throw a few racks on the smoker and finish off with Caught A Buzz. I continue to use your recipes/ advice all of the time.
Thanks. Yup I’m fine, just getting older. Still make sausage, smoke, grill and griddle. Still fish the Arrowhead, Boulder, Island, and Rice lakes.